How to identify Windows upgrade issues using SetupDiag on Windows 11/10
Whenever your Windows 11 or Windows 10 PC has an upgrade or update issue, you will usually see an error code indicating the actual cause behind the failure. However, sometimes confusion can arise when an upgrade or update fails without an error code being displayed. With handy error codes, you know exactly where the problem is so you can try to fix it. But since no error code appears, it becomes challenging to identify the issue and resolve it. This will take up a lot of your time to simply find out the reason behind the error.
In this case, you can try using a dedicated tool called SetupDiag provided by Microsoft, which can help you easily identify the real cause behind the error and save time in finding a fix for the problem. This utility is free to use and is designed to determine the root cause behind a failed upgrade or update.
This utility checks the cached Windows Installer logs generated by the installation process, which are now forgotten. At the same time, it also scans the database for common errors to find any details that indicate the real cause of the installation failure. This will ultimately help you find the appropriate fix for the error. Additionally, the SetupDiag tool is known to contain a large database of rules (approximately 60) containing issues identified by Microsoft. However, the rules are updated every time the tool gets a new version.
This article will guide you through the process on how to use SetupDiag to identify Windows upgrade issues on Windows 11/10.
How to use SetupDiag to determine why an upgrade failed
Although using the SetupDiag tool is very simple, before proceeding, make sure your system meets the .NET Framework requirements. You can then run the utility smoothly and generate results. Let’s see how to check if your PC has the required .NET Framework version:
How to check if your PC is compliant with .NET Framework
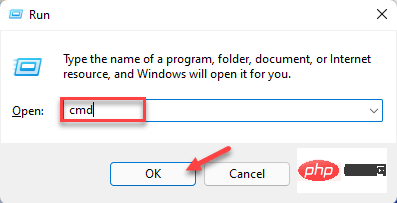
Step 1: Press the Win R keys simultaneously on your keyboard to launch the Run Command window.
Step 2: In the Run Command search field, type cmd in the search bar and press on your keyboard Ctrl Shift Enter shortcut key opens an elevated Command Prompt window.

Step 3: In the Command Prompt( admin) window, run the following command and press Enter:
reg query "HKLM\SOFTWARE\Microsoft\Net Framework Setup\NDP\v4" /s
Step 4: Now, in the results, check the Version field and make sure the version is 4.6 or higher version, you can use the SetupDiag tool at this time.
*Note –If your device does not come with .NET 4.6 or higher, please visit the Microsoft official download page to get the .NET 4.6 installer and download it manually and Installation files.
Now, continue running the SetupDiag tool.
How to run the SetupDiag tool
Follow the following instructions to run the utility:
Step 1:Click the link below to visit the official Microsoft SetupDiagTool download page:
Download SetupDiag tool
Step 2:Now, from the home page, click Download SetupDiag button.
Step 3: After downloading the .exe file, right-click on it and select Show in folder.
It will usually take you to the Downloads folder.
Now, cut and paste this file into an empty folder.
*NOTE – If necessary, create a new folder and paste it into this folder.
Step 4: Now, press the Win E keys simultaneously on your keyboard to open the File Explorer window.
Step 5: In the File Explorer window, navigate to the location where the SetupDiag.exe file is saved.
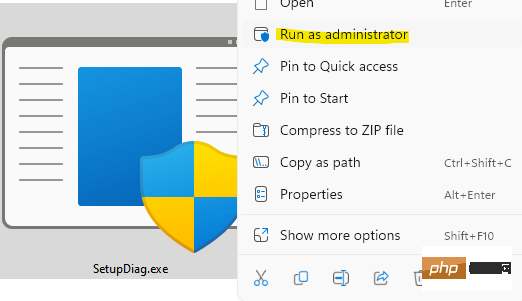
Next, right-click the .exe file and select Run as administrator.

Now the tool will start running immediately and the best part is, it does not require installation or any interaction. It runs a scan to check the logs generated by failed installations for any available rules. Once completed, the tool will automatically close.
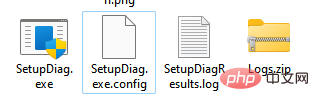
After the scanning process is completed, it will generate three new files - Log.zip, SetupDiag.exe.config and SetupDiagResults.log and save them in the folder where the SetupDiag.exe file is located.

How to read SetupDiag results
Here's how to read SetupDiag results and understand them:
Step 1: Go to Start , right-click it and select File Explorer.
Step 2: In the File Explorer window, navigate to the folder where SetupDiag,exe is saved.
Here, look for SetupDiagResults.log, right-click on it and click Open.
Step 3: This will open the log file where you can view the results extracted by the tool after scanning for available rules.
For example, if you try to upgrade to the latest version of Windows 10 and then the device is force shut down, the installation process will direct the operating system to the older version of Windows 10 and store an error log on the device.
So when you open the log file you will see the system details like PC name, manufacturer name, BIOS (UEFI) version, original version of Windows 10, etc. in the upper part and then you will see Go to the error details at the bottom with the error code.
It also mentions the exact cause or root cause of the problem and the solution to resolve it. If there are no steps or solutions, click on the link provided or look for the error code or any other relevant information to find any available solutions online. Alternatively, you can use the resources available in the Microsoft Forums to find solutions.
The above is the detailed content of How to identify Windows upgrade issues using SetupDiag on Windows 11/10. For more information, please follow other related articles on the PHP Chinese website!

Hot AI Tools

Undresser.AI Undress
AI-powered app for creating realistic nude photos

AI Clothes Remover
Online AI tool for removing clothes from photos.

Undress AI Tool
Undress images for free

Clothoff.io
AI clothes remover

AI Hentai Generator
Generate AI Hentai for free.

Hot Article

Hot Tools

Notepad++7.3.1
Easy-to-use and free code editor

SublimeText3 Chinese version
Chinese version, very easy to use

Zend Studio 13.0.1
Powerful PHP integrated development environment

Dreamweaver CS6
Visual web development tools

SublimeText3 Mac version
God-level code editing software (SublimeText3)

Hot Topics
 How to update the latest version of Bybit Exchange? Will there be any impact if it is not updated?
Feb 21, 2025 pm 10:54 PM
The way to update ByBit exchanges varies by platform and device: Mobile: Check for updates and install in the app store. Desktop Client: Check for updates in the Help menu and install automatically. Web page: You need to manually access the official website for updates. Failure to update the exchange can lead to security vulnerabilities, functional limitations, compatibility issues and reduced transaction execution efficiency.
 deepseek web version entrance deepseek official website entrance
Feb 19, 2025 pm 04:54 PM
DeepSeek is a powerful intelligent search and analysis tool that provides two access methods: web version and official website. The web version is convenient and efficient, and can be used without installation; the official website provides comprehensive product information, download resources and support services. Whether individuals or corporate users, they can easily obtain and analyze massive data through DeepSeek to improve work efficiency, assist decision-making and promote innovation.
 Pi Node Teaching: What is a Pi Node? How to install and set up Pi Node?
Mar 05, 2025 pm 05:57 PM
Detailed explanation and installation guide for PiNetwork nodes This article will introduce the PiNetwork ecosystem in detail - Pi nodes, a key role in the PiNetwork ecosystem, and provide complete steps for installation and configuration. After the launch of the PiNetwork blockchain test network, Pi nodes have become an important part of many pioneers actively participating in the testing, preparing for the upcoming main network release. If you don’t know PiNetwork yet, please refer to what is Picoin? What is the price for listing? Pi usage, mining and security analysis. What is PiNetwork? The PiNetwork project started in 2019 and owns its exclusive cryptocurrency Pi Coin. The project aims to create a one that everyone can participate
 How to install deepseek
Feb 19, 2025 pm 05:48 PM
There are many ways to install DeepSeek, including: compile from source (for experienced developers) using precompiled packages (for Windows users) using Docker containers (for most convenient, no need to worry about compatibility) No matter which method you choose, Please read the official documents carefully and prepare them fully to avoid unnecessary trouble.
 Coinsuper exchange software channel official website entrance
Feb 21, 2025 pm 10:39 PM
The official website entrance of the Coinsuper Exchange: https://www.coinsuper.com. The client download channels are: Windows client, macOS client, and mobile (iOS/Android). Registration requires an email, mobile phone number and password, and you need to complete real-name authentication before you can trade. The platform provides a variety of digital asset transactions, including Bitcoin, Ethereum, etc., with the transaction fee rate of 0.1% for both orders and acceptors. Security safeguards include cold wallet storage, dual-factor verification, anti-money laundering and anti-terrorism financing measures, and with security public
 Ouyi okx installation package is directly included
Feb 21, 2025 pm 08:00 PM
Ouyi OKX, the world's leading digital asset exchange, has now launched an official installation package to provide a safe and convenient trading experience. The OKX installation package of Ouyi does not need to be accessed through a browser. It can directly install independent applications on the device, creating a stable and efficient trading platform for users. The installation process is simple and easy to understand. Users only need to download the latest version of the installation package and follow the prompts to complete the installation step by step.
 BITGet official website installation (2025 beginner's guide)
Feb 21, 2025 pm 08:42 PM
BITGet is a cryptocurrency exchange that provides a variety of trading services including spot trading, contract trading and derivatives. Founded in 2018, the exchange is headquartered in Singapore and is committed to providing users with a safe and reliable trading platform. BITGet offers a variety of trading pairs, including BTC/USDT, ETH/USDT and XRP/USDT. Additionally, the exchange has a reputation for security and liquidity and offers a variety of features such as premium order types, leveraged trading and 24/7 customer support.
 Get the gate.io installation package for free
Feb 21, 2025 pm 08:21 PM
Gate.io is a popular cryptocurrency exchange that users can use by downloading its installation package and installing it on their devices. The steps to obtain the installation package are as follows: Visit the official website of Gate.io, click "Download", select the corresponding operating system (Windows, Mac or Linux), and download the installation package to your computer. It is recommended to temporarily disable antivirus software or firewall during installation to ensure smooth installation. After completion, the user needs to create a Gate.io account to start using it.


