How to hide contacts on iPhone
Can you hide contacts on your iPhone?
Unfortunately, you can't hide contacts on iPhone. iOS 16 or lower does not offer native functionality to hide contacts like Android devices. This is because the ability to hide contacts is a native feature in Google Contacts and comes pre-installed on most Android devices. If you are an iPhone user, you need to use some workarounds to hide contacts on iPhone.
How to Hide Contacts on iPhone Using Workarounds
Here are some workarounds that can help you hide contacts on iPhone and ensure maximum privacy. let's start.
Case 1: Hide Contacts from Anywhere
To hide contacts created in the Contacts app from anywhere on your iPhone, you can use the below mentioned Solution. We recommend you to start with the first one mentioned below and then browse the list until you find the one that best suits your current needs and requirements.
Method 1: Remember Contacts
The best way to hide contacts on iPhone is to simply remember the phone number. You can remember and test your memory a few times before deleting a contact. This way, you'll know the contact's exact identity when it appears as a random phone number on your iPhone. This can be a little tedious if you're trying to remember a difficult number, but it's by far the best way to ensure privacy when hiding contacts on your iPhone. Once you've memorized the number, here's how you can delete the contact from your iPhone.
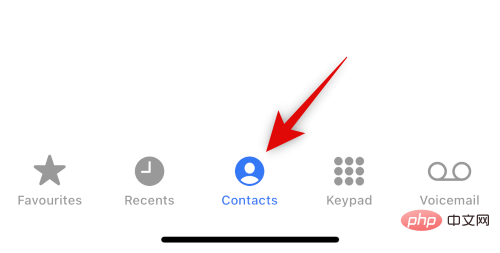
Open the Phone app and tap Contacts at the bottom.
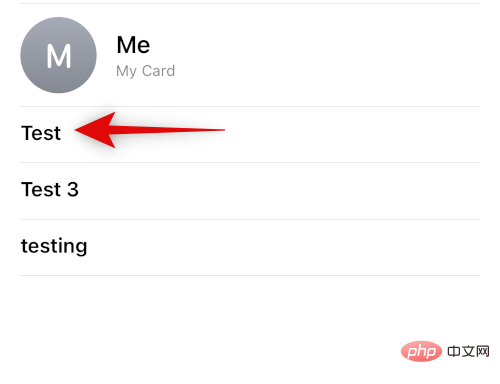
#Now tap and hold on the contact you want to delete.
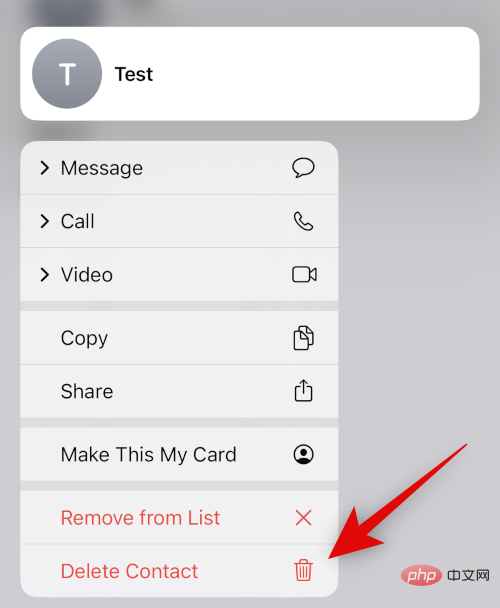
Select Delete Contact.
Click Delete Contact again to confirm your choice.
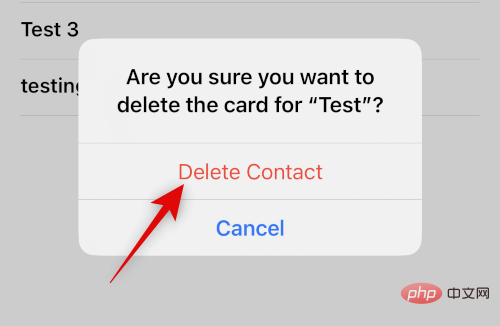
The selected contacts will now be deleted from your iPhone.
Method 2: Use a different name
If you don’t want to remember a contact, you can choose to use a different name for that contact. Depending on your preference, you can use a nickname or a pseudonym. This will help ensure that only you know the contact's true identity. Here's how to rename a contact to hide it on your iPhone.
Open the Phone app and tap Contacts at the bottom.

#Tap and select the relevant contact from the list on the screen.
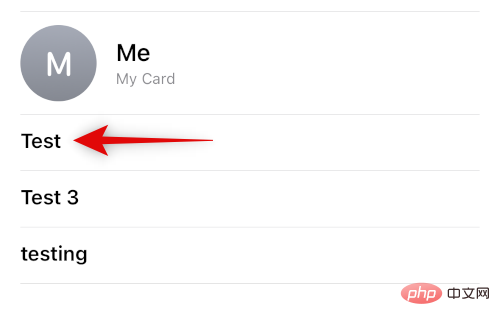
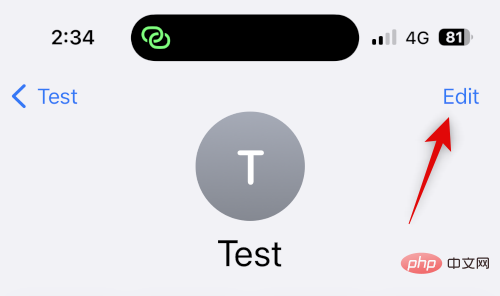
Now click Edit in the upper right corner of the screen.
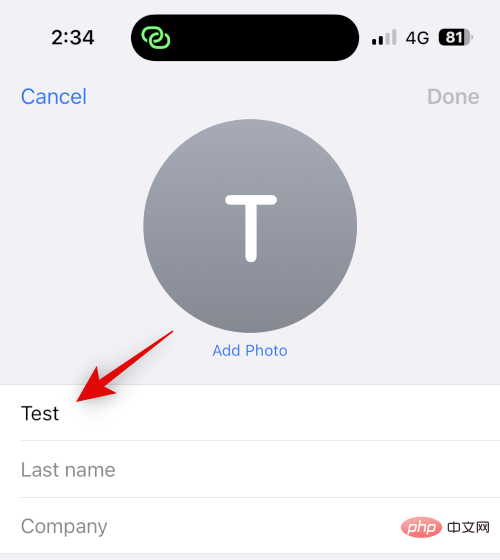
# Click and edit the name itself at the top using a nickname or pseudonym.
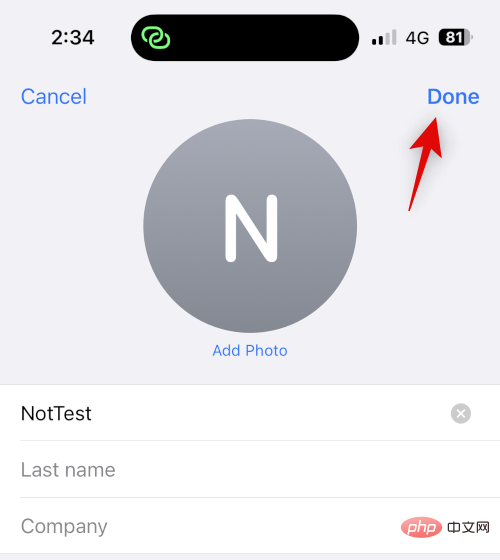
Click Complete.
 `
`
This is how you can hide a contact by using a different name on your iPhone.
Method 3: Use the Files app
The Files app on iPhone can also help you hide contacts. You can export the vCard to your Files app and then delete the contact from your iPhone. This will hide the contact and appear as an unknown number on your iPhone. You can then view the vCard when you need to access your contacts. Here's how to do it on your iPhone.
Open the Contacts app on your iPhone, then tap and hold the contact you want to hide.
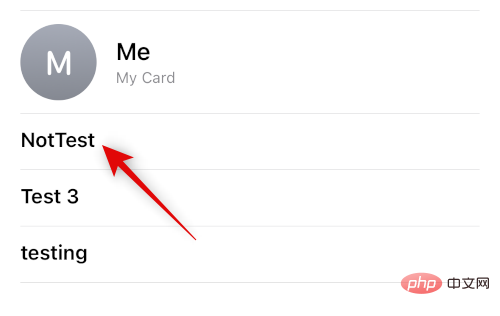
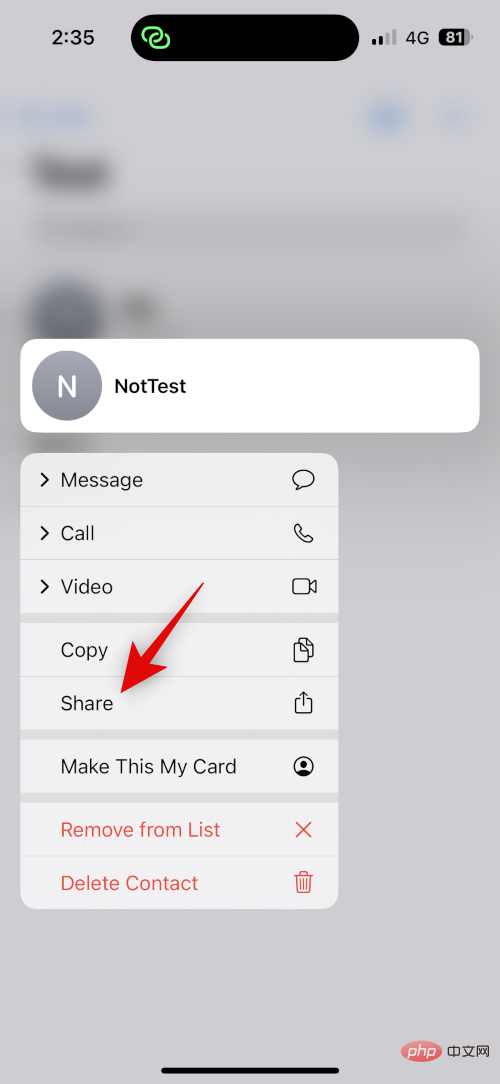
Now click and select Share.
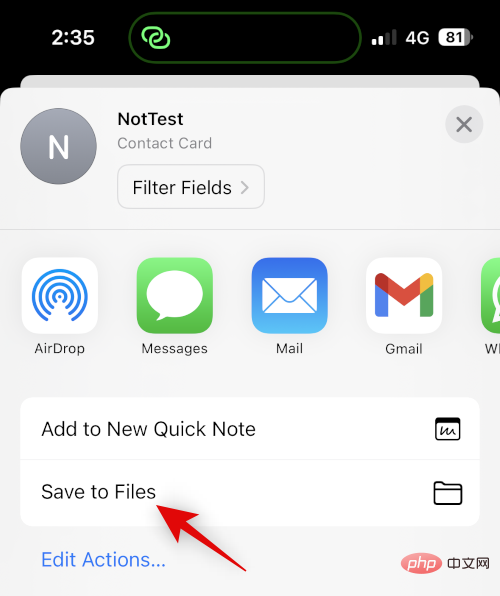
Scroll down and click Save to File.
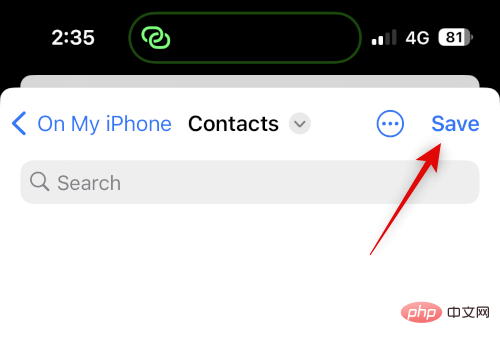
Select the preferred location and name for your contact in the Files app. We recommend that you change contact names when sharing your iPhone to help ensure better privacy. When finished, click Save .
The contact will now be saved as a vCard. Once done, tap and hold on the contact.

Select Delete Contact.

Click Delete Contact again to confirm your choice.

#The contact will now be deleted and hidden on your iPhone. You can now use the Files app to access your contacts when you need them.
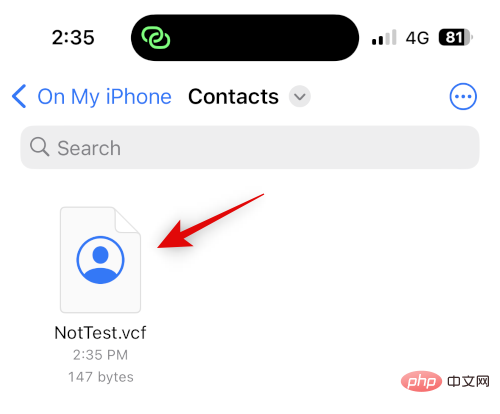
#This is what it looks like after you access the vCard in the Files app.
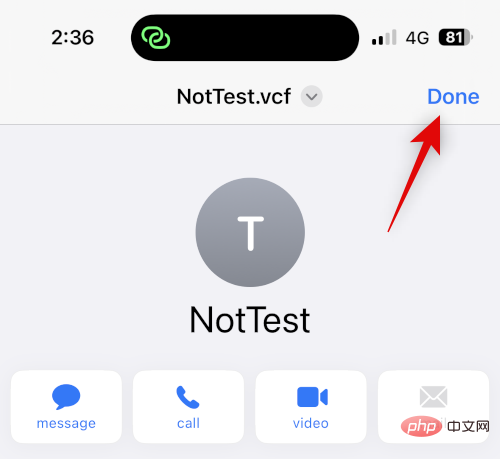
#This is how you can hide contacts using the Files app.
Method Four: Use a Third-Party App
If none of the above methods work for you, you can use a third-party app to store your contacts and ditch the default Contacts app entirely. Here are our picks of third-party apps that can help you hide contacts on your iPhone.
Method 1: Use Google Contacts
Google Contacts can be accessed using a web browser and allows you to hide contacts from within the app. You can take advantage of this and hide contacts on your iPhone. The downside is that you have to open Google Contacts in your browser every time you access it on your device. However, you can overcome this hurdle by adding a web icon for Google Contacts on your home screen for easier access.
Use the following steps to help you complete the process.
Note: If you wish, you can choose to export only the contacts you want to hide instead of all contacts.
Step 1: Add your contacts to Google Contacts
You can add contacts to Google Contacts by exporting them from your iCloud account as a vCard. Please follow the steps below to help you through the process.
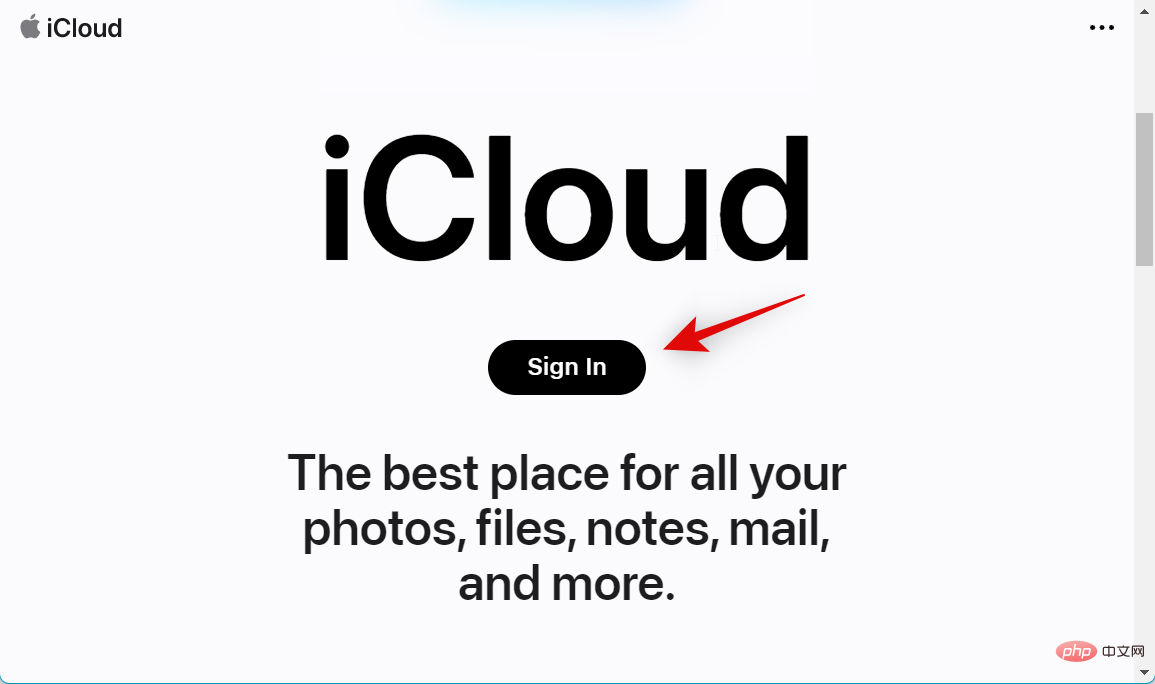
Open iCloud.com in your browser and click Sign In.
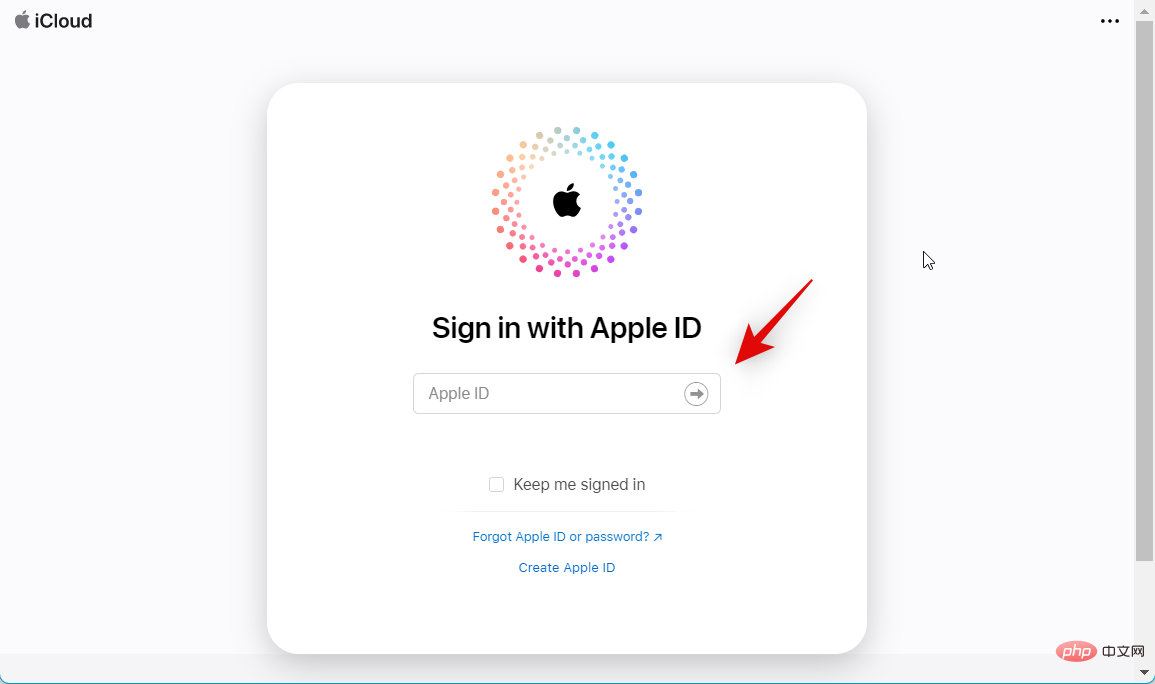
#Now log in to your iCloud account using your Apple ID credentials.
After logging in, click the "Application" icon in the upper right corner.

Click Contact.

Click and select a contact, then press Ctrl A to select all contacts in your iCloud account.

Note: If you only want to export a few selected contacts, please hold down Ctrl and select the necessary contacts.
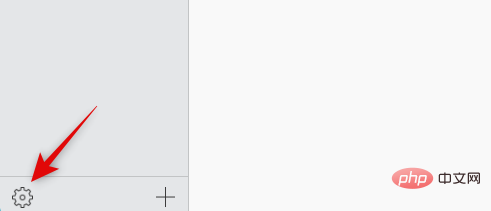
Now click on the Cog (  ) icon in the left sidebar.
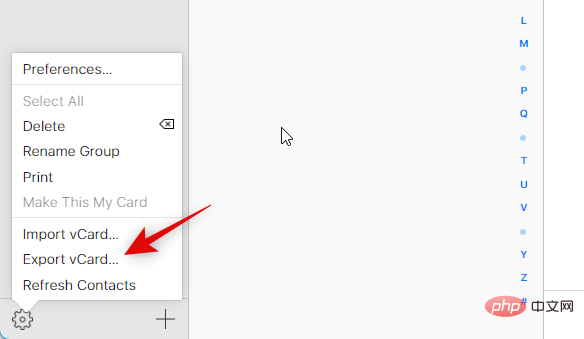
Select Export electronic business card.
The contact will now be exported as a vCard and the download will begin. Save contacts in your preferred location on your computer.
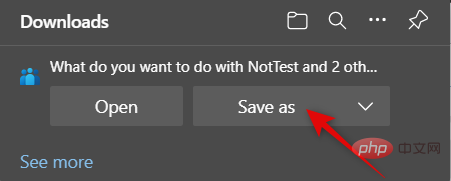
You will now export all your iCloud contacts.
Step 2: Delete Contacts from iPhone
We can now delete your contacts so you can switch to Google Contacts. Since you can't delete contacts in bulk from an iPhone, we'll use iCloud.com instead. Please follow the steps below to help you through the process.
Open iCloud.com and log in to your Apple ID as we did in the steps above. Now click on the Apps icon and select Contatcs.

Click and select any contact, then press Ctrl A to select all contacts.

Note: If you exported only a few selected contacts that you want to hide, hold down the Ctrl key and click and select those contacts people.
Now press Delete key on your keyboard to delete the selected contact. Click Remove to confirm your choice.
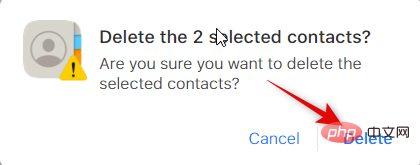
The contact will now be deleted from your iCloud account and the changes will now be synced to all your devices.
Step 3: Import and Hide Contacts in Google Contacts
We can now import and hide exported contacts in Google Contacts as needed. If you want to use these steps on your phone, we recommend transfer the exported contacts to your iPhone. You also have the option of performing these steps on Google Contacts on the web on your desktop and accessing them later on your iPhone. We'll be using an iPhone in this tutorial. let's start.
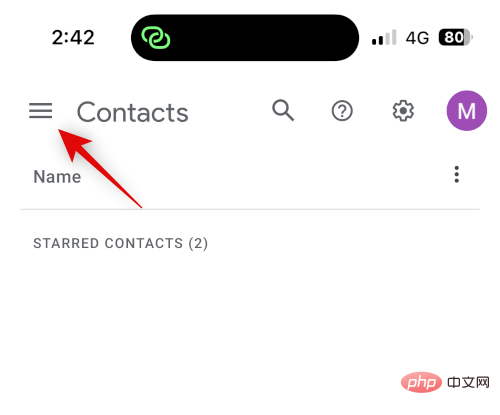
Open Google Contacts on your iPhone and log in to your Google Account. If you want to add Google Contacts to your home screen, we recommend using Safari. After logging in, click the hamburger icon (  ) in the upper left corner.
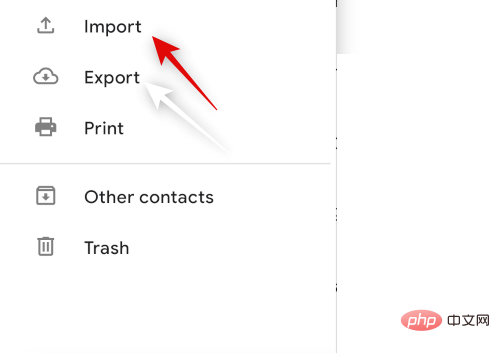
Scroll down and tap Import.
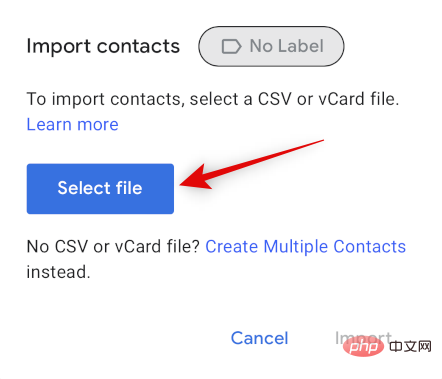
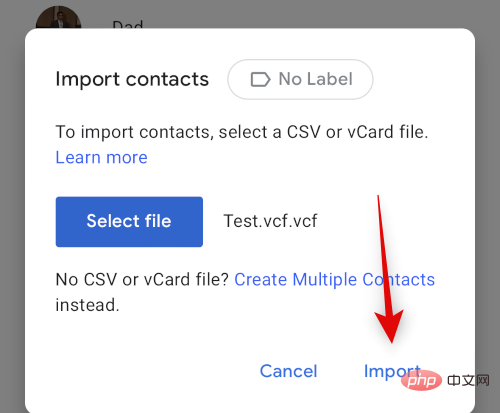
Click and select the file.
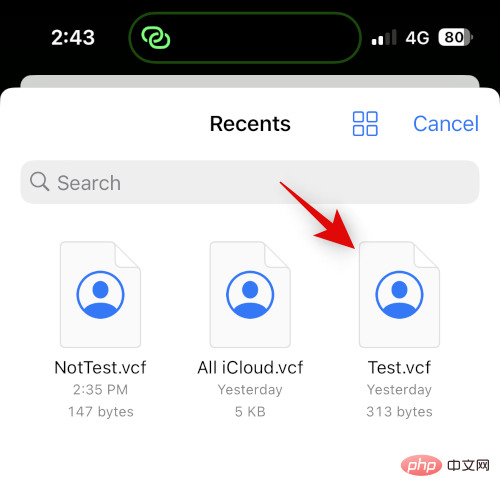
#Click and select the exported vCard to transfer to your iPhone.
Click Import.
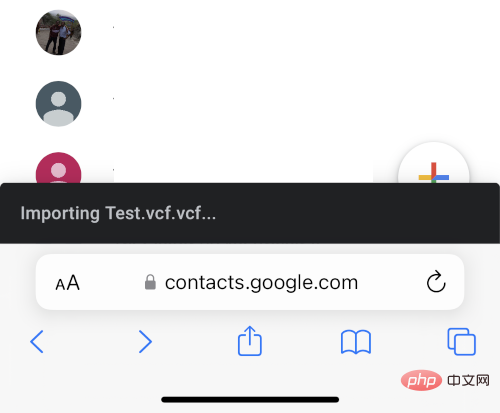
The selected vCard will now be imported into Google Contacts.
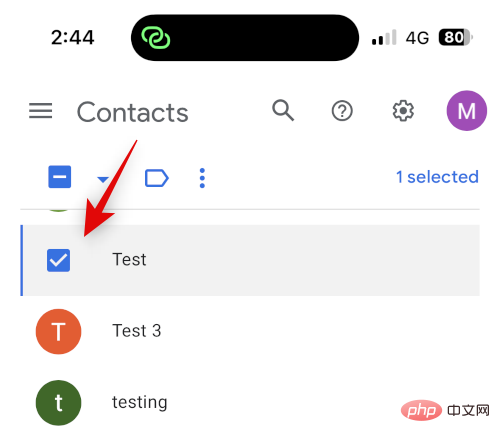
Now use the sidebar to go back to Contacts and check the boxes for the contacts you want to hide.
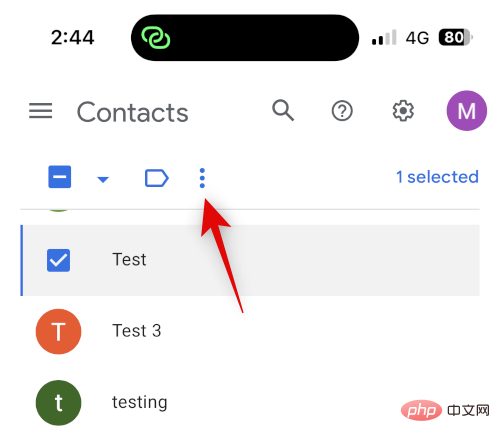
Click on the three dots ( ) icon at the top  .
.
Select to hide from your contacts.
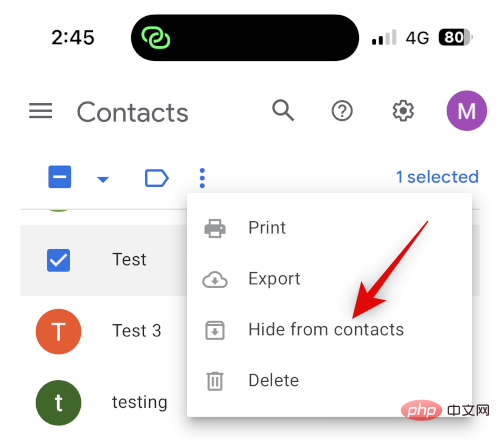
The selected contacts will now be hidden from Google Contacts. Repeat the above steps to hide any other contacts according to your preference. When finished, tap the Share icon at the bottom of the screen.
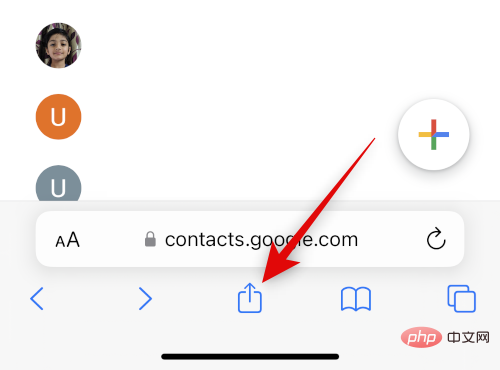
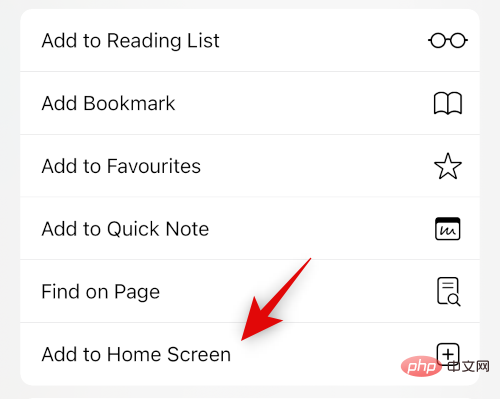
Scroll down and tap Add to Home Screen.
Choose a name for the app icon if you wish.
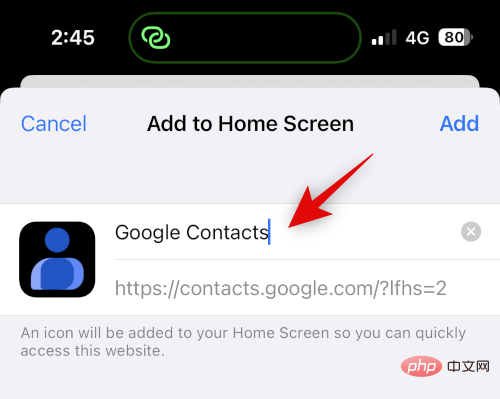
Click Add.
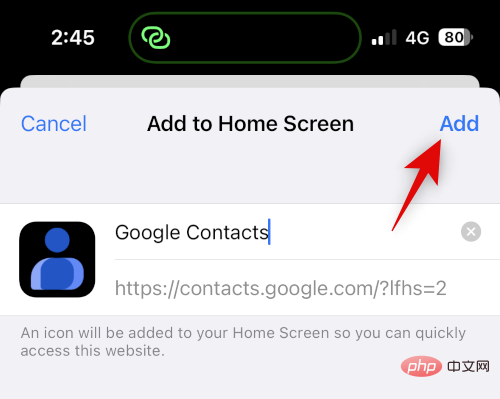
Google Contacts will now be added to your home screen. Click to launch the application. This may take a few seconds to load the necessary data.
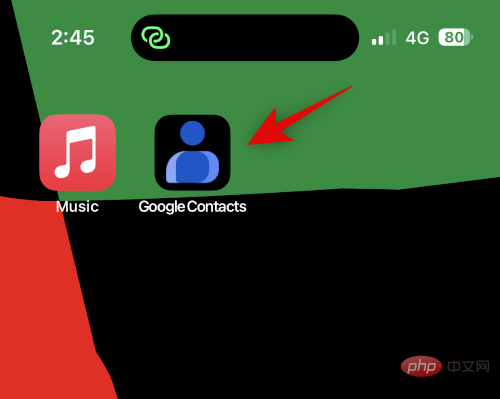
#This is how you can hide your contacts using Google Contacts.
Note: The first time you use the Home screen icon, you may need to sign in again to your Google Account.
Step 4: Access Hidden Contacts
Here’s how to access hidden contacts in Google Contacts on iPhone.
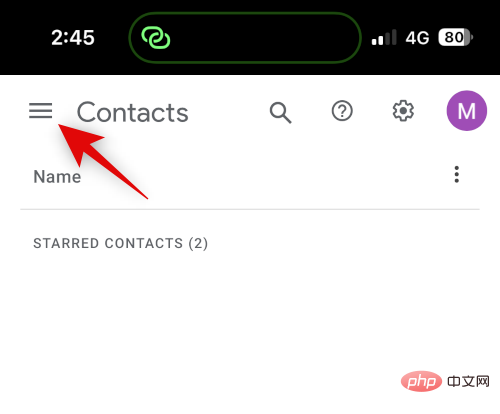
Use the home screen icon or open Google Contacts in your browser. Now click on the Burger (  ) icon.
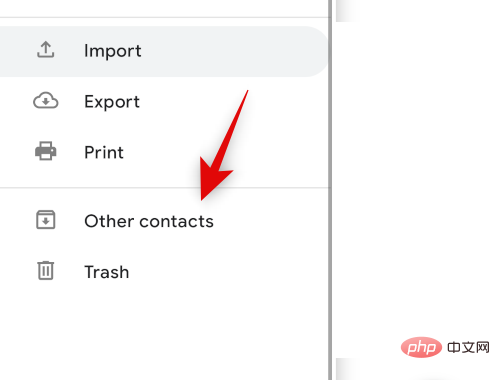
Scroll down and tap Other Contacts.
Now search for hidden contacts using the "Search" icon at the top.
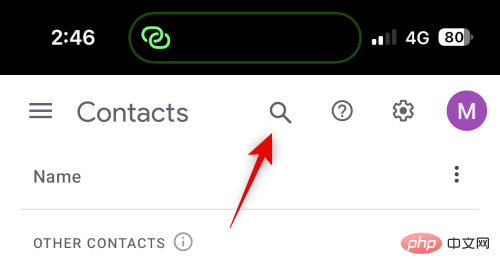
#You can now access hidden contacts from search results.
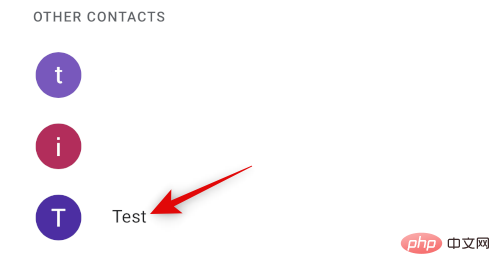
#This is how you can view and access hidden contacts in Google Contacts.
Method 2: Use Private Contacts Lite
Private Contacts Lite is a standalone app that allows Face ID and passcode locking to help you hide your contacts. Here's how to use it on your iPhone.
Use the link below to download Private Contacts Lite.
- Private Contact Lite| Download Link
After downloading the app open the app and tap Not Allowed to grant Access to your contacts.
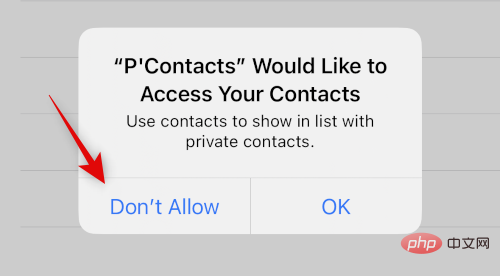
You will now be prompted to set a password. Enter and set your preferred password.
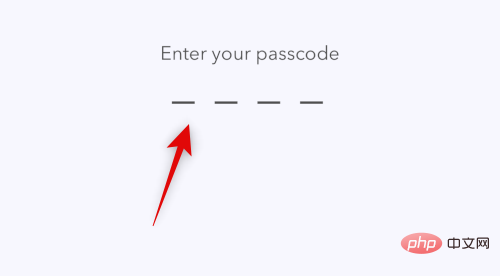
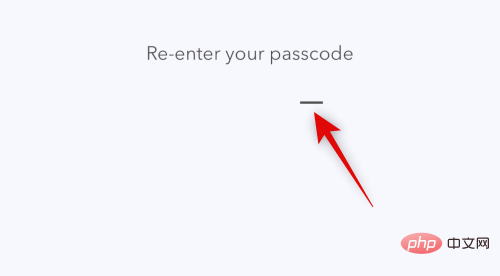
Confirm your password in the next step.
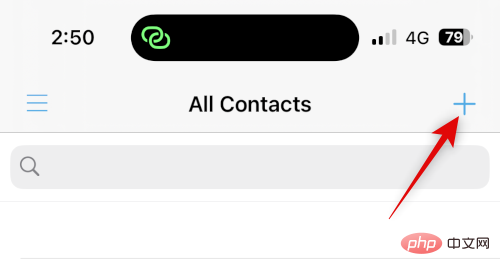
Instead of syncing your contacts with the Contacts app, tap the icon.
Create a new contact for the contact you want to hide.
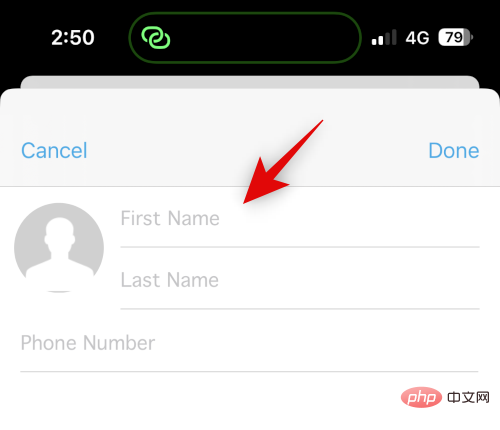
NOTE: This app has a bug in dark mode where the text you type will not be visible when creating a new app. If you encounter this error, we recommend switching to light mode on your iPhone.
Click Finish after creating the contact.
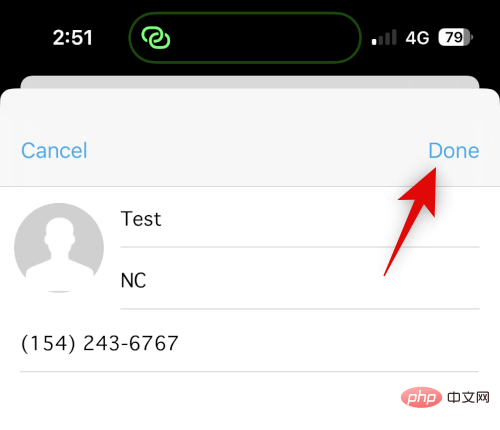
#Repeat the above steps for any other contacts you wish to hide on your iPhone. We can now proceed with deleting the contact from your Contacts app. Open the app and tap and hold on the relevant contact.

Click to delete the contact.

Click Delete Contact again to confirm your choice.

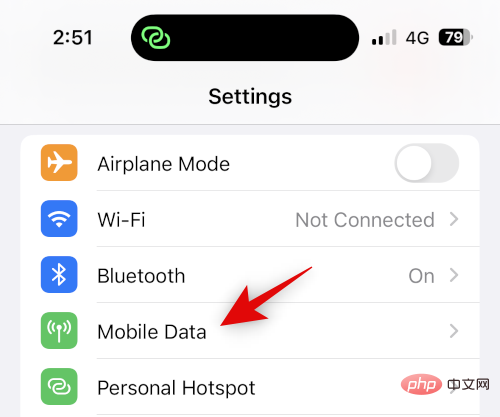
The contact will now be deleted from your iPhone. While Private Contacts Lite doesn't collect any data, it does display a lot of ads. We recommend that you turn off mobile data for this app to avoid seeing too many ads. Open the Settings app and tap Mobile Data.
Now scroll through the application list and turn off the switch for P'Contacts.
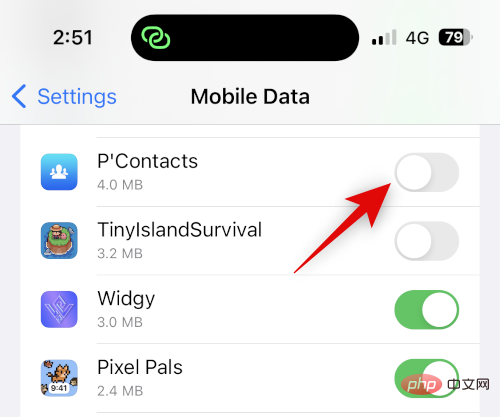
That's it! You have now set up Private Contacts Lite on your iPhone. All selected contacts will now be password protected and hidden.
Case 2: Hide Contacts in Messages App
If you want to hide contacts, you may want to hide their conversations from the Messages app as well. Here's how to do it on your iPhone.
Method One: Hide Alert
First, you can hide the alert to hide the conversation in the Messages app. This isn't that efficient, but it works if you wish to hide incoming notifications and alerts from selected contacts. Please follow the steps below to help you through the process.
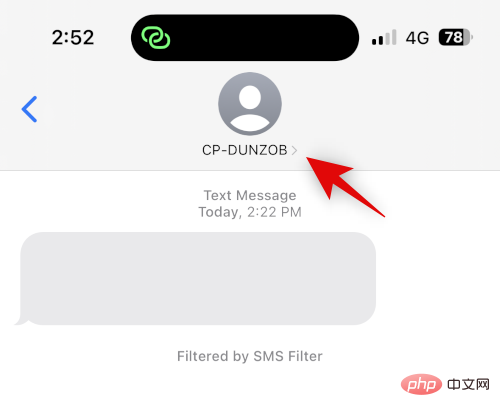
Open Messages and click on the conversation you want to hide alerts for. Click the contact name at the top.
Now click and turn on the switch for Hide Alerts.
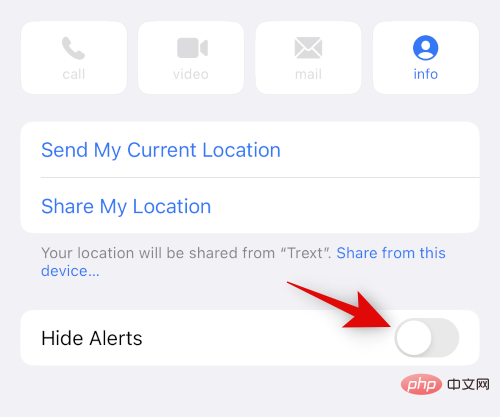
That's it! Alerts for all incoming messages in selected conversations will now be hidden on your iPhone.
Method Two: Use Message Filtering
iPhone allows you to filter messages from unknown senders. These messages do not send any notifications and are added to a separate category in the Messages app. This category is well hidden and can only be discovered by users who actively look for it. You can take advantage of this by deleting a contact so that all messages in your inbox are filtered and hidden. Here's how to do it on your iPhone.
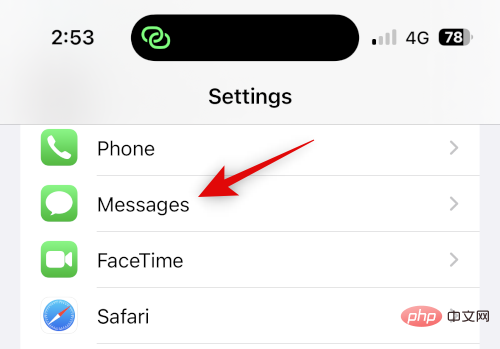
Open the "Settings" app and tap "Messages".
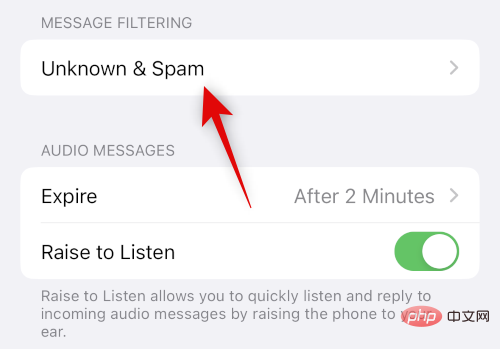
Now scroll down and click on Unknown & Spam under MESSAGE FILTERING.
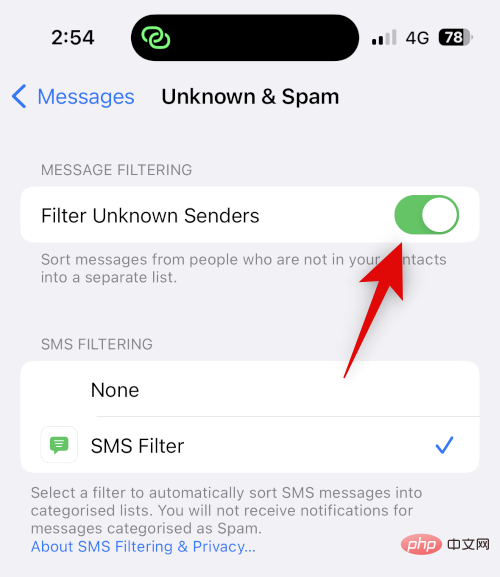
Click and turn on the Filter unknown senders switch.
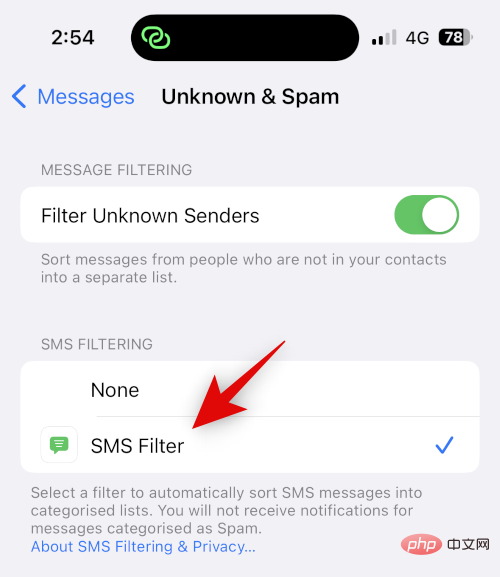
Click and select SMS Filter under SMS FILTERING.
You can now go ahead and delete the selected contacts from your device. Open the "Contacts" app and tap and hold on the relevant contact.

Select Delete Contact.

Click Delete Contact again to confirm your choice.

The contact will now be deleted from your iPhone and all their messages will now be filtered. You can use the following steps to find filtered messages.
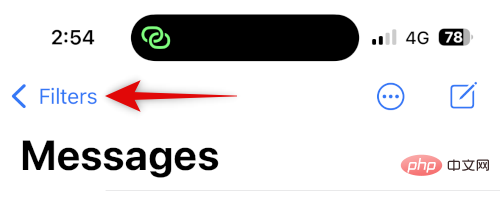
Open Messages and click
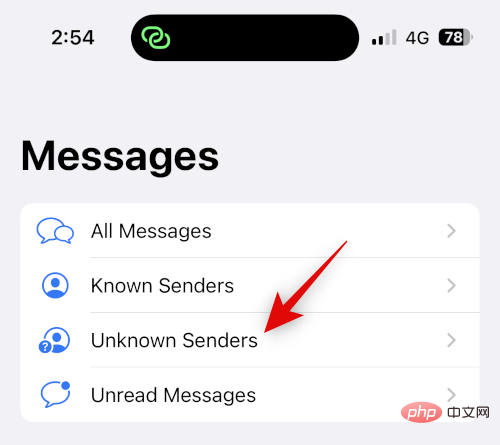
Click and select Unknown Sender.
You can now find any received messages in hidden conversations in this list.
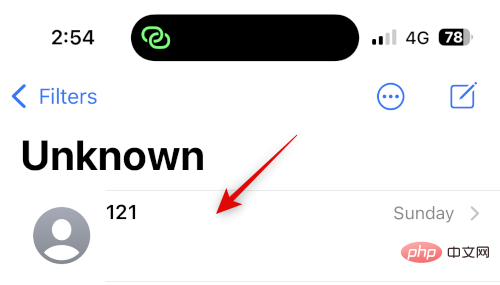
#This is how you can use message filtering to hide conversations with specific contacts.
Method 3: Use Recently Deleted
Messages you delete on iOS 16 and later are now sent to Recently Deleted so they can be restored later. You can use this feature to delete and restore conversations with contacts you wish to hide. Use the following steps to help you through the process.
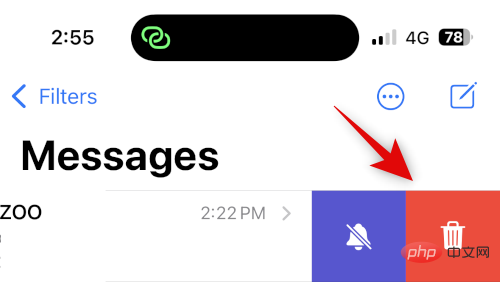
Open a message and swipe left on the relevant conversation.
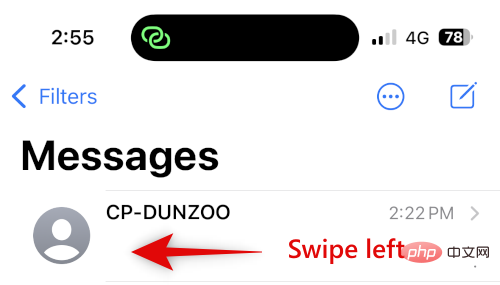
Click the delete icon.
Click Delete again to confirm your choice.
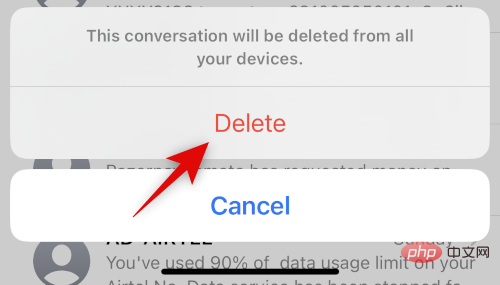
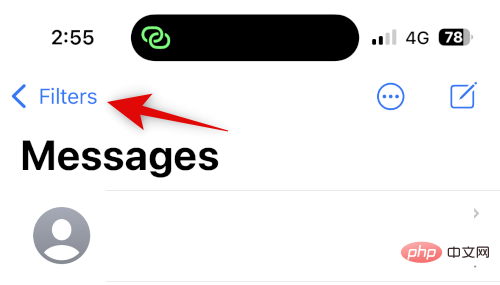
Conversations will now be hidden from messages. If you want to access the conversation, tap
Click Recently deleted.
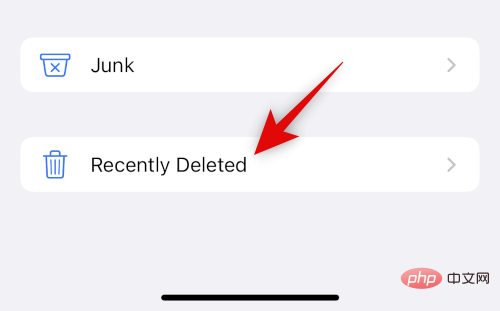
You will now find your deleted conversations in the list on your screen.
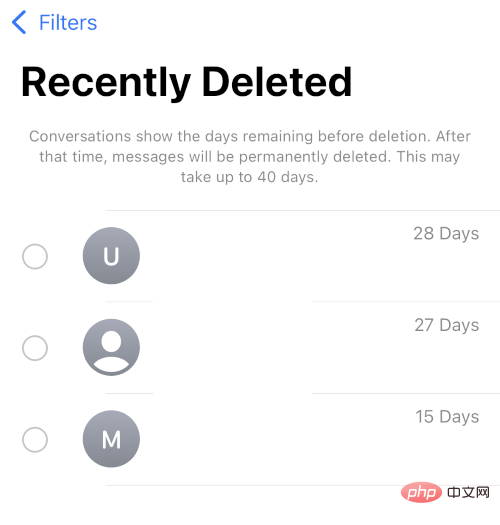
#This is how you can use Recently Deleted to hide conversations in the Messages app.
Hide calls from a contact
You can hide calls from a contact by disabling alerts using focus mode or manually deleting call history. Here's how to use both methods on your iPhone.
Method 1: Use Focus Mode to Disable Alerts
Open the Settings app and tap Focus.
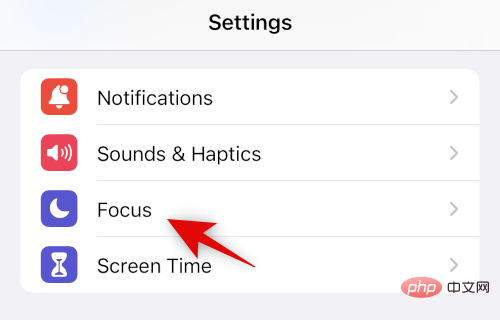
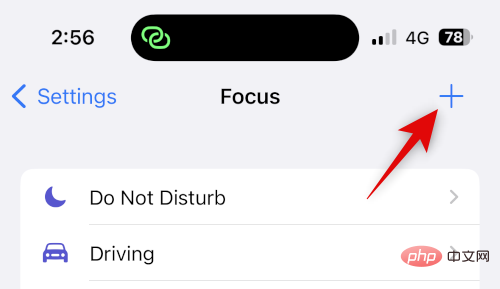
Let's create a new Focus to disable alerts from certain contacts you wish to hide. You can also choose to make these changes within an existing focus mode if you wish. Click the icon to get started.
Click and select Customize.
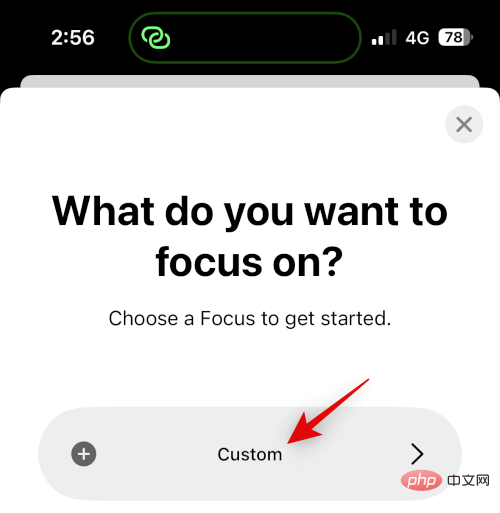
#Enter a name for the new focus mode, select a glyph, and choose your preferred color.
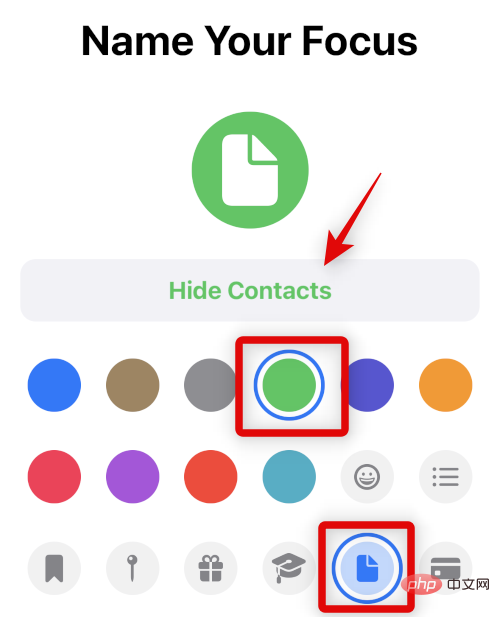
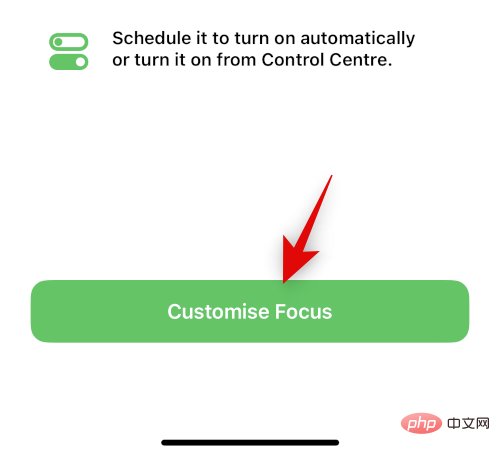
Click Next at the bottom, then click Custom Focus at ten o’clock.
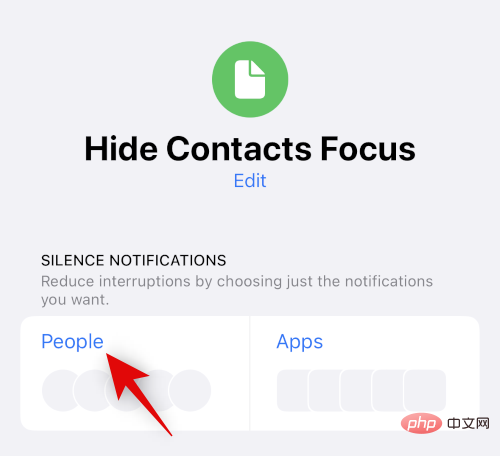
Click on the person at the top.
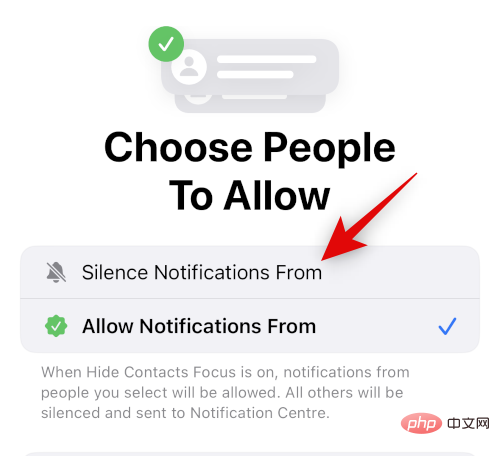
Click and select Mute notifications from .
Now click at the bottom to add.
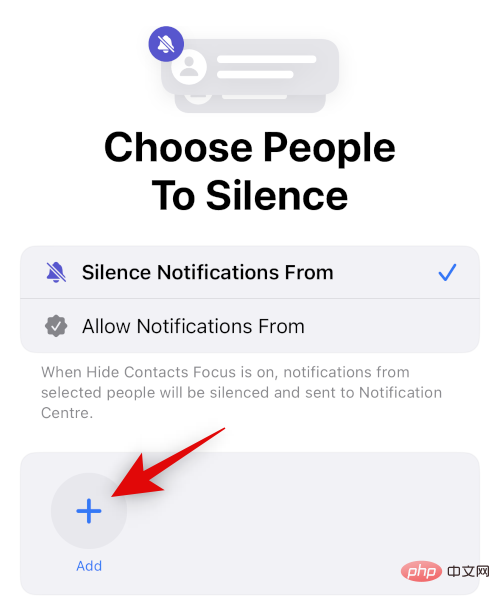
#Click and select the relevant contact whose calls you want to hide.
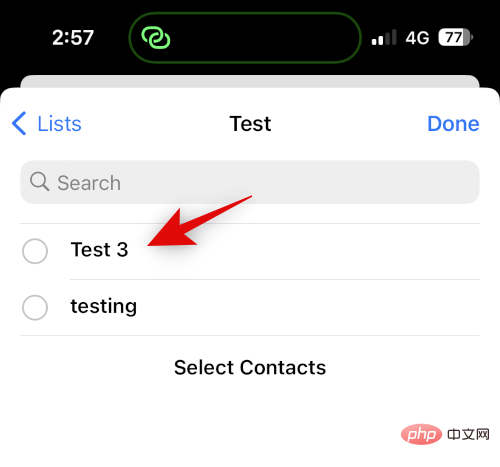
Click Complete.
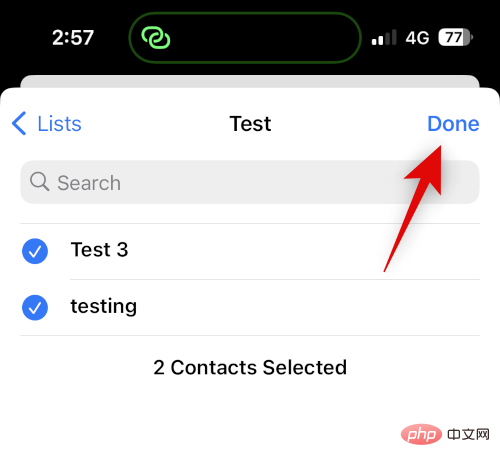
Click in the upper right corner again to complete.
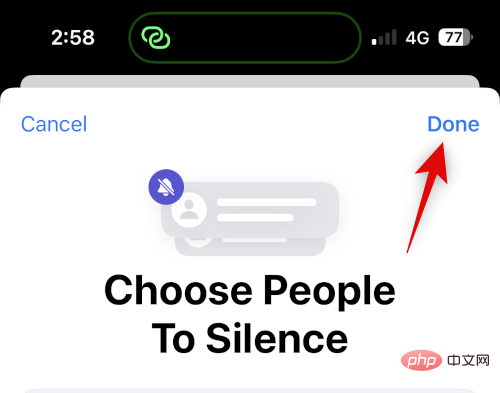
All calls from the selected contact will now be muted. You will only receive badge notifications on app icons that represent the same. If you wish to disable the badge for the Phone app, use the following steps.
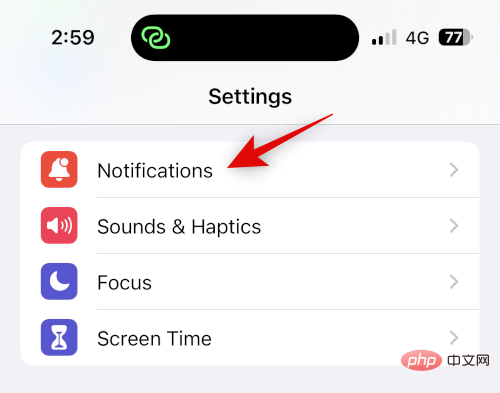
Open Settings and click Notifications.
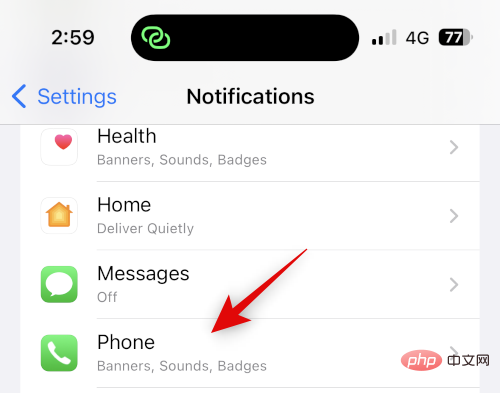
Now click on the Phone app in the list on the screen.
Click and turn off the switch of Badges.
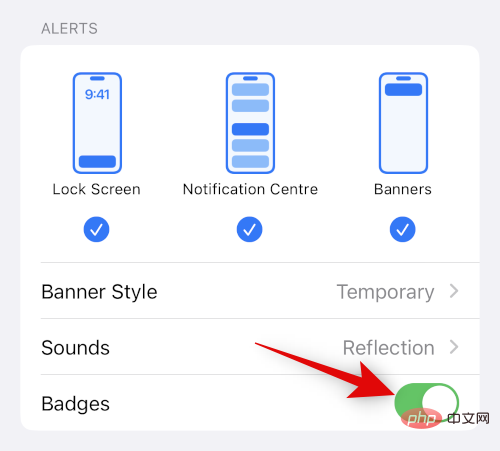
That's it! You will now hide calls from selected users, and you will no longer receive a declined call badge.
Method Two: Delete Call History Hide Calls
If you don’t want to mute the selected contacts while hiding them, then you can choose to manually delete the call history from your iPhone. Use these steps to delete call history on iPhone.
Open the "Phone " app and tap Press "Recent".
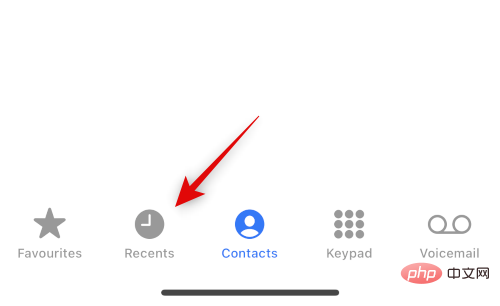
Find the log you want to delete and swipe left on it.
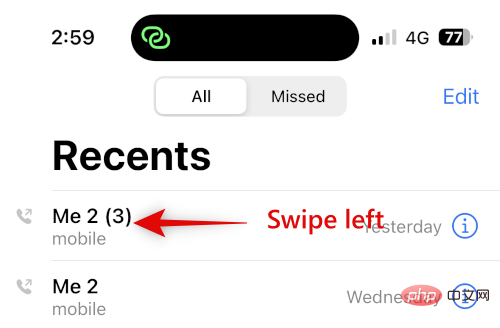
Click Delete.
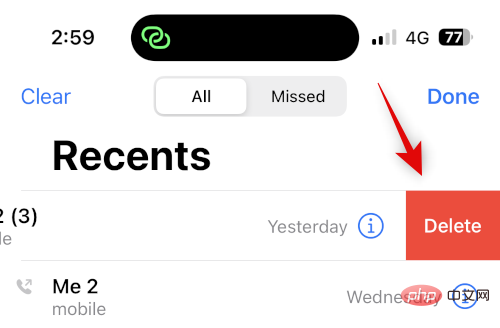
That's it! The selected call history will now be deleted from your iPhone. You can now repeat the above steps to delete any other call history as per your preference.
Disable contact suggestions for enhanced privacy
Finally, Siri learns and recommends contacts based on your activity. These suggestions appear in many places, including the share sheet and Spotlight search. Spotlight Search can be accessed from the lock screen to make your contacts public even when your device is locked. When hiding contacts on iPhone, you can disable these suggestions to enhance privacy. Use the following steps to help you through the process.
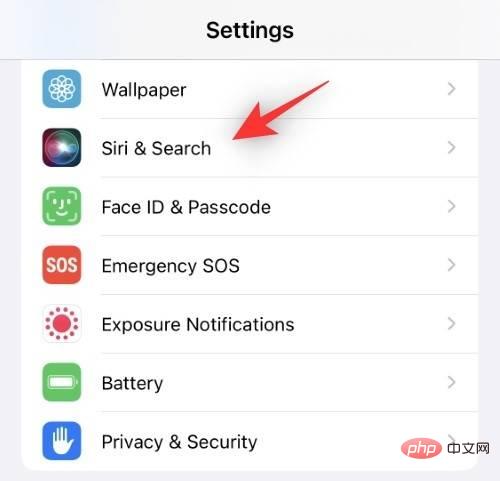
Open the Settings app and tap Siri & Search.
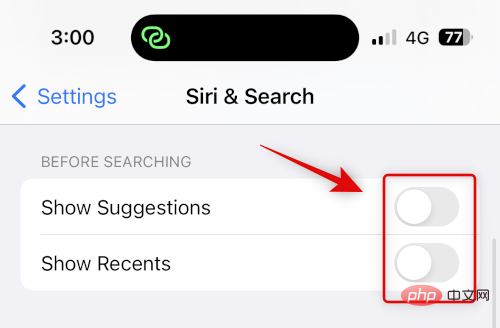
Now scroll down to Search before and turn off the switch for the following option.
- Show suggestions
- Recent shows
CONTENT FROM APPLE the following switches.
- Show in Find
- Show in Spotlight
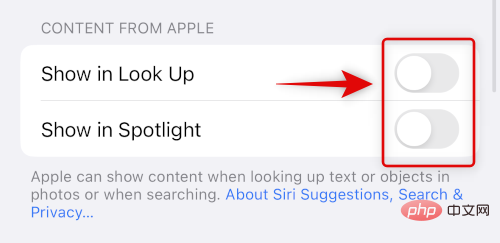 ##Finally, close
.
Allow notifications- Show in App Library
- Show when sharing
- Show when listening
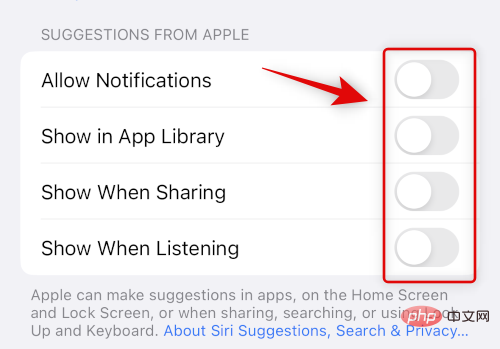 That's it! Suggested contacts will no longer appear in your share sheet or Spotlight search.
The above is the detailed content of How to hide contacts on iPhone. For more information, please follow other related articles on the PHP Chinese website!

Hot AI Tools

Undresser.AI Undress
AI-powered app for creating realistic nude photos

AI Clothes Remover
Online AI tool for removing clothes from photos.

Undress AI Tool
Undress images for free

Clothoff.io
AI clothes remover

AI Hentai Generator
Generate AI Hentai for free.

Hot Article

Hot Tools

Notepad++7.3.1
Easy-to-use and free code editor

SublimeText3 Chinese version
Chinese version, very easy to use

Zend Studio 13.0.1
Powerful PHP integrated development environment

Dreamweaver CS6
Visual web development tools

SublimeText3 Mac version
God-level code editing software (SublimeText3)

Hot Topics
 iPhone 16 Pro and iPhone 16 Pro Max official with new cameras, A18 Pro SoC and larger screens
Sep 10, 2024 am 06:50 AM
Apple has finally lifted the covers off its new high-end iPhone models. The iPhone 16 Pro and iPhone 16 Pro Max now come with larger screens compared to their last-gen counterparts (6.3-in on the Pro, 6.9-in on Pro Max). They get an enhanced Apple A1
 iPhone parts Activation Lock spotted in iOS 18 RC — may be Apple\'s latest blow to right to repair sold under the guise of user protection
Sep 14, 2024 am 06:29 AM
Earlier this year, Apple announced that it would be expanding its Activation Lock feature to iPhone components. This effectively links individual iPhone components, like the battery, display, FaceID assembly, and camera hardware to an iCloud account,
 Gate.io trading platform official app download and installation address
Feb 13, 2025 pm 07:33 PM
This article details the steps to register and download the latest app on the official website of Gate.io. First, the registration process is introduced, including filling in the registration information, verifying the email/mobile phone number, and completing the registration. Secondly, it explains how to download the Gate.io App on iOS devices and Android devices. Finally, security tips are emphasized, such as verifying the authenticity of the official website, enabling two-step verification, and being alert to phishing risks to ensure the safety of user accounts and assets.
 iPhone parts Activation Lock may be Apple\'s latest blow to right to repair sold under the guise of user protection
Sep 13, 2024 pm 06:17 PM
Earlier this year, Apple announced that it would be expanding its Activation Lock feature to iPhone components. This effectively links individual iPhone components, like the battery, display, FaceID assembly, and camera hardware to an iCloud account,
 LCD iPhone becomes history! Apple will be completely abandoned: the end of an era
Sep 03, 2024 pm 09:38 PM
According to media reports citing sources, Apple will completely abandon the use of LCD (liquid crystal display) screens in iPhones, and all iPhones sold next year and beyond will use OLED (organic light-emitting diode) displays. Apple first used OLED displays on iPhoneX in 2017. Since then, Apple has popularized OLED displays in mid-to-high-end models, but the iPhone SE series still uses LCD screens. However, iPhones with LCD screens are about to become history. People familiar with the matter said that Apple has begun ordering OLED displays from BOE and LG for the new generation iPhone SE. Samsung currently holds about half of the iPhone OLED display market, LG
 How to install and register an app for buying virtual coins?
Feb 21, 2025 pm 06:00 PM
Abstract: This article aims to guide users on how to install and register a virtual currency trading application on Apple devices. Apple has strict regulations on virtual currency applications, so users need to take special steps to complete the installation process. This article will elaborate on the steps required, including downloading the application, creating an account, and verifying your identity. Following this article's guide, users can easily set up a virtual currency trading app on their Apple devices and start trading.
 Anbi app official download v2.96.2 latest version installation Anbi official Android version
Mar 04, 2025 pm 01:06 PM
Binance App official installation steps: Android needs to visit the official website to find the download link, choose the Android version to download and install; iOS search for "Binance" on the App Store. All should pay attention to the agreement through official channels.
 Download link of Ouyi iOS version installation package
Feb 21, 2025 pm 07:42 PM
Ouyi is a world-leading cryptocurrency exchange with its official iOS app that provides users with a convenient and secure digital asset management experience. Users can download the Ouyi iOS version installation package for free through the download link provided in this article, and enjoy the following main functions: Convenient trading platform: Users can easily buy and sell hundreds of cryptocurrencies on the Ouyi iOS app, including Bitcoin and Ethereum. and Dogecoin. Safe and reliable storage: Ouyi adopts advanced security technology to provide users with safe and reliable digital asset storage. 2FA, biometric authentication and other security measures ensure that user assets are not infringed. Real-time market data: Ouyi iOS app provides real-time market data and charts, allowing users to grasp encryption at any time


