

How to modify search index location in Windows 11

The Windows search indexing option is designed to make searches on your computer faster. It indexes all your files, documents, and more to find content faster. Windows Search creates an index of files, photos, videos, folders, and more that users can search based on location, size, name, author name, and more. Searching becomes very easy and fast. But keeping the Windows search index open is not mandatory, and now you may be wondering what happens if it is turned off. If you do this, it will stop indexing your documents and searches will still work, but may consume more time. The most interesting option in indexing is to select only those locations where you need to add indexing functionality. In this article, we will discuss how to add, remove, or modify search index locations on Windows 11.
Modify search index locations on Windows 11
We can add locations or remove locations from the index. Including indexing options makes searching faster, removing indexing options may reduce size but the application may be slower and search results may be delayed. So modifications can be done in two ways, let's see what they are.
Method 1: Use Settings to modify the search index position
Step 1: Also use the key (Windows I) to open Windows Settings, or you You can click the "Start" button and then click "Settings".
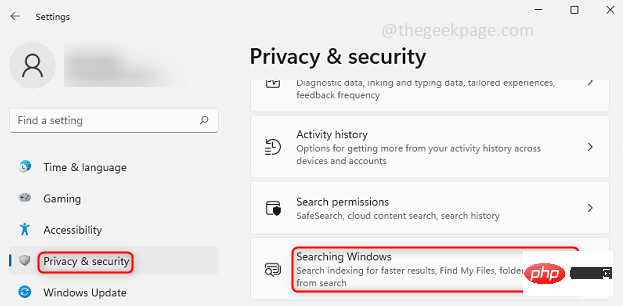
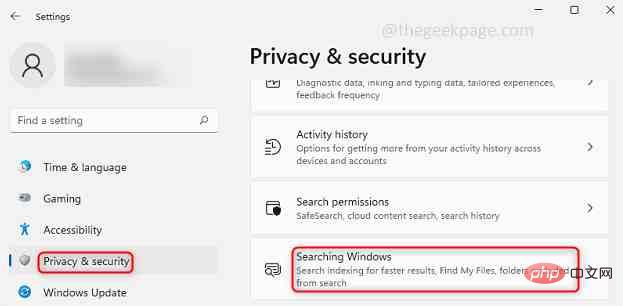
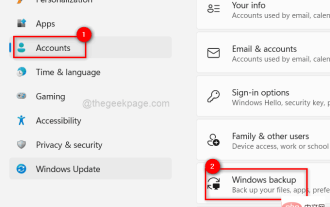
Step 2: Click Privacy & Security in the left pane, then click right Click Search Windows in the pane.
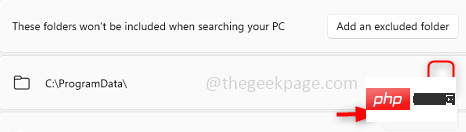
Step 3: To exclude a folder from indexing, this means if you don't need indexing, just Click on the right to add excluded folders, then browse and select the folders or drives you want to exclude. Excluded files and folders will be listed in the same window below.

Step 4: To remove a folder from the exclude list, click on the file you want to remove from the list Clip the 3 points on the right side. Click to delete . This also means that from now on, specific folders will have indexing options.
Method 2: Modify the search index position using advanced indexing options
Step 1: Also use the key ( Windows I ) Open Windows Settings, or you can click the Start button and then click Settings.
Step 2: Click Privacy & Security in the left pane, then click right Click Search Windows in the pane.
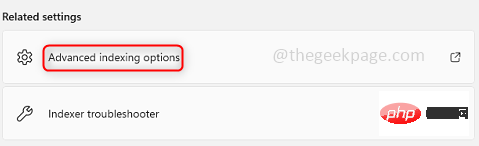
Step 3: Click Advanced Indexing Options.
Step 4: Click at the bottom to modify the options.
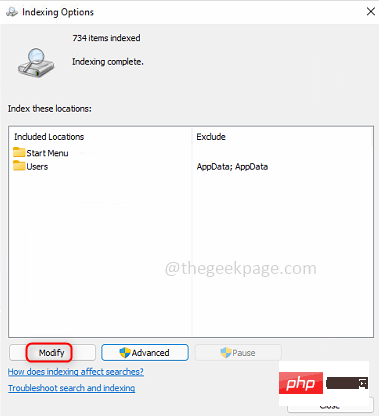
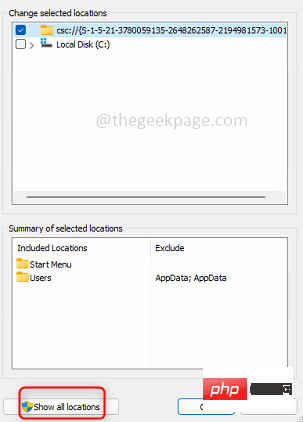
Step 5: Click Show All Locations to apply all users, And note that you must be logged in as admin. If you do not click Show all locations , the changes will only apply to the current user.
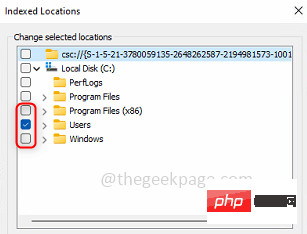
Step 6: A window appears where you can have all your drives and folders and there is a checkbox next to it. To include a folder for search indexing, click the checkbox for the specific folder you want to include. To exclude a folder from search indexing, uncheck the checkbox for that specific folder.
Step 7: You can also view the included and excluded folders in the Summary section . Click OK.
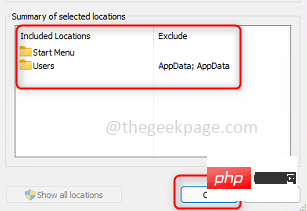
Step 8: Now the changes have been applied, so you can go ahead and close the window by clicking the Close button.

The above is the detailed content of How to modify search index location in Windows 11. For more information, please follow other related articles on the PHP Chinese website!

Hot AI Tools

Undresser.AI Undress
AI-powered app for creating realistic nude photos

AI Clothes Remover
Online AI tool for removing clothes from photos.

Undress AI Tool
Undress images for free

Clothoff.io
AI clothes remover

Video Face Swap
Swap faces in any video effortlessly with our completely free AI face swap tool!
Hot Article
Hot Tools

Notepad++7.3.1
Easy-to-use and free code editor

SublimeText3 Chinese version
Chinese version, very easy to use

Zend Studio 13.0.1
Powerful PHP integrated development environment

Dreamweaver CS6
Visual web development tools

SublimeText3 Mac version
God-level code editing software (SublimeText3)
Hot Topics


 7 Ways to Fix Printer Access Denied Error in Windows 11
May 10, 2023 pm 03:43 PM
7 Ways to Fix Printer Access Denied Error in Windows 11
May 10, 2023 pm 03:43 PM
Connecting your Windows computer to external devices such as printers can make things easier for you. However, you may encounter several problems when trying to collect computers from external devices such as printers. Users complain about Windows 11 printer access denied error. Many situations can cause this issue, including hardware issues, driver issues, and more. Therefore, this article will discuss the cause of the problem and how to solve it. Windows 11 printer access denied error prevents you from using the printer to perform any action on your computer. This indicates that there is not a good connection between the computer and the printer. Likewise, printer errors may cause Windows to be unable to connect to the printer Access Denied error 0x0000011b.
 How to fix preview pane not working in Windows 11
Apr 24, 2023 pm 06:46 PM
How to fix preview pane not working in Windows 11
Apr 24, 2023 pm 06:46 PM
One of the features that comes with Windows File Explorer is the preview pane, which displays a preview of the file you selected. This means you can view the contents of the file before opening it. The preview pane of File Explorer provides previews for different types of files such as Office-related documents, PDFs, text files, images, and videos. It usually works fine, but sometimes the file preview isn't available. Recently, many Windows 11 users have raised the issue that File Explorer’s preview pane is not working and they are unable to view file previews. Are you facing the issue of preview pane not working on your Windows computer? Then, continue reading this article. Here we have compiled a list of fixes that can help you fix
 Fix: Snipping Tool notification missing in Windows 11, 10
May 16, 2023 pm 06:34 PM
Fix: Snipping Tool notification missing in Windows 11, 10
May 16, 2023 pm 06:34 PM
Snip&Sketch is an excellent Windows screenshot tool. Microsoft has added tons of new cool features and shortcuts to make this tool almost indispensable for users. However, you may have noticed an issue after taking the screenshot, the preview notification does not appear in the notification panel! There are many reasons that could be the source of the problem. So, no need to waste more time, just follow these solutions to find a quick solution. Fix 1 – Check notification settings You may have blocked Snip & Sketch notification settings. 1. You have to open settings. So, press Windows key + I key at the same time. 2. Now, go to “System” from the left pane. 3. On the right side, click All Options
 3 Ways to Fix Error 740 When Adding a Printer in Windows 11
Apr 22, 2023 pm 12:04 PM
3 Ways to Fix Error 740 When Adding a Printer in Windows 11
Apr 22, 2023 pm 12:04 PM
Can't add printer on Windows 11? If you encounter error 740 when adding a printer to your Windows 11 PC, you are not alone. It often leaves you wondering, will your printer work with Windows 11? This is a common error and the message reads – This doesn’t work. We cannot install this printer at this time. Please try again later or contact your network administrator for assistance. Bug: #740. But, to your relief, this just means that you need to have the required administrator rights to add the printer. Additionally, you may see the message – The requested operation requires elevation: Error 740. This error prevents you from running applications or accessing files on your storage device
 Ghost Specter Windows 11 Superlite: Download and Installation Guide
May 05, 2023 am 09:10 AM
Ghost Specter Windows 11 Superlite: Download and Installation Guide
May 05, 2023 am 09:10 AM
Updating the operating system to the latest Windows 11 poses a challenge for many PCs due to insufficient system requirements. Therefore, Microsoft released a modified version, GhostSpectreWindows11Superlite, compatible with every PC. Therefore, we will discuss how to download and install it. Likewise, if your PC meets the Windows 11 system requirements, you can read further about obtaining a Windows 11 custom ISO. What is Ghost Windows 11? GhostSpectreWindows11 is a modified version called LightWindows11. This is because of the installed
 Fix issue where Windows 11 display language cannot be changed
May 07, 2023 am 10:10 AM
Fix issue where Windows 11 display language cannot be changed
May 07, 2023 am 10:10 AM
The display language is the front-end language in which users can read and view system screen content. Windows 11 releases updated versions regularly, but sometimes this causes some unexpected things to change. Many Windows users have noticed a change in Windows 11 systems where they cannot change their display language. They're not sure why this is happening. We suspect this may be due to a recent Windows version being installed on the system or having sync settings enabled to remember preferences for different devices. Don't worry if you encounter such problems when changing the display language. In this article, we have explained below some solutions that will help users to resolve this issue and be able to change the display language. build
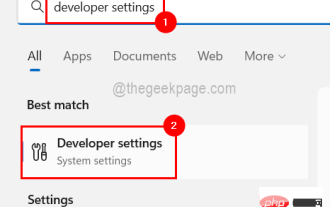 How to enable developer mode in Windows 11
Apr 25, 2023 pm 10:58 PM
How to enable developer mode in Windows 11
Apr 25, 2023 pm 10:58 PM
Microsoft has announced a new feature alongside Windows 10 called Developer Mode, which is also present in Windows 11. This is very important for all developers who code software development on Windows PC and want to deploy it to other devices. To improve the coding environment, users must enable developer mode on Windows systems, which allows users to benefit from enhanced assistance in writing, testing, and deploying code. Users must ensure that developer mode is enabled not only on the Windows machine where coding is done, but also on the device where it is deployed and tested. If you are new to coding and want to make the most of this feature, continue reading this article which will guide you how
 No color printing in Windows 11? 6 simple fixes to choose from
Apr 20, 2023 pm 05:43 PM
No color printing in Windows 11? 6 simple fixes to choose from
Apr 20, 2023 pm 05:43 PM
Printers are an important piece of equipment in most offices and some homes. Although many offices are transitioning to paperless workspaces, printers must work effectively until then. But some users reported that Windows 11 did not print color copies. Whenever you upgrade your operating system, there's a good chance you'll run into compatibility issues. The printer driver or related application that may be installed is incompatible with Windows 11. Additionally, there are some critical services that must be running for the printer to work efficiently. Apart from this, it could be a conflicting background process or a cartridge issue behind the issue. Now that you have a basic understanding of why, it's time to find out what to do if Windows 11 isn't printing in color. If Windows1