

Fixed: Windows 11 Android emulator not responding

It’s no news that Windows 11 has now become the operating system of choice since its release. At the top of the list are developers looking to take advantage of its new features and improvements. But it's a painful trade-off.
Most developers have complained that the Windows 11 Android Emulator is unresponsive since the upgrade.
Nowadays, emulators have become an integral part of application development and most people have to downgrade their PC to Windows 10 to solve the problem.
This tutorial will walk you through three effective ways to resolve this issue without downgrading your PC.
Requirements for running Android apps on Windows 11
Not all Windows 11-compatible PCs can run Android apps. Here are the minimum requirements listed by Microsoft:
- Memory: 8GB (minimum), 16GB (recommended).
- Storage Type: Solid State Drive (SSD).
-
Processor:
- Intel Core i3 8th generation minimum or higher.
- AMD Ryzen 3000 minimum or higher.
- Qualcomm Snapdragon 8c minimum or higher.
- Processor architecture: x64 or ARM64.
- Virtual Machine Platform: Feature must be enabled.
Now that we’ve cleared up the details about what your system needs to optimally run this application, let’s dive into the actual fixes for this issue.
How to fix Android emulator not responding on Windows 11?
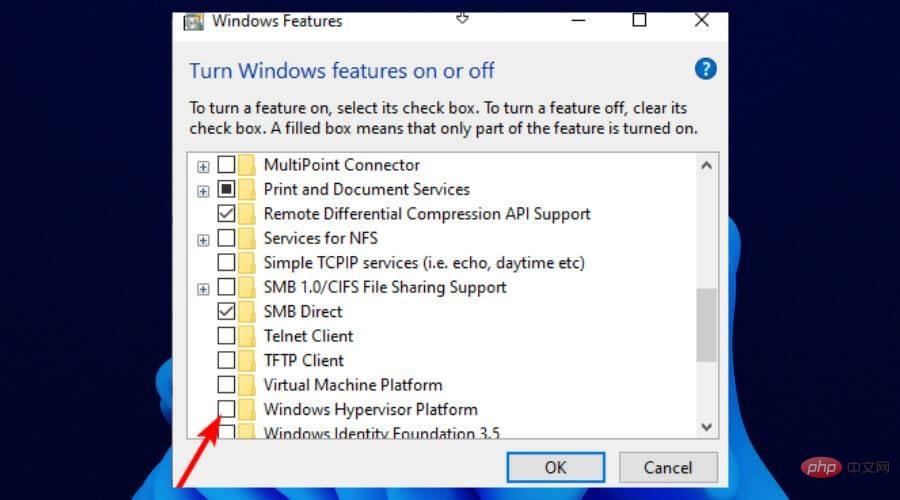
1. Using the Turn On and Off feature options
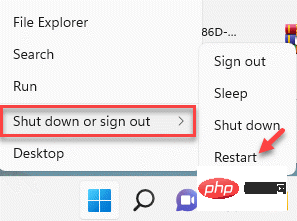
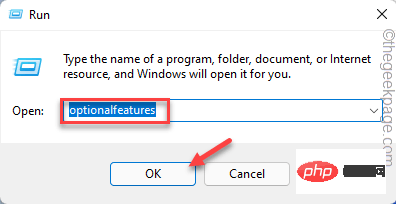
- Press the Start button and type Turn Windows.
- Select the Turn Windows features on or off option.

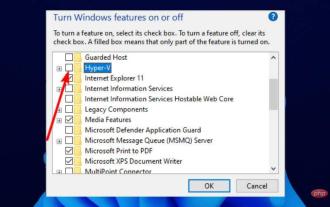
- Find the Hyper-V option and uncheck the box.
- UncheckWindows Hypervisor Platform.

After disabling these features, you can now install the Android Emulator Hypervisor Driver from the SDK tools in Android Studio and SDK Manager.
Please note that WSL2 and other virtual machines will not work when you disable Hyper-V. To use them, you must enable the feature again.
2. Comment out a line in the Android Emulator source code
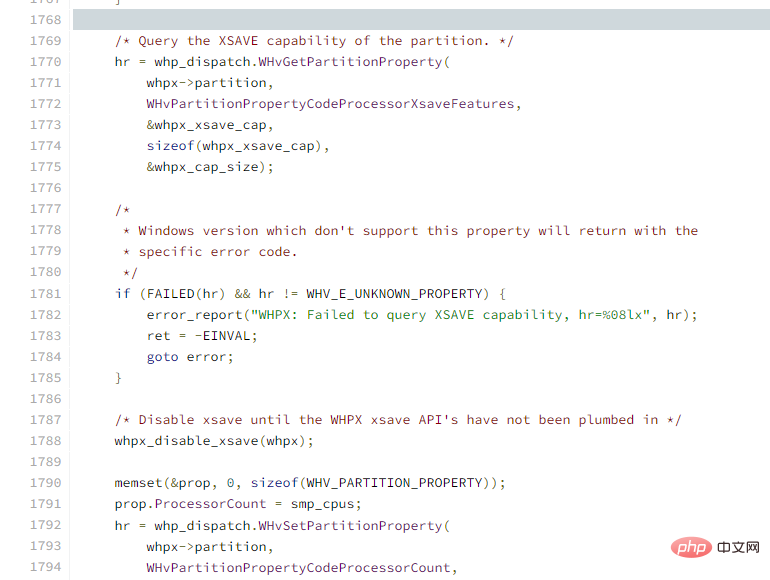
The Windows 11 Android emulator unresponsiveness problem is related to the XSAVE disabling code in the WHPX API integration .
A quick fix is to comment out this line of code and compile it yourself. So many users have confirmed that this works for them without having to disable Hyper-V. It will be best if you try it too.
3. Try alternative emulators
If the above fixes don't work for you, we recommend you try an alternative emulator in LD Player.
LD Player is an amazing lightweight emulator that allows you to test, install and uninstall your Android app games on Windows 11 without any issues.
More suitable emulator for gamers, it is good at running other applications. What’s more, it’s powered by LD Store where you can download millions of games and apps. It also allows you to download the application APK and install it on the platform.
It might just be all you need to run an Android emulator on your PC without having to disable Hyper-V and subsequently WSL2.
⇒Get LD Player
How to run an Android application using a physical device?
If the Windows 11 Android emulator is still unresponsive or you want to try a new approach, you can run your Android apps on a real Android device.
To do this, you need to go through two stages:
1. Enable developer mode on your Android device
- Connect your phone to your Windows development machine via USB cable. If prompted, install the USB driver.
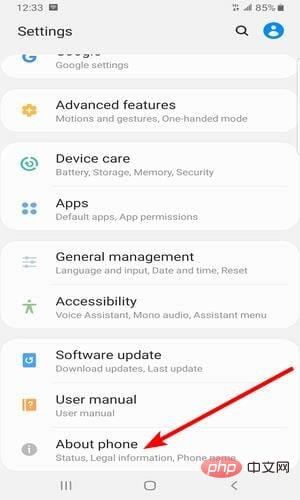
- Go to the Settings app on your Android phone.
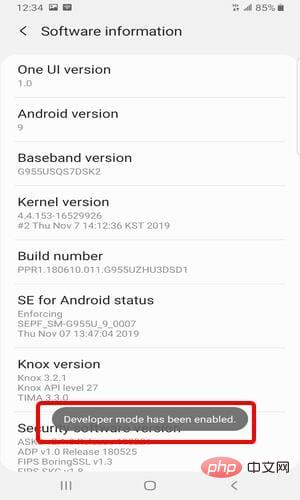
- Click on the About phone option.
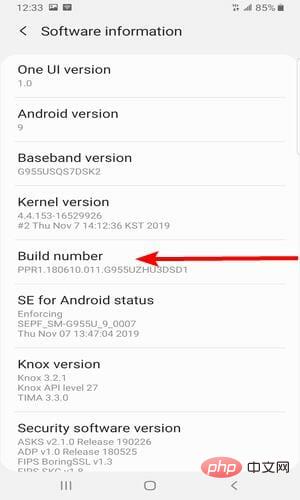
- Click Build number seven times. Wait until it says Developer mode is now enabled or equivalent prompt.
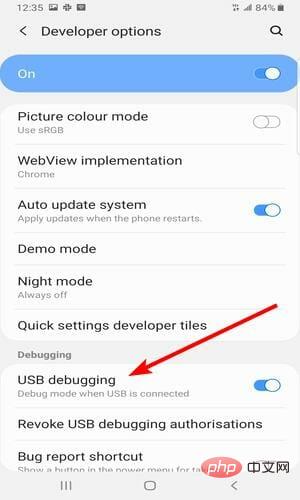
- Return to the "Settings" application window and select the "Developer" option after the "About phone" option.
- Now, enable USB debugging in the Developer Options window.
2. Run the application on your device
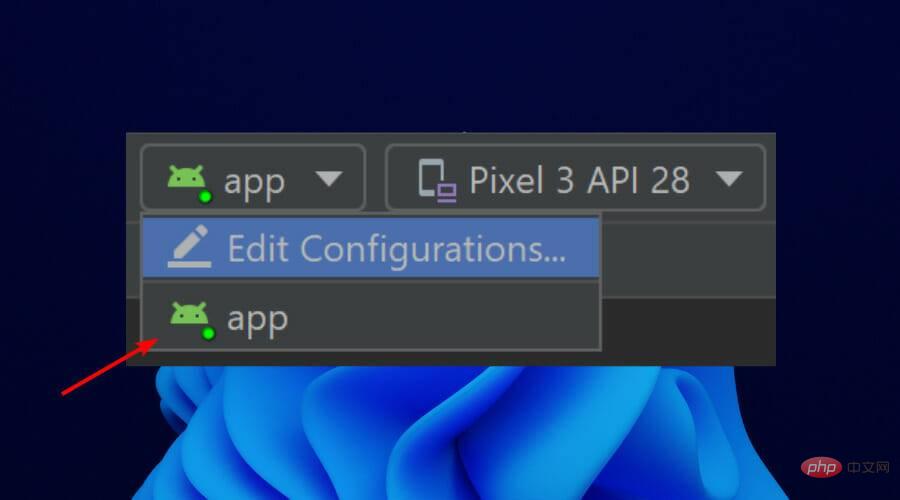
- Go to the Android Studio toolbar and select from the Run Configuration drop-down menu Select the application to run.
- Finally, select your device name from the Available Devices drop-down menu.
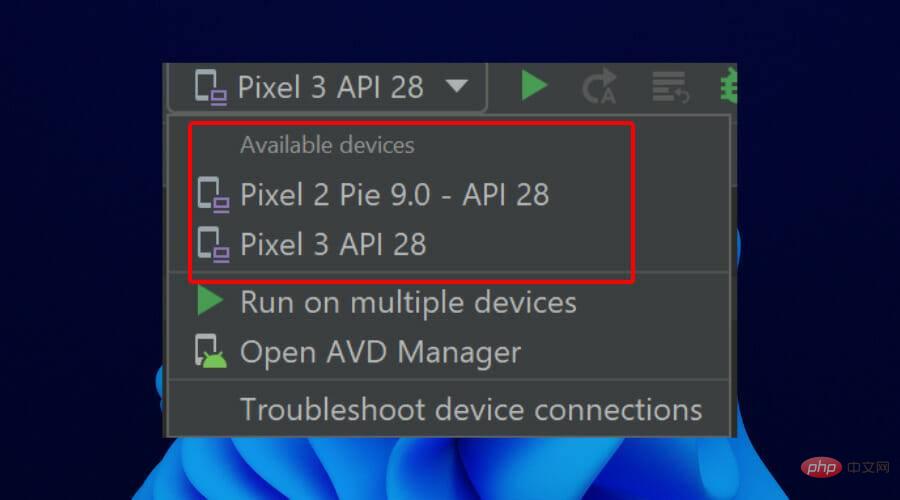
Please note that your device must be running Android 9.0 or higher to use this option.
Windows 11 Android emulator unresponsive issue can be frustrating. But it’s not an unsolvable problem, as shown above.
We hope these fixes help you get back to doing the things you love without having to install Windows 11.
The above is the detailed content of Fixed: Windows 11 Android emulator not responding. For more information, please follow other related articles on the PHP Chinese website!

Hot AI Tools

Undresser.AI Undress
AI-powered app for creating realistic nude photos

AI Clothes Remover
Online AI tool for removing clothes from photos.

Undress AI Tool
Undress images for free

Clothoff.io
AI clothes remover

AI Hentai Generator
Generate AI Hentai for free.

Hot Article
Hot Tools

Notepad++7.3.1
Easy-to-use and free code editor

SublimeText3 Chinese version
Chinese version, very easy to use

Zend Studio 13.0.1
Powerful PHP integrated development environment

Dreamweaver CS6
Visual web development tools

SublimeText3 Mac version
God-level code editing software (SublimeText3)
Hot Topics
 1384
1384
 52
52

 How to fix hypervisor errors in Windows 11
Apr 16, 2023 pm 12:37 PM
How to fix hypervisor errors in Windows 11
Apr 16, 2023 pm 12:37 PM
For many users, Windows has a hidden built-in feature for easily creating and managing virtual machines. This feature is called Hypervisor or Hyper-V. But like other Windows features, this one isn't completely bug-free. In this article, we will show you how to fix Hyper-V issues easily and quickly. So without further ado, let’s jump into the solution and get the virtual machine up and running. Fix 1 – Check if your system supports Hyper-V The first thing you should try is to check if your system supports Hyper-V and is still active. 1. You must restart the system. To do this safely, press Wi once
 Recommended four best Windows 11 launchers for Android: free and paid versions
Apr 22, 2023 am 09:01 AM
Recommended four best Windows 11 launchers for Android: free and paid versions
Apr 22, 2023 am 09:01 AM
Wondering how to find the best launcher for Android to change the look and feel of your phone? We bring you our roundup of the best Windows 11 launchers for Android. These launchers offer a Windows 11-style experience on Android, including icon packs, wallpapers, app drawer page transitions, and more. The best launchers feature many design cues from Windows 11 and provide a more cohesive experience between your desktop PC and Android device. Luckily, there are several great apps that fit the bill. With different features and customizable options, they offer a fresh look without overpowering Andr
 Fixed: Windows 11 Android emulator not responding
Apr 17, 2023 pm 06:58 PM
Fixed: Windows 11 Android emulator not responding
Apr 17, 2023 pm 06:58 PM
It’s no news that Windows 11 has now become the operating system of choice since its release. At the top of the list are developers looking to take advantage of its new features and improvements. But it's a painful trade-off. Since the upgrade, most developers have complained that Windows 11 Android Emulator is unresponsive. Today, emulators have become an integral part of app development, and most people have to downgrade their PCs to Windows 10 to solve the problem. This tutorial will take you through three effective ways to fix this problem without downgrading your PC. Not all requirements for running Android apps on Windows 11
 How to solve the problem that win11 does not have hyper-v option? Win11 cannot find hyper-v option problem analysis
Feb 29, 2024 pm 05:25 PM
How to solve the problem that win11 does not have hyper-v option? Win11 cannot find hyper-v option problem analysis
Feb 29, 2024 pm 05:25 PM
When we use the win11 system, we sometimes need to use the hyper-v option, but many users are asking what to do if win11 does not have the hyper-v option? Users can directly create a new text document, and then copy the following code to perform the operation. Let this site carefully introduce to users the analysis of the problem that win11 cannot find the hyper-v option. Analysis of the problem that the hyper-v option cannot be found in win11 1. Right-click a blank space on the desktop and select New Text Document.
 Fix for BlueStacks not functioning properly after enabling Hyper-V
Apr 22, 2023 pm 02:10 PM
Fix for BlueStacks not functioning properly after enabling Hyper-V
Apr 22, 2023 pm 02:10 PM
Are you seeing "BlueStackscan'tstartwhenHyper-Visenabled" when trying to launch BlueStacks applications on your system? In fact, older versions of BlueStacks do directly conflict with Hypervisor or Hyper-V. However, some versions of Bluestacks officially support Hyper-V. Therefore, there are two simple ways to solve this problem. Way 1 – Disable Hyper-V functionality Way 2 – Install new Bluestacks with Hyper-V support We have described both the processes in detail so that
 Here are the Windows 11 requirements for VMware and Hyper-V
Apr 14, 2023 am 08:28 AM
Here are the Windows 11 requirements for VMware and Hyper-V
Apr 14, 2023 am 08:28 AM
A virtual machine is computer software that creates a virtual environment on a host machine with dedicated memory, hardware, storage, network settings for different purposes. It enables users to run application, software, and cloud tests. Most virtual machines are free to use, but others require payment to access premium features and are primarily aimed at enterprise users. Some common virtual machines are Hyper-V built into the Windows operating system and VMware is an enterprise-grade virtual machine built by the Vmware cloud company. For example, VMware Workstation is a desktop management program for running virtual machines on Windows or Linux. This tutorial will look at Window
 How to disable Hyper-V in Windows 11
May 05, 2023 pm 03:37 PM
How to disable Hyper-V in Windows 11
May 05, 2023 pm 03:37 PM
Virtualization is popular because it allows us to run multiple operating systems on one computer, even if their file systems are incompatible with each other. Since no hardware is required, money is saved and the behavior of an application or new system can be predicted before it is installed or updated in an actual setting. Microsoft has created its own virtualization technology in the form of Hyper-V. By using this feature, we can create and run various types of virtual machines (including but not limited to Windows, Linux, etc.). One of the advantages of Hyper-V is the ability to run virtual machines in their own isolated space, which allows us to not only run one virtual machine, but also multiple virtual machines at the same time, which is very convenient. However, some users reported that they wished to disable
 This Pixel 6 user found a way to run Windows 11 on Android 13
Apr 15, 2023 pm 03:43 PM
This Pixel 6 user found a way to run Windows 11 on Android 13
Apr 15, 2023 pm 03:43 PM
Like every other Google Pixel phone, the Pixel 6 runs on Android. However, that doesn't mean users don't want to have some fun with their devices and experiment a bit with them by trying to run completely different operating systems. One developer appears to have achieved this feat by letting the Pixel 6 run Windows 11 as a virtual machine while running Android 13 on a developer preview. Well, as you can imagine, the process is quite complex, but if you have enough technical knowledge, you might be able to implement it yourself. The Android operating system is built on the Linux kernel, allowing you to