How to fix iPhone not detected or not recognized issue in Windows 11 or 10
Many iPhone/iPad/iPod users reported encountering issues with their device not being recognized or detected after connecting to a Windows 11 PC. In this case, even though the device is physically connected to your system via a Lightning cable, Windows will not detect it. Once you encounter this issue, you will not be able to transfer any files from your device to your system or your device may not charge as well. Additionally, some users have mentioned that their Apple devices are not visible in the iTunes app on Windows PC.
If you are such an iPhone/iPad/iPod user and your device encounters this issue on Windows 11, please continue reading this article. Here, we've curated some troubleshooting fixes that can help you resolve this issue.
Fix 1 – Uninstall and reinstall iTunes and Apple Mobile Device Support
1. Press the Windows and I keys simultaneously to open the WindowsSettings page .
2. Click the Applications tab in the left pane of the Settings window.
3. On the right side of this Settings window, select the option Apps and Features.
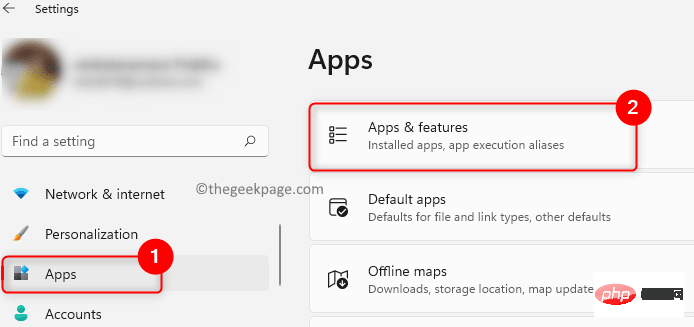
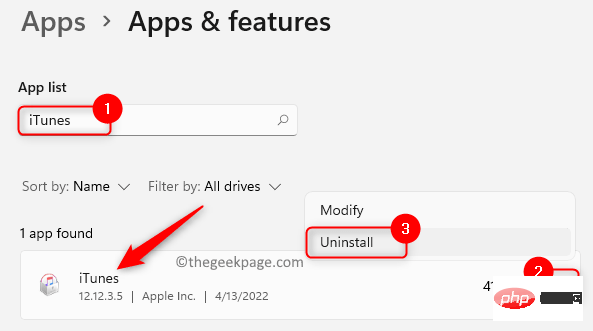
4. Find iTunes in the list of installed applications.
5. On the right end, click the three vertical dots associated with the iTunes application and select Uninstall.
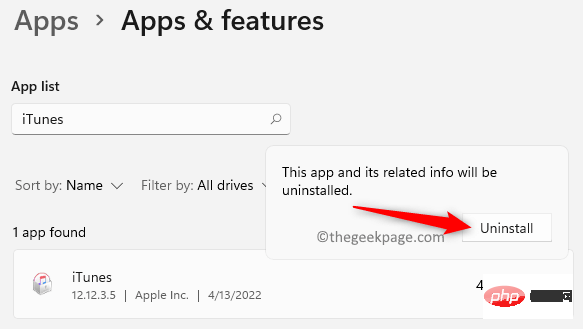
6. In the confirmation prompt that pops up, click Uninstall again.
# 7. Wait for iTunes to be uninstalled from your PC.
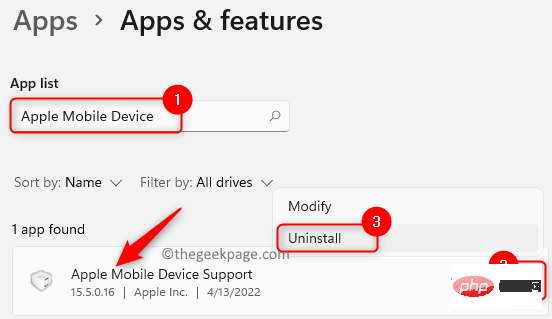
8. Now, search for Apple Mobile Device Support in the app list again.
9. Repeat Steps 4 and 5 to uninstall the Apple Mobile Device Support software from your computer.
10. Enter Apple’s official download page. Download the version of iTunes specific to your Windows PC.
11. Install iTunes and perform a restart when prompted.
12. Reconnect your Apple device and check if it is recognized/detected by your system.
Fix 2 – Update Apple Mobile Device USB Driver
1. Click the Start (blue window shape) button in the taskbar.
TypeDevice Manager in the Windows search box.
2. In the search results that appear, click Device Manager.
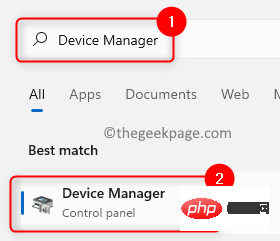
3. In the Device Manager window, scroll down and expand Universal Serial by clicking the arrow next to it bus device.
4.Right-click AppleMobile Device USB Device and selectUpdate Driver.
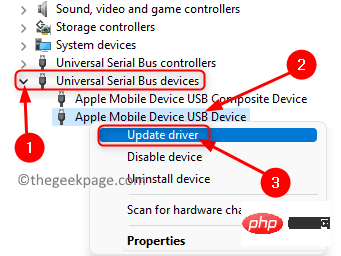
#5. This will open the Update Driver window for Apple Mobile USB Devices.
Click the optionAutomatically search for drivers in this window.
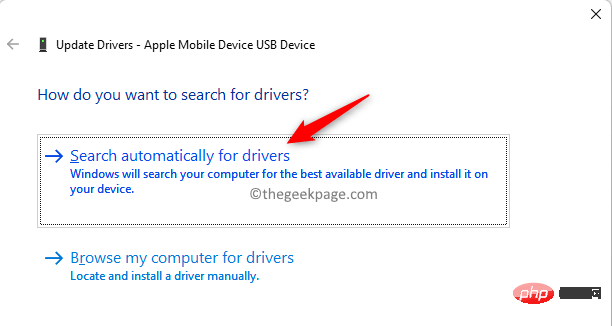
#6. If any new updates are available, they will be automatically downloaded and installed.
When the update is complete, a message will be displayed stating that the device's driver has been updated to the latest version.
7.Restart your PC and check whether the issue of your iPhone device not being recognized is resolved.
Fix 3 – Change the startup type of Apple Mobile Device Service
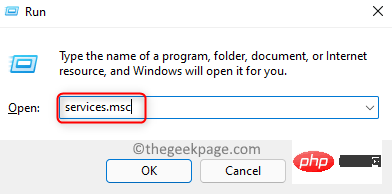
1. Use the Windows R key to open Run.
2. Enter services.msc and press Enter to open the Windows service.
#3. Find Apple Mobile Device Service in the service list.
4. To open the properties of the Apple Mobile Device Service, right-click on it and select the option Properties.
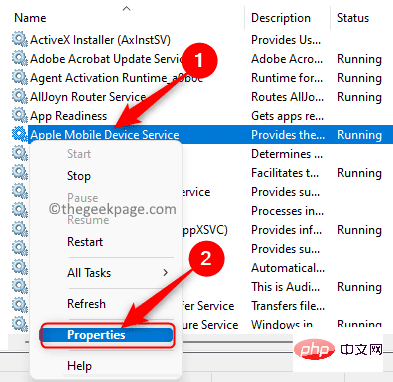
5. In the Properties window, ensure the Startup Type## for the Apple Mobile Device Service #Set to automatic.
6. If theservice status is stopped, click the Start button to make the service running.
7. ClickApply and then click OK to save the changes.
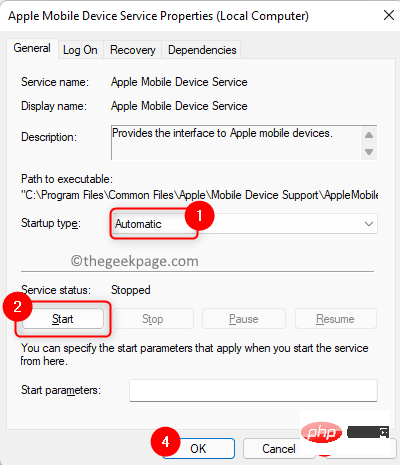
Restart your computer. Reconnect your Apple device and check if the issue is resolved.
Fix 4 – Disable and re-enable the Apple mobile device driver
1. Press Windows R and type devmgmt.msc to open Device Manager .
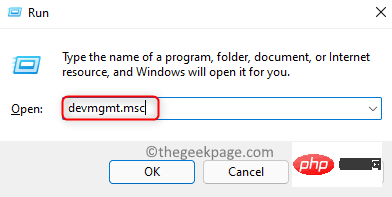
2. Scroll down to the bottom of Device Manager and find Universal Serial Bus Devices.
3. Click the small arrow next to it to expand the Universal Serial Bus Devices section.
4.Right-click Apple Mobile Device USB device and selectDisable device.
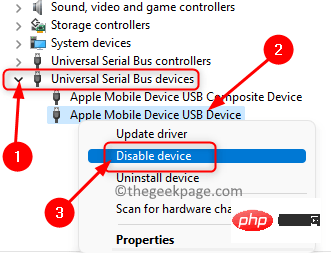
5. Click Yes in the window with the warning message to confirm whether you want to continue disabling this device.
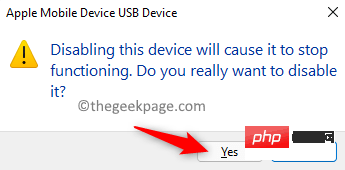
6. Right-click Apple Mobile Device USB device again and select Enable device.
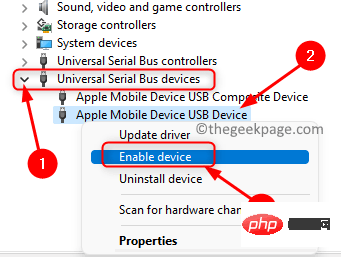
#7. Check if your Apple device is detected and visible in File Explorer.
The above is the detailed content of How to fix iPhone not detected or not recognized issue in Windows 11 or 10. For more information, please follow other related articles on the PHP Chinese website!

Hot AI Tools

Undresser.AI Undress
AI-powered app for creating realistic nude photos

AI Clothes Remover
Online AI tool for removing clothes from photos.

Undress AI Tool
Undress images for free

Clothoff.io
AI clothes remover

Video Face Swap
Swap faces in any video effortlessly with our completely free AI face swap tool!

Hot Article

Hot Tools

Notepad++7.3.1
Easy-to-use and free code editor

SublimeText3 Chinese version
Chinese version, very easy to use

Zend Studio 13.0.1
Powerful PHP integrated development environment

Dreamweaver CS6
Visual web development tools

SublimeText3 Mac version
God-level code editing software (SublimeText3)

Hot Topics
 1389
1389
 52
52
 Why can't the Bybit exchange link be directly downloaded and installed?
Feb 21, 2025 pm 10:57 PM
Why can’t the Bybit exchange link be directly downloaded and installed? Bybit is a cryptocurrency exchange that provides trading services to users. The exchange's mobile apps cannot be downloaded directly through AppStore or GooglePlay for the following reasons: 1. App Store policy restricts Apple and Google from having strict requirements on the types of applications allowed in the app store. Cryptocurrency exchange applications often do not meet these requirements because they involve financial services and require specific regulations and security standards. 2. Laws and regulations Compliance In many countries, activities related to cryptocurrency transactions are regulated or restricted. To comply with these regulations, Bybit Application can only be used through official websites or other authorized channels
 Anbi app official download v2.96.2 latest version installation Anbi official Android version
Mar 04, 2025 pm 01:06 PM
Binance App official installation steps: Android needs to visit the official website to find the download link, choose the Android version to download and install; iOS search for "Binance" on the App Store. All should pay attention to the agreement through official channels.
 Sesame Open Door Trading Platform Download Mobile Version Gateio Trading Platform Download Address
Feb 28, 2025 am 10:51 AM
It is crucial to choose a formal channel to download the app and ensure the safety of your account.
 How to solve the problem of 'Undefined array key 'sign'' error when calling Alipay EasySDK using PHP?
Mar 31, 2025 pm 11:51 PM
Problem Description When calling Alipay EasySDK using PHP, after filling in the parameters according to the official code, an error message was reported during operation: "Undefined...
 Download link of Ouyi iOS version installation package
Feb 21, 2025 pm 07:42 PM
Ouyi is a world-leading cryptocurrency exchange with its official iOS app that provides users with a convenient and secure digital asset management experience. Users can download the Ouyi iOS version installation package for free through the download link provided in this article, and enjoy the following main functions: Convenient trading platform: Users can easily buy and sell hundreds of cryptocurrencies on the Ouyi iOS app, including Bitcoin and Ethereum. and Dogecoin. Safe and reliable storage: Ouyi adopts advanced security technology to provide users with safe and reliable digital asset storage. 2FA, biometric authentication and other security measures ensure that user assets are not infringed. Real-time market data: Ouyi iOS app provides real-time market data and charts, allowing users to grasp encryption at any time
 Sesame Open Door Exchange App Official Download Sesame Open Door Exchange Official Download
Mar 04, 2025 pm 11:54 PM
The official download steps of the Sesame Open Exchange app cover the Android and iOS system download process, as well as common problems solutions, helping you download safely and quickly and enable convenient transactions of cryptocurrencies.
 gate.io sesame door download Chinese tutorial
Feb 28, 2025 am 10:54 AM
This article will guide you in detail how to access the official website of Gate.io, switch Chinese language, register or log in to your account, as well as optional mobile app download and use procedures, helping you easily get started with the Gate.io exchange. For more tutorials on using Gate.io in Chinese, please continue reading.
 Is there any mobile app that can convert XML into PDF?
Apr 02, 2025 pm 08:54 PM
An application that converts XML directly to PDF cannot be found because they are two fundamentally different formats. XML is used to store data, while PDF is used to display documents. To complete the transformation, you can use programming languages and libraries such as Python and ReportLab to parse XML data and generate PDF documents.


