Windows 11 won't shut down: 8 ways to fix it
Shut down your computer after use to perform routine tasks almost every day. Not only does this help save power, but it also gives your computer's components a much-needed rest to ensure their longevity and optimal performance.
It’s hard for any user to appreciate this critical feature of shutting down a PC properly; until the computer doesn’t shut down on command. If your system is also experiencing this particular problem, then you are at the right place.
If the problem is software-based, finding a solution is relatively quick and easy. Fortunately, there are some quick fixes you can use to resolve Windows 11 won’t shut down issues.
Why doesn’t my Windows 11 computer shut down?
There may be more than one reason why your Windows 11 computer isn't shutting down properly. There may be third-party software installed on the system that is preventing the shutdown, or a recently installed update may be causing the problem.
If you are on a mobile device, the machine's quick startup feature could also be the culprit behind it. As mentioned before, there are many possibilities.
While solving the problem is relatively easy, each solution requires a different approach on your part. Therefore, you may need to perform multiple solutions to fully resolve the issue.
Also, if you have just switched from a macOS device to a Windows device, please note that the physical power buttons are configured to do nothing even when you press them. If this is the case, this is a very quick and easy fix that only takes a few seconds.
How to fix Windows 11 won’t shut down?
1. Change Power Settings
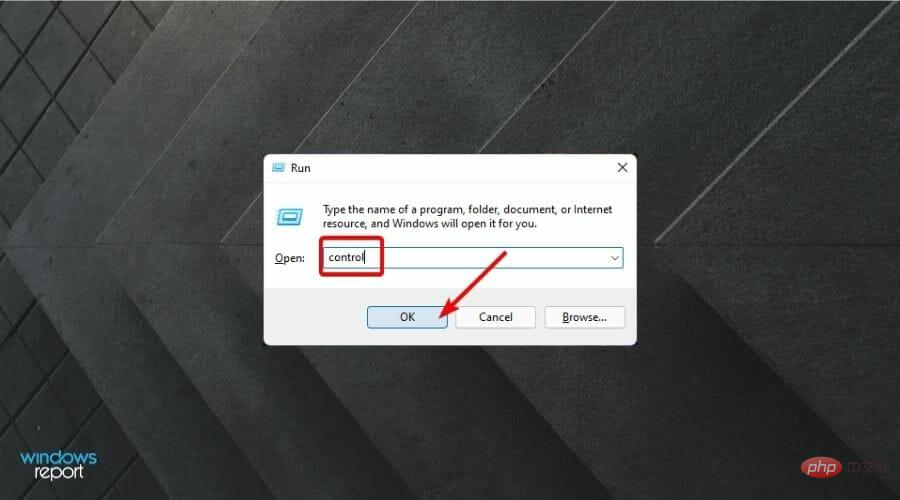
- First, press the shortcut on your keyboard to open the Run Command Utility. Next, type control and press the OK button to launch the control panel. WindowsR

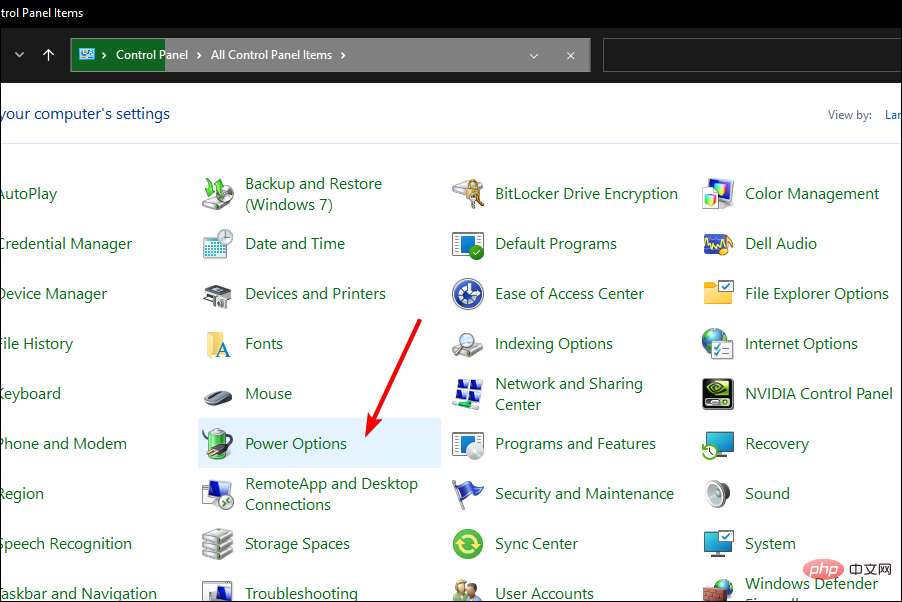
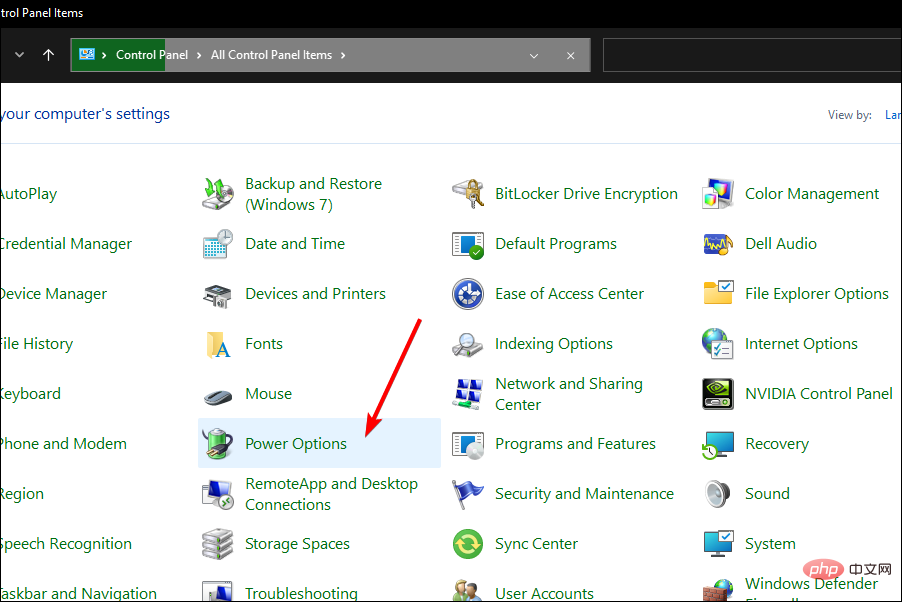
- Now, from the Control Panel window, click on the Power Options tile.

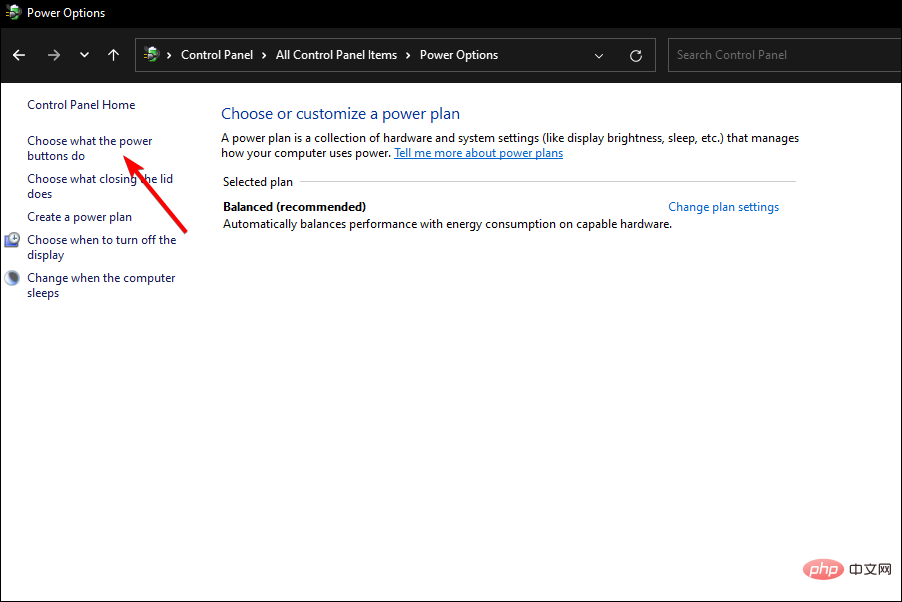
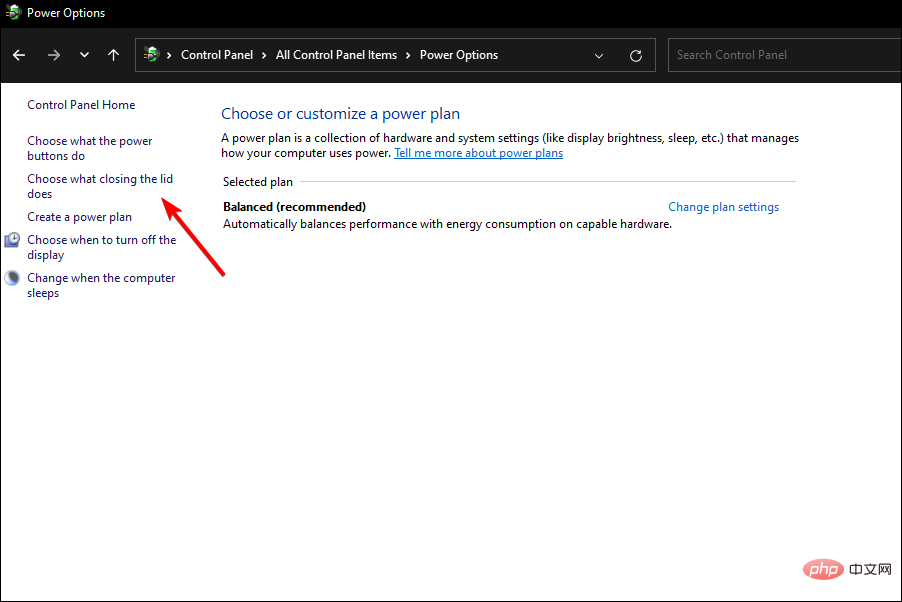
- After that, click the "Choose what the power buttons do" option in the upper left corner of the "Power Options" window.

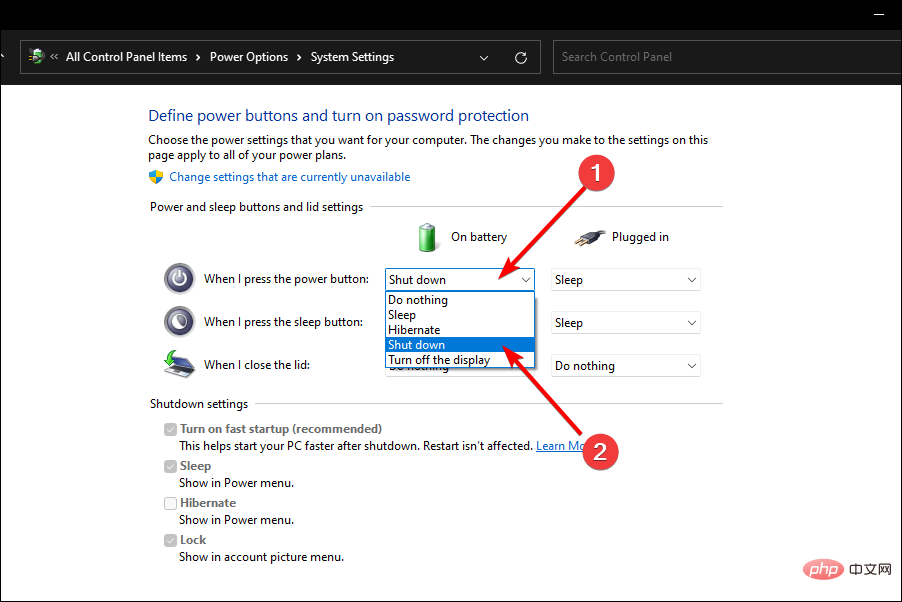
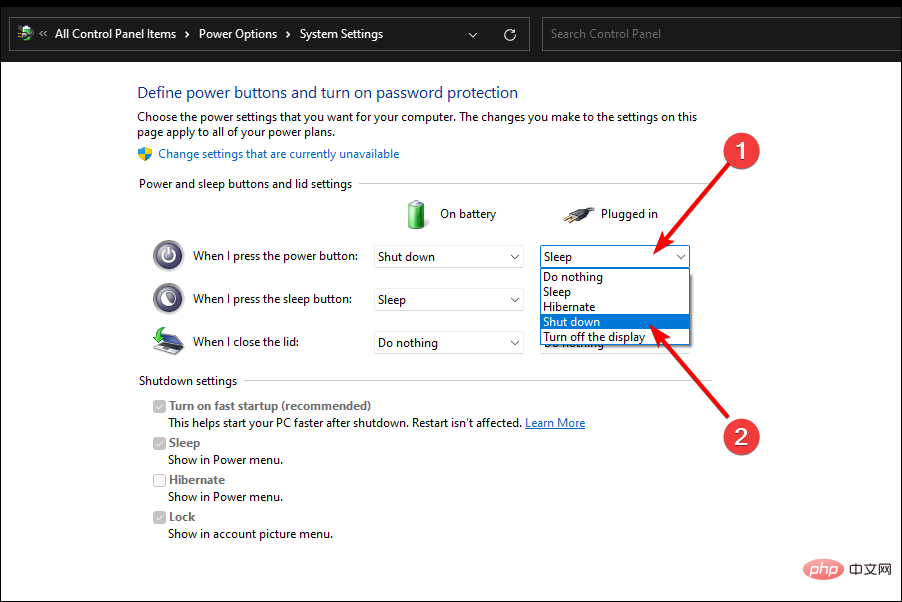
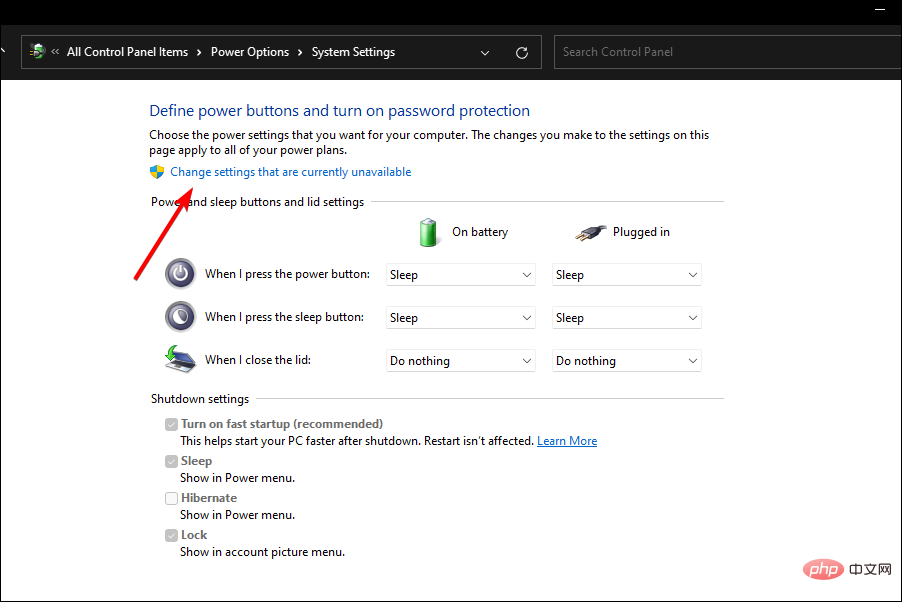
- Next, click the drop-down menu after the "When I press the power button" field and select the "Shutdown" option.

- Select the "Shutdown" option from the drop-down menu under the "Insert" column.

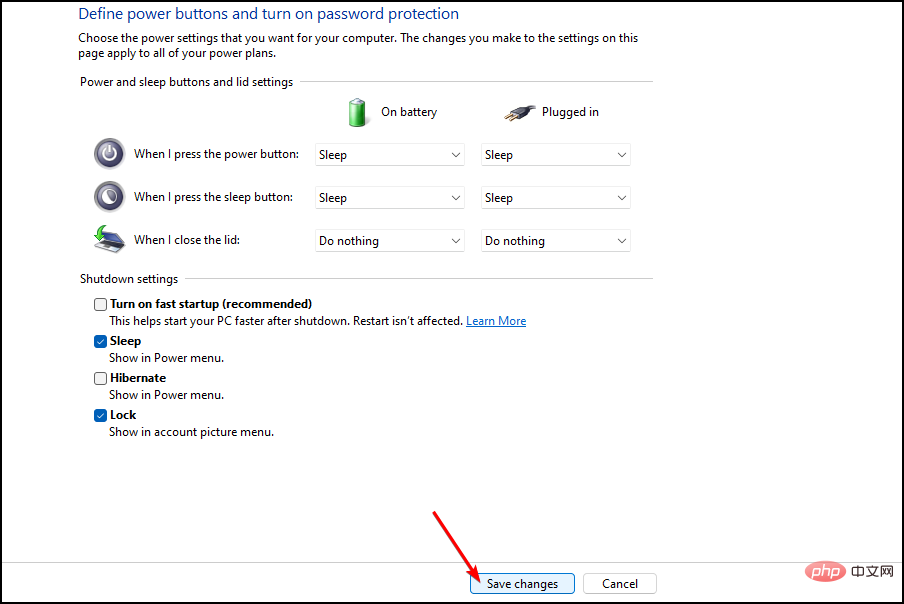
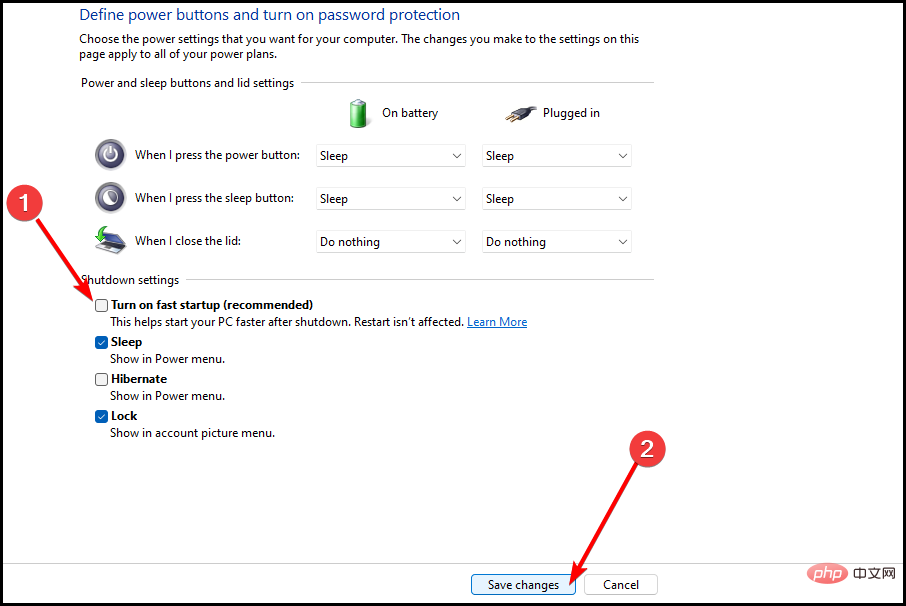
- Finally, click the "Save Changes" button to apply the settings.

Keep in mind that this setting only affects the physical power button on the device and has no effect on the Power menu in the device's Start menu.
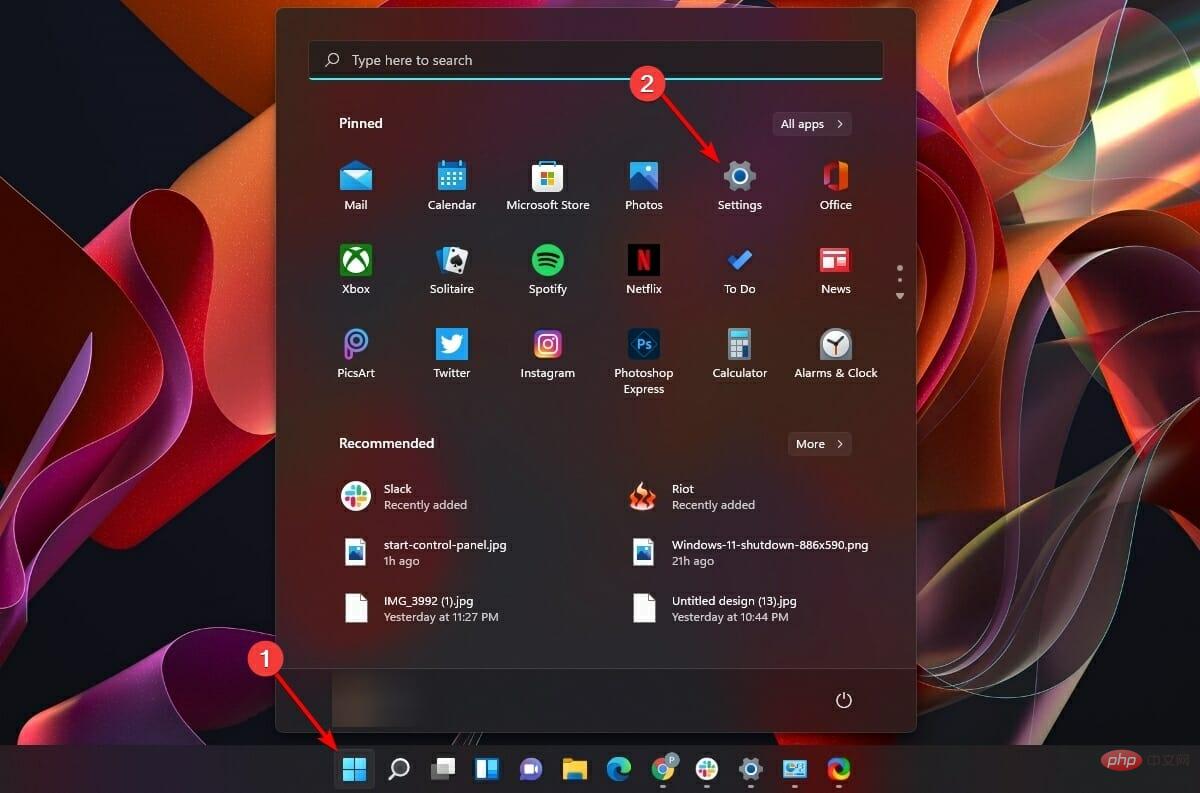
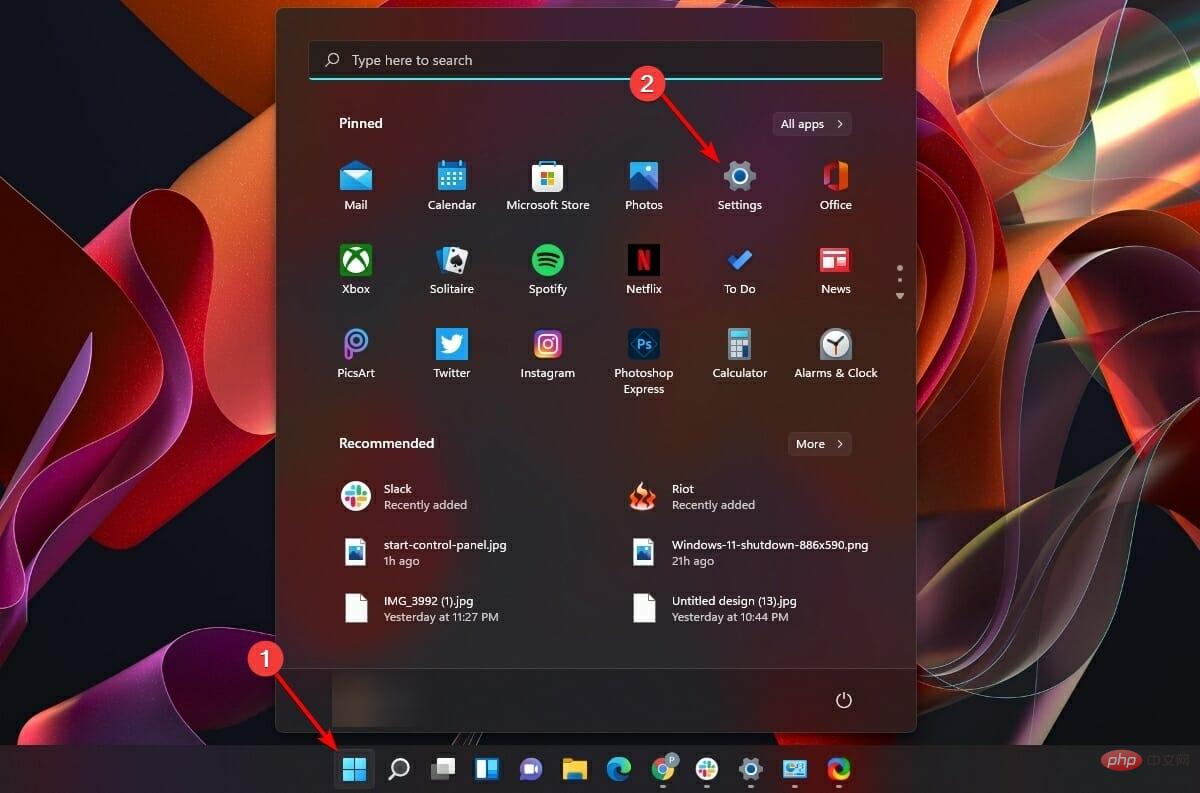
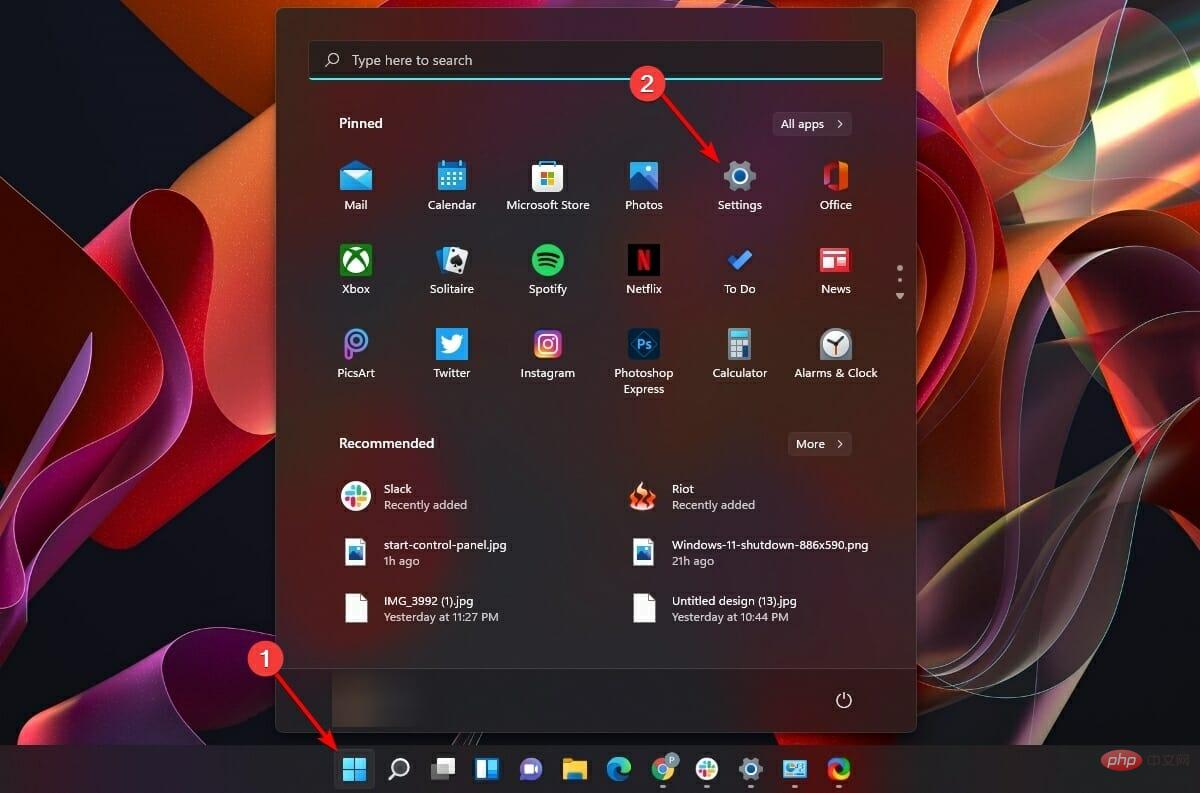
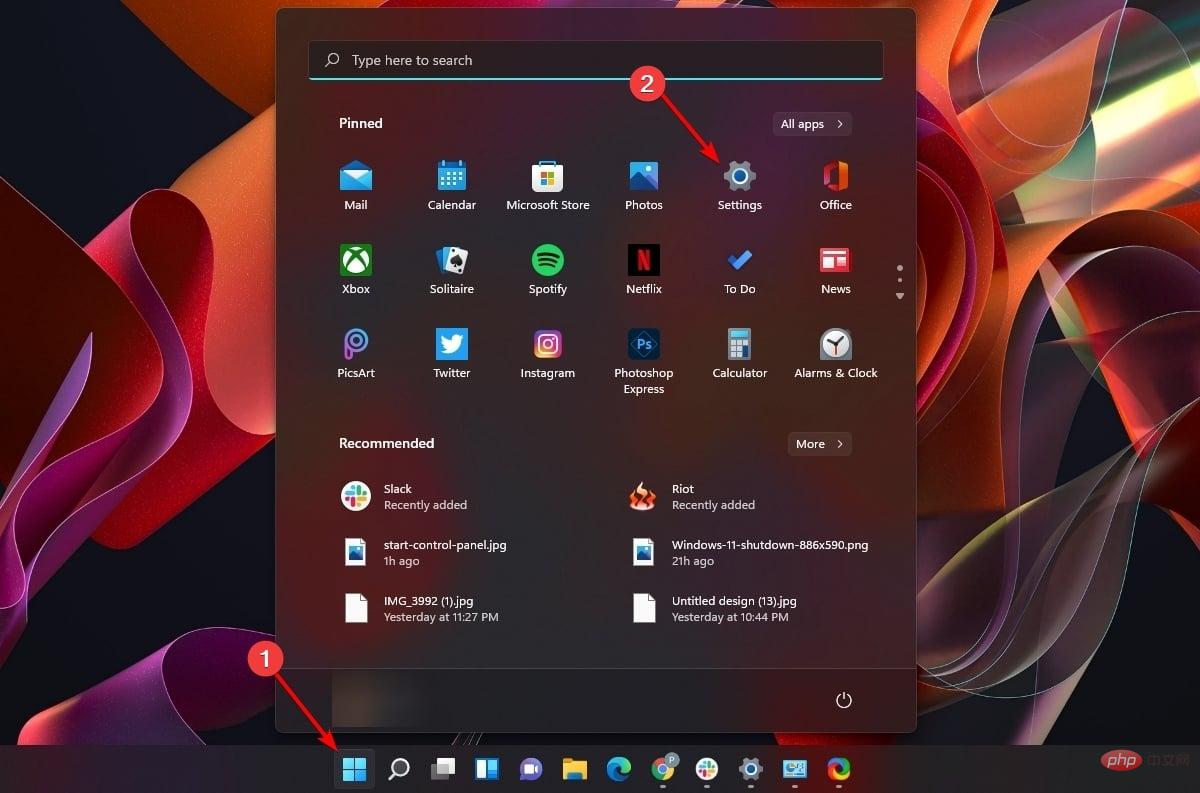
2. Roll back a recent Windows updateNote This method only works if you started noticing the issue after receiving an update recently. If the problem predates the update, this may not be the most efficient solution.- Click the Start menu icon on the taskbar. Next, click on the Settings option in the flyout.

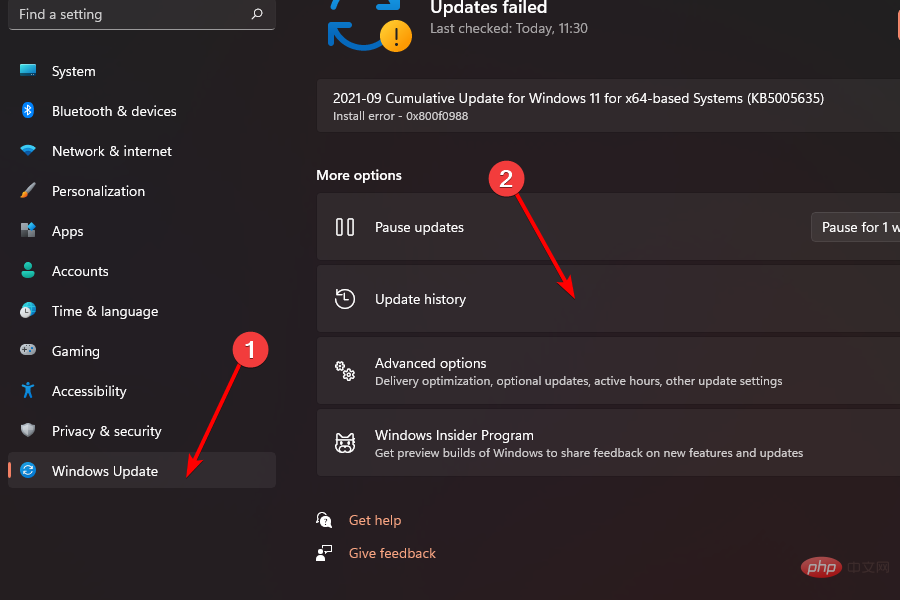
- After that, click the Windows Update tab in the left panel of the Settings window. Then, click the Update History tile on the right side of the window.

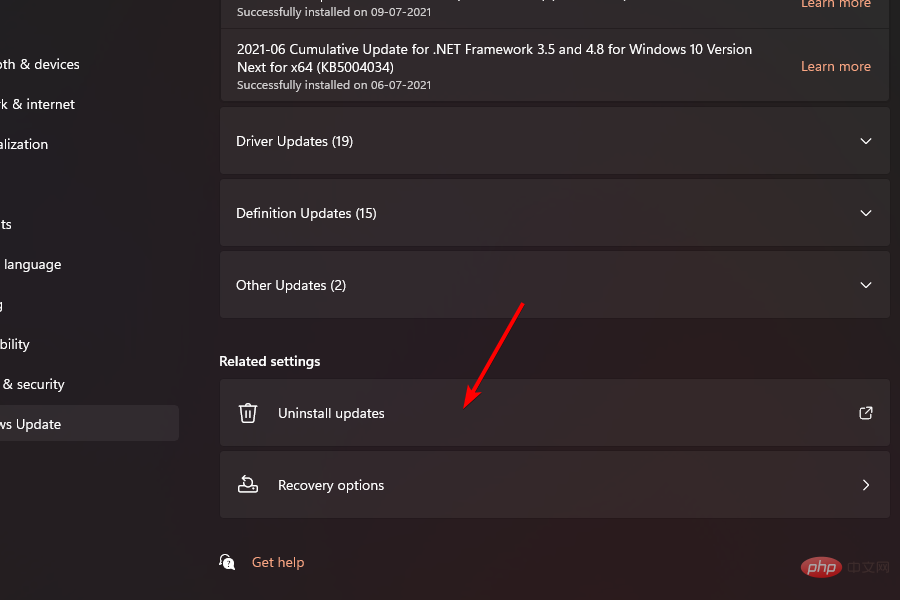
- Now, scroll down and click on the "Uninstall Updates" tile under the "Related Settings" section. This will open a separate window on your screen.

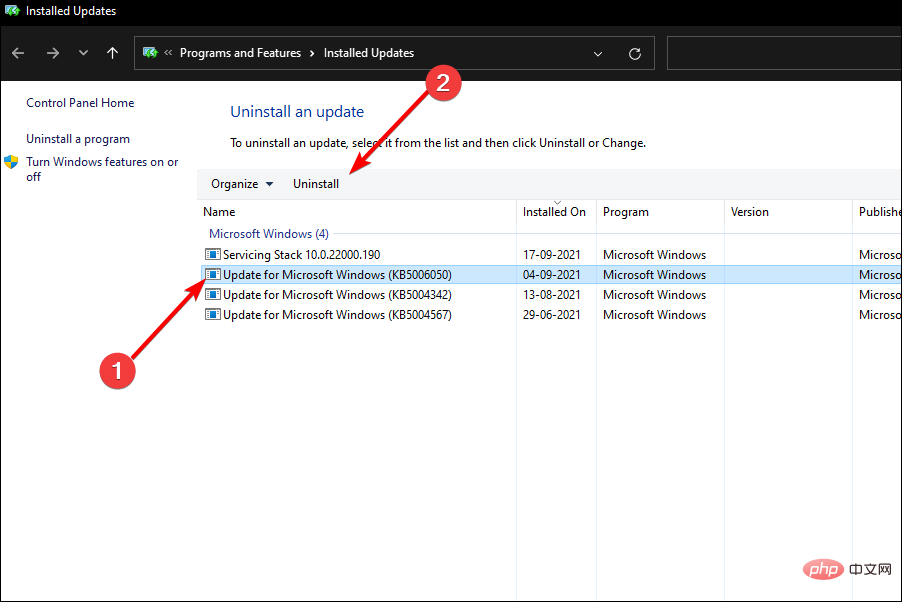
- In a separate window, click the recently installed update. Then, click the Uninstall button on the window.

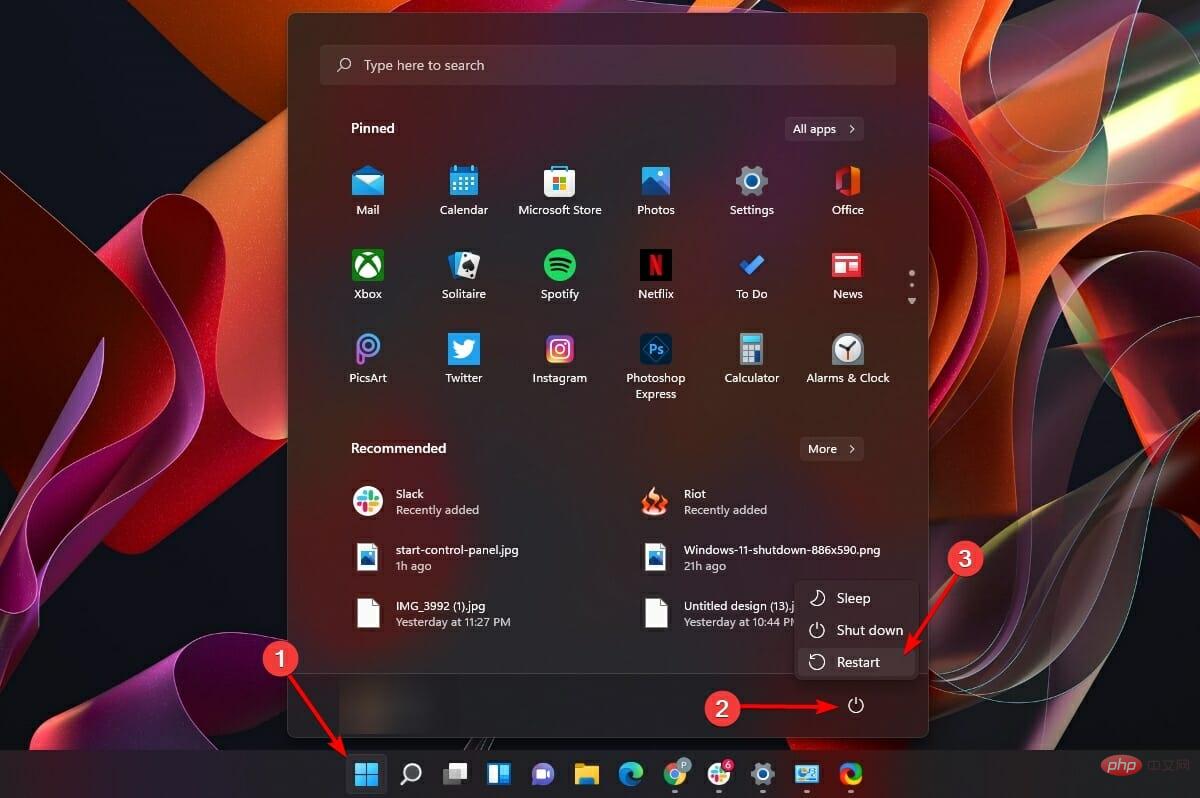
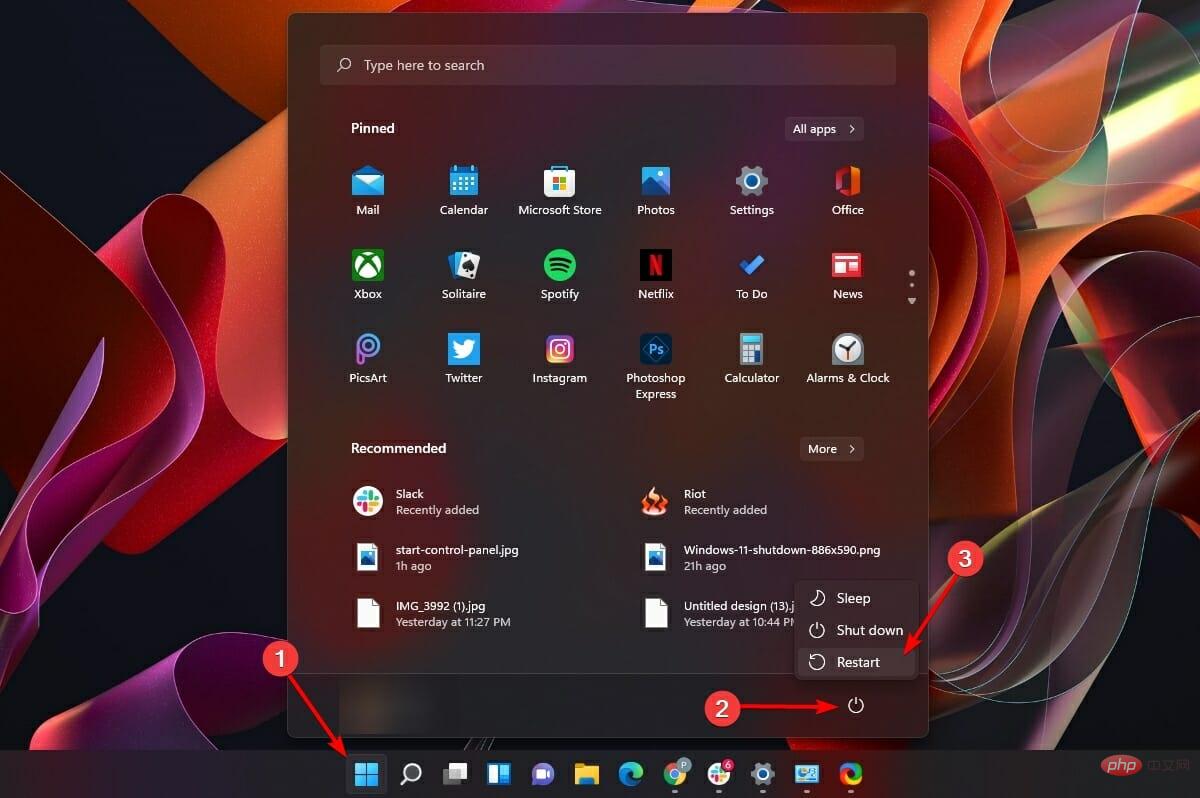
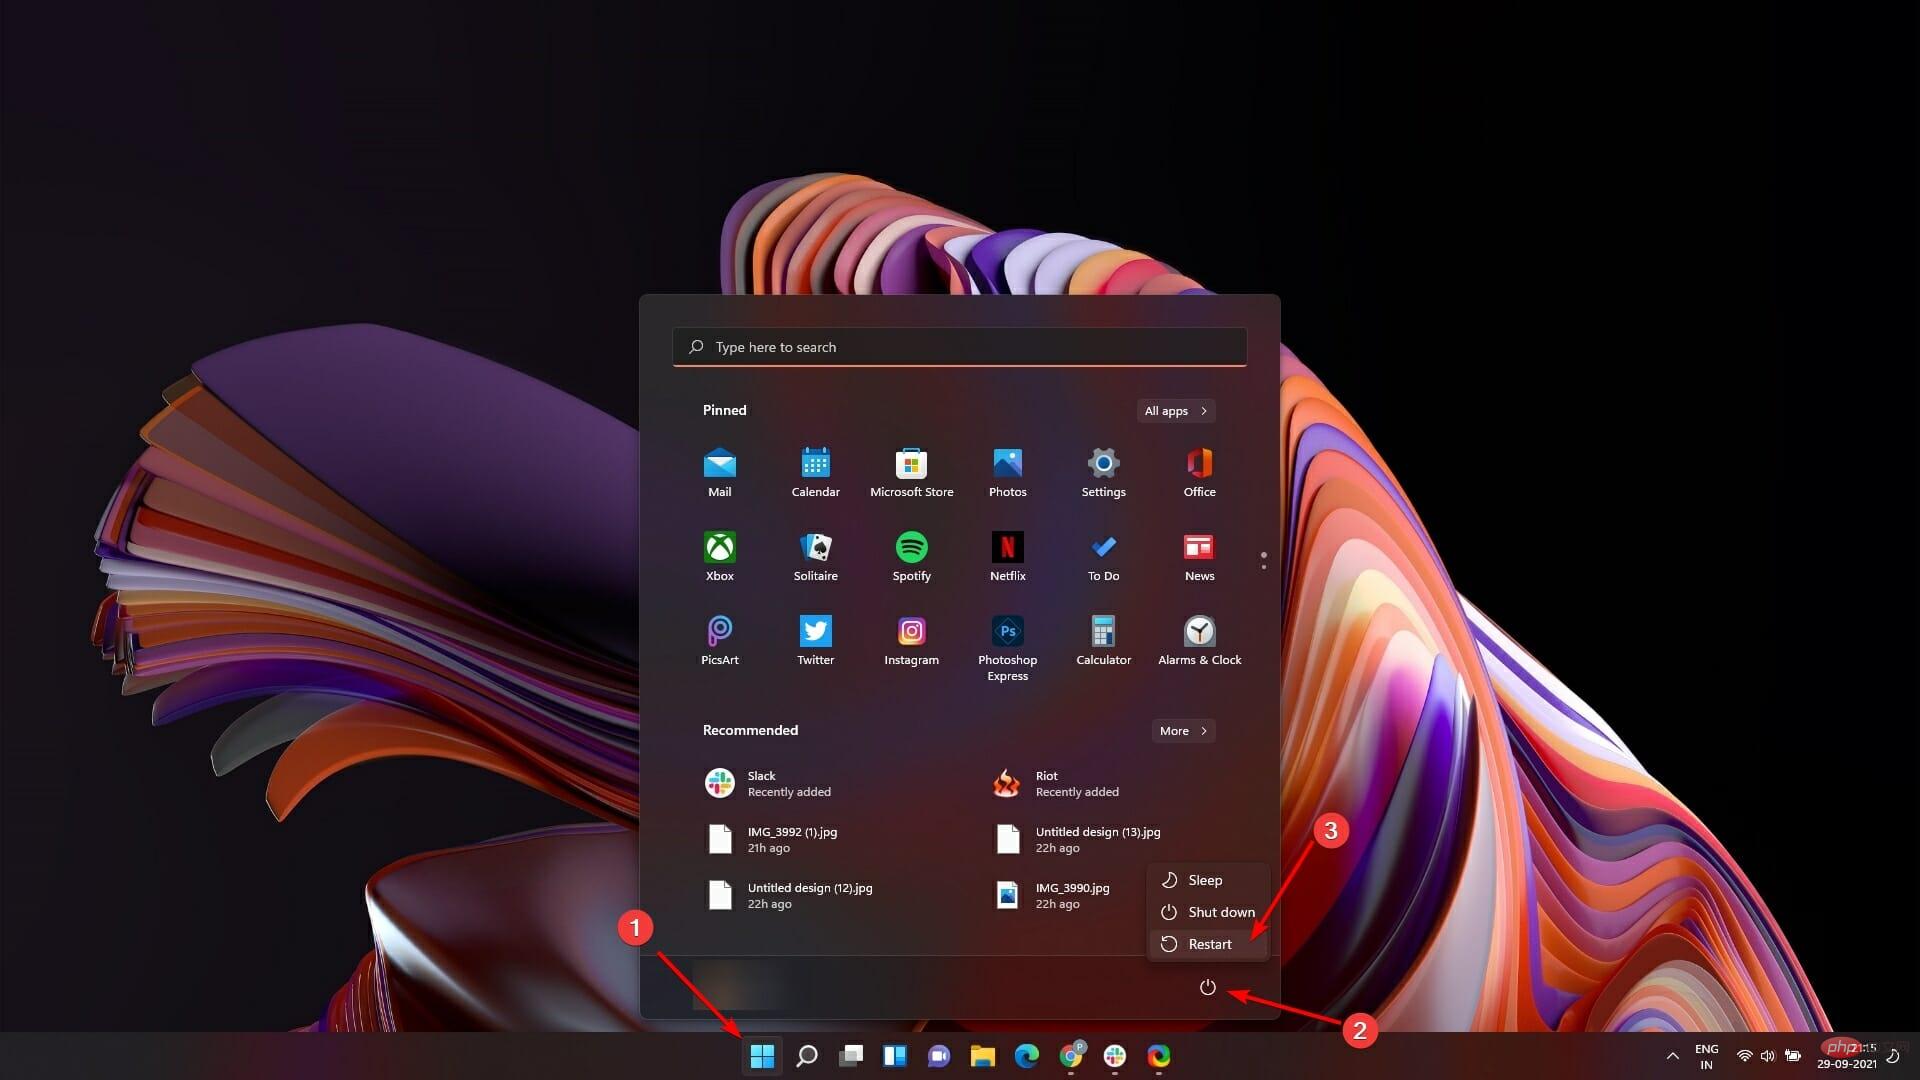
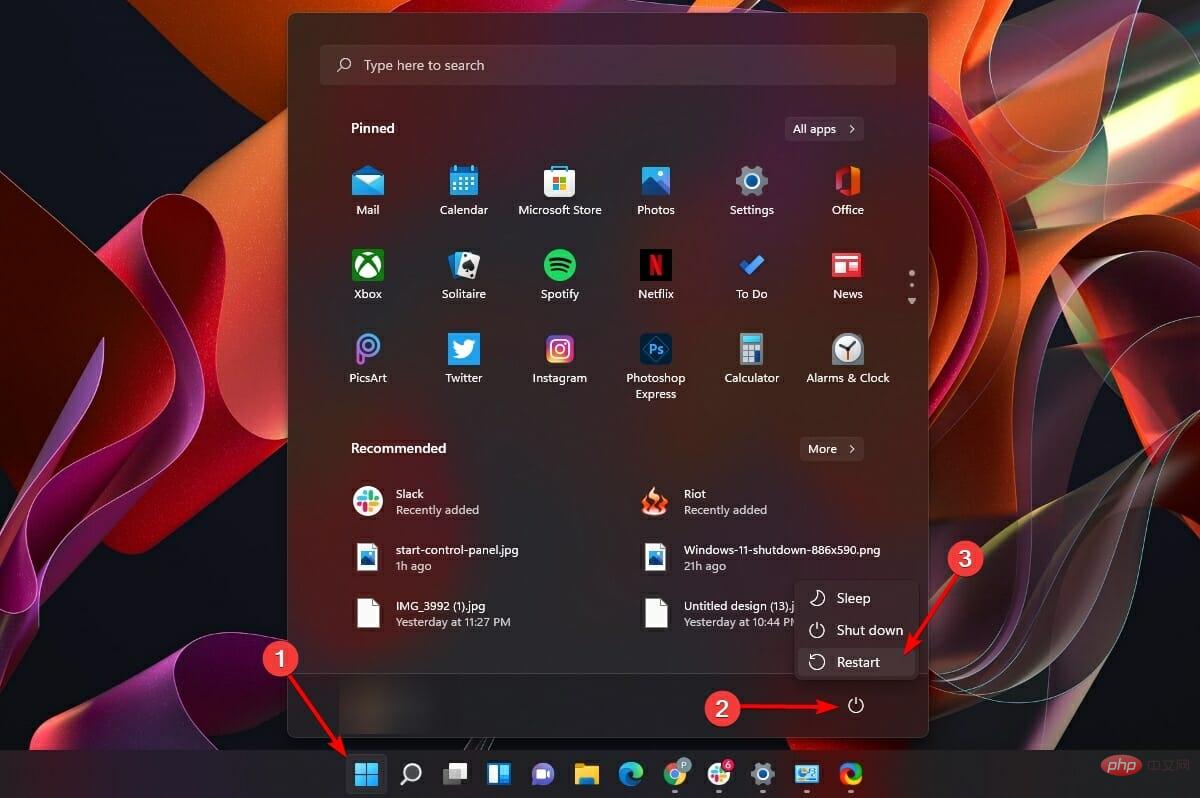
- After uninstalling, restart the computer from the Start Menu and then try shutting down the computer. Your issue should be resolved.

3. Disable the Quick Start feature
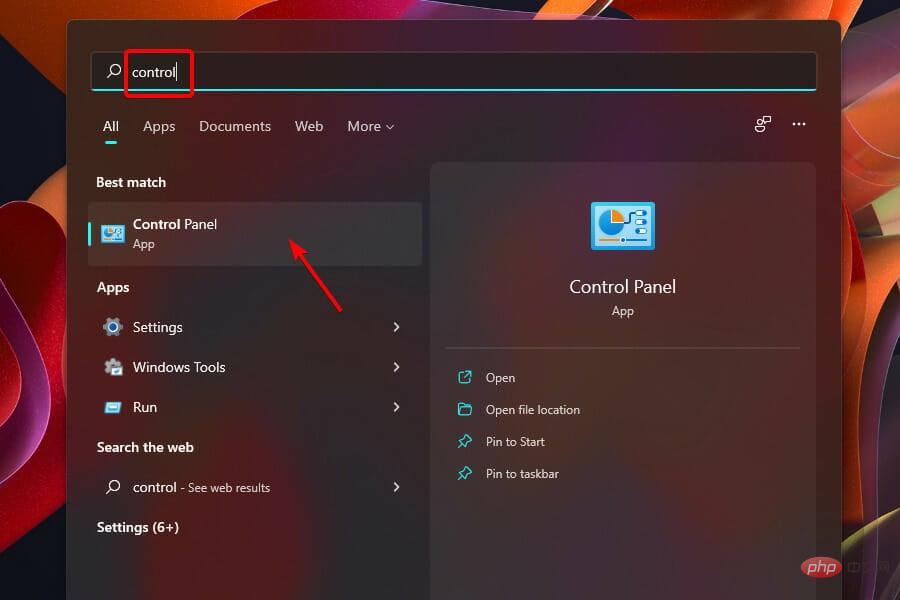
- Click the search icon that appears on your computer’s taskbar. Next, type "Control" in the search box and click the "Control Panel" tile in the search results to open "Control Panel".

- Next, click the Power Options tile in the options grid.

- After that, click Choose how the lid closes from the upper left corner of the window.

- Then, click on the Change settings that are currently unavailable option present on the page.

- Now, uncheck the "Turn on fast startup (recommended) " option under the "Shutdown Settings" section. Then, click on the "Save Changes" option to apply the settings.

- Finally, restart your computer from the Start Menu.

As the name suggests, the Fast Startup feature enables your computer to start up faster. However, sometimes it interferes and prevents the computer from shutting down properly.
If you have a desktop computer and notice that the fans and lights of certain components remain on even after shutting down, disabling the fast startup feature is definitely for you.
4. Run the Windows Update Troubleshooter
- To do this, click the Start menu icon on your computer's taskbar. Then, tap on the Settings option to launch the Settings app.

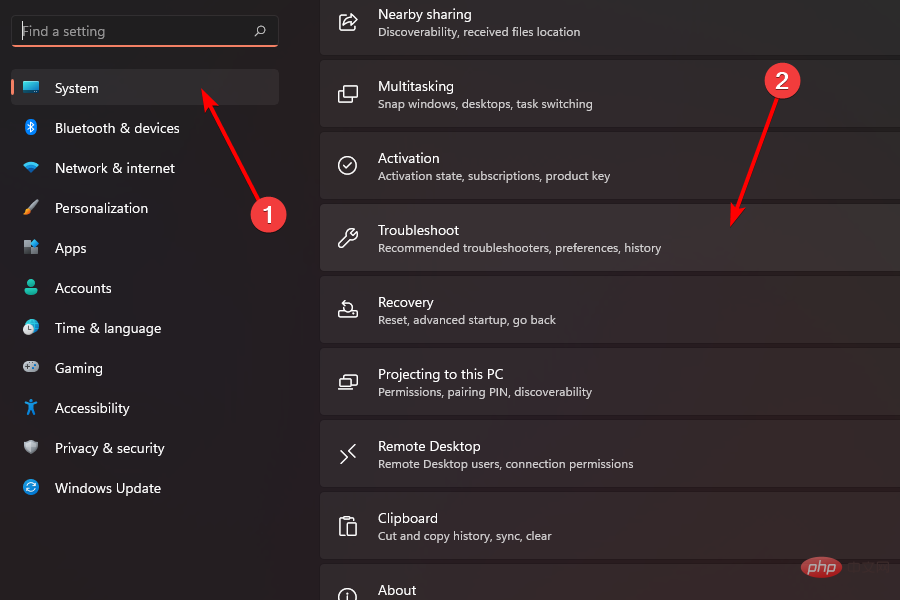
- Then, click the System tab on the left panel of the window. Next, click on the Troubleshooting tile on the right side of the window.

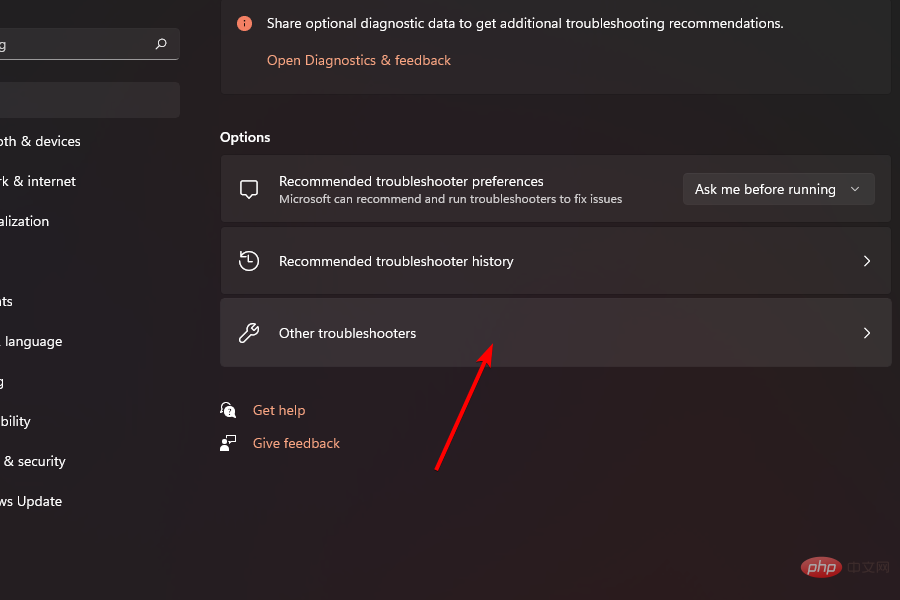
- After that, click the "Additional Troubleshooting" tile.

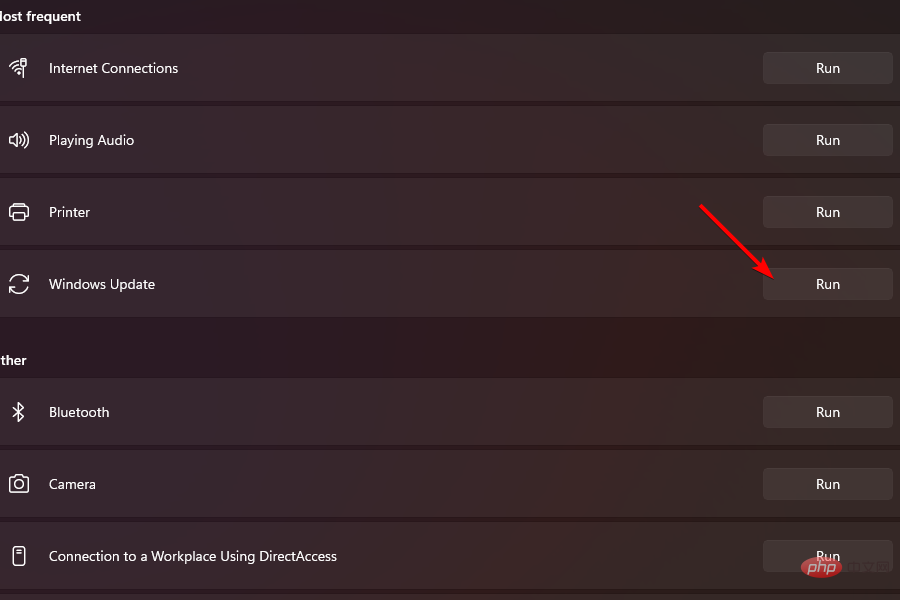
- Finally, find the Windows Update tile and click the Run button on it to run the troubleshooter. Then, take action to correct the problem when Windows recommends it.

The Windows Update Troubleshooter will effectively resolve the current issue if it is caused by an unusually behaving Windows Update client.
5. Run the SFC (System File Checker) command
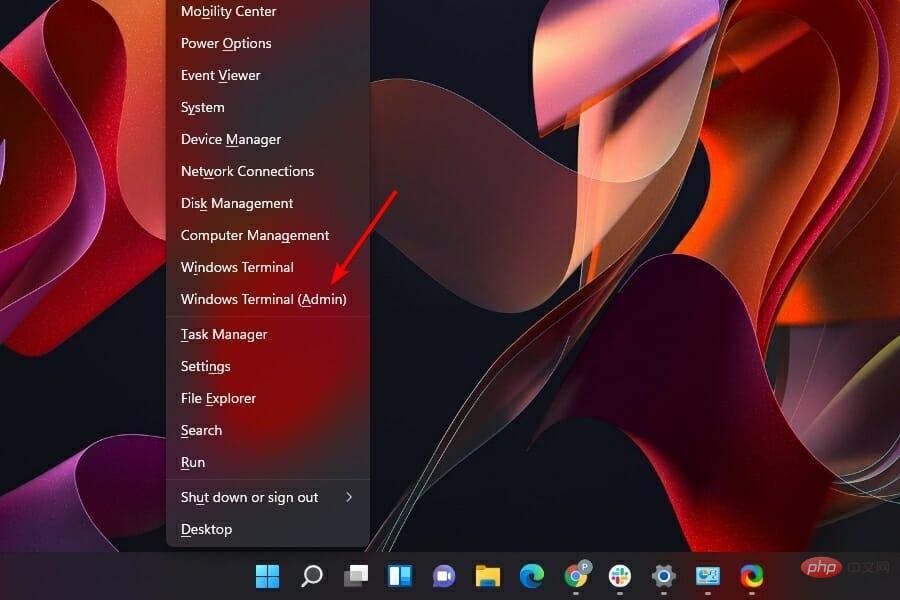
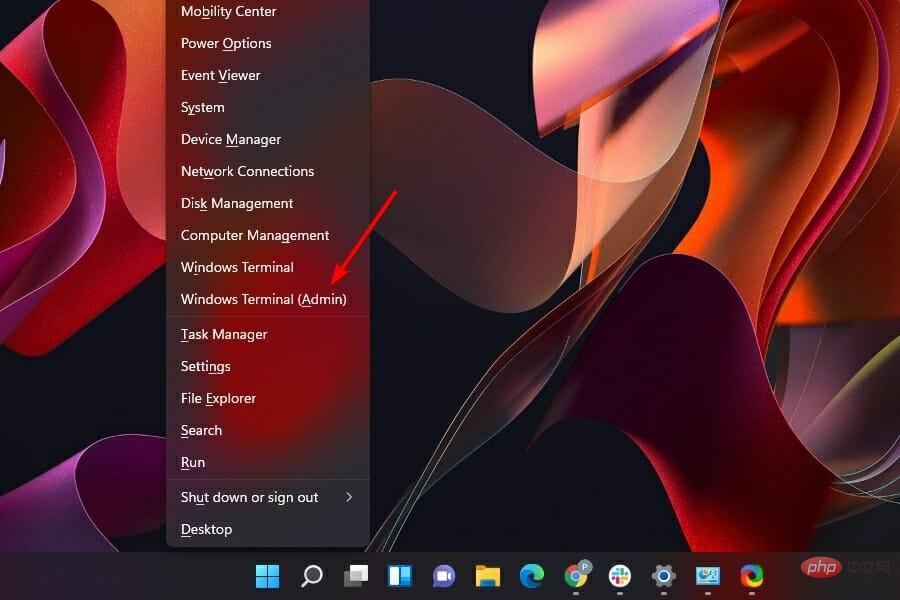
- Press shorcut on the keyboard. This will open a pop-up menu from the Start Menu icon. WindowsX
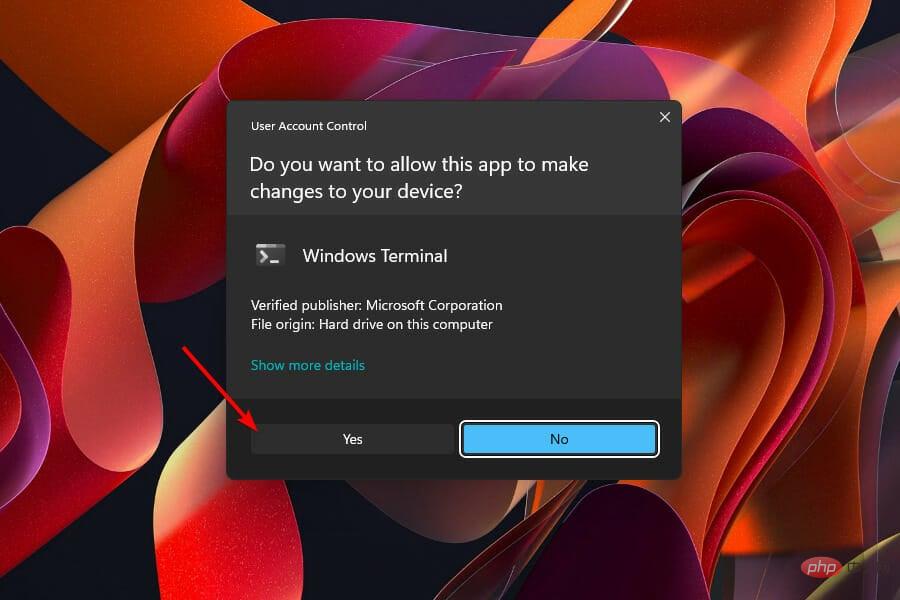
- Next, click on the Windows Terminal (Administrator) option present on the flyout. This will display the UAC window on the screen.

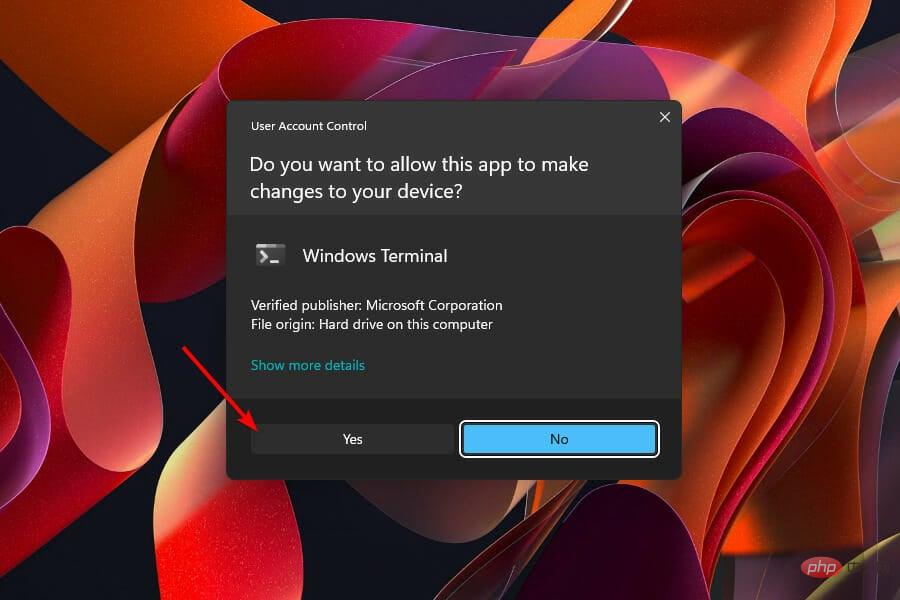
- Enter the credentials of the administrator account in the UAC (User Account Control) window in case you are not logged in from an administrator account. Otherwise, click the "is" button to launch Windows Terminal.

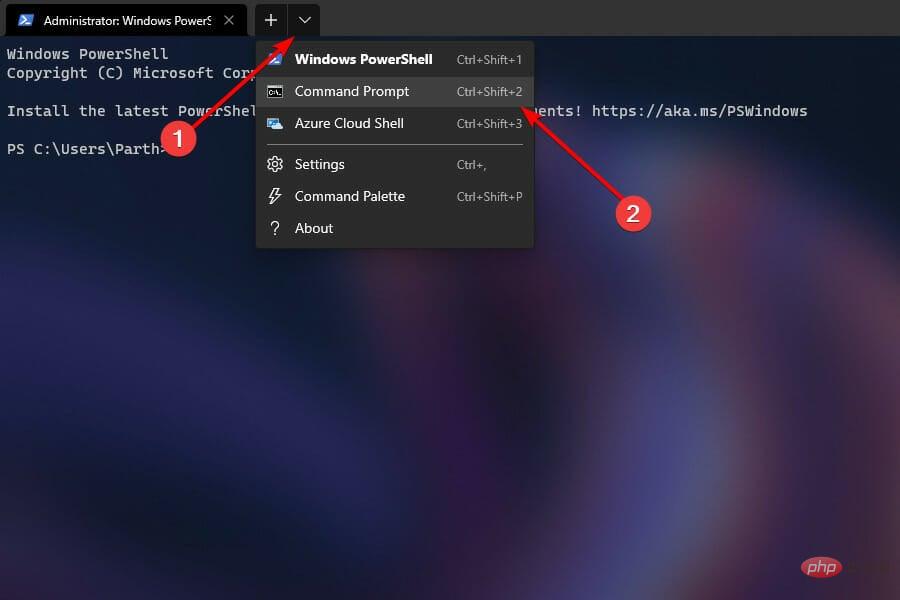
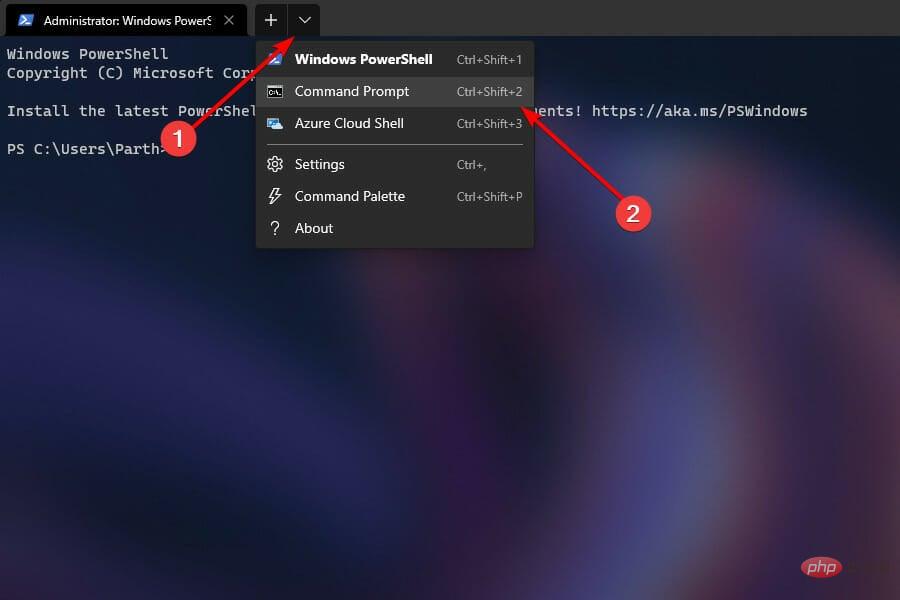
- Then, click on the carat icon (down arrow) and select the Command Prompt option. Alternatively, you can also press the shortcut to open an elevated Command Prompt tab. CtrlShift2

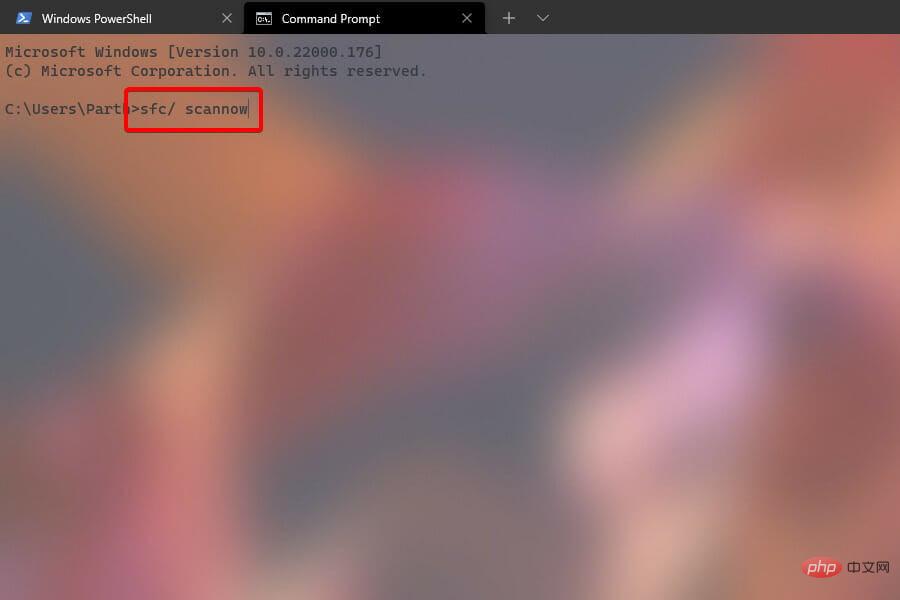
- Next, in the Command Prompt window, type or copy-paste the following command to run the system file Checker. The command may take a while to run, please wait for the process to complete.
<strong>sfc/ SCANNOW</strong>
- After the process is complete, you may receive one of the following messages:
- Windows Resource Protection did not find any integrity violations.
- Windows Resource Protection cannot perform the requested operation.
- Windows Resource Protection finds corrupt files and successfully repairs them. Details are contained in
<strong>CBS.Log %WinDir%\Logs\CBS\CBS.log</strong> - Windows Resource Protection found corrupted files but was unable to repair some of them . Details are contained in
<strong>CBS.Log %WinDir%\Logs\CBS\CBS.log</strong>
- If you receive the last message, you must manually find the corrupted file from the sfc file log and obtain a known good copy of the file from another system running the same version of Windows.
- Otherwise, please restart the computer from the Start Menu and check if the problem is resolved.

SFC Scanner will be able to detect and repair any corrupted and/or damaged system files. If you create a system restore point, you may encounter the same problem again.
Expert Tips:
Sponsored
Some PC problems are difficult to solve, especially when they involve a corrupted repository or When losing Windows files. If you are having trouble fixing errors, your system may be partially corrupted.
We recommend installing Restoro, a tool that will scan your machine and determine what the fault is.
Click here to download and start repairing.
You can use the DISM command to restore system installation files. To learn more, check out our ultimate guide on DISM commands.
6. Run the chkdsk command
- First, press the shortcut on your keyboard. This will open a flyout from the Start Menu icon. Next, click on the Windows Terminal (Administrator) option in the list. WindowsX
 Then, enter the administrator credentials in the UAC window, or if you are already logged in with an administrator user account, just click
 - "Yes" button.
 Next, in the Windows Terminal window, click the
 - karat icon (down arrow) and select the Command Prompt option.
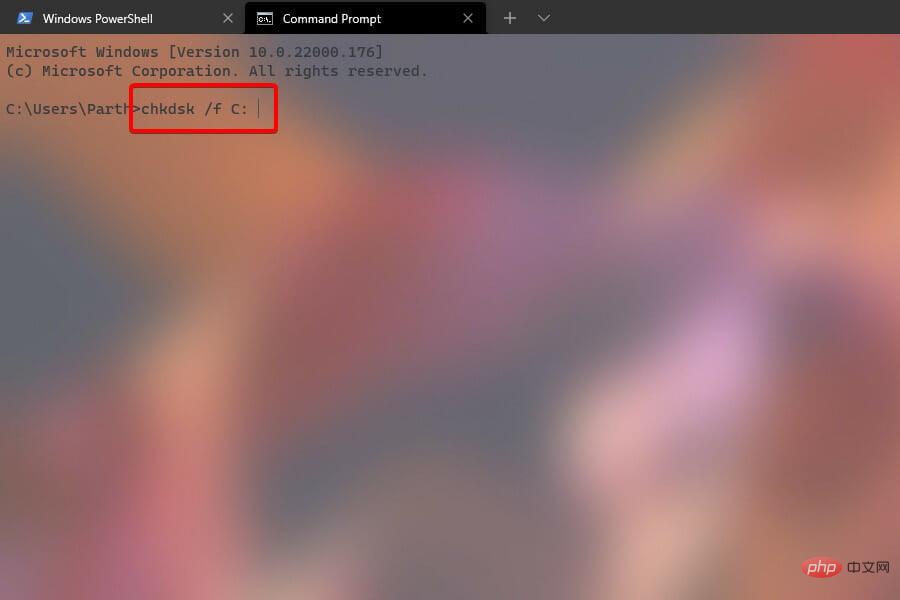
 After that, type or copy-paste the following command and click to run the scan:
 - Enter
chkdsk /f <strong>:<your windows installer drive letter></your></strong>
- Now, restart your system from the Start menu as chkdsk will scan and repair errors on the drive at startup.

chkdsk command will check the hard drive for any bad sectors and fix them before booting. After the computer starts, try shutting it down to see if it fixes the problem.
7. Run System Restore
- To run System Restore, click the Start menu icon on the taskbar and select " Setting Options. Alternatively, press the shortcut on your keyboard to launch the application. WindowsI
 After that, click on the
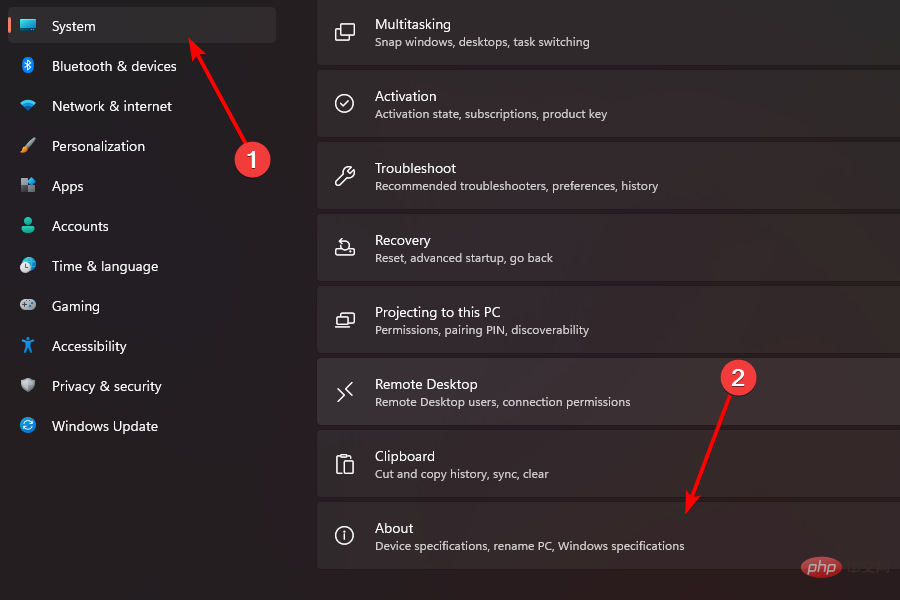
 - System tab on the left panel of the screen. Next, click on the "About" tile in the right portion of the window.
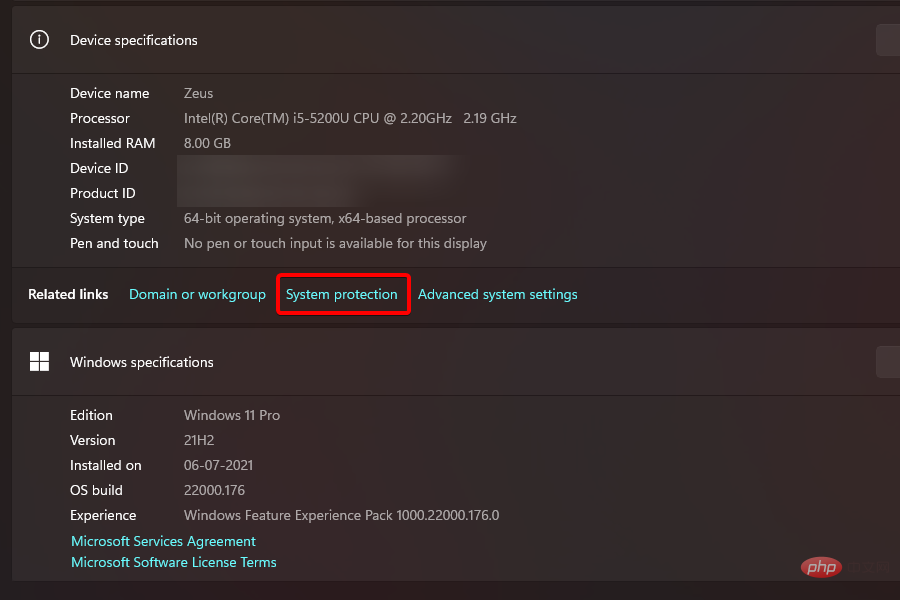
 Now, click on the
 - "System Protection" option in the "Related Links" section. This will open a separate window on your screen.
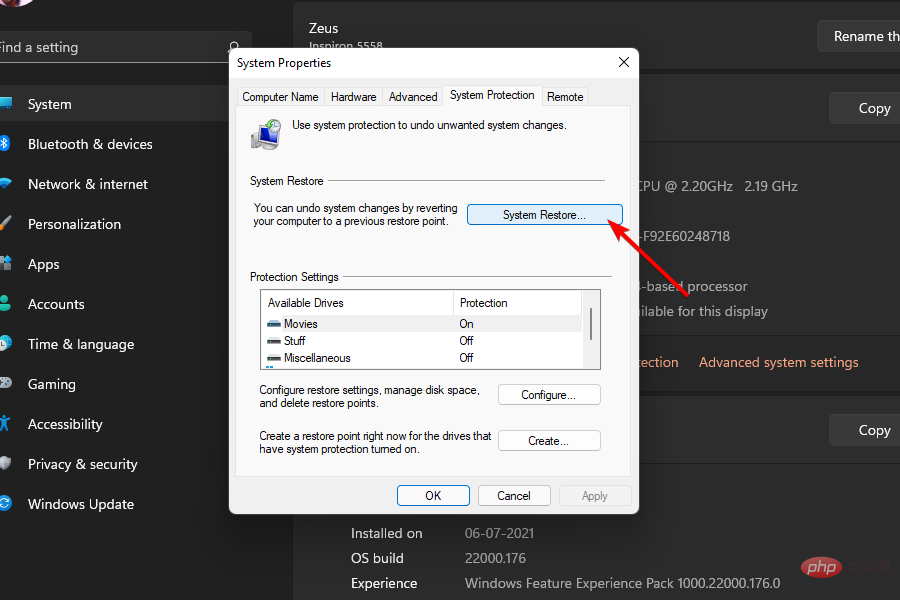
 In the window that opens, click the "
 - System Restore" option.
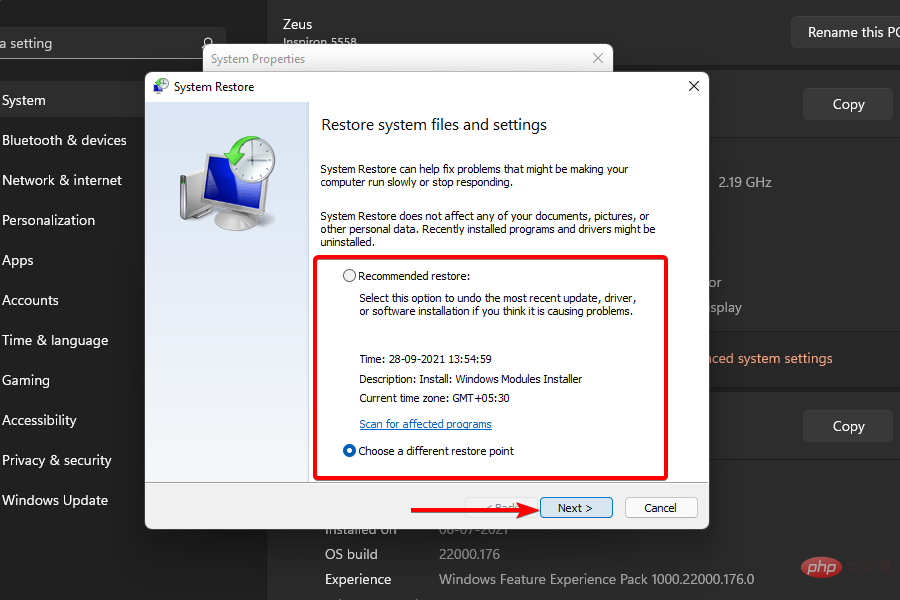
 Next, select the
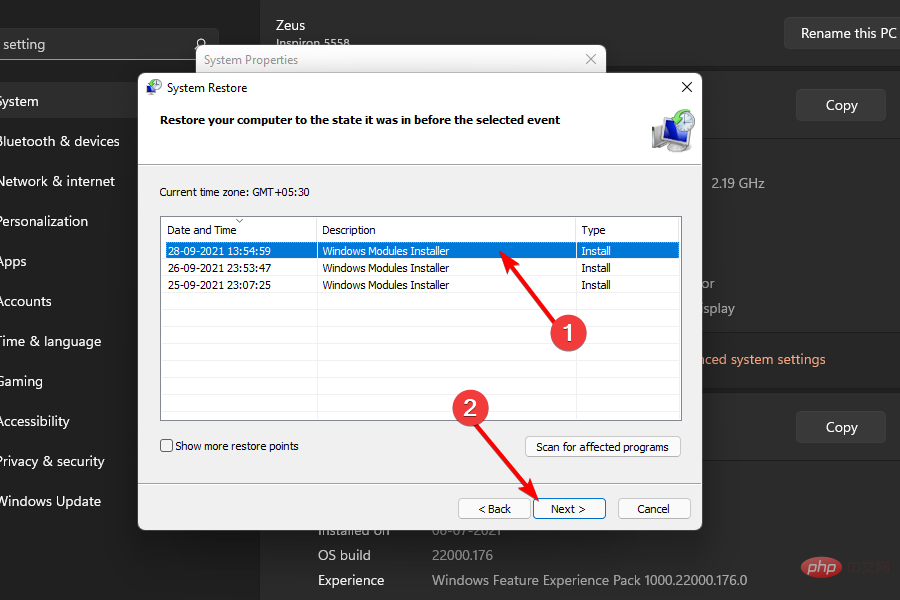
 - "Recommended Restore" option by clicking the radio button in front of the Undo latest changes option. Otherwise, select the "Select a different restore point" option to manually select the point to which you want to roll back your system. Then, click the "Next" button to continue.
 If you choose to manually select a restore point, click to select the restore point required for your system, and then click the "
 - Next" button.
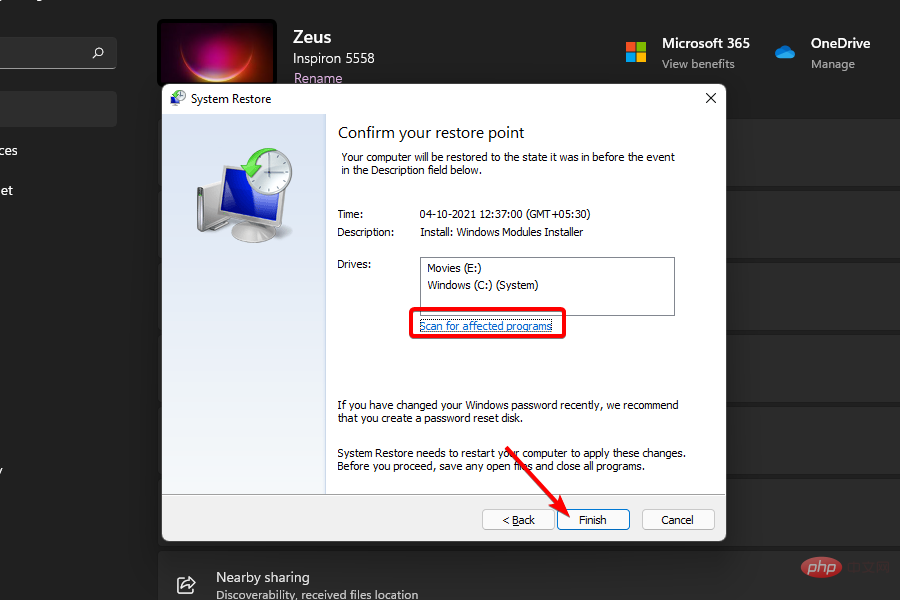
 On the next screen, Windows will display the drives that will be affected by System Restore. To see the complete list of affected programs, click on the Scan for affected programs option. Finally, to restore your system, click the
 - "Finish" button to start the process.

- First, launch the
-
Settings app from the Start menu on your Windows 11 computer.
 Next, click the
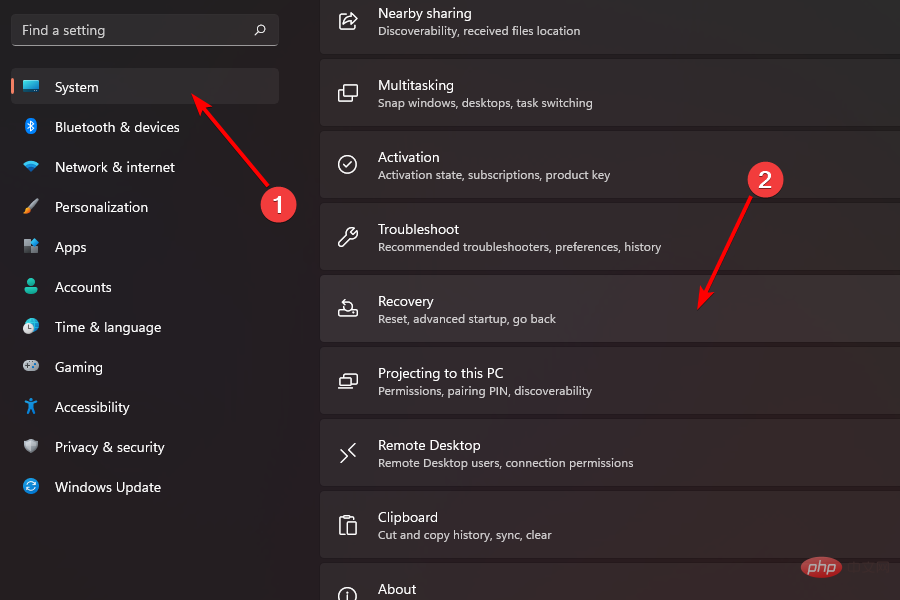
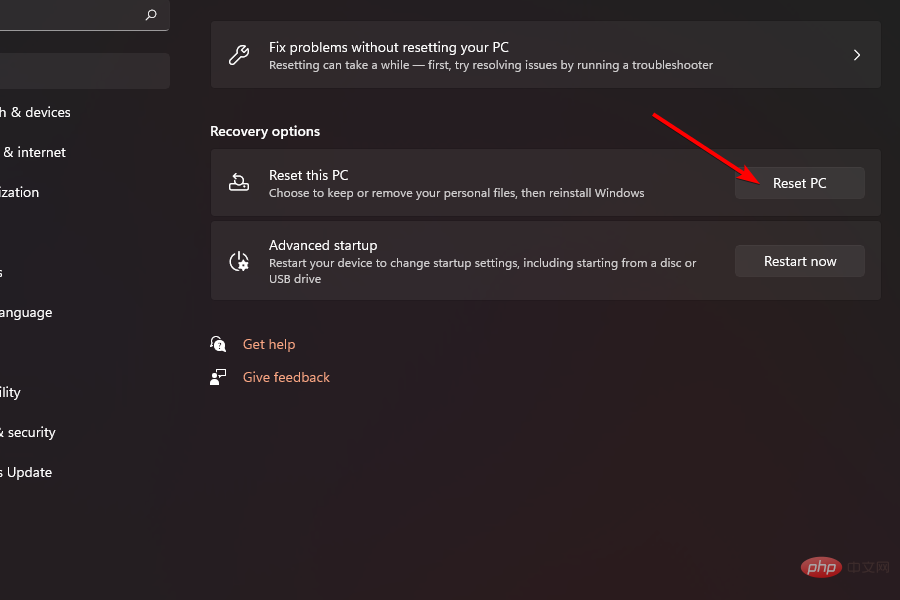
 - System tab in the left panel of the window, then click the Recovery tile on the right side of the Settings window.
 After that, click the
 - "Reset PC" button under the "Recovery Options" section. This action will open a separate window on the screen.
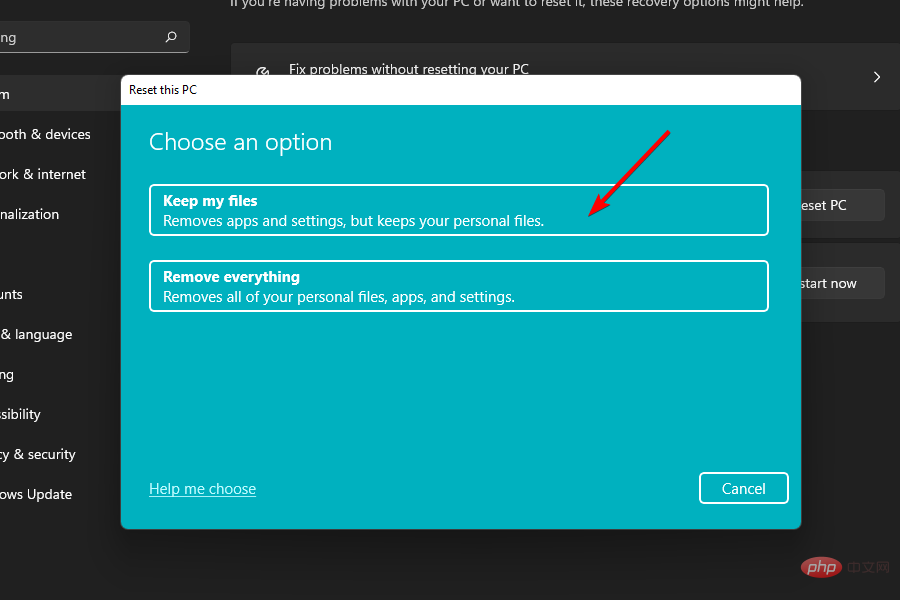
 Then, to continue enjoying your personal files as is and reset only the system settings and applications, select the
 - Keep everything option. Otherwise, click on the "Delete everything" option.
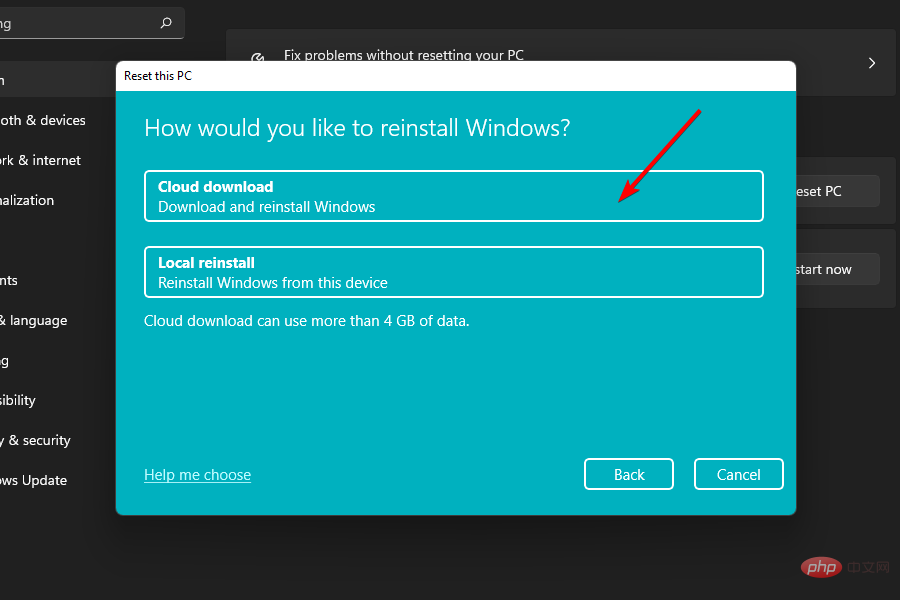
 Now, to reinstall system files, Windows can download them from Microsoft servers or use files that exist locally on the system. Select your preferred option by clicking on it.
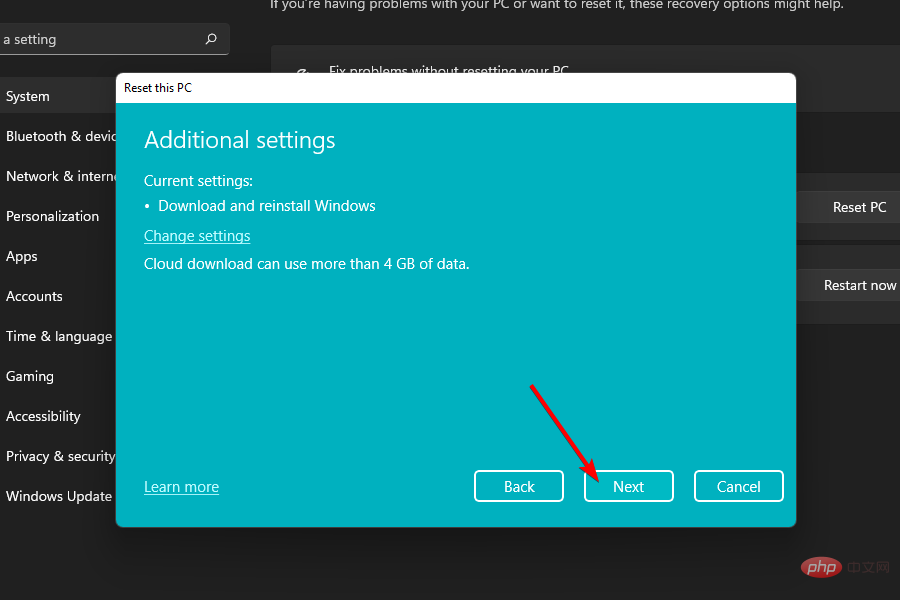
  On the next screen, Windows will list the current settings for resetting your PC. To continue, click the
 - Next button on the window.
 Finally, click the
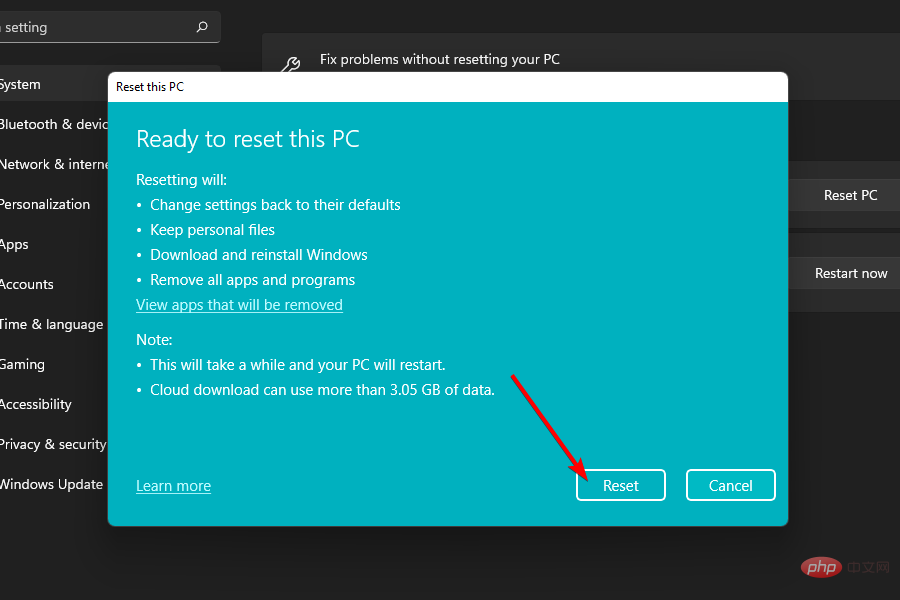
 - Reset button to reset your computer. Keep in mind that your machine may restart several times during this process, this is normal behavior when resetting.

With extended use, the physical components of your computer may limit its performance to control the amount of heat they expel, which directly affects performance and in turn makes your computer appear laggy unnecessarily.
In addition, such use may also affect the service life of components, and they may Will be sent out earlier than expected.
Therefore, it is not recommended at all to never shut down your PC to keep your system healthy both physically and logically.
How do I force shut down my Windows 11 computer?
First, on a laptop, hold down the physical power switch for 5 seconds or more and it will immediately shut down the PC. While this is true on a traditional desktop computer, you can also remove power by unplugging it.
However, shutting down in this manner is not recommended at all, as it does not allow the computer to prepare for shutdown and may corrupt or damage system files, and may also result in the loss of any unsaved data.
It's definitely a bit concerning that the computer won't shut down. Although using the solutions listed here, you will definitely be able to restore the functionality.
The above is the detailed content of Windows 11 won't shut down: 8 ways to fix it. For more information, please follow other related articles on the PHP Chinese website!

Hot AI Tools

Undresser.AI Undress
AI-powered app for creating realistic nude photos

AI Clothes Remover
Online AI tool for removing clothes from photos.

Undress AI Tool
Undress images for free

Clothoff.io
AI clothes remover

Video Face Swap
Swap faces in any video effortlessly with our completely free AI face swap tool!

Hot Article

Hot Tools

Notepad++7.3.1
Easy-to-use and free code editor

SublimeText3 Chinese version
Chinese version, very easy to use

Zend Studio 13.0.1
Powerful PHP integrated development environment

Dreamweaver CS6
Visual web development tools

SublimeText3 Mac version
God-level code editing software (SublimeText3)

Hot Topics
 FSP showcases its new 2500W Cannon Pro power supply and U700-B chassis, which can control four RTX 4090 graphics cards at the same time
Jun 10, 2024 pm 09:13 PM
News from this site on June 8 FSP displayed a variety of PC accessories at Computex 2024 Taipei International Computer Show, including PC cases of various sizes, new air-cooled and liquid-cooled radiators, and a variety of new power supplies. ▲Picture source: Wccftech FSP is showing off its new CannonPro2500W power supply this year, which has been upgraded to ATX3.1 and Gen5.1 standards and has passed 80PLUS230VEU Platinum certification. This power supply is equipped with four PCIe12V-2x6 connectors and can power four RTX4090 graphics cards at the same time. In addition, FSP also launched a new MEGATI series power supply, which adopts 80PLUS platinum design, complies with ATX3.1 standard, has a rated power of 1650W, and is equipped with
 CUDA's universal matrix multiplication: from entry to proficiency!
Mar 25, 2024 pm 12:30 PM
General Matrix Multiplication (GEMM) is a vital part of many applications and algorithms, and is also one of the important indicators for evaluating computer hardware performance. In-depth research and optimization of the implementation of GEMM can help us better understand high-performance computing and the relationship between software and hardware systems. In computer science, effective optimization of GEMM can increase computing speed and save resources, which is crucial to improving the overall performance of a computer system. An in-depth understanding of the working principle and optimization method of GEMM will help us better utilize the potential of modern computing hardware and provide more efficient solutions for various complex computing tasks. By optimizing the performance of GEMM
 Huawei's Qiankun ADS3.0 intelligent driving system will be launched in August and will be launched on Xiangjie S9 for the first time
Jul 30, 2024 pm 02:17 PM
On July 29, at the roll-off ceremony of AITO Wenjie's 400,000th new car, Yu Chengdong, Huawei's Managing Director, Chairman of Terminal BG, and Chairman of Smart Car Solutions BU, attended and delivered a speech and announced that Wenjie series models will be launched this year In August, Huawei Qiankun ADS 3.0 version was launched, and it is planned to successively push upgrades from August to September. The Xiangjie S9, which will be released on August 6, will debut Huawei’s ADS3.0 intelligent driving system. With the assistance of lidar, Huawei Qiankun ADS3.0 version will greatly improve its intelligent driving capabilities, have end-to-end integrated capabilities, and adopt a new end-to-end architecture of GOD (general obstacle identification)/PDP (predictive decision-making and control) , providing the NCA function of smart driving from parking space to parking space, and upgrading CAS3.0
 Assassin 4 is upgraded again, Kyushu Fengshen releases Assassin 4 VC LCD air-cooled radiator and other new products
Jun 12, 2024 pm 09:39 PM
This site reported on June 5 that Kyushu Fengshen released the enhanced version of the Assassin 4 flagship air-cooled radiator Assassin 4VLCD at the 2024 Taipei International Computer Show. Assassin 4VCLCD maintains the basic structure of the original Assassin 4 dual towers, dual fans and 7 heat pipes, and upgrades the traditional copper base to a VC vapor chamber, which significantly improves the thermal conductivity efficiency and further increases the heat dissipation capacity from 280W to 300W. At the same time, Assassin 4VCLCD is equipped with a top-cover LCD screen that can display CPU status parameters in real time. As for other tower air-cooled radiators, Kyushu Fengshen has launched a digital display PRO version for its AK400/620 products. The new product has a larger screen area, can display more data at the same time, and supports color imaging that can detect system health in real time.
 Always new! Huawei Mate60 series upgrades to HarmonyOS 4.2: AI cloud enhancement, Xiaoyi Dialect is so easy to use
Jun 02, 2024 pm 02:58 PM
On April 11, Huawei officially announced the HarmonyOS 4.2 100-machine upgrade plan for the first time. This time, more than 180 devices will participate in the upgrade, covering mobile phones, tablets, watches, headphones, smart screens and other devices. In the past month, with the steady progress of the HarmonyOS4.2 100-machine upgrade plan, many popular models including Huawei Pocket2, Huawei MateX5 series, nova12 series, Huawei Pura series, etc. have also started to upgrade and adapt, which means that there will be More Huawei model users can enjoy the common and often new experience brought by HarmonyOS. Judging from user feedback, the experience of Huawei Mate60 series models has improved in all aspects after upgrading HarmonyOS4.2. Especially Huawei M
 Which version of Apple 16 system is the best?
Mar 08, 2024 pm 05:16 PM
The best version of the Apple 16 system is iOS16.1.4. The best version of the iOS16 system may vary from person to person. The additions and improvements in daily use experience have also been praised by many users. Which version of the Apple 16 system is the best? Answer: iOS16.1.4 The best version of the iOS 16 system may vary from person to person. According to public information, iOS16, launched in 2022, is considered a very stable and performant version, and users are quite satisfied with its overall experience. In addition, the addition of new features and improvements in daily use experience in iOS16 have also been well received by many users. Especially in terms of updated battery life, signal performance and heating control, user feedback has been relatively positive. However, considering iPhone14
 Corsair RMx series ATX 3.1 gold medal full-module power supply launched in China: 750W, 850W, 1000W optional, starting from 999 yuan
Jul 25, 2024 am 01:39 AM
According to news from this site on July 24, Corsair announced that the RMx series ATX3.1 gold medal full-module power supply will be launched in China today, offering three power models with prices starting at 999 yuan. RM750x: 999 yuan RM850x: 1099 yuan RM1000x: 1399 yuan According to reports, Corsair’s new RMx series power supply has passed the Cybernetics Gold Certification. The 750W model has obtained A+ noise certification, the 850W has obtained Class A noise certification, and the 1000W model has obtained A-noise certification. In addition, this series of power supplies adopts the Intel ATX3.1 standard, supports the PCIe5.1 platform, and natively supports the 12V-2x6 cable used by RTX40 series graphics cards. In terms of internal materials, Corsair RMx series power supplies use
 ADATA XPG FUSION 1600W ATX 3.0 titanium power supply is on sale: supports dual-channel RTX 4090, 4999 yuan
Mar 11, 2024 pm 04:50 PM
According to news from this site on March 11, the national version of ADATA XPGFUSION1600W titanium power supply has been put on JD.com. This power supply is compatible with ATX3.0 and PCIe5.0 standards, supports dual-channel RTX4090 graphics cards, and sells for 4,999 yuan. According to reports, the XPGFUSION1600W titanium full module power supply is a product jointly developed by ADATA and Delta Electronics. It has 80PLUS titanium and Cybenetics titanium certification. The overall size of the power supply is 210x150x86mm, with a built-in 135mm fan, dual ball bearings, and a rotation speed of 2700±10 %RPM, supports XPGPRIME management software parameter adjustment. In terms of interface, this power supply is equipped with a 24Pin motherboard power supply.


