Logitech G Hub not working in Windows 11? Fix now
Logitech G Hub is software that allows users to manage their Logitech peripherals. The software is compatible with Windows 11.
However, some users have reported that Logitech G Hub does not work for them in Windows 11.
Our readers have reported that when they try to launch the software, it gets stuck loading. Therefore, they cannot use the software when it does not open for them.
Have you also tried to fix Logitech G Hub not working in Windows 11? If so, here are potential solutions that might launch Logitech G Hub.
Why is Logitech G Hub not working in Windows 11?
Logitech G Hub may not run for the same reason that many other software packages fail to launch in Windows 11.
The software may have corrupted or missing files. In this case, reinstalling the Logitech G Hub would be a possible solution.
Faulty or outdated device drivers on your PC could be another potential factor why Logitech G Hub is not working in Windows 11. Therefore, you may need to update some device drivers on your PC to resolve this issue.
Logitech G Hub software also has a LGHUB updater service. This service needs to be enabled and running to open the software.
So, disabled LGHUB updater service is another potential reason why Logitech G Hub is not working.
How to fix Logitech G Hub not working in Windows 11?
1. Update Windows 11
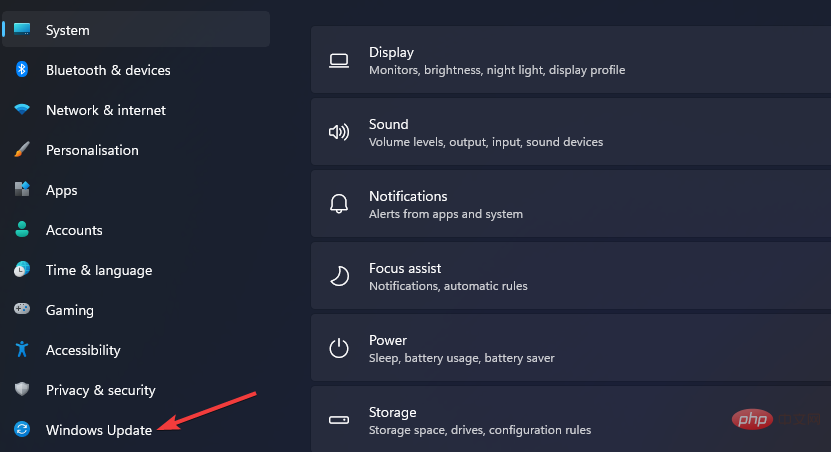
- Simultaneously press the Windows I keyboard keys to launch the "Settings" app program.
- Select the Windows Update tab.

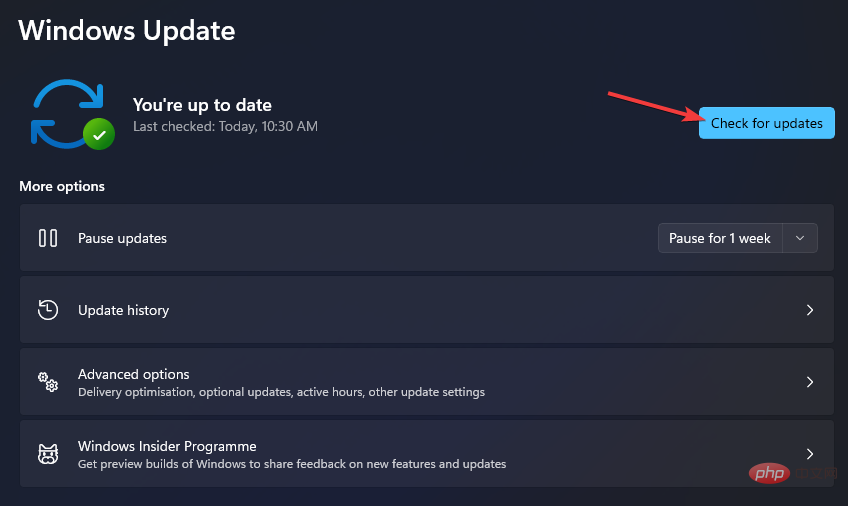
- Click Check for Updates to download and install any available content.

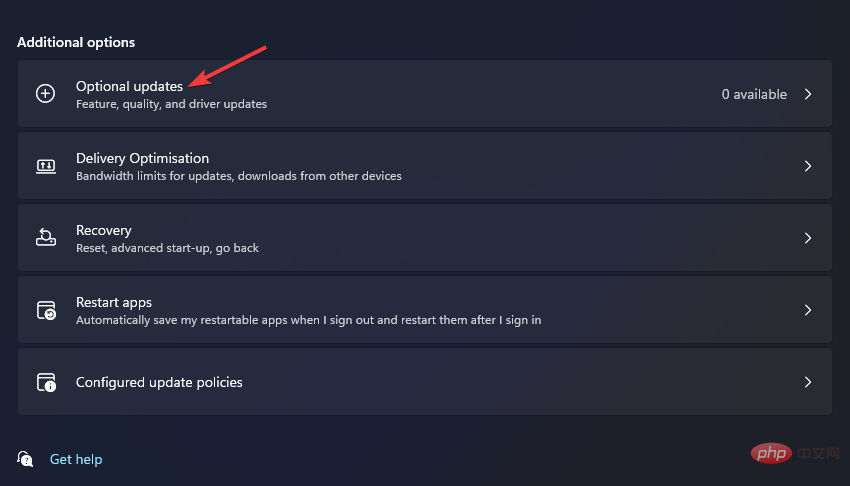
- Select Advanced Options, then select Optional Updates in Settings.

- Then select the checkbox for any optional driver updates and click the Download and Install button.
2. Run Logitech G Hub as administrator
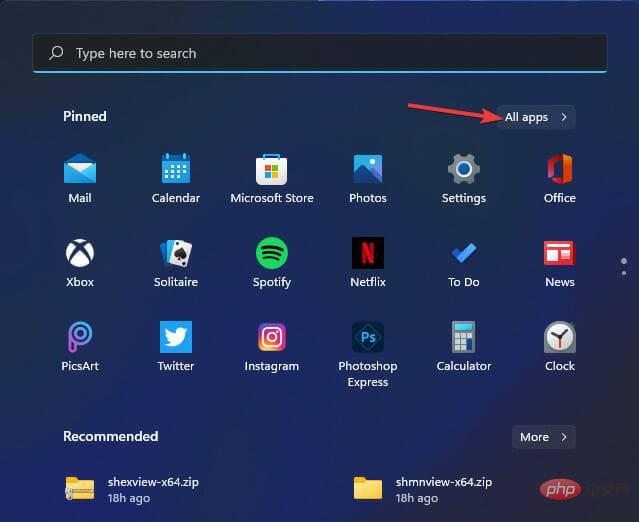
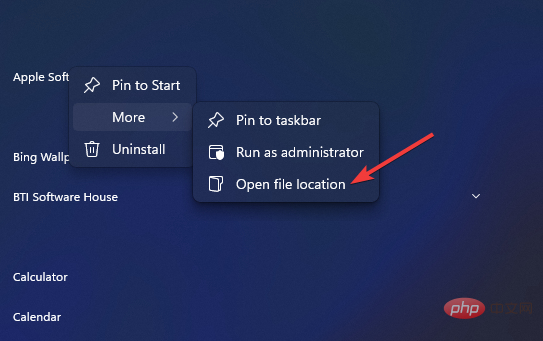
- Click Start on the taskbar and selectAll Apps on the menu .
 Right-click the
 - Logitech G Hub software on the Start menu, select More, and then select Open file location.
 Then right-click on the lghub.exe file to select its
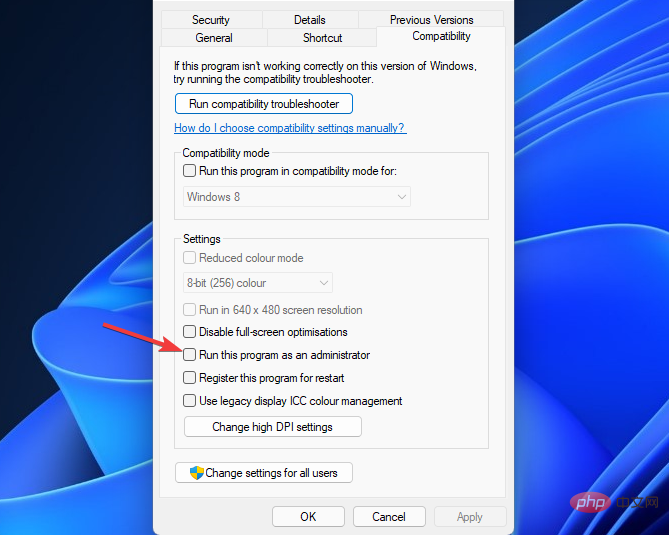
 - Properties option. Click
- Compatibility to view the settings for this tab. Check the box for the
- Run this program as administrator setting on this tab.
 Press the
 - Apply button on the Logitech G Hub properties window.
CompatibilityThe tab also includes the option to run the compatibility troubleshooter. Clicking on this troubleshooting option can also help you fix Logitech G Hub not working in Windows 11.
3. Update buggy or outdated device drivers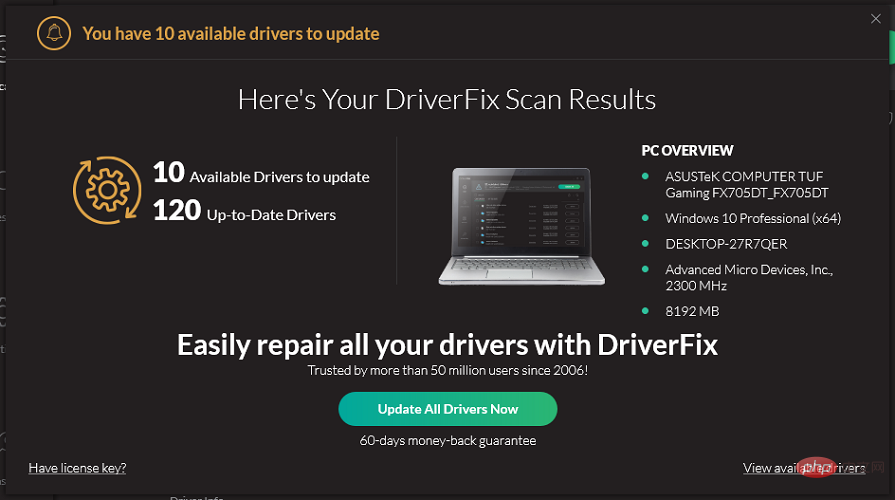
Programs.
The software includes anautomatic installation option that you can select. This option will save you from having to extract and manually install the driver package.
Nevertheless, it is a fast, simple and automatic software that can clear any driver issues like Charisma in just a few clicks.⇒Get DriverFix
4. Restart the Logitech G Hub service
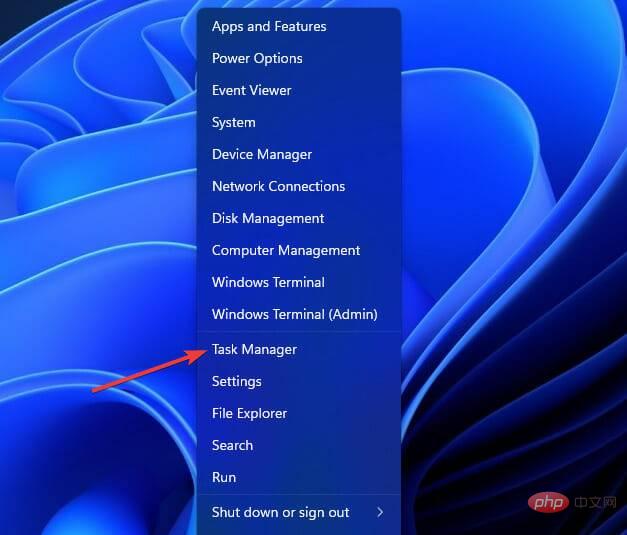
- Press the Windows key combination and Xselect Task Manager from the list.

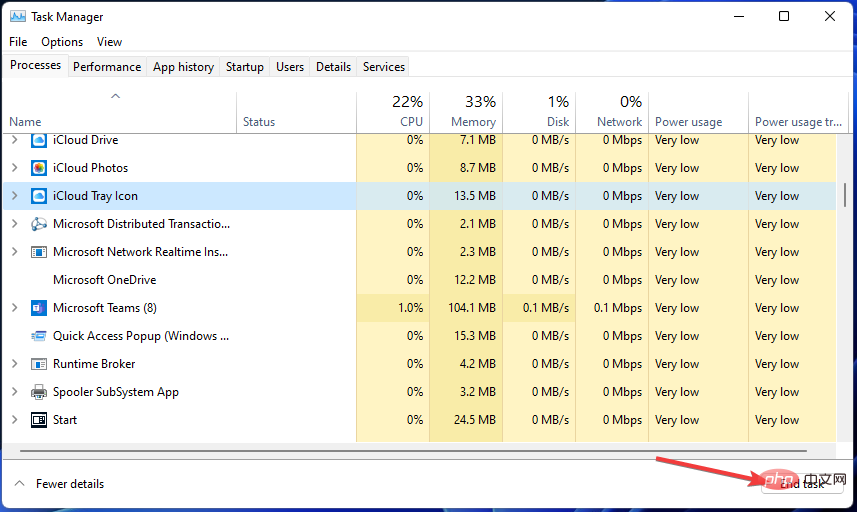
- Select and disable Lghub_updater.exe, Lghub_agent.exe and on the Processes tab by clicking the End Task button Lghub.exeService.

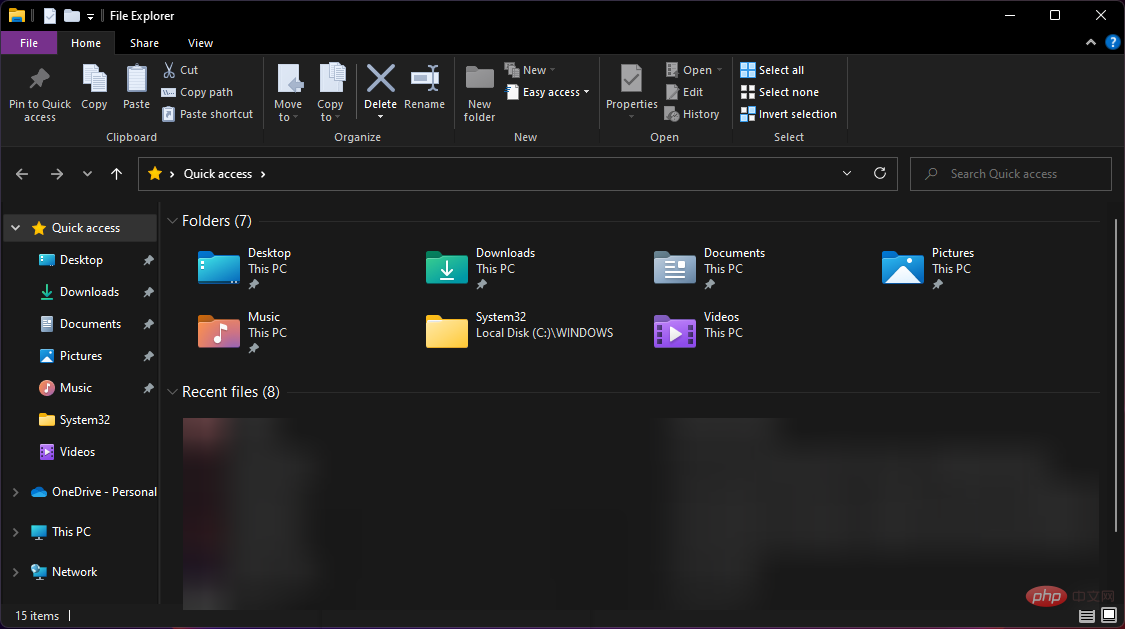
- Press Windows E to open File Explorer.

- Click the Explorer taskbar button and open the Logitech G Hub folder. The default folder path of the software is:
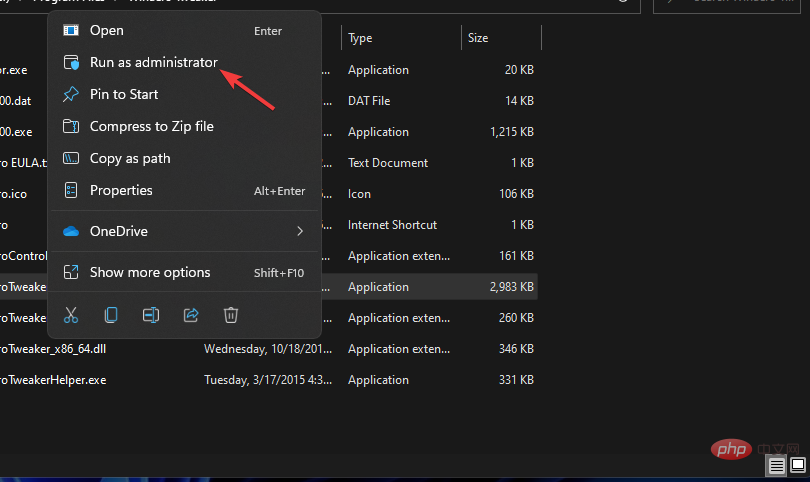
<strong>C:\Program Files\LGHUB</strong> - Right click on Lghub_agent.exe and Lghub_updater.exe files, select Run as administrator for them.

- Then run Lghub.exe by selecting the Run as administrator option.
This process will basically restart the Logitech G Hub service and refresh its processes.
5. Check whether the LGHUB update service is turned on
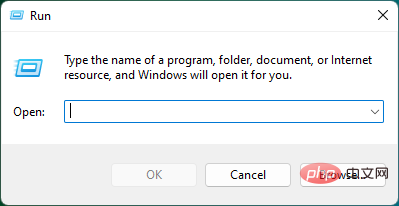
- Press the Windows R keyboard shortcut to open the "Run" dialog box.

- To open the "Service" window, enter the following text and click "OK" or press Enter:
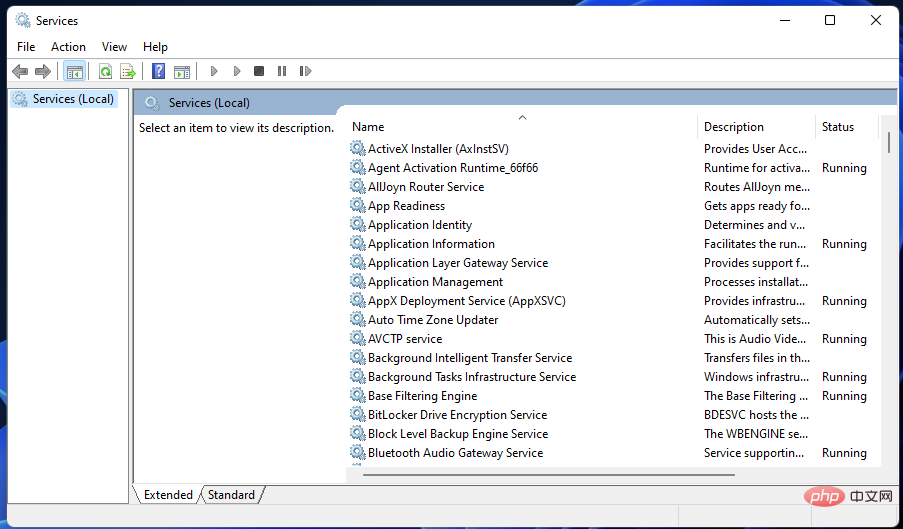
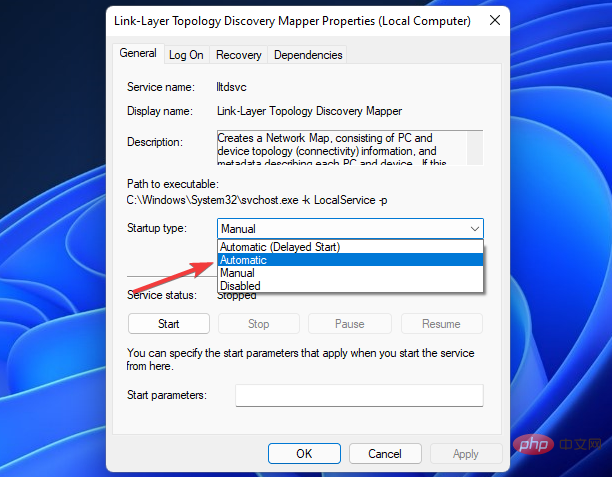
<strong>services.msc</strong> - Locate the LGHUB Updater Service in the Services window and double-click it.

- Select the Automatic service startup type option if it is not already selected.

- Click OK to close the window.
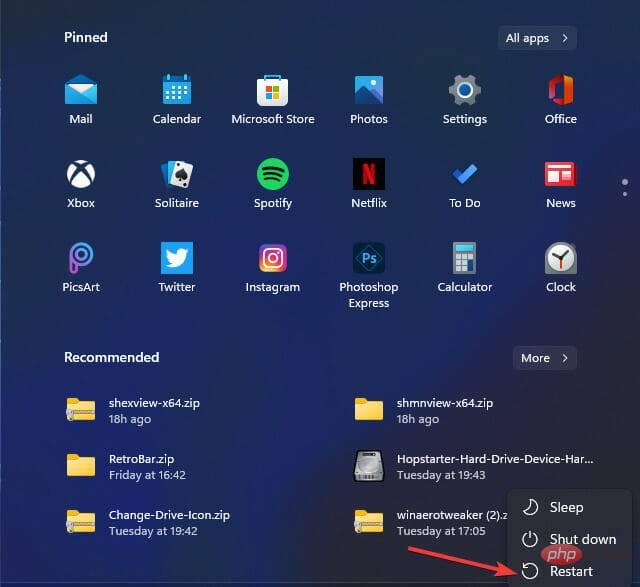
- Press the Start button on the taskbar. Then select the Power and Restart options.

6. Reinstall the Logitech USB input device
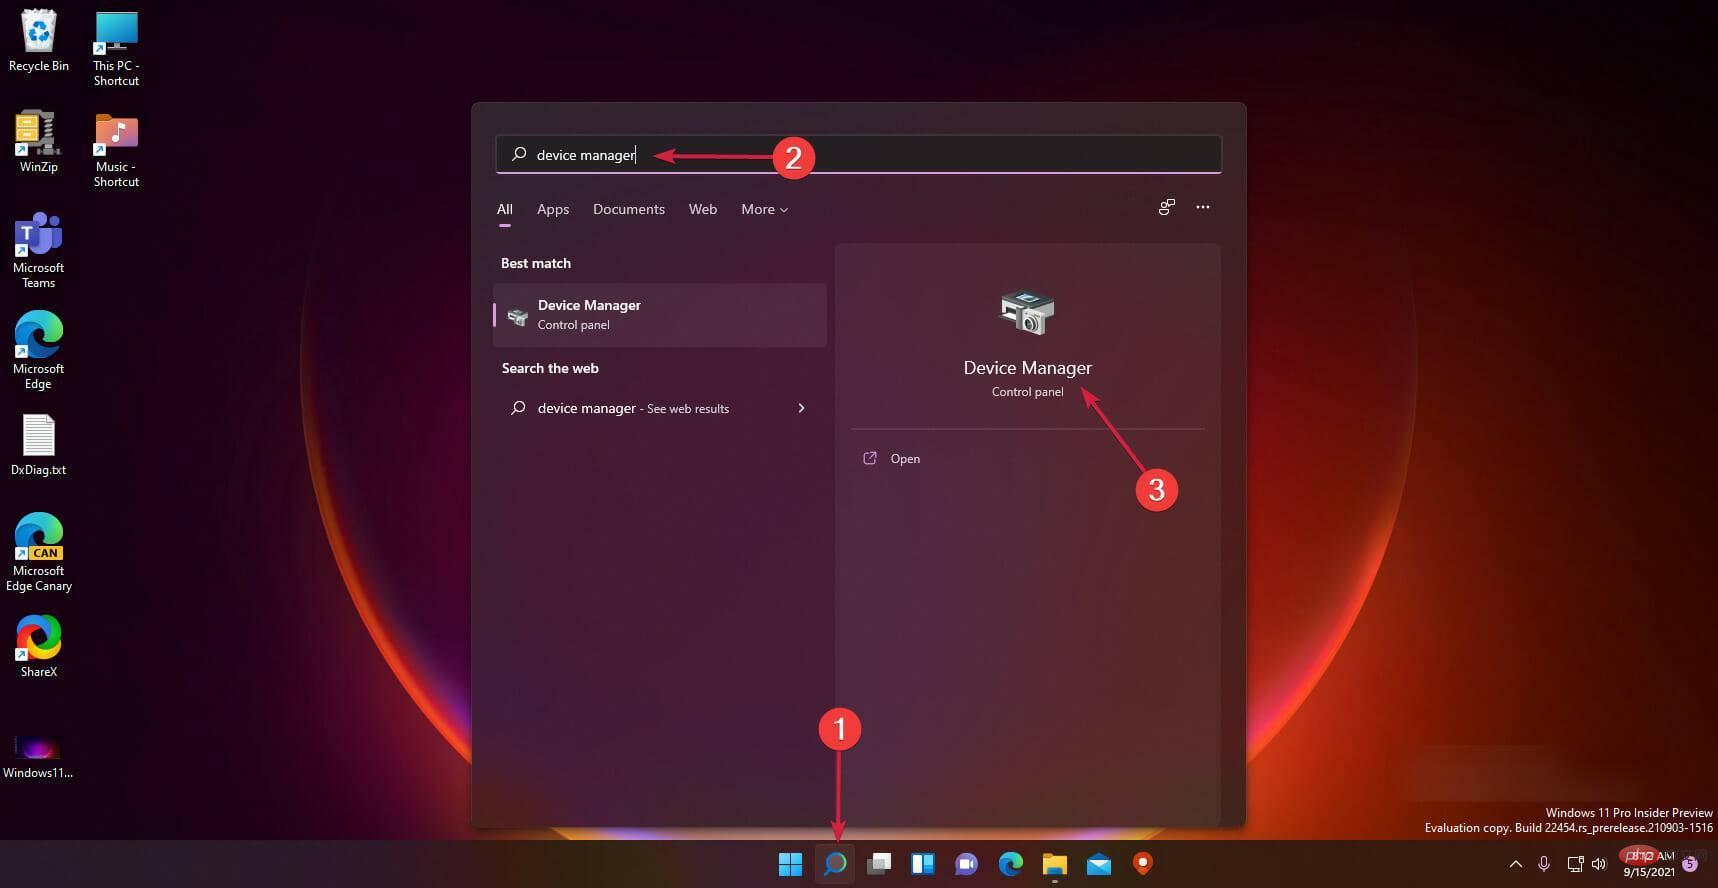
- Click the Search icon in the taskbar and type device management manager and select the app from the results.

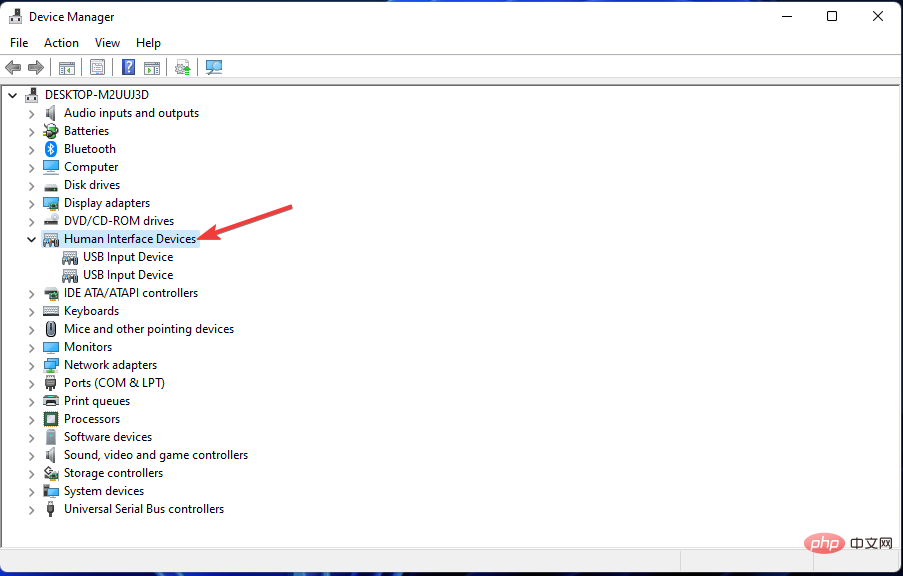
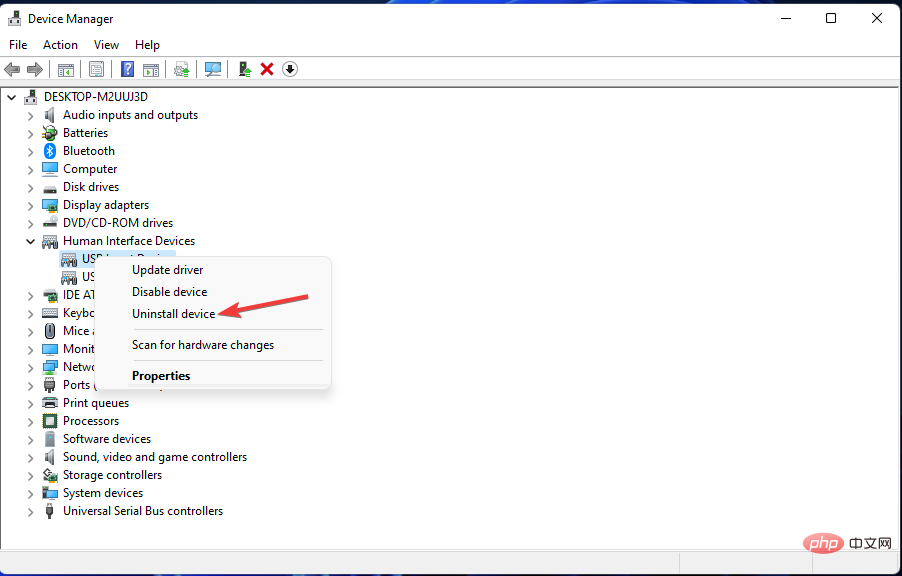
- Select Human Interface Devices to expand the category.

- Right-click the Logitech USB Input Device to select the Uninstall Device context menu option.

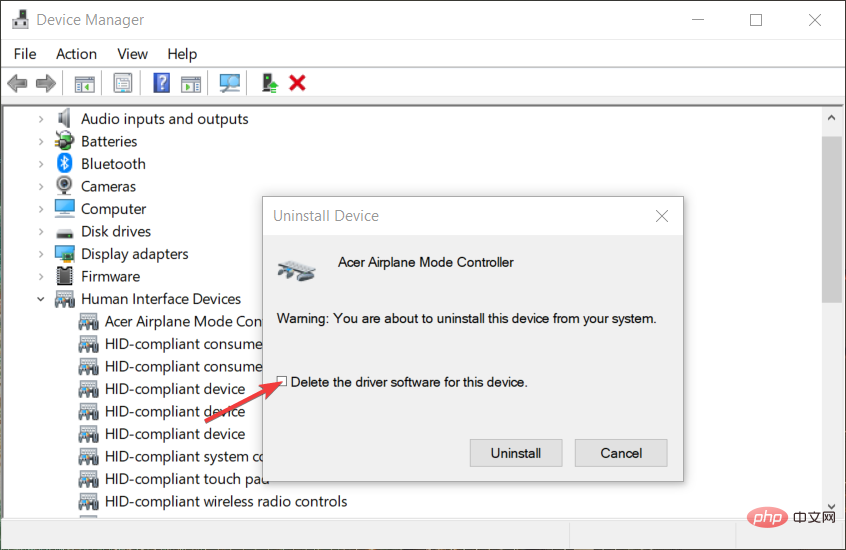
- Select the checkbox for the "Remove the driver software for this device" option, and then click "Uninstall" to confirm.

- Restart your PC to automatically reinstall the universal driver and try launching Logitech G Hub again.
- How to Download Logitech G Hub on Windows 11
- The Best Logitech Mouse of 2022
- Logitech Unifying Receiver not working/detected
7. Clean boot Windows 11
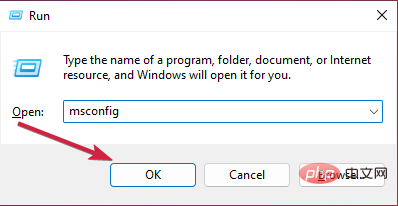
- Press Windows R Key combination starts Run, type msconfig and press Enter or click OK.

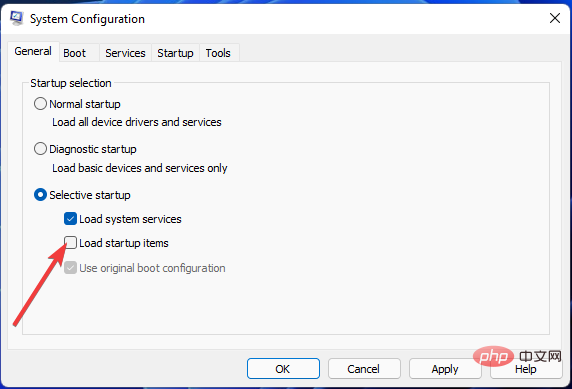
- Uncheck the checkbox for the Load startup items option selected on the General tab.

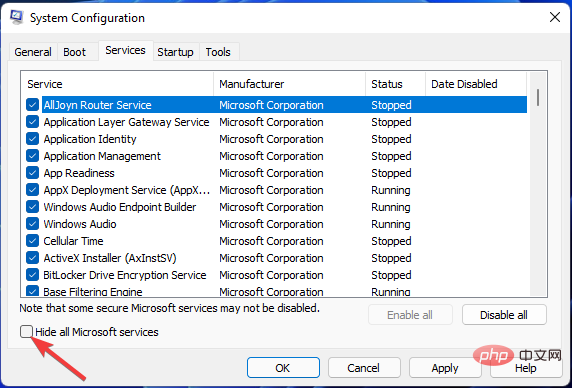
- Then click on the Services tab and select Hide all Microsoft services.

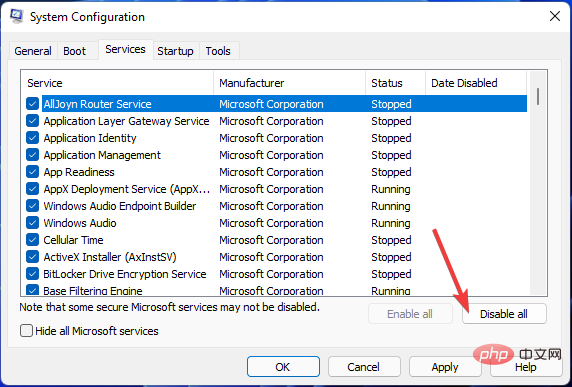
- Click Disable All to uncheck the checkboxes for other services.

- Press the Apply button to save the new boot configuration, then click OK to exit MSConfig.
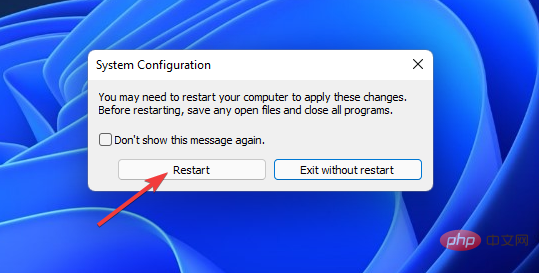
- ClickRestart in the confirmation dialog box.

- Try starting Logitech G Hub after a clean boot of Windows.
If any software conflicts with Logitech G Hub, performing a clean boot will display this issue.
You need to identify the software causing this problem and disable it from the startup list or uninstall it completely.
To restore the original boot settings, open MSConfig again. On the General tab select Load startup items. Click Enable All on the Services tab. Then press Apply to save your selected options.
8. Reinstall Logitech G Hub
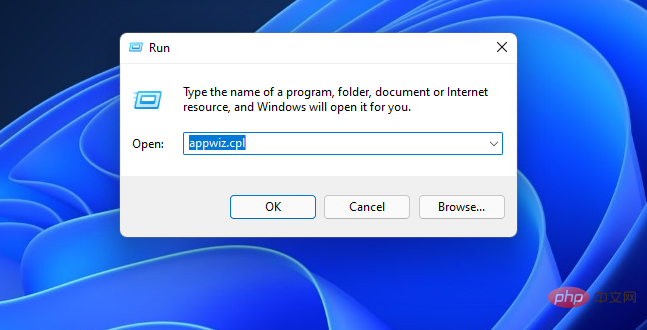
- Press the Windows R key to start the Run console and type appwiz.cpl and press Enter or click OK.

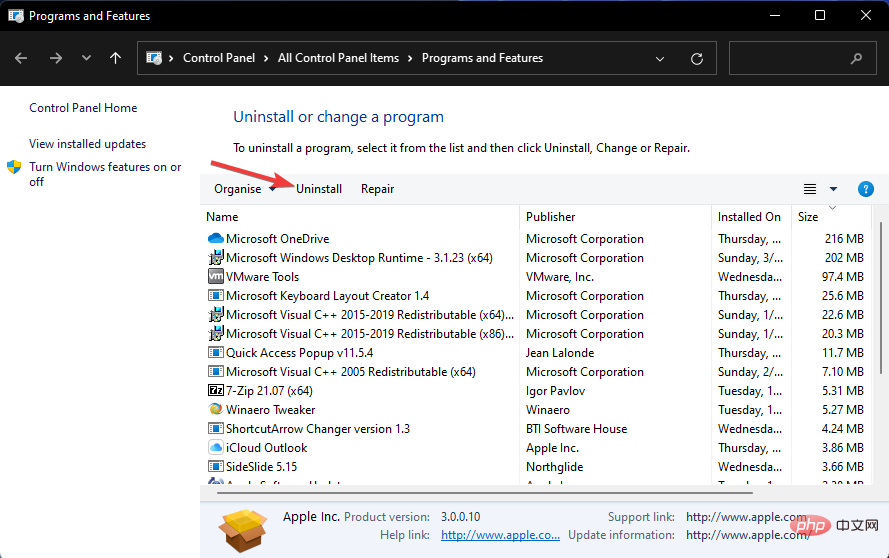
- Select Logitech G Hub in the Programs and Features applet.
- Click the Uninstall option of Logitech G Hub to remove the software.

- Press the Windows key again to RopenRun, then enter the following command and click OK:
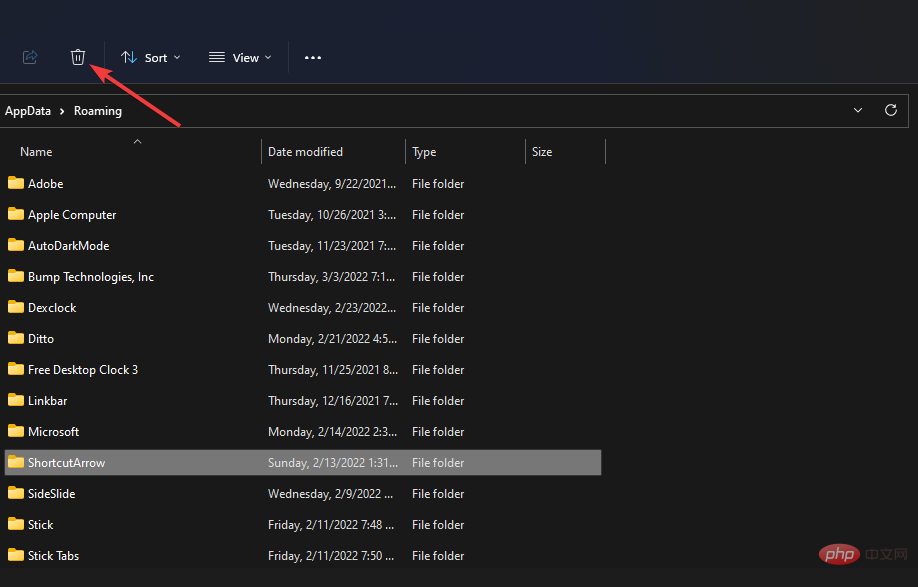
<strong>%appdata%</strong> - Select the remaining LGHUB folder and click the Delete button on your keyboard.

- Press the Windows E key to launch File Explorer and navigate to the following folder:
<strong>C :\ProgramData</strong> - Select the LGHUB folder and click the Delete button on your keyboard.
- Restart your computer.
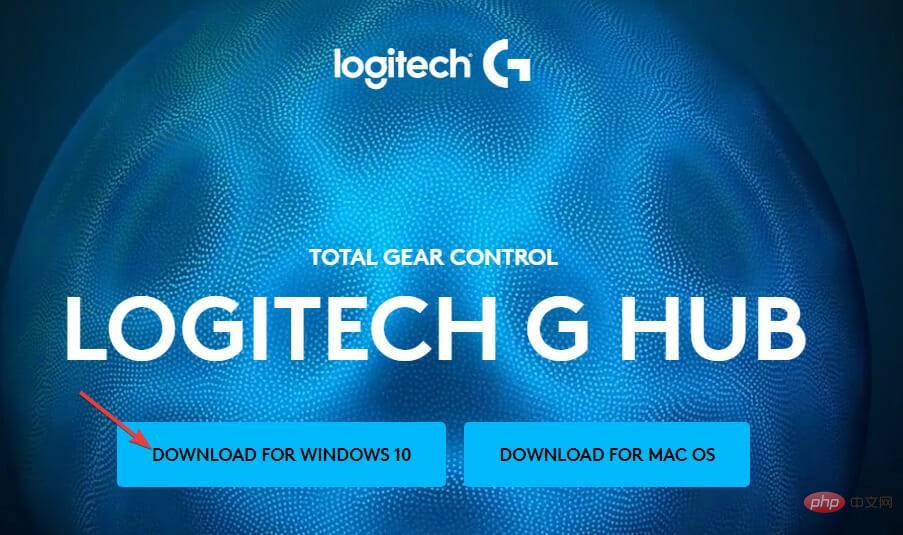
- Click the Windows 10 Download button on the Logitech website.

- Then reinstall Logitech G Hub using the installation wizard you just downloaded.
For a more complete uninstall of Logitech G Hub, check out the freeware IObit Uninstaller.
IObit Uninstaller is a third-party uninstaller utility that gives you the option to delete all remaining residual files and registry entries after uninstalling the software.
These potential solutions will help you launch Logitech G Hub in Windows 11 and restore it to working condition.
If you still cannot launch the software after applying these resolutions, please consider contacting Logitech Support.
You can discuss this issue with a support agent by clicking Chat on the Logitech Contact Support page. Alternatively, you can post information about the issue on Logitech's support forum.
You are also welcome to discuss Logitech G Hub not working in Windows 11 in the comments section of this page.
This is a great place to add any questions or even share other potential fixes for Logitech G Hub not working properly.
The above is the detailed content of Logitech G Hub not working in Windows 11? Fix now. For more information, please follow other related articles on the PHP Chinese website!

Hot AI Tools

Undresser.AI Undress
AI-powered app for creating realistic nude photos

AI Clothes Remover
Online AI tool for removing clothes from photos.

Undress AI Tool
Undress images for free

Clothoff.io
AI clothes remover

AI Hentai Generator
Generate AI Hentai for free.

Hot Article

Hot Tools

Notepad++7.3.1
Easy-to-use and free code editor

SublimeText3 Chinese version
Chinese version, very easy to use

Zend Studio 13.0.1
Powerful PHP integrated development environment

Dreamweaver CS6
Visual web development tools

SublimeText3 Mac version
God-level code editing software (SublimeText3)

Hot Topics
 How to set up cf Logitech one-click macro? cf logitech mouse macro settings
Mar 14, 2024 pm 10:50 PM
Mouse macros assign a series of complex operations to the mouse buttons, which can be simply understood as mouse shortcut key settings. After clicking the button to set the mouse macro, you can complete some operations that are usually impossible to do. So how to set mouse macros when playing CF? Let’s take a look at the cf Logitech mouse macro setting tutorial. 1. First, install the Logitech game software on your computer, and then click as shown by the arrow in the picture to open the custom button setting interface. Next, you need to select a key, such as the left key, click the small arrow, and then select "Edit Command" in the pop-up menu, so that you can open the left key macro setting interface. 3. Then click the button, as shown by the red arrow in the picture, click the text box and enter any key. Note that such as A
 What to do if WPS Office cannot open the PPT file - What to do if WPS Office cannot open the PPT file
Mar 04, 2024 am 11:40 AM
Recently, many friends have asked me what to do if WPSOffice cannot open PPT files. Next, let us learn how to solve the problem of WPSOffice not being able to open PPT files. I hope it can help everyone. 1. First open WPSOffice and enter the homepage, as shown in the figure below. 2. Then enter the keyword "document repair" in the search bar above, and then click to open the document repair tool, as shown in the figure below. 3. Then import the PPT file for repair, as shown in the figure below.
 What software is crystaldiskmark? -How to use crystaldiskmark?
Mar 18, 2024 pm 02:58 PM
CrystalDiskMark is a small HDD benchmark tool for hard drives that quickly measures sequential and random read/write speeds. Next, let the editor introduce CrystalDiskMark to you and how to use crystaldiskmark~ 1. Introduction to CrystalDiskMark CrystalDiskMark is a widely used disk performance testing tool used to evaluate the read and write speed and performance of mechanical hard drives and solid-state drives (SSD). Random I/O performance. It is a free Windows application and provides a user-friendly interface and various test modes to evaluate different aspects of hard drive performance and is widely used in hardware reviews
 Steps to restore Logitech driver to default configuration
Feb 28, 2024 am 11:04 AM
Facing the Logitech driver that cannot be used normally, it can only be solved by restoring the factory settings. However, many friends do not know how to restore the factory settings. The following will provide you with detailed steps to restore the factory settings. I hope it can help you. Steps to restore the Logitech driver to the default configuration: 1. First download the Logitech dedicated driver software GHub, and open it after the download is complete. 2. Then open the mouse to set up, and click the settings (gear) in the upper right corner. 3. At the bottom, click "Restore default settings" , click directly and reopen the software to restore factory settings. How to connect the Logitech driver to the device 1. Open the back cover of the mouse and take out the wireless mouse socket. 2. Select the mouse socket next to the computer. 3. Set the corresponding parameter information for the mouse. 4. Bluetooth pair the device and long press Bluetooth.
 CrystalDiskinfo usage tutorial-What software is CrystalDiskinfo?
Mar 18, 2024 pm 04:50 PM
CrystalDiskInfo is a software used to check computer hardware devices. In this software, we can check our own computer hardware, such as reading speed, transmission mode, interface, etc.! So in addition to these functions, how to use CrystalDiskInfo and what exactly is CrystalDiskInfo? Let me sort it out for you! 1. The Origin of CrystalDiskInfo As one of the three major components of a computer host, a solid-state drive is the storage medium of a computer and is responsible for computer data storage. A good solid-state drive can speed up file reading and affect consumer experience. When consumers receive new devices, they can use third-party software or other SSDs to
 What kind of software is bonjour? Is it useful?
Feb 22, 2024 pm 08:39 PM
Bonjour is a network protocol and software launched by Apple for discovering and configuring network services within a local area network. Its main role is to automatically discover and communicate between devices connected in the same network. Bonjour was first introduced in the MacOSX10.2 version in 2002, and is now installed and enabled by default in Apple's operating system. Since then, Apple has opened up Bonjour's technology to other manufacturers, so many other operating systems and devices can also support Bonjour.
 How to set the keyboard increment in Adobe Illustrator CS6 - How to set the keyboard increment in Adobe Illustrator CS6
Mar 04, 2024 pm 06:04 PM
Many users are using the Adobe Illustrator CS6 software in their offices, so do you know how to set the keyboard increment in Adobe Illustrator CS6? Then, the editor will bring you the method of setting the keyboard increment in Adobe Illustrator CS6. Interested users can take a look below. Step 1: Start Adobe Illustrator CS6 software, as shown in the figure below. Step 2: In the menu bar, click the [Edit] → [Preferences] → [General] command in sequence. Step 3: The [Keyboard Increment] dialog box pops up, enter the required number in the [Keyboard Increment] text box, and finally click the [OK] button. Step 4: Use the shortcut key [Ctrl]
 How to resolve an incompatible software attempt to load with Edge?
Mar 15, 2024 pm 01:34 PM
When we use the Edge browser, sometimes incompatible software attempts to be loaded together, so what is going on? Let this site carefully introduce to users how to solve the problem of trying to load incompatible software with Edge. How to solve an incompatible software trying to load with Edge Solution 1: Search IE in the start menu and access it directly with IE. Solution 2: Note: Modifying the registry may cause system failure, so operate with caution. Modify registry parameters. 1. Enter regedit during operation. 2. Find the path\HKEY_LOCAL_MACHINE\SOFTWARE\Policies\Micros


