

As the most important part of HTML, forms are reflected on almost every web page, such as user submission information, user feedback information, user query information, etc., so it is the communication between website administrators and viewers. bridge. The following is an introduction to how jQuery implements form validation through example code
Form validation
As the most important component of HTML, the form is almost It is reflected on every web page, such as user submission information, user feedback information and user query information, etc., so it is a communication bridge between website administrators and viewers. In forms, the role of form validation is also very important. It can make the form more flexible, beautiful and rich.
Take a simple user registration as an example. First create a new form, the HTML code is as follows:
<!DOCTYPE html>
<html>
<head>
 <meta http-equiv="content-type" content="text/html; charset=utf-8">
 <title>jQueryStudy</title>
 <style type="text/css">
 .int{ height: 30px; text-align: left; width: 600px; }
 label{ width: 200px; margin-left: 20px; }
 .high{ color: red; }
 .msg{ font-size: 13px; }
 .onError{ color: red; }
 .onSuccess{ color: green; }
 </style>
 <script type="text/javascript" src="jquery-1.10.2.js"></script>
</head>
<body>
 <form method="post" action="">
 <p class="int">
  <label for="name">名称:</label>
  <input type="text" id="name" class="required" />
 </p>
 <p class="int">
  <label for="email">邮箱:</label>
  <input type="text" id="email" class="required" />
 </p>
 <p class="int">
  <label for="address">地址:</label>
  <input type="text" id="personinfo" />
 </p>
 <p class="int">
  <input type="submit" value="提交" id="send" style="margin-left: 70px;" />
  <input type="reset" value="重置" id="res" />
 </p>
 </form>
 <script type="text/javascript"></script>
</body>
</html>The display effect is shown in Figure 1.
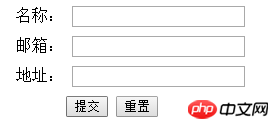
Figure 1 Form Initialization
The text box with the class attribute "required" in the form must be filled in, so it needs to be separated from other non- Form elements that must be filled in are distinguished by appending a red asterisk after the text box. This can be done using the append() method. The code is as follows:
<script type="text/javascript">
//为表单的必填文本框添加提示信息(选择form中的所有后代input元素)
$("form :input.required").each(function () {
//创建元素
var $required = $("<strong class='high'>*</strong>");
//将它追加到文档中
$(this).parent().append($required);
});
</script>The display effect is shown in Figure 2.

Figure 2 Marked with a small red star
After the user fills in the information in the "Name" text box, change the focus of the cursor from the "Name" text box When moving out, it is necessary to immediately determine whether the name complies with the verification rules. When the focus of the cursor moves out of the "Mailbox" text box, it is also necessary to immediately determine whether the "Mailbox" is filled in correctly, so it is necessary to add a focus loss event, that is, a blur event, to the form element.
The jQuery code is as follows:
<script type="text/javascript">
 //为表单的元素添加失去焦点事件
 $("form :input").blur(function () {
 // ...省略代码
 });
</script>The steps to verify the form elements are as follows:
(1) Determine whether the element currently losing focus is "name" or "mailbox", and then Treat them separately.
(2) If it is "name", determine whether the length of the element's value is less than 6. If it is less than 6, use red font to remind the user that the input is incorrect. Otherwise, use green to remind the user that the input is correct.
(3) If it is "mailbox", determine whether the value of the element conforms to the format of the mailbox. If not, use red fonts to remind the user that the input is incorrect. Otherwise, use green fonts to remind the user that the input is correct.
(4) Append the reminder information to the end of the current parent element.
Note: For ease of use, when the content in the text text box is in an incorrect format, the program should try to display all prompts instead of only error reminders related to each format after verifying it. .
Based on the above analysis, the following jQuery code can be written:
<script type="text/javascript">
//为表单的必填文本框添加提示信息(选择form中的所有后代input元素)
$("form :input.required").each(function () {
//创建元素
var $required = $("<strong class='high'>*</strong>");
//将它追加到文档中
$(this).parent().append($required);
});
//为表单元素添加失去焦点事件
$("form :input").blur(function(){
var $parent = $(this).parent();
//验证名称
if($(this).is("#name")){
if($.trim(this.value) == "" || $.trim(this.value).length < 6){
var errorMsg = " 请输入至少6位的名称!";
//class='msg onError' 中间的空格是层叠样式的格式
$parent.append("<span class='msg onError'>" + errorMsg + "</span>");
}
else{
var okMsg=" 输入正确";
$parent.find(".high").remove();
$parent.append("<span class='msg onSuccess'>" + okMsg + "</span>");
}
}
//验证邮箱
if($(this).is("#email")){
if($.trim(this.value) == "" || ($.trim(this.value) != "" && !/.+@.+\.[a-zA-Z]{2,4}$/.test($.trim(this.value)))){
var errorMsg = " 请输入正确的E-Mail地址!";
$parent.append("<span class='msg onError'>" + errorMsg + "</span>");
}
else{
var okMsg=" 输入正确";
$parent.find(".high").remove();
$parent.append("<span class='msg onSuccess'>" + okMsg + "</span>");
}
}
});
</script>When the wrong format is entered several times in a row, the effect shown in Figure 3 will appear
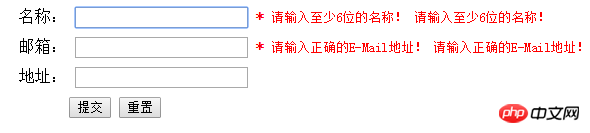
Figure 3 Prompt effect of multiple operations
Since each time the element loses focus, a new reminder element will be created and then appended to the document. Finally Reminder messages appeared multiple times. Therefore, you need to delete all previous reminder elements of the current element before creating a reminder element. This can be done using the remove() method. The code is as follows:
//为表单元素添加失去焦点事件
$("form :input").blur(function(){
 var $parent = $(this).parent();
 $parent.find(".msg").remove(); //删除以前的提醒元素
 // ...省略代码
});The display effect is shown in Figure 4.

Figure 4 Correct effect
When the mouse loses focus multiple times in the form element, it can remind the user whether the filling is correct. However, if the user ignores the error reminder and insists on clicking the "Submit" button, in order to fill in the form accurately, the required elements of the form need to be fully verified before submitting the form. You can directly use the trigger() method to trigger the blur event to achieve verification effects. If there is an error in filling in, the user will be reminded in red; if the name and email address do not comply with the rules, then there are two errors, that is, there are two elements with class "onError", so the length of the element with class "onError" can be determined to determine whether it can be submitted. If the length is 0, i.e. true, it means it can be submitted; if the length is greater than 0, i.e. false, it means there is an error and the form submission needs to be prevented. To prevent form submission, you can directly use the "return false" statement.
According to the above analysis, the following jQuery code can be written in the submission event:
//点击重置按钮时,触发文本框的失去焦点事件
$("#send").click(function(){
 //trigger 事件执行完后,浏览器会为submit按钮获得焦点
 $("form .required:input").trigger("blur");
 var numError = $("form .onError").length;
 if(numError){
 return false;
 }
 alert("注册成功,密码已发到你的邮箱");
});The display effect is shown in Figure 5.

图 5 正确提交
用户也许会提出:为什么每次都要等字段元素失去焦点后,才提醒是否正确?如果输入时就可以提醒,这样就可以更加即时了。
为了达到用户提出的需求,需要给表单元素绑定 keyup 事件和 focus 事件,keyup 事件能在用户每次松开按键时触发,实现即时提醒;focus 事件能在元素得到焦点的时候触发,也可以实现即时提醒。
代码如下:
$("form :input").blur(function(){
 //失去焦点处理函数
 //代码省略...
}).keyup(function(){
 //triggerHandler 防止事件执行完后,浏览器自动为标签获得焦点
 $(this).triggerHandler("blur");
}).focus(function(){
 $(this).triggerHandler("blur");
});这样当用户将光标定位到文本框上和改变文本框的值时,表单就会即时提醒用户填写是否正确,从而符合了用户的需求。
在前面的章节已经提过,trigger(“blur”)不仅会触发为元素绑定的blur事件,也会触发浏览器默认的 blur 事件,即不能讲光标定位到文本框上。而 triggerHandler(“blur”)只会触发为元素绑定的 blur 事件,而不触发浏览器默认的 blur 事件。
至此,表单验证过程就全部完成。读者可以根据自己的实际需求修改验证规则。
注:客户端的验证仅用于提升用户的操作体验,而服务器仍需对用户输入的数据的合法性进行校验。对于禁用了脚本的用户和用户自制的网页提交操作,必须在服务器端验证。
完整代码:
<!DOCTYPE html>
<html>
<head>
<meta http-equiv="content-type" content="text/html; charset=utf-8">
<title>jQueryStudy</title>
<style type="text/css">
.int{ height: 30px; text-align: left; width: 600px; }
label{ width: 200px; margin-left: 20px; }
.high{ color: red; }
.msg{ font-size: 13px; }
.onError{ color: red; }
.onSuccess{ color: green; }
</style>
<script type="text/javascript" src="jquery-1.10.2.js"></script>
</head>
<body>
<form method="post" action="">
<p class="int">
<label for="name">名称:</label>
<input type="text" id="name" class="required" />
</p>
<p class="int">
<label for="email">邮箱:</label>
<input type="text" id="email" class="required" />
</p>
<p class="int">
<label for="address">地址:</label>
<input type="text" id="personinfo" />
</p>
<p class="int">
<input type="submit" value="提交" id="send" style="margin-left: 70px;" />
<input type="reset" value="重置" id="res" />
</p>
</form>
<script type="text/javascript">
$(document).ready(function(){
//为表单的必填文本框添加提示信息(选择form中的所有后代input元素)
$("form :input.required").each(function(){
//创建元素
var $required = $("<strong class='high'>*</strong>");
//将它追加到文档中
$(this).parent().append($required);
});
//为表单的必填文本框添加相关事件(blur、focus、keyup)
$("form :input").blur(function(){
//注意:这里的this是DOM对象,$(this)才是jQuery对象
var $parent = $(this).parent();
//删除之前的错误提醒信息
$parent.find(".msg").remove();
//验证“名称”
if($(this).is("#name")){
//运用jQuery中的$.trim()方法,去掉首位空格
if($.trim(this.value) == "" || $.trim(this.value).length < 6){
var errorMsg = " 请输入至少6位的名称!";
//class='msg onError' 中间的空格是层叠样式的格式
$parent.append("<span class='msg onError'>" + errorMsg + "</span>");
}
else{
var okMsg=" 输入正确";
$parent.find(".high").remove();
$parent.append("<span class='msg onSuccess'>" + okMsg + "</span>");
}
}
//验证邮箱
if($(this).is("#email")){
if($.trim(this.value) == "" || ($.trim(this.value) != "" && !/.+@.+\.[a-zA-Z]{2,4}$/.test($.trim(this.value)))){
var errorMsg = "请输入正确的E-Mail地址!";
$parent.append("<span class='msg onError'>" + errorMsg + "</span>");
}
else{
var okMsg=" 输入正确";
$parent.find(".high").remove();
$parent.append("<span class='msg onSuccess'>" + okMsg + "</span>");
}
}
}).keyup(function(){
//triggerHandler 防止事件执行完后,浏览器自动为标签获得焦点
$(this).triggerHandler("blur");
}).focus(function(){
$(this).triggerHandler("blur");
});
//点击重置按钮时,触发文本框的失去焦点事件
$("#send").click(function(){
//trigger 事件执行完后,浏览器会为submit按钮获得焦点
$("form .required:input").trigger("blur");
var numError = $("form .onError").length;
if(numError){
return false;
}
alert("注册成功,密码已发到你的邮箱");
});
});
</script>
</body>
</html>jQuery 官方 API: http://api.jquery.com/
以上就是jQuery 实现表单验证功能的全部内容,希望对大家有所帮助,更多相关教程请访问jQuery视频教程!


![[Web front-end] Node.js quick start](https://img.php.cn/upload/course/000/000/067/662b5d34ba7c0227.png)


