Fix: Windows 11 keeps freezing randomly
How to fix Windows 11 randomly freezing?
1. Run a system file scan
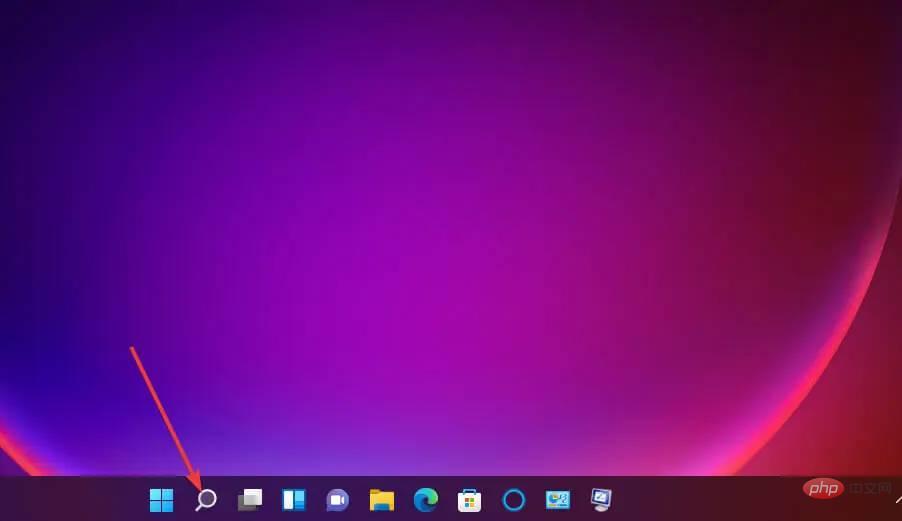
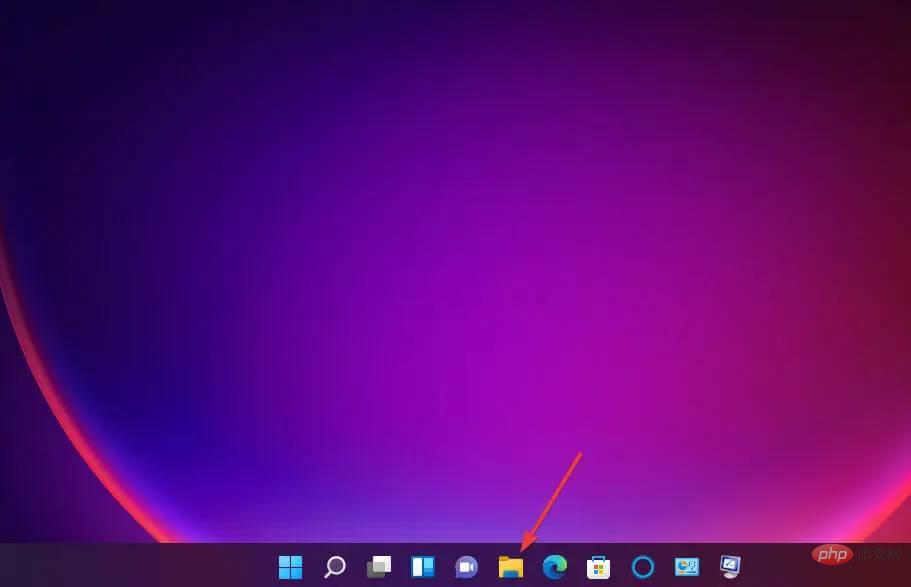
- First, click the magnifying glass icon next to the Start menu on the taskbar.

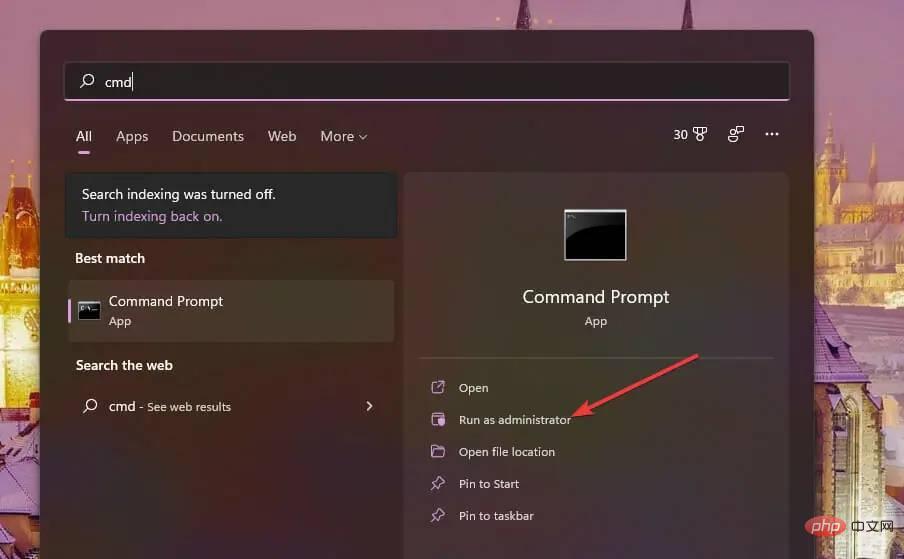
- You need to enter cmd in the search box to find the command prompt.
- Make sure to open an elevated prompt by right-clicking the command prompt search result and selecting Run as administrator.

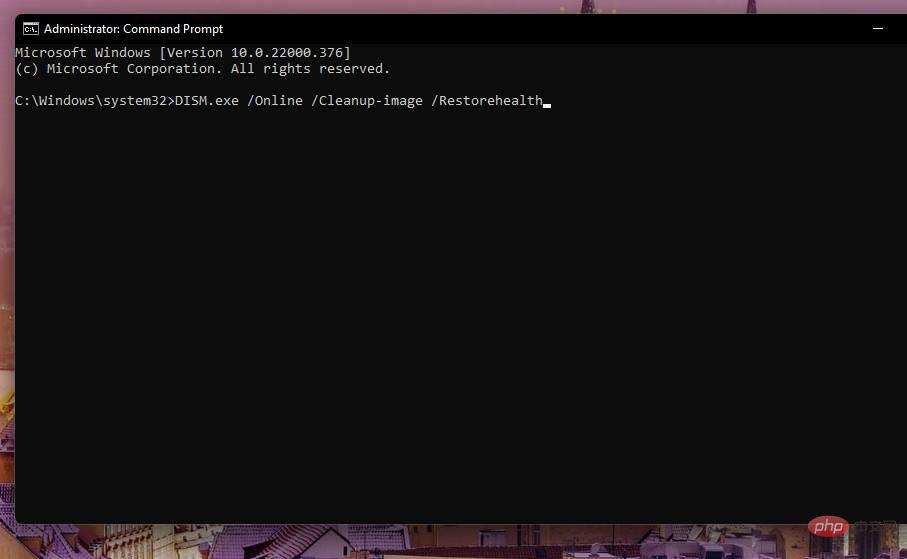
- Enter this command and press Return:
<strong>DISM.exe /Online /Cleanup-image /Restorehealth</strong>
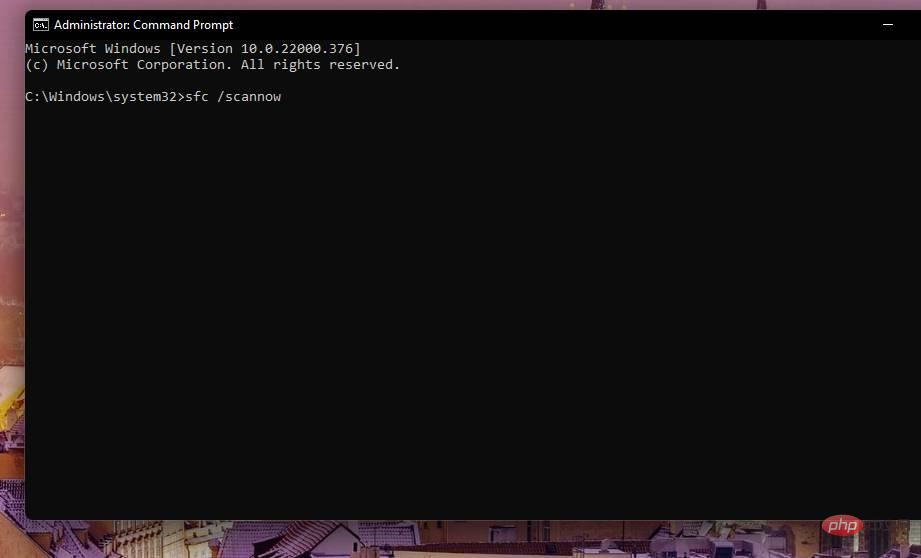
- Next, enter the following SFC command and hit Enter:
<strong>sfc /scannow</strong>
- Now wait for the System File Checker scan to complete and display the results in the command prompt window.
2. Run a disk scan
- Open a command prompt as an administrator as described in the first three steps of the previous solution.
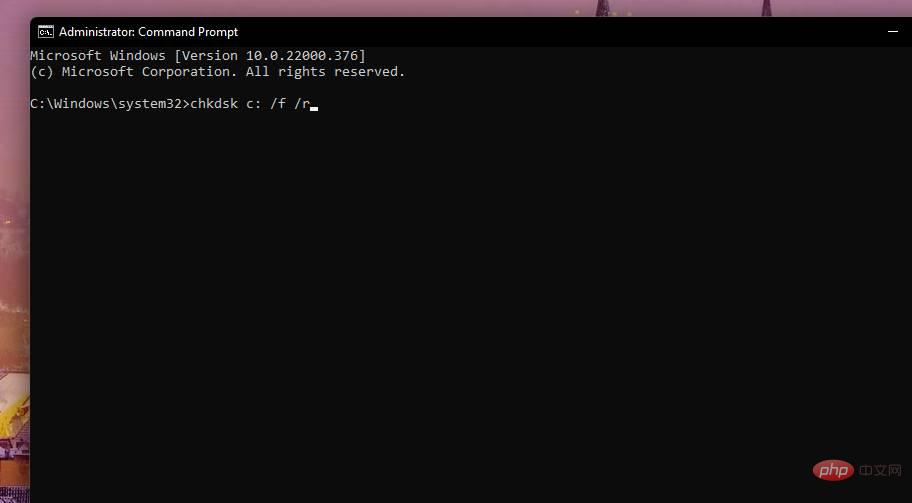
- Click this disk scan command and hit Enter:
<strong>chkdsk c: /f /r</strong>
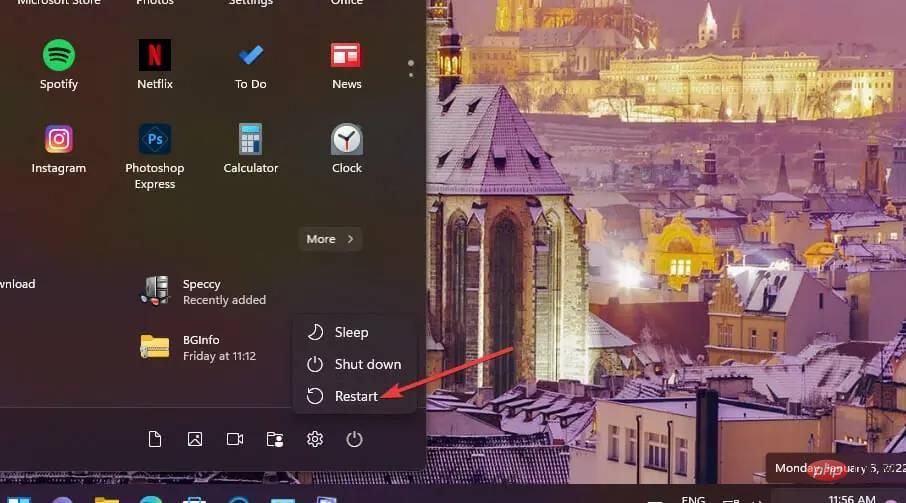
- Checkdisk scan will now be scheduled to run on reboot. Click the Start menu, press the Power button, and select Restart.

3. Lower your monitor’s resolution settings
- Click the Windows taskbar icon to bring up the Start menu, then click here Select the pinned Settings app.

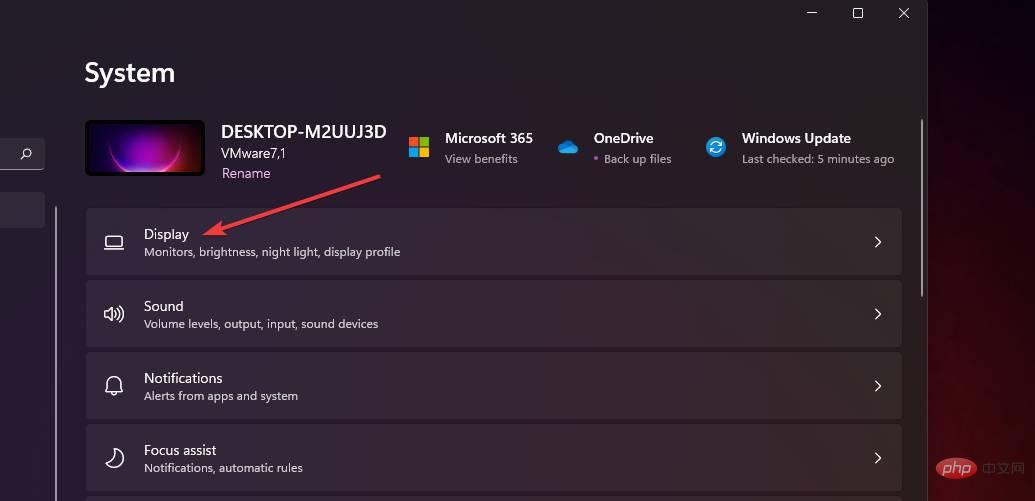
- Select the Show Navigation option on the System tab.

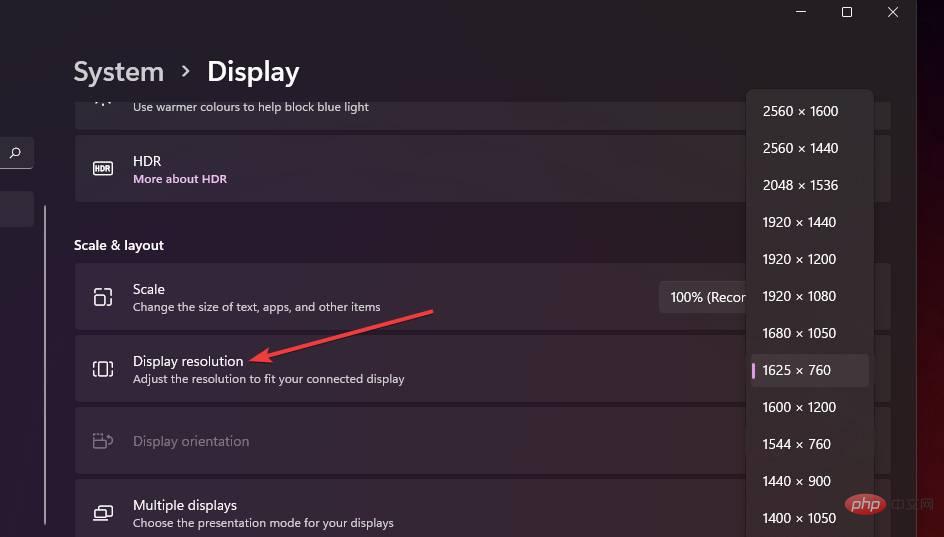
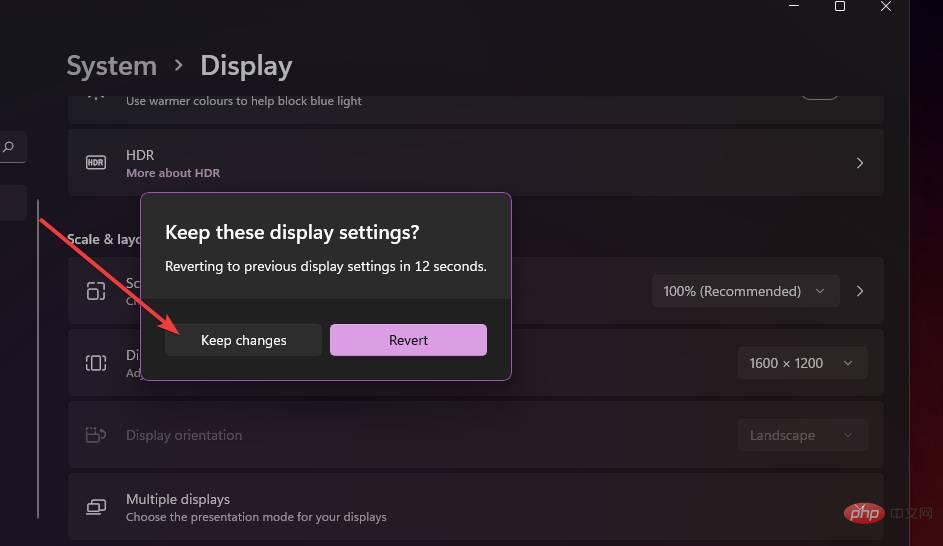
- Click the Show resolution drop-down menu to select a slightly lower resolution setting.

- Select the Keep changes option in the dialog box prompt to confirm.

4. Check for memory issues
- Press the Windows and S keys simultaneously.
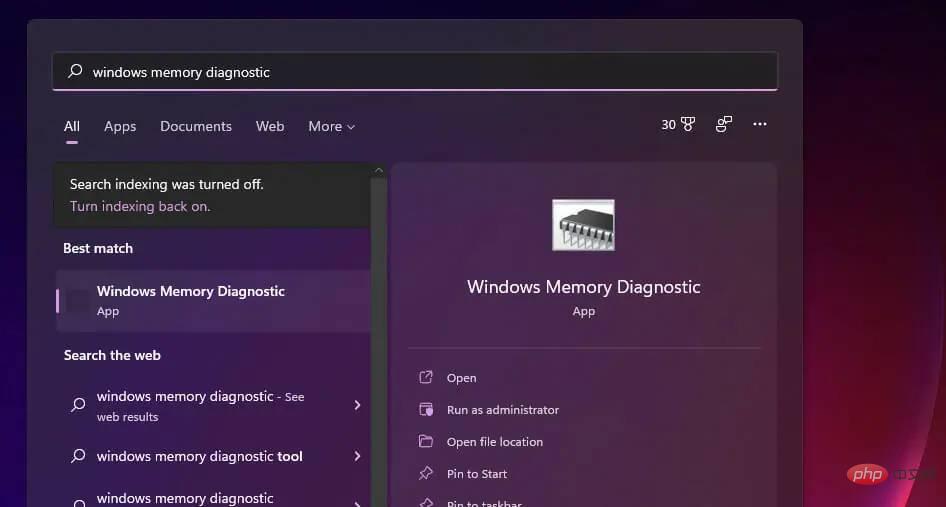
- Enter Windows Memory Diagnosis in the search box that opens.

- Click Windows Memory Diagnostics to open it.
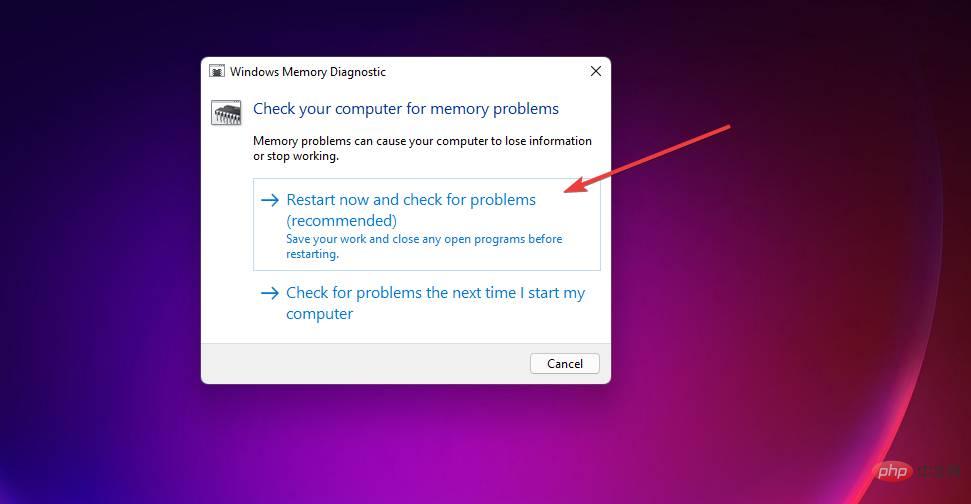
- Select Restart Now and check the Problem options.

If Windows Memory Diagnostics detects errors, you may need to replace the faulty RAM module.
5. Extend virtual memory allocation
- Bring up the search utility using its taskbar button or the Windows key S hotkey.
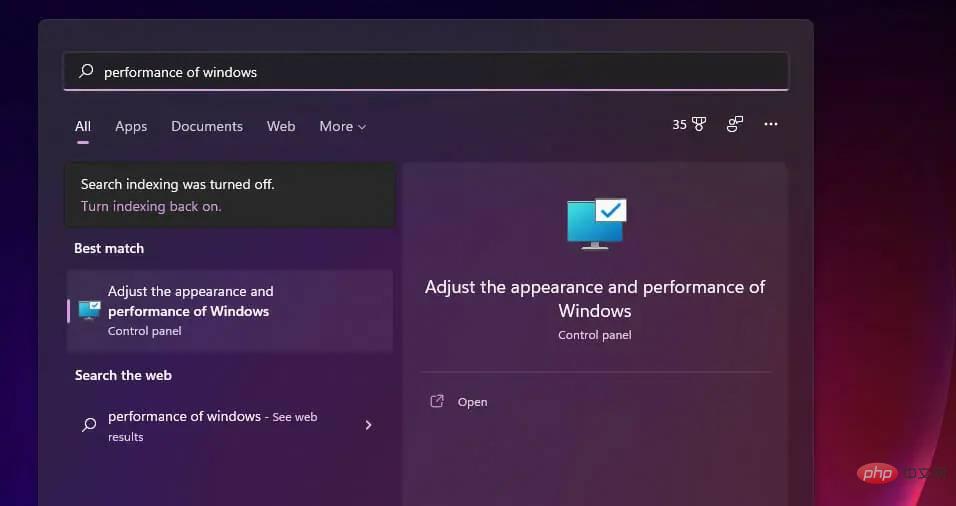
- Enter the keyword Windows in the search box Performance.

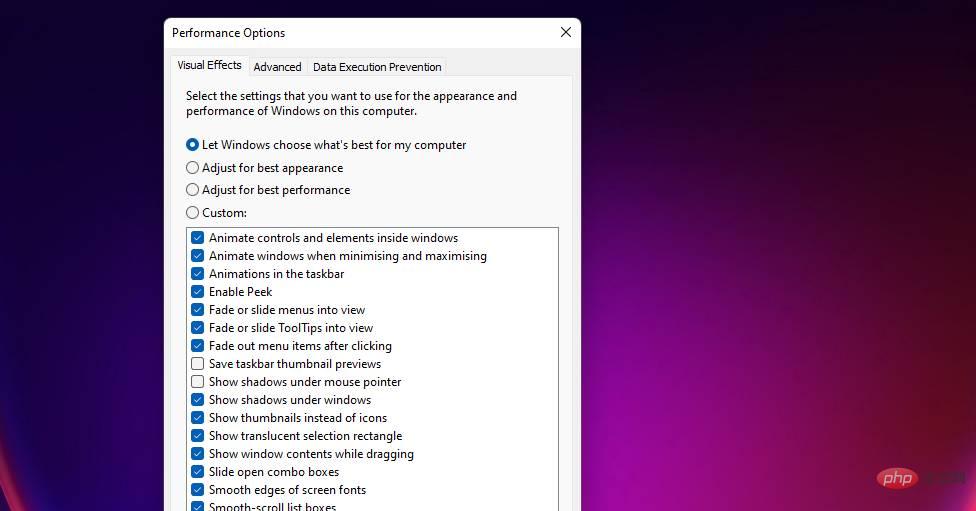
- Then select Adjust the appearance and performance of Windows search results to open the Visual Effects tab shown directly below.

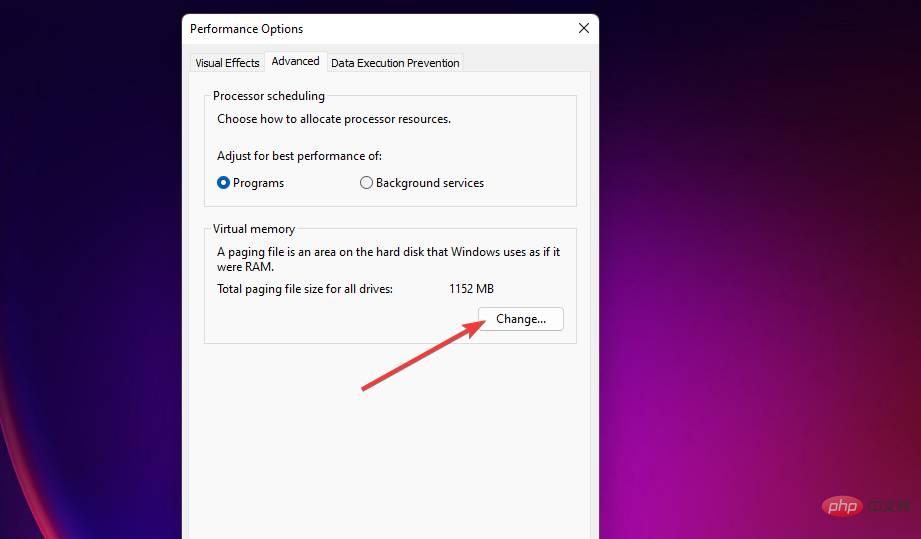
- Click the Advanced tab.
- Then select the Change option there.

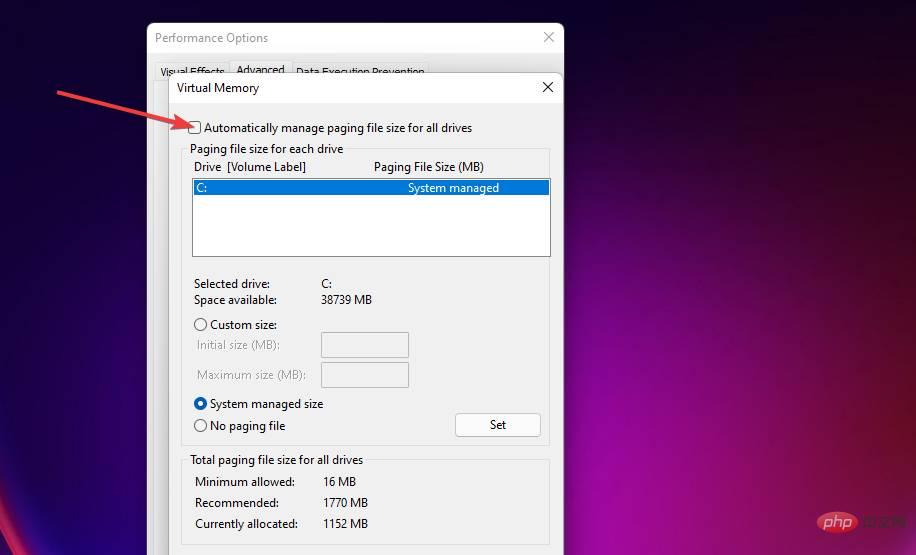
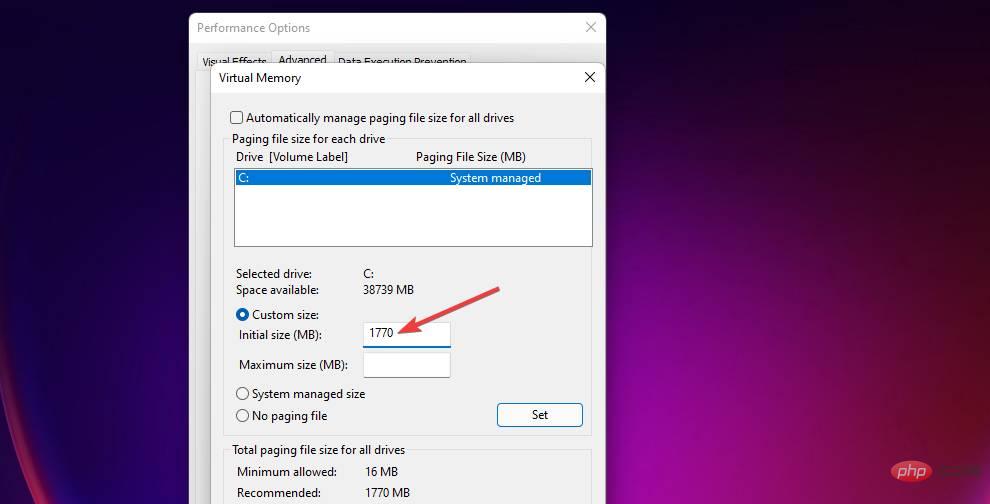
- Uncheck the Automatically manage paging file size for all drives checkbox and select the primary C: drive partition.

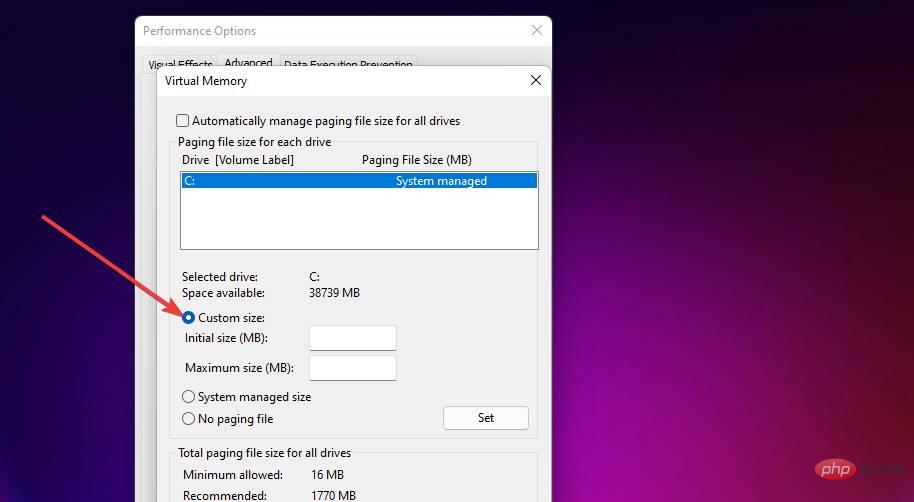
- Then click the Customize Size radio button.

- Type the recommended value specified in the Virtual Memory window in the Initial Size (MB) text box.

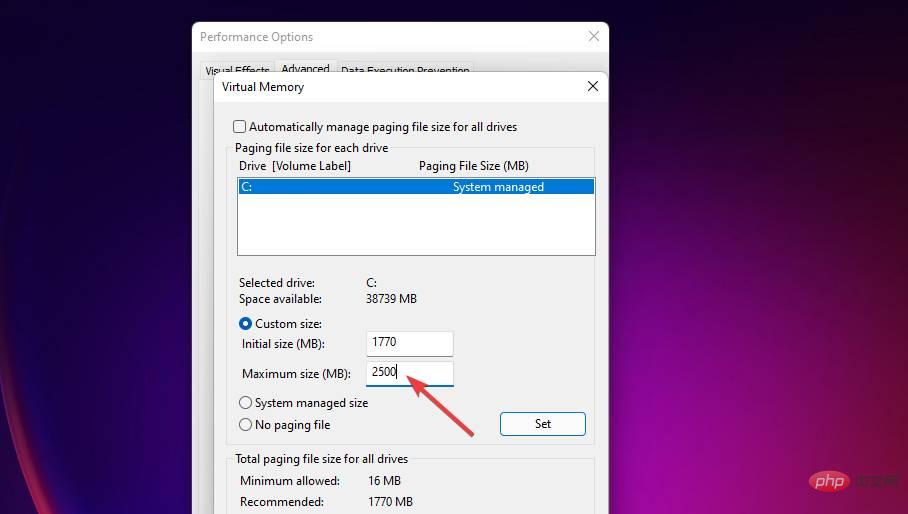
- Enter a value greater than the recommended value in the Maximum size box.

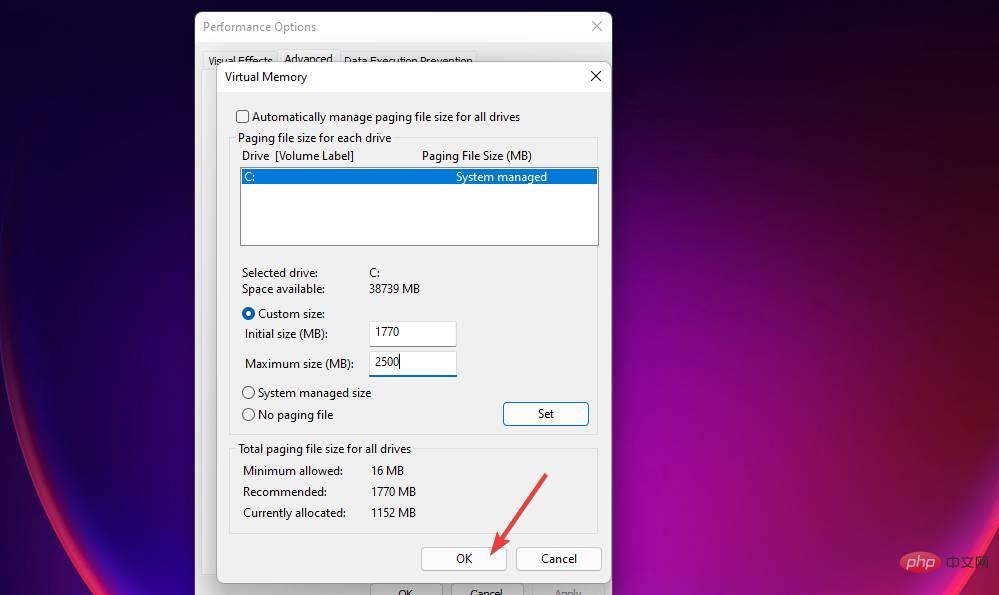
- Click "OK" on the "Virtual Memory" window.

#6. Update your GPU driver
- Open the manufacturer website of your graphics card (NVIDIA, Intel, AMD).
- Then go to the driver download section of the website.

- Select your graphics card model and Windows platform from the menu in the Driver Download section.
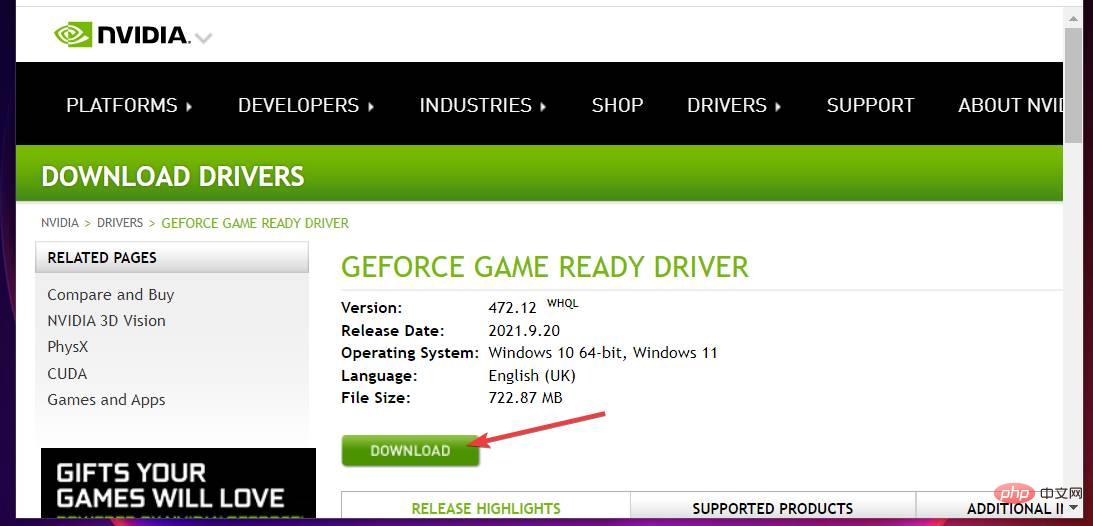
- Click on the Download option for the latest driver compatible with your PC.

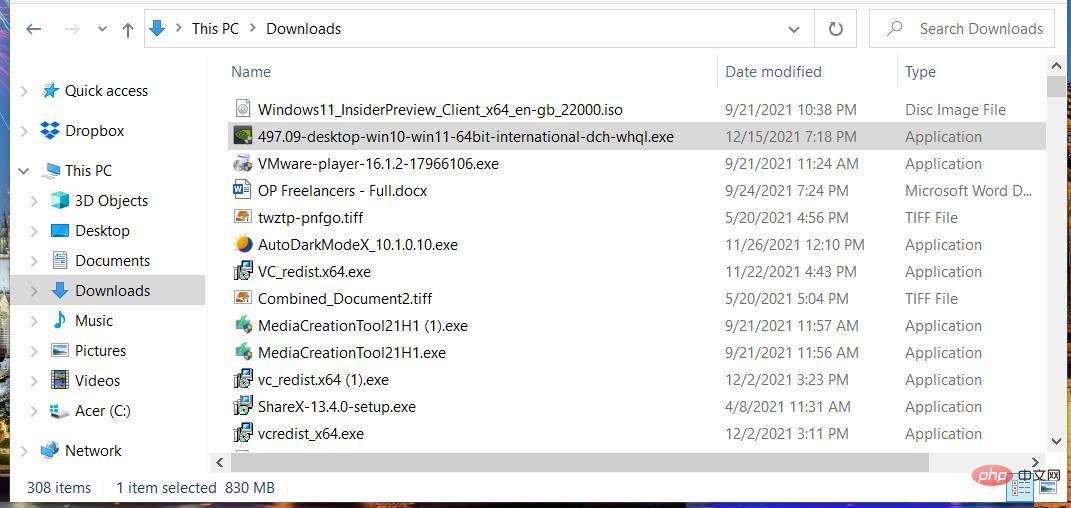
- After this, bring up File Explorer by clicking on the taskbar button shown directly below.

- Open the folder containing the driver package you downloaded.
- Double-click the driver package to open its settings window. Then install the driver through the setup wizard.

7. Uninstall Sonic Studio 3
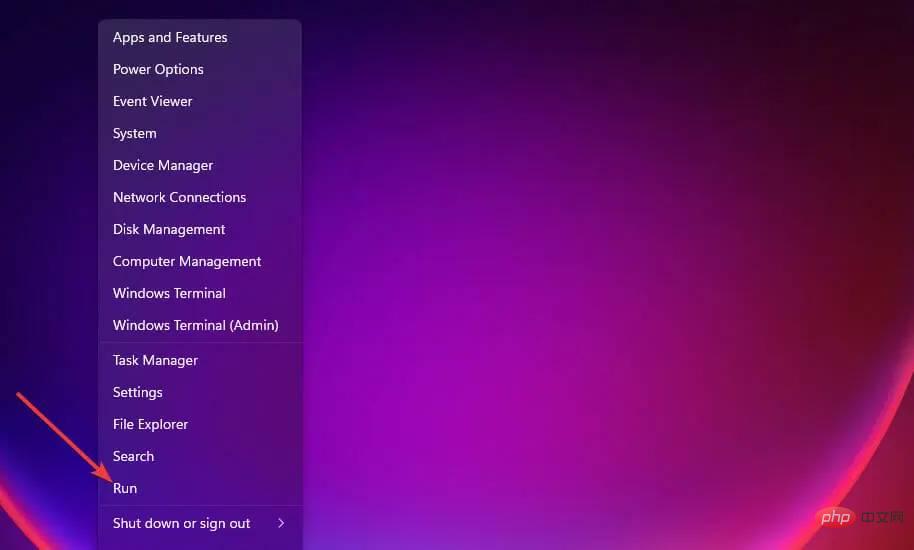
- Press the Windows X key combination and select RunShortcut.

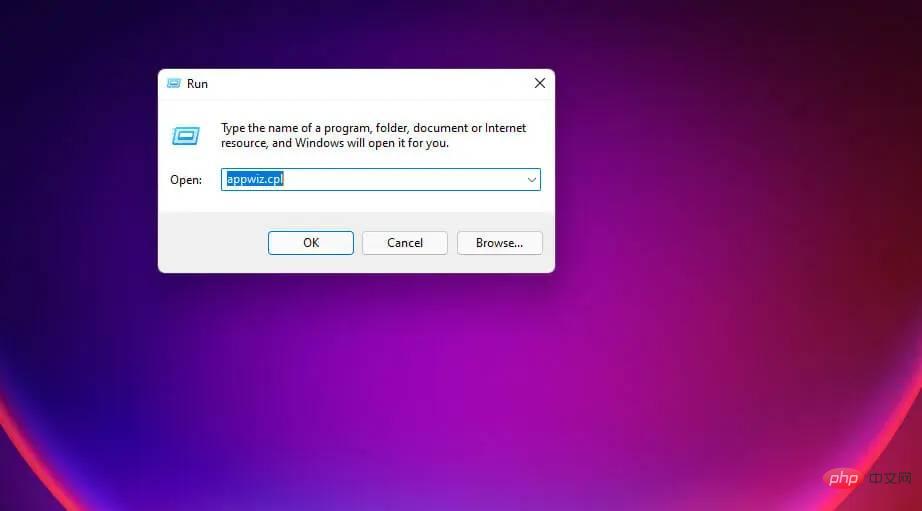
- Type this command in the Open box and click OK :
<strong>appwiz.cpl</strong>
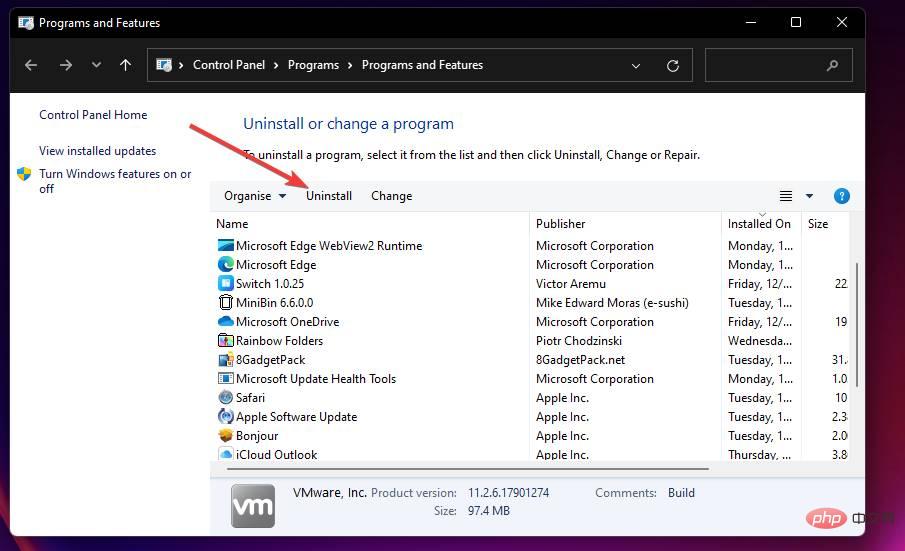
- Select Sonic Studio 3 in Programs and Features and click the Uninstall option for that software.

- Click Yes on any uninstall confirmation prompt that may pop up.
Some users may prefer to use a third-party uninstall utility such as IObit Uninstaller to uninstall Sonic 3. With IObit Uninstaller, you can also remove residual files and registry entries left behind by installed software.
8. Reset Windows 11 to factory default settings
- Press the Windows I key combination.
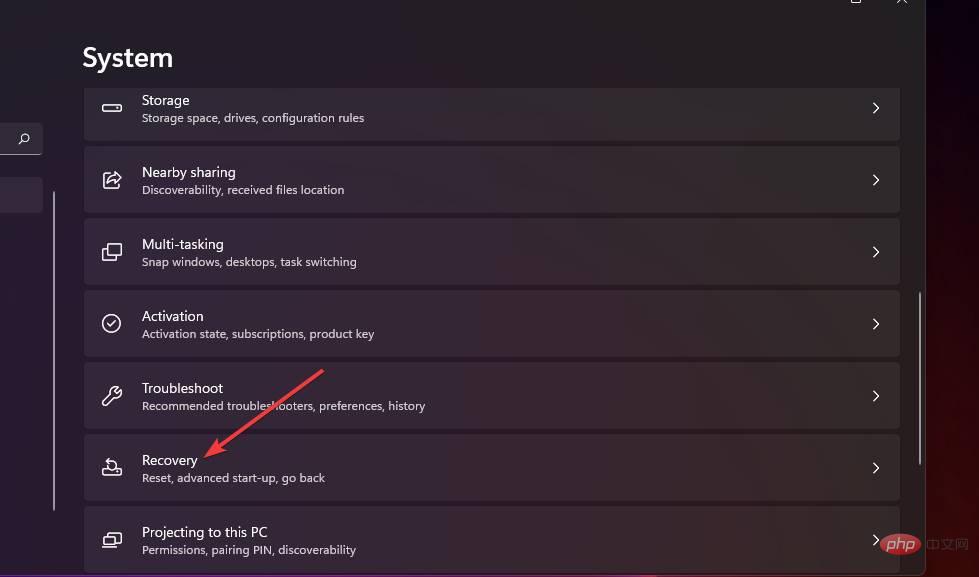
- Select "Recovery" on the "System" tab of "Settings".

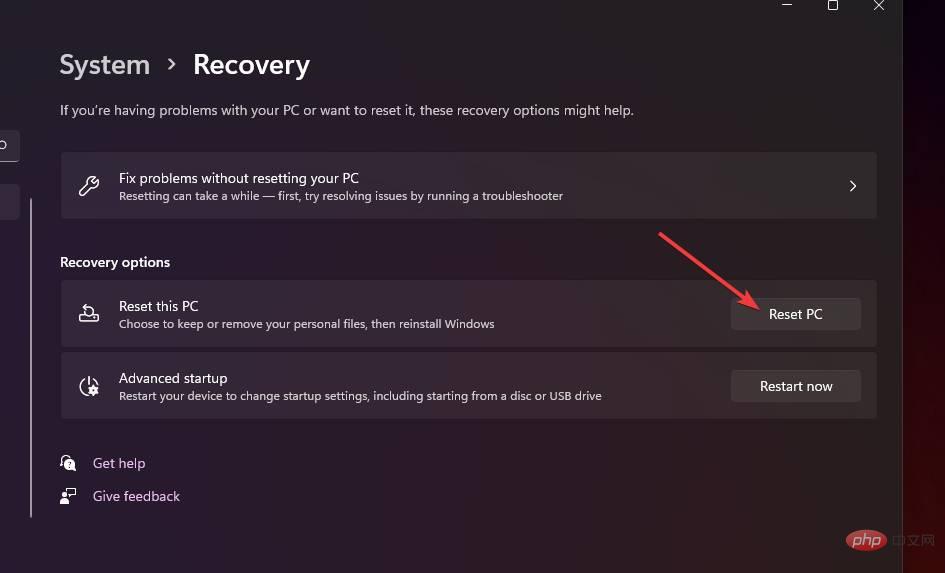
- Click the Reset PC button shown directly below.

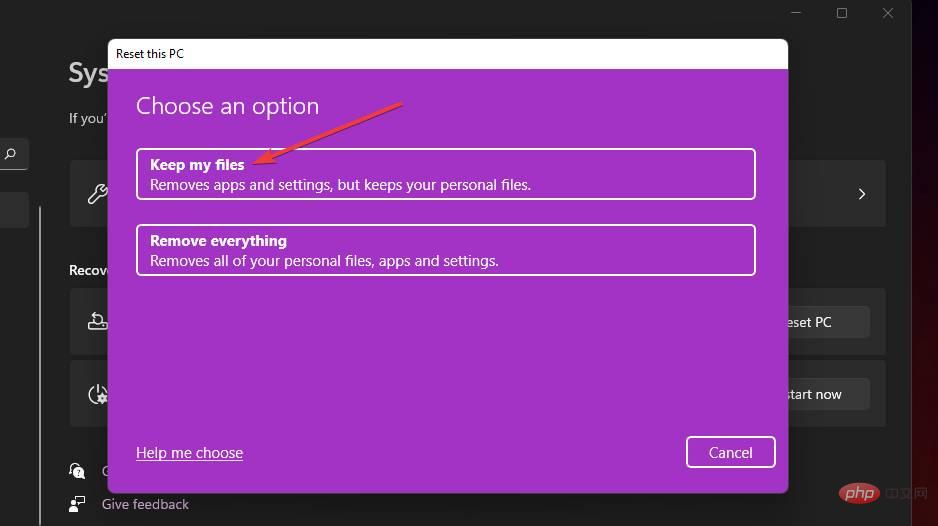
- Select the Keep my files option.

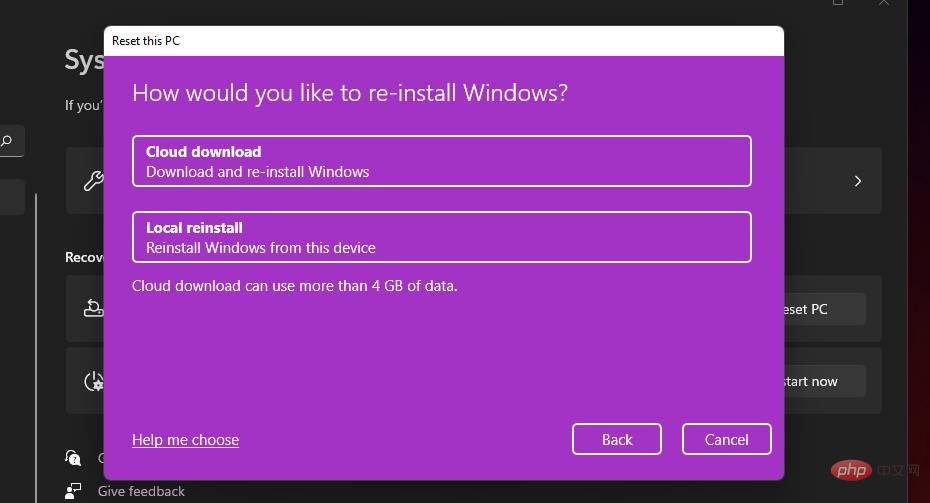
- Then select Cloud download or Local reinstall.

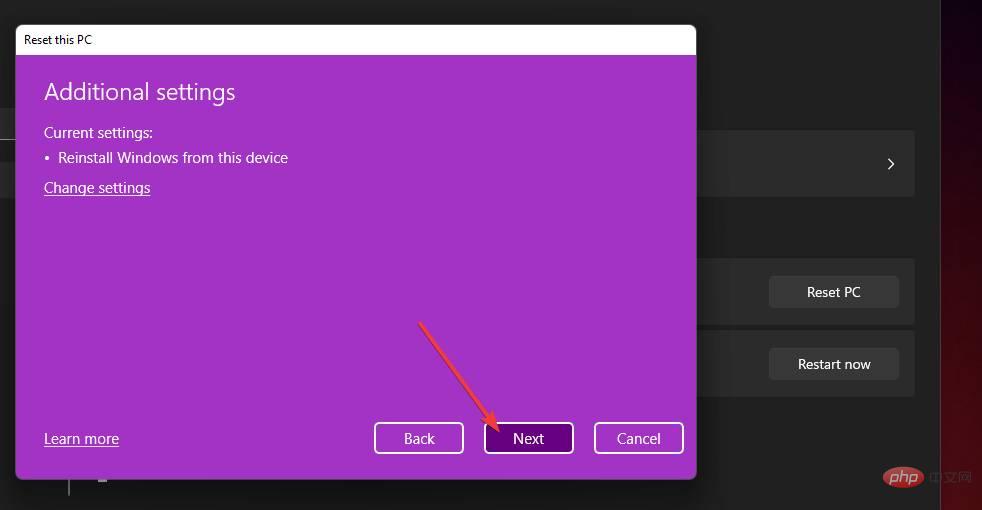
- Click Next>Reset to restore Windows 11 to factory default settings.

Does the same problem occur on other Windows platforms?
Yes, users have also reported similar Windows 10 freezes in support forums. Interestingly, some users said that the freezes/crashes started after an OS update. This type of issue may also occur on Windows XP, Vista, 7, and 8.
Some of the solutions above may help resolve similar freezing issues on different Windows platforms. However, our Windows 10 random freezes tutorial includes potential solutions and instructions specifically for this platform.
We cannot guarantee that the potential solutions in this tutorial will fix random freezes in Windows 11 for all users. However, there is a good chance that they will fix random and periodic freezes on many Windows PCs. Try to apply all these fixes in the specified order.
The above is the detailed content of Fix: Windows 11 keeps freezing randomly. For more information, please follow other related articles on the PHP Chinese website!

Hot AI Tools

Undresser.AI Undress
AI-powered app for creating realistic nude photos

AI Clothes Remover
Online AI tool for removing clothes from photos.

Undress AI Tool
Undress images for free

Clothoff.io
AI clothes remover

AI Hentai Generator
Generate AI Hentai for free.

Hot Article

Hot Tools

Notepad++7.3.1
Easy-to-use and free code editor

SublimeText3 Chinese version
Chinese version, very easy to use

Zend Studio 13.0.1
Powerful PHP integrated development environment

Dreamweaver CS6
Visual web development tools

SublimeText3 Mac version
God-level code editing software (SublimeText3)

Hot Topics
 What software is crystaldiskmark? -How to use crystaldiskmark?
Mar 18, 2024 pm 02:58 PM
CrystalDiskMark is a small HDD benchmark tool for hard drives that quickly measures sequential and random read/write speeds. Next, let the editor introduce CrystalDiskMark to you and how to use crystaldiskmark~ 1. Introduction to CrystalDiskMark CrystalDiskMark is a widely used disk performance testing tool used to evaluate the read and write speed and performance of mechanical hard drives and solid-state drives (SSD). Random I/O performance. It is a free Windows application and provides a user-friendly interface and various test modes to evaluate different aspects of hard drive performance and is widely used in hardware reviews
 CUDA's universal matrix multiplication: from entry to proficiency!
Mar 25, 2024 pm 12:30 PM
General Matrix Multiplication (GEMM) is a vital part of many applications and algorithms, and is also one of the important indicators for evaluating computer hardware performance. In-depth research and optimization of the implementation of GEMM can help us better understand high-performance computing and the relationship between software and hardware systems. In computer science, effective optimization of GEMM can increase computing speed and save resources, which is crucial to improving the overall performance of a computer system. An in-depth understanding of the working principle and optimization method of GEMM will help us better utilize the potential of modern computing hardware and provide more efficient solutions for various complex computing tasks. By optimizing the performance of GEMM
 Huawei's Qiankun ADS3.0 intelligent driving system will be launched in August and will be launched on Xiangjie S9 for the first time
Jul 30, 2024 pm 02:17 PM
On July 29, at the roll-off ceremony of AITO Wenjie's 400,000th new car, Yu Chengdong, Huawei's Managing Director, Chairman of Terminal BG, and Chairman of Smart Car Solutions BU, attended and delivered a speech and announced that Wenjie series models will be launched this year In August, Huawei Qiankun ADS 3.0 version was launched, and it is planned to successively push upgrades from August to September. The Xiangjie S9, which will be released on August 6, will debut Huawei’s ADS3.0 intelligent driving system. With the assistance of lidar, Huawei Qiankun ADS3.0 version will greatly improve its intelligent driving capabilities, have end-to-end integrated capabilities, and adopt a new end-to-end architecture of GOD (general obstacle identification)/PDP (predictive decision-making and control) , providing the NCA function of smart driving from parking space to parking space, and upgrading CAS3.0
 CrystalDiskinfo usage tutorial-What software is CrystalDiskinfo?
Mar 18, 2024 pm 04:50 PM
CrystalDiskInfo is a software used to check computer hardware devices. In this software, we can check our own computer hardware, such as reading speed, transmission mode, interface, etc.! So in addition to these functions, how to use CrystalDiskInfo and what exactly is CrystalDiskInfo? Let me sort it out for you! 1. The Origin of CrystalDiskInfo As one of the three major components of a computer host, a solid-state drive is the storage medium of a computer and is responsible for computer data storage. A good solid-state drive can speed up file reading and affect consumer experience. When consumers receive new devices, they can use third-party software or other SSDs to
 Oracle NVL function common problems and solutions
Mar 10, 2024 am 08:42 AM
Common problems and solutions for OracleNVL function Oracle database is a widely used relational database system, and it is often necessary to deal with null values during data processing. In order to deal with the problems caused by null values, Oracle provides the NVL function to handle null values. This article will introduce common problems and solutions of NVL functions, and provide specific code examples. Question 1: Improper usage of NVL function. The basic syntax of NVL function is: NVL(expr1,default_value).
 Implementing Machine Learning Algorithms in C++: Common Challenges and Solutions
Jun 03, 2024 pm 01:25 PM
Common challenges faced by machine learning algorithms in C++ include memory management, multi-threading, performance optimization, and maintainability. Solutions include using smart pointers, modern threading libraries, SIMD instructions and third-party libraries, as well as following coding style guidelines and using automation tools. Practical cases show how to use the Eigen library to implement linear regression algorithms, effectively manage memory and use high-performance matrix operations.
 How to resolve an incompatible software attempt to load with Edge?
Mar 15, 2024 pm 01:34 PM
When we use the Edge browser, sometimes incompatible software attempts to be loaded together, so what is going on? Let this site carefully introduce to users how to solve the problem of trying to load incompatible software with Edge. How to solve an incompatible software trying to load with Edge Solution 1: Search IE in the start menu and access it directly with IE. Solution 2: Note: Modifying the registry may cause system failure, so operate with caution. Modify registry parameters. 1. Enter regedit during operation. 2. Find the path\HKEY_LOCAL_MACHINE\SOFTWARE\Policies\Micros
 What software is photoshopcs5? -photoshopcs5 usage tutorial
Mar 19, 2024 am 09:04 AM
PhotoshopCS is the abbreviation of Photoshop Creative Suite. It is a software produced by Adobe and is widely used in graphic design and image processing. As a novice learning PS, let me explain to you today what software photoshopcs5 is and how to use photoshopcs5. 1. What software is photoshop cs5? Adobe Photoshop CS5 Extended is ideal for professionals in film, video and multimedia fields, graphic and web designers who use 3D and animation, and professionals in engineering and scientific fields. Render a 3D image and merge it into a 2D composite image. Edit videos easily


