

Fix: Microsoft Visual C++ 2015 Redistributable Setup Failed error 0x80240017

Microsoft Visual C has become an integral part of the Windows operating system required to run most common applications. Now, some users have recently complained about issues they encountered while trying to install Visual C Redistributable Packages for 2015 or Microsoft Visual Studio Redistributable Packages for 2013. According to these users, the installer stopped midway and displayed "0x80240017 - Unspecified Error ". There could be many reasons behind this failure. So, don’t waste your time on the reasons for this failure, follow these quick fixes to find a quick solution.
Solution——
1. Try to restart the system. After restarting the device, try installing the redistributable package again.
2. Uninstall/disable the antivirus program on your system.
If workarounds are not sufficient to resolve the issue, make these fixes.
Fix 1 – Uninstall existing redistributable installation files
If the redistributable library files are already installed on your system, you must uninstall them first.
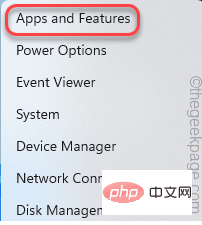
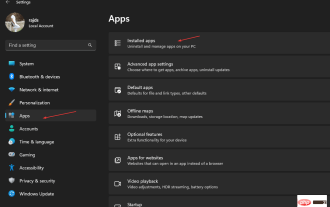
1. Just right-click on the Windows icon and click "Apps and Features".
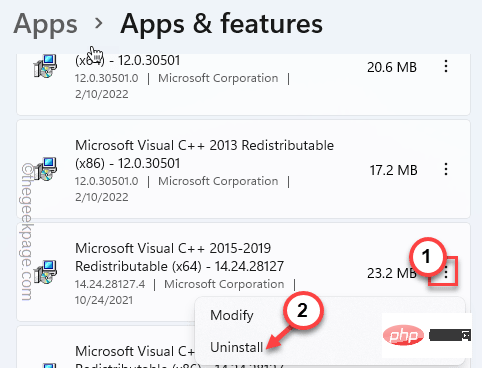
#2. Simply scroll down the list of installed applications and find any redistributable package related to the application you want to install.
(for example - Microsoft Visual C 2015-2019 Redistributable).
3. Click the three-dot menu, and then click "Uninstall".
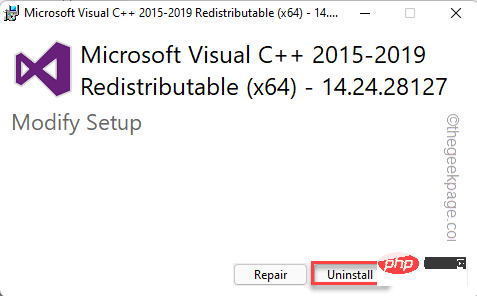
4. You can click "Uninstall" again to completely uninstall the package.
#Wait until the uninstall process is completed. Then close everything and restart your Windows machine.
Then, try installing the redistributable package again. This time you won't encounter any errors.
Fix 2 – Empty the Temp folder
Corrupted files in the Temp folder may cause this issue.
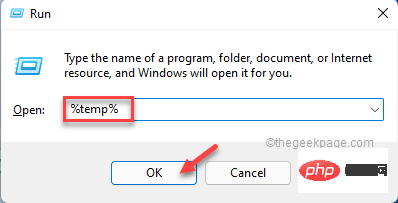
1. Press Windows keys and R keys simultaneously to enter run.
2. Then, enter this code and click "OK" to open the Temp folder.
%温度%
3. When Temp is open, press the Ctrl A keys at the same time.
4. Then, press the "Delete" key on the keyboard to clear the folder.

After deleting all files, close File Explorer.
Then, run the Redistributable Packages installer to install it. If the error code continues to appear, proceed to the next fix.
Fix 3 – Re-register the Windows Installer service
Windows Installer may have been unregistered.
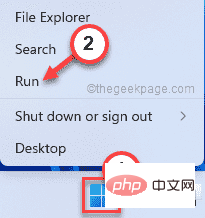
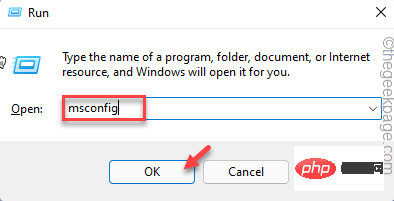
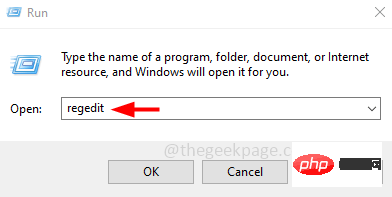
1. Right-click the Windows icon and click "Run" to open it.
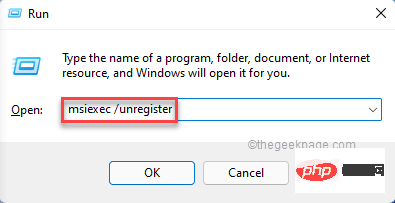
#2. Now type this in the Run terminal and press Enter to unregister the Windows Installer service.
msiexec /注销
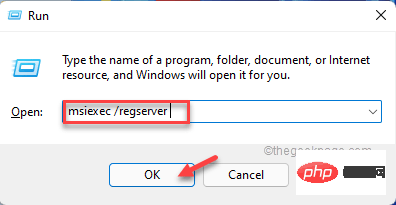
3. Again, copy and paste this line into Run, then click "OK" and try again Register the Windows Installer service.
msiexec /regserver
After completion, run the setup once.
You won't stumble upon error codes anymore.
Fix 4 – Check for Latest Windows Updates
Lack of current update patches may cause this issue on your system.
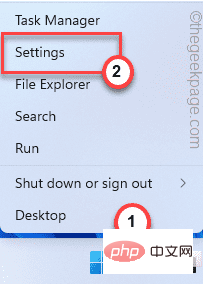
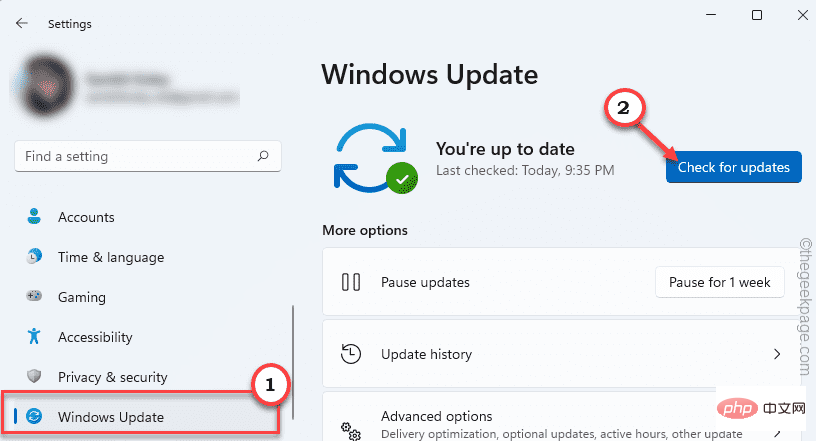
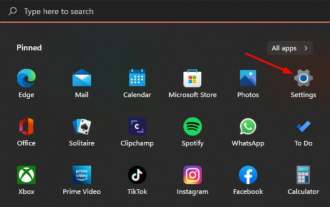
1. Right-click the Windows icon on the taskbar and click "Settings" to access it.
#2. When the settings appear, click "Windows Update" on the left.
4. To check for the latest update patch, please click "Check for Updates".
#Windows will detect the latest patches or feature updates for your system.
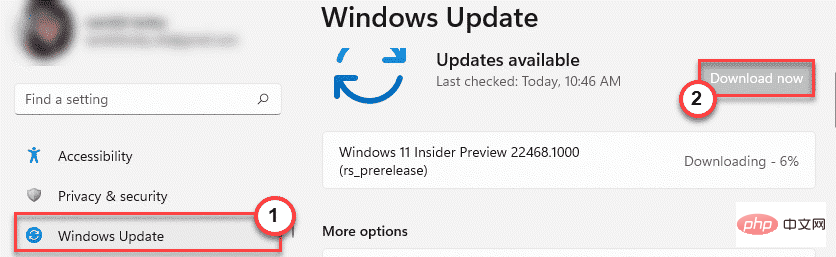
5. Click "Download Now" to download and install the update patch.
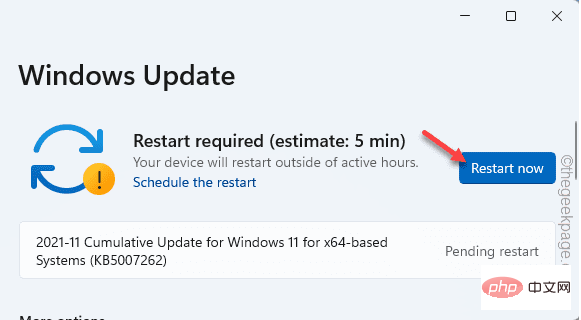
#6. After the installation is complete, you will be asked to restart the system. Click "Restart Now" to restart the system.
After restarting the system, run the installer again. If the problem persists, proceed to the next fix.
Fix 5 – Adjust correct date and time
Setup will fail if the system is configured with the wrong date and time.
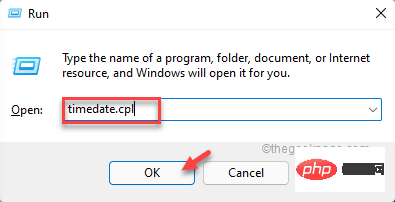
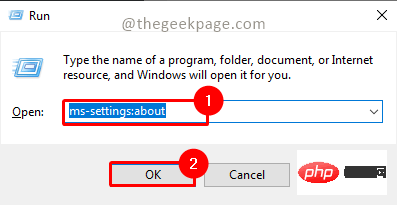
1. 按键盘上的Windows 键和R键应打开运行。
2. 现在,输入“ timedate.cpl ”并点击“ OK ”。
3. 打开日期和时间设置后,转到“日期和时间”选项卡。
4. 之后,点击“更改日期和时间... ”以访问它。
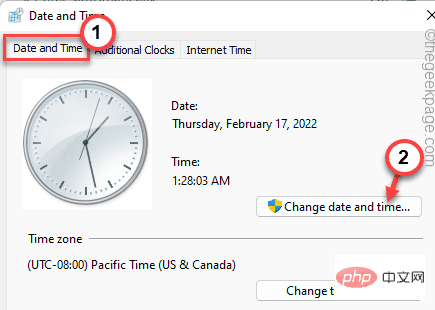
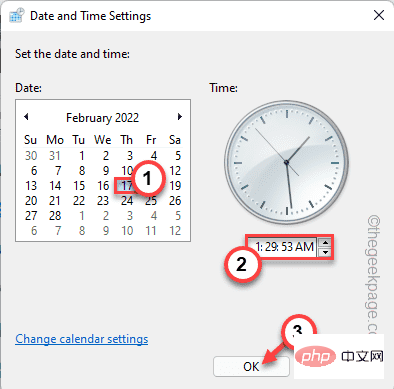
5. 现在,只需根据您的当地时间设置时间。对日期做同样的事情。
6. 然后,点击“确定”保存设置。
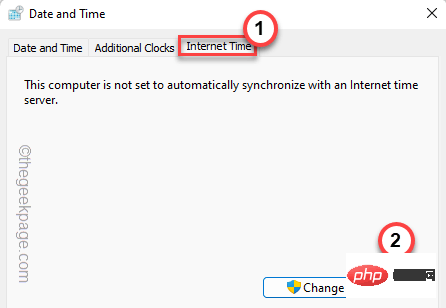
7. 完成时间和日期的更正后,转到“ Internet Time ”部分。
8. 之后,点击“更改设置... ”。
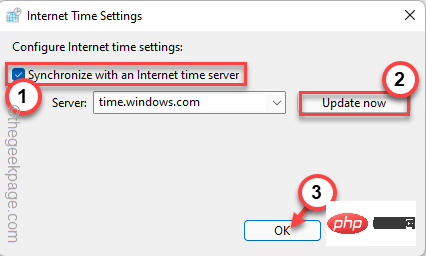
9. 接下来,选中“与 Internet 服务器同步”框。
10. 现在,单击“立即更新”以更新时间服务器设置。
11. 然后,点击“确定”保存更改。
12. 回到“日期和时间”窗口,点击“应用”和“确定”保存更改。

完成此操作后,重新启动系统一次。然后,再次运行安装文件并检查是否成功。
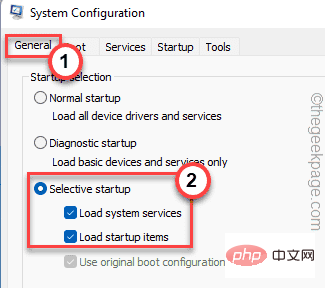
修复 6 – 执行干净启动
干净启动为设置过程提供干净的体验,停止所有干扰的第三方服务。
1. 按Windows键+R可以打开运行窗口。
2. 在那个运行窗口中,你可以写下这一行,然后按 Enter。
配置文件
3. 之后,点击“常规”部分。
4. 在这里,选择单选按钮“选择性启动”。
5. 然后,检查这两个选项 -
加载系统服务加载启动项
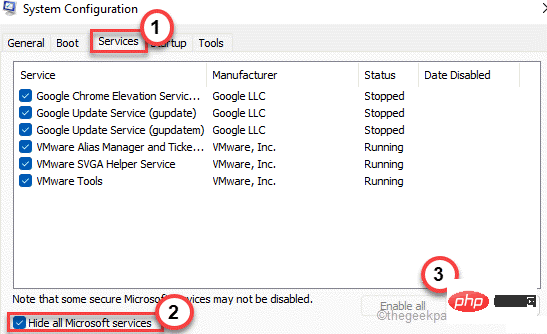
6. 完成后,前往“服务”部分。
7. 在这里,只需勾选“隐藏所有 Microsoft 服务”框。
8. 您会注意到所有第三方服务都被自动选择了。
9. 然后,单击“全部禁用”选项以禁用所有这些服务。
10.禁用服务后,您必须阻止异常应用程序自动启动。只需转到“启动”区域。
11.在这里,点击“打开任务管理器”以访问任务管理器实用程序。
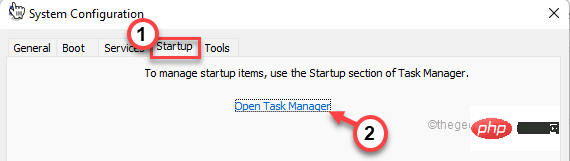
任务管理器将打开。
12. 您会注意到几个应用程序设置为随系统自动启动。
13. 右键单击每个服务,然后点击“禁用”将其禁用。
这样,请确保您已禁用所有不需要的应用程序。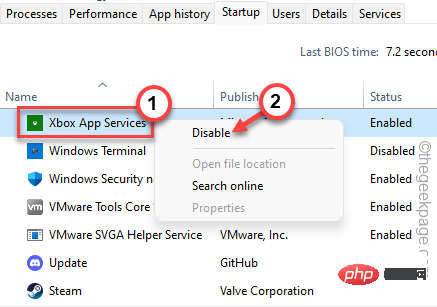
完成后关闭任务管理器窗口。
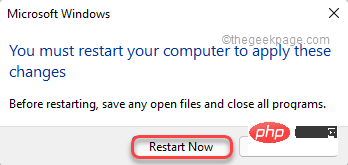
13. 只需单击“应用”,然后单击“确定”。

之后,您会注意到屏幕上出现了提示。
14.只需单击“立即重新启动”以重新启动系统以应用这些更改。
系统重新启动后,再次运行 Redistributable Package 设置文件。测试这是否可行。
修复 7 – 下载 Visual C++ 安装包
如果安装程序无法下载正确的软件包,您可以下载并手动安装。
1. 根据您的要求从这些链接下载特定的 Visual 包 -
适用于 Visual Studio 2013 的Visual C++ Redistributable Package – 下载链接
适用于 Visual Studio 2015 的 Visual C++ Redistributable Package – 下载链接
2. 到达页面后,点击“下载”按钮。

3. 在这里,只需根据您的操作系统架构检查正确的文件。
比如,如果您使用的是 64 位架构,请检查“ vc_redistx64.exe ”。
4. 然后,点击“下一步”开始下载安装文件。

5. 下载安装文件后,双击它。
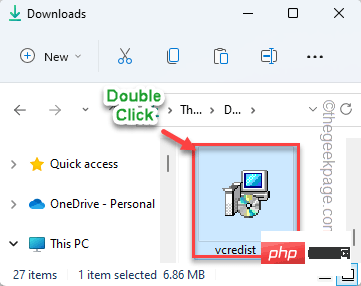
然后,按照屏幕上的步骤完成该过程。
检查此过程是否可以帮助您解决问题。
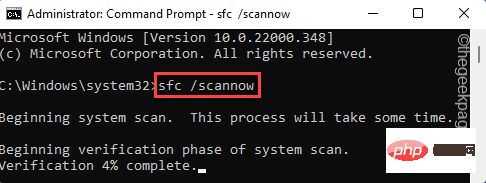
修复 8 – 运行 SFC 和 DISM 扫描
运行简单的 SFC 和 DISM 扫描应该
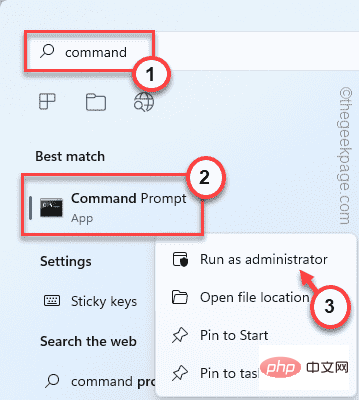
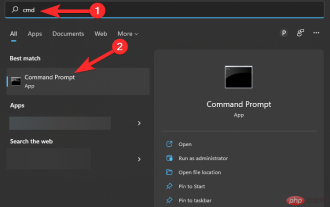
1.在搜索栏中输入“命令”。2. 然后,右键单击“命令提示符”并点击“以管理员身份运行”。
2. 然后,编写此 SFC 扫描命令并按Enter以运行 SFC 扫描。
sfc /scannow
3. SFC 扫描完成后,从此处复制此代码,将其粘贴到终端中,然后按Enter键。
dism 在线清理-映像恢复健康
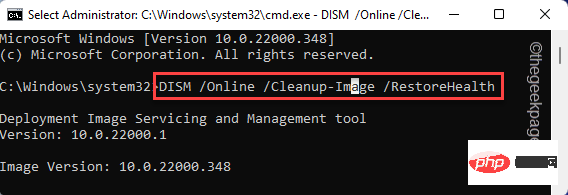
等到 Windows 完成 DISM 扫描。
运行这两个扫描后,关闭命令提示符。然后,运行一次安装文件以完成安装。
The above is the detailed content of Fix: Microsoft Visual C++ 2015 Redistributable Setup Failed error 0x80240017. For more information, please follow other related articles on the PHP Chinese website!

Hot AI Tools

Undresser.AI Undress
AI-powered app for creating realistic nude photos

AI Clothes Remover
Online AI tool for removing clothes from photos.

Undress AI Tool
Undress images for free

Clothoff.io
AI clothes remover

AI Hentai Generator
Generate AI Hentai for free.

Hot Article
Hot Tools

Notepad++7.3.1
Easy-to-use and free code editor

SublimeText3 Chinese version
Chinese version, very easy to use

Zend Studio 13.0.1
Powerful PHP integrated development environment

Dreamweaver CS6
Visual web development tools

SublimeText3 Mac version
God-level code editing software (SublimeText3)
Hot Topics
 1378
1378
 52
52

 How to run a JAR file on Windows 11 or 10
May 12, 2023 pm 06:34 PM
How to run a JAR file on Windows 11 or 10
May 12, 2023 pm 06:34 PM
Windows 11 is capable of running a large number of file types with or without external third-party applications. Not only does it allow you to perform numerous tasks from the comfort of your PC, but it also ensures that you can take advantage of your PC's raw capabilities. Today, we'll take a look at a complex file type—jar—and tell you how to open it on your Windows 11 or Windows 10 PC. What is a jar file? jar is an archive package format that may or may not contain an executable Java program. These archives can contain Java applications or source code, which can then be used to compile and run applications without having to write separate code for each application. You can use various methods
 How to disable driver signature enforcement in Windows 11
May 20, 2023 pm 02:17 PM
How to disable driver signature enforcement in Windows 11
May 20, 2023 pm 02:17 PM
Microsoft has built several security features into Windows to ensure your PC remains secure. One of them is driver signature enforcement in Windows 11. When this feature is enabled, it ensures that only drivers digitally signed by Microsoft can be installed on the system. This helps most of the users to a great extent as it protects them. But there is a downside to enabling driver signature enforcement. Suppose you find a driver that works for your device, but it is not signed by Microsoft, although it is completely safe. But you won't be able to install it. Therefore, you must know how to disable driver signing in Windows 11
 4 Ways to Enable or Disable Microsoft Store on Windows 11 or 10
May 14, 2023 am 10:46 AM
4 Ways to Enable or Disable Microsoft Store on Windows 11 or 10
May 14, 2023 am 10:46 AM
Here are some possible reasons why you need to disable Microsoft Store: Stop unwanted notifications. Preserves data by limiting the background processes of the Microsoft Store to improve security or privacy Addresses some issues related to the Store or the apps it installs. Restrict children, family members, or other users from downloading applications without permission. Steps to Disable or Enable Windows Store Before following this tutorial, disabling the Microsoft Store will also stop the installation of any apps that require its services. To use the store, users need to enable its service in the same way as blocking it. 1. Block WindowsStore background service Let us from restricting Microsoft Store as
 How to fix Windows 11 activation error 0xc004c060
May 17, 2023 pm 08:47 PM
How to fix Windows 11 activation error 0xc004c060
May 17, 2023 pm 08:47 PM
Why am I encountering Windows 11 activation error 0xc004c060? First make sure you are using genuine Windows and that the license key is valid. Also, check if it was obtained from an official source and if the key is suitable for the installed OS version. If there is an issue with any of these, you may encounter Windows 11 activation error 0xc004c060. So be sure to verify these and if you find everything is in order, move on to the next section. If you obtained the key through unreliable means or believe that the installed copy is a pirated version, you will need to purchase a valid key from Microsoft. In addition to this, misconfigured settings, missing
 How to fix runtime error 339 on Windows 11/10
May 13, 2023 pm 11:22 PM
How to fix runtime error 339 on Windows 11/10
May 13, 2023 pm 11:22 PM
There can be several reasons why runtime error 339 occurs when running a program. Some of them may be that some ocx or dll files are missing, damaged or the dll or ocx is not registered. This would be an annoying experience for the smooth execution of the application. Here are some of the possible error messages you may see for Runtime Error 339 Error – Runtime Error 339: Component DUZOCX32.OCX is not registered correctly or the file is missing. Error – Runtime Error 339. Component MSMASK32.ocx or one of its dependencies is not registered correctly; the file is missing or invalid. Error – Runtime Error '339': Component 'FM20.DLL' or one of its dependencies was not correctly noted
 0x80010105: How to fix this Windows update error
May 17, 2023 pm 05:44 PM
0x80010105: How to fix this Windows update error
May 17, 2023 pm 05:44 PM
Microsoft regularly releases Windows updates to improve functionality or increase the security of the operating system. You can ignore some of these updates, but it's important to always install security updates. While installing these updates, you may encounter error code; 0x80010105. An unstable connection usually causes most update errors, and once the connection is reestablished you're good to go. However, some require more technical troubleshooting, such as the 0x80010105 error, which is what we will see in this article. What causes WindowsUpdate error 0x80010105? This error may occur if your computer has not been updated in a while. Some users may have permanently disabled W for their reasons
 How to disable display scaling for high DPI settings in Windows 11 or 10
May 22, 2023 pm 10:11 PM
How to disable display scaling for high DPI settings in Windows 11 or 10
May 22, 2023 pm 10:11 PM
The default display scaling feature on Windows 10 or later is a core component of the Windows operating system. But sometimes, this feature of certain apps can cause compatibility issues, unreadable text, blurry logos, and ultimately, app crashes. This can be a huge headache if you're dealing with 2160p or higher resolutions. There are many ways to disable the default display scaling feature on high DPI settings. We've selected the best ones and detailed step-by-step instructions for each process. How to Disable Display Scaling on High DPI Settings There is a way, all you have to do is disable high DPI scaling for a single application, and there is a way to do it for the entire Window
 How to disable core parking on Windows 10
May 16, 2023 pm 01:07 PM
How to disable core parking on Windows 10
May 16, 2023 pm 01:07 PM
If you are a Windows user and want to disable the core parking functionality in your system, this article will guide you through the process. What is core parking? The core parking function is a power saving mechanism. It puts some of your processors into a sleep mode that doesn't perform any tasks and consumes very little or no power. This helps reduce energy consumption and therefore heat in the system. These cores are unparked when needed. Few users need to disable this feature, especially gamers. Disabling this feature will improve your system performance. Disable Windows Core Parking using Windows Registry Editor Step 1: Use Windows + R keys simultaneously to open the run prompt. Step 2: At the run prompt