

How to add or remove folders to Controlled Folder Access in Windows 11 and 10

Microsoft has launched an antivirus software that helps protect folders from any other application called Defender Antivirus. In a ransomware attack, all the folders and files within it are compromised and you will not be able to use them as it will be locked by another virus process. So when you add a folder to Controlled Folder Access, it provides extra security and prevents these ransomware attacks. By default, Windows adds folders such as Documents, Pictures, Videos, etc. in the user directory to Controlled Folder Access. You need to be logged in as SystemAdministrator to add or remove folders from Controlled Folder Access. In this article we have explained some of the ways you can do this.
How to add or remove folders to Controlled Folder Access in Windows 11 using Settings
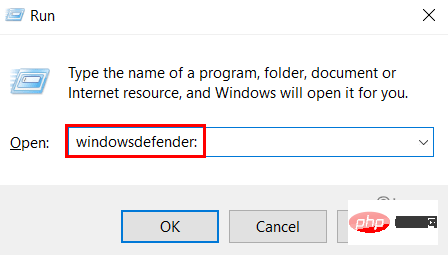
Step 1: Press the Windows R key simultaneously on your keyboard to open the Run dialog box.
Step 2: Type windowsdefender: in the Run dialog box and press the Enter key on your keyboard to open Windows Security .
Step 3: Select Virus & Threat Protection on the left side of Window Security. 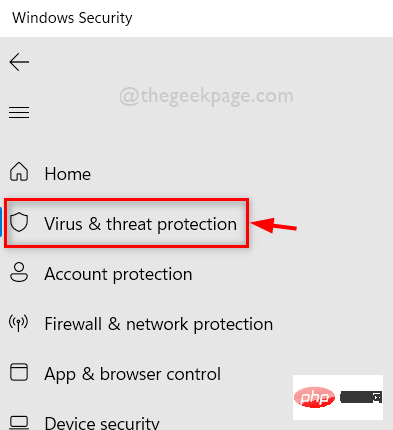
Step 4: On the right side of the window, scroll down and click Management Settings under the Virus & Threat Protection Settings option as shown below.
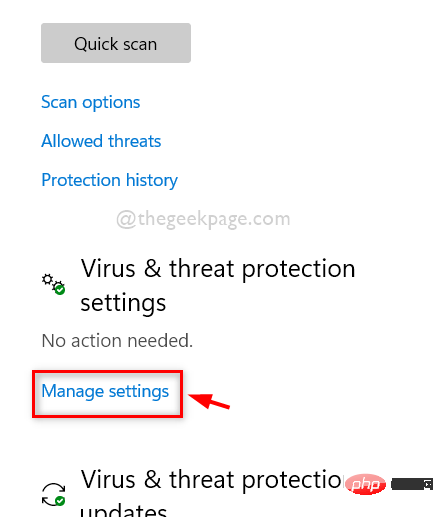
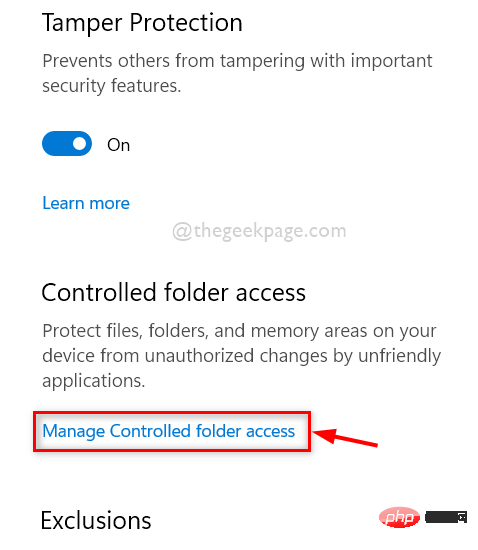
Step 5: Then, at the bottom of the Virus & Threat Protection Settings page, click the Manage Controlled Folder Access option as shown below .
Step 6: Click the Controlled Folder Accesstoggle button to turn it on.
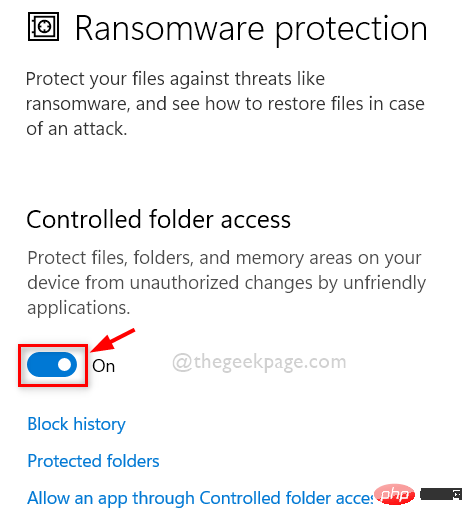
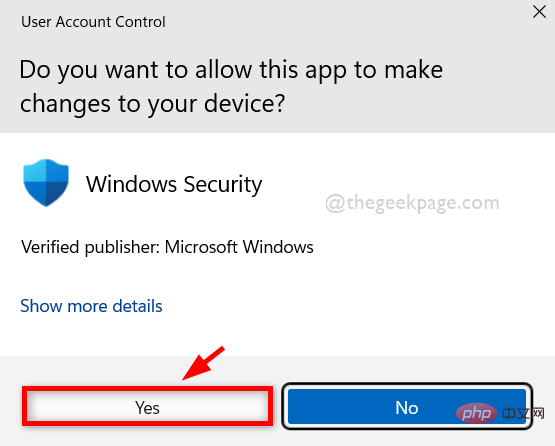
Step 7: Accept the UAC prompt and enable Controlled Folder Access by clicking Yes as shown.
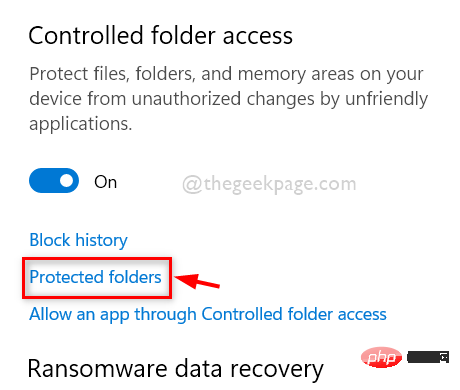
Step 8: After enabling Controlled Folder Access, click on Protected Folders to view the list of folders as shown below.
Step 9: Click Yes" again to accept the UAC prompt to continue.
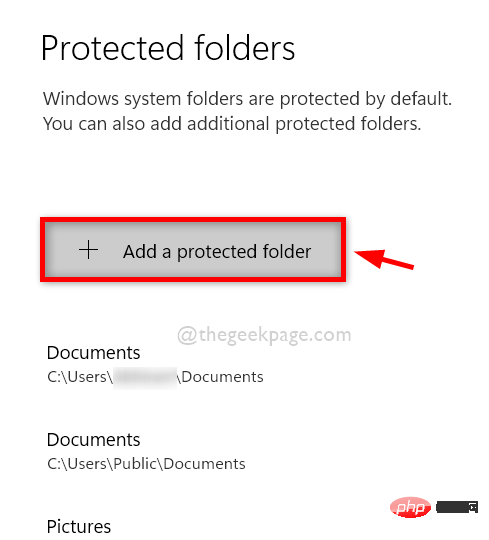
Step 10: Then, click the Add Protected Folder button to add the required folders.
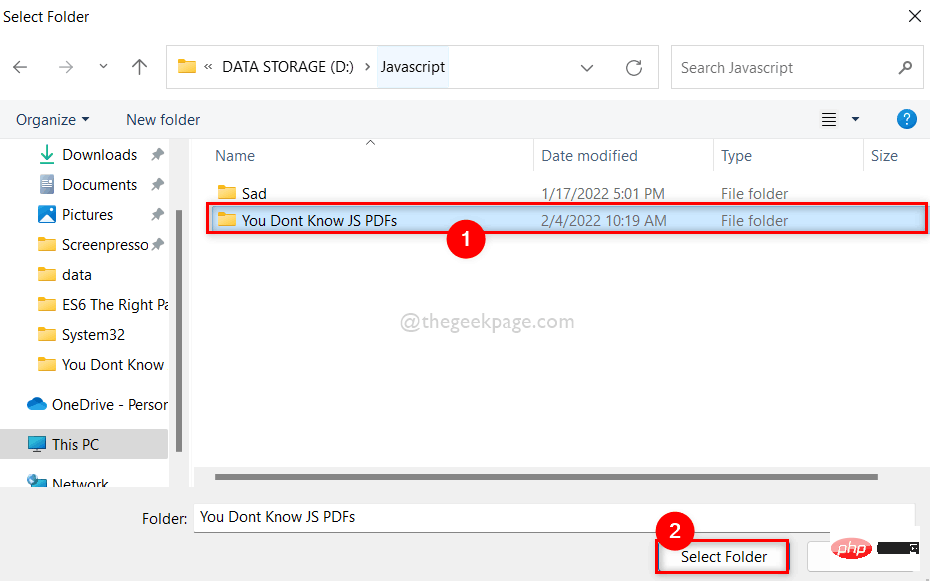
Step 11: Browse to and select the folder you want to add.
Step 12: Then, click the Select Folder button as shown in the image below.
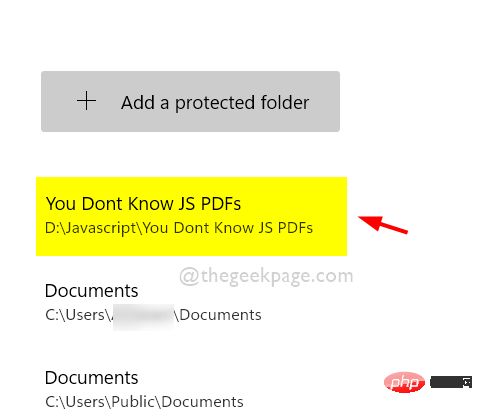
Step 13: Now you can see that the folder you selected has been added to the protected folder list.
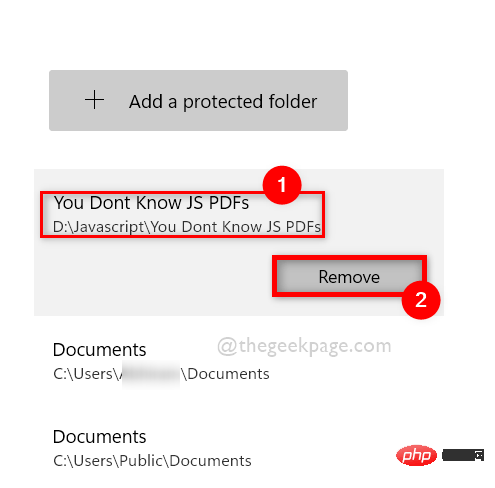
Step 14: If you want to remove a protected folder from the list, just click on the folder.
Step 15: Then you will see the Delete button under the protected folder. Please click on it and delete the protected folder immediately.
Step 16: Once completed, close the Windows Security window.
that's all.
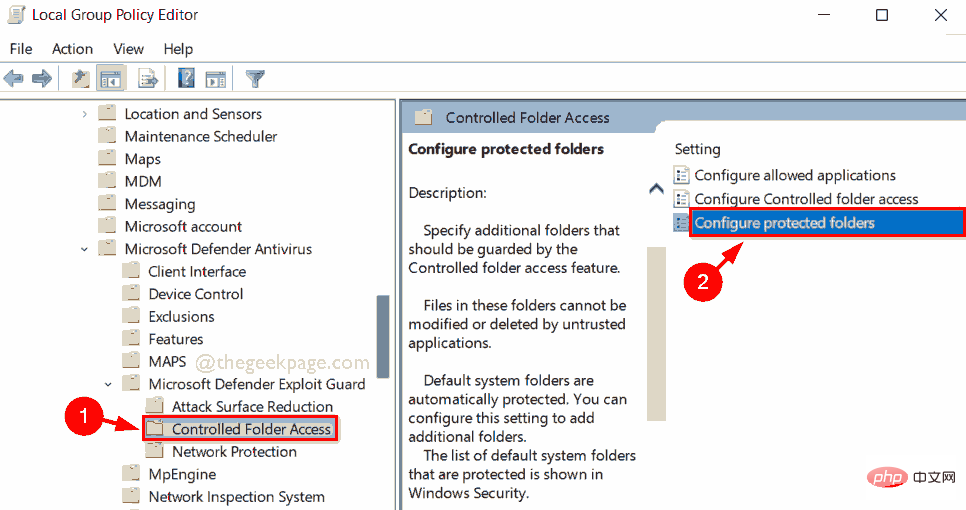
How to add or remove folders to Controlled Folder Access in Windows 11 using the Local Group Policy Editor
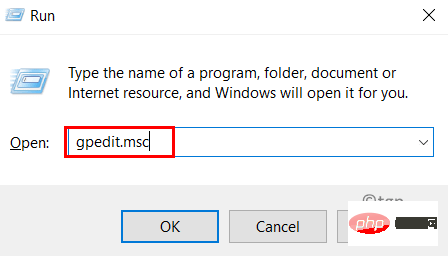
Step 1: Press Windows R# simultaneously on your keyboard ## key to open the Run dialog box.
Step 2: Typegpedit.msc in the Run dialog box, and then press the Enter key to open the Local Group Policy Editor.
Controlled Folder Access option.
计算机配置> 管理模板> Windows 组件> Microsoft Defender 防病毒> Microsoft Defender Exploit Guard> 受控文件夹访问
Controlled Folder Access on the left panel of the Local Group Policy Editor.
Step 5: Then, on the right side of the window, double-click theConfigure protected folder option as shown in the image below.
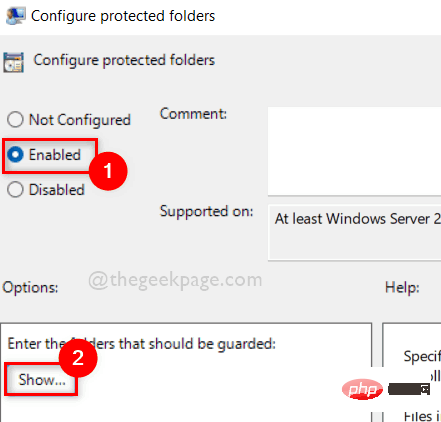
Enabled radio button and click Show button, as shown below.
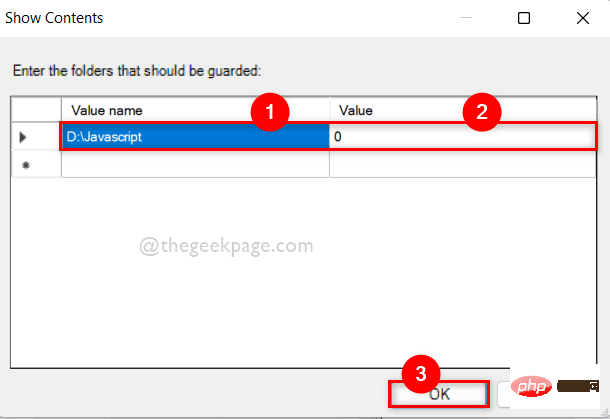
第 7 步:在“显示内容”窗口中,在“值名称”字段中输入要添加到受控文件夹访问的文件夹的路径。
第 8 步:然后,在值字段中输入0 。
步骤 9:对于另一个多个文件夹,按照步骤 8 中的说明依次输入文件夹的路径。
第 10 步:单击“确定”继续。
第 11 步:要从受控文件夹访问中删除文件夹,请单击启用,然后如前所述点击显示按钮。
第 12 步:然后,从“显示内容”窗口中删除/清除文件夹的路径。
步骤 13:完成后关闭本地组策略编辑器窗口。
就这样。
如何使用 PowerShell 在 Windows 11 中向受控文件夹访问添加或删除文件夹
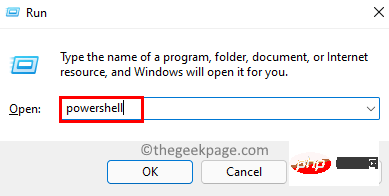
第 1 步:按键盘上的Windows + R键打开“运行”对话框。
第 2 步:然后,在运行框中键入powershell ,然后按CTRL + SHIFT + ENTER键以管理员 身份打开PowerShell应用程序。
第 3 步:要将文件夹添加到受控文件夹访问权限,请复制并粘贴以下命令,然后按Enter键执行。
注意:请将D:\Javascript替换为要添加到受控文件夹访问的文件夹的路径。
PowerShell Add-MpPreference -ControlledFolderAccessProtectedFolders "D:\Javascript"

第 4 步:如果要从受控文件夹访问中删除任何文件夹,请执行以下给定命令。
注意:请将D:\Javascript替换为要从受控文件夹访问中删除的文件夹的路径。
PowerShell 删除-MpPreference -ControlledFolderAccessProtectedFolders "D:\Javascript"

第 5 步:完成后,关闭 PowerShell 应用程序。
就这样。
如何使用注册表编辑器在 Windows 11 中向受控文件夹访问添加或删除文件夹
注意:在继续使用此方法之前,请保留注册表文件的备份。因为如果注册表文件出现问题可能会损坏您的系统,您可以随时将其恢复。
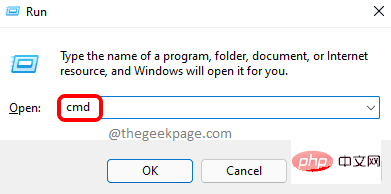
步骤 1:同时按键盘上的Windows + R键以打开运行对话框。
第 2 步:然后,在运行框中键入cmd并同时按CTRL + SHIFT + ENTER键以管理员身份打开命令提示符。
第3步:一一执行以下命令。
set key="HKEY_LOCAL_MACHINE\SOFTWARE\Policies\Microsoft\Windows Defender\Windows Defender Exploit Guard\受控文件夹访问\ProtectedFolders"
注册添加 %key%

第 4 步:关闭命令提示符。
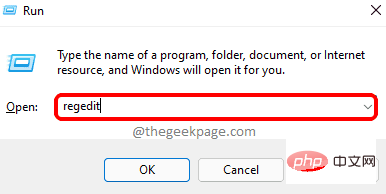
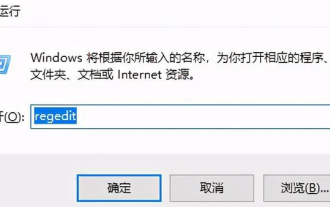
第 5 步:在键盘上同时按Windows + R键以打开运行命令框。
第 6 步:在运行框中键入regedit ,然后按Enter键打开注册表编辑器。
步骤 7:通过单击是继续接受 UAC 提示。
第 8 步:将以下给定路径复制并粘贴到空白且清晰的地址栏中。
HKEY_LOCAL_MACHINE\SOFTWARE\Policies\Microsoft\Windows Defender\Windows Defender Exploit Guard\Controlled Folder Access
第9步:然后右键单击受控文件夹访问并选择新建> DWORD(32位)值。

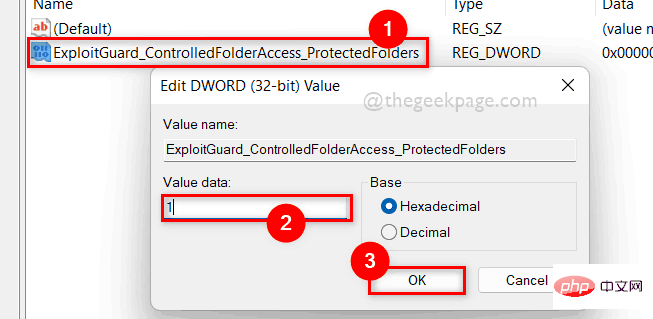
第 10 步:将新创建的 DWORD 值重命名为ExploitGuard_ControlledFolderAccess_ProtectedFolders并双击打开它。
第 11 步:之后,在 Value data 字段中输入1并单击OK。
第 12 步:再次将以下路径复制并粘贴到空地址栏中,然后按Enter键。
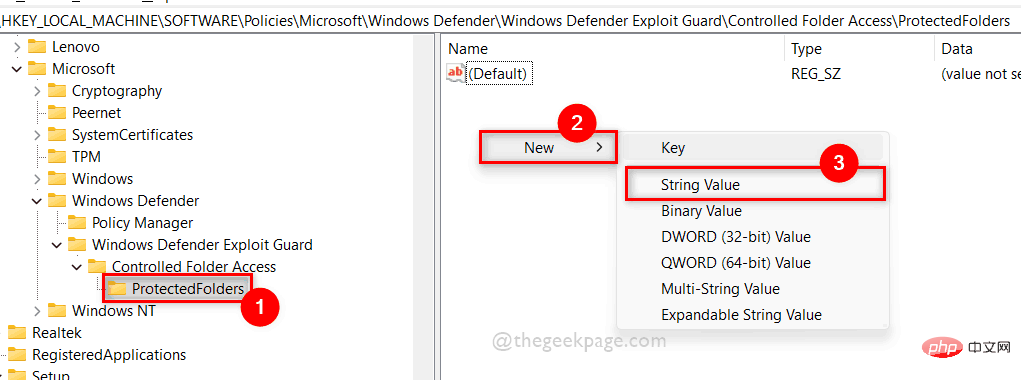
HKEY_LOCAL_MACHINE\SOFTWARE\Policies\Microsoft\Windows Defender\Windows Defender Exploit Guard\受控文件夹访问\ProtectedFolders
第 13 步:然后,确保选中左侧的ProtectedFolders注册表项。
第 14 步:在右侧,右键单击空白区域并选择New > String Value。
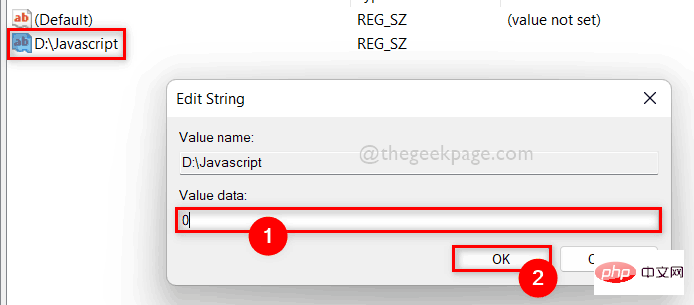
第 15 步:将字符串值重命名为要添加到受控文件夹访问的文件夹的路径。
第 16 步:双击打开它并在数值数据字段中输入0 ,然后单击确定。
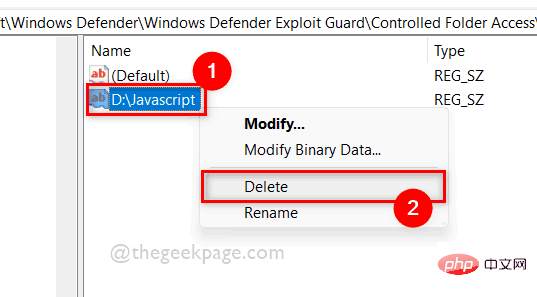
Step 17: If you want to remove the folder from Controlled Folder Access, right-click on the string value folder path and select the Remove option from the context menu as shown below.
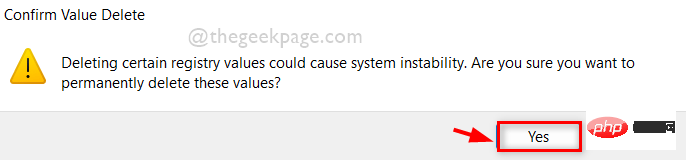
Step 18: Click "Yes" to confirm deleting the value as shown below.
Step 19: When finished, close Registry Editor.
that's all.
Hope this article is useful.
The above is the detailed content of How to add or remove folders to Controlled Folder Access in Windows 11 and 10. For more information, please follow other related articles on the PHP Chinese website!

Hot AI Tools

Undresser.AI Undress
AI-powered app for creating realistic nude photos

AI Clothes Remover
Online AI tool for removing clothes from photos.

Undress AI Tool
Undress images for free

Clothoff.io
AI clothes remover

AI Hentai Generator
Generate AI Hentai for free.

Hot Article
Hot Tools

Notepad++7.3.1
Easy-to-use and free code editor

SublimeText3 Chinese version
Chinese version, very easy to use

Zend Studio 13.0.1
Powerful PHP integrated development environment

Dreamweaver CS6
Visual web development tools

SublimeText3 Mac version
God-level code editing software (SublimeText3)
Hot Topics


 What to do if WPS Office cannot open the PPT file - What to do if WPS Office cannot open the PPT file
Mar 04, 2024 am 11:40 AM
What to do if WPS Office cannot open the PPT file - What to do if WPS Office cannot open the PPT file
Mar 04, 2024 am 11:40 AM
Recently, many friends have asked me what to do if WPSOffice cannot open PPT files. Next, let us learn how to solve the problem of WPSOffice not being able to open PPT files. I hope it can help everyone. 1. First open WPSOffice and enter the homepage, as shown in the figure below. 2. Then enter the keyword "document repair" in the search bar above, and then click to open the document repair tool, as shown in the figure below. 3. Then import the PPT file for repair, as shown in the figure below.
 What software is crystaldiskmark? -How to use crystaldiskmark?
Mar 18, 2024 pm 02:58 PM
What software is crystaldiskmark? -How to use crystaldiskmark?
Mar 18, 2024 pm 02:58 PM
CrystalDiskMark is a small HDD benchmark tool for hard drives that quickly measures sequential and random read/write speeds. Next, let the editor introduce CrystalDiskMark to you and how to use crystaldiskmark~ 1. Introduction to CrystalDiskMark CrystalDiskMark is a widely used disk performance testing tool used to evaluate the read and write speed and performance of mechanical hard drives and solid-state drives (SSD). Random I/O performance. It is a free Windows application and provides a user-friendly interface and various test modes to evaluate different aspects of hard drive performance and is widely used in hardware reviews
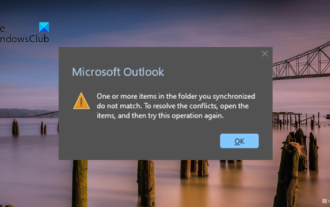 One or more items in the folder you synced do not match Outlook error
Mar 18, 2024 am 09:46 AM
One or more items in the folder you synced do not match Outlook error
Mar 18, 2024 am 09:46 AM
When you find that one or more items in your sync folder do not match the error message in Outlook, it may be because you updated or canceled meeting items. In this case, you will see an error message saying that your local version of the data conflicts with the remote copy. This situation usually happens in Outlook desktop application. One or more items in the folder you synced do not match. To resolve the conflict, open the projects and try the operation again. Fix One or more items in synced folders do not match Outlook error In Outlook desktop version, you may encounter issues when local calendar items conflict with the server copy. Fortunately, though, there are some simple ways to help
 CrystalDiskinfo usage tutorial-What software is CrystalDiskinfo?
Mar 18, 2024 pm 04:50 PM
CrystalDiskinfo usage tutorial-What software is CrystalDiskinfo?
Mar 18, 2024 pm 04:50 PM
CrystalDiskInfo is a software used to check computer hardware devices. In this software, we can check our own computer hardware, such as reading speed, transmission mode, interface, etc.! So in addition to these functions, how to use CrystalDiskInfo and what exactly is CrystalDiskInfo? Let me sort it out for you! 1. The Origin of CrystalDiskInfo As one of the three major components of a computer host, a solid-state drive is the storage medium of a computer and is responsible for computer data storage. A good solid-state drive can speed up file reading and affect consumer experience. When consumers receive new devices, they can use third-party software or other SSDs to
 How to set the keyboard increment in Adobe Illustrator CS6 - How to set the keyboard increment in Adobe Illustrator CS6
Mar 04, 2024 pm 06:04 PM
How to set the keyboard increment in Adobe Illustrator CS6 - How to set the keyboard increment in Adobe Illustrator CS6
Mar 04, 2024 pm 06:04 PM
Many users are using the Adobe Illustrator CS6 software in their offices, so do you know how to set the keyboard increment in Adobe Illustrator CS6? Then, the editor will bring you the method of setting the keyboard increment in Adobe Illustrator CS6. Interested users can take a look below. Step 1: Start Adobe Illustrator CS6 software, as shown in the figure below. Step 2: In the menu bar, click the [Edit] → [Preferences] → [General] command in sequence. Step 3: The [Keyboard Increment] dialog box pops up, enter the required number in the [Keyboard Increment] text box, and finally click the [OK] button. Step 4: Use the shortcut key [Ctrl]
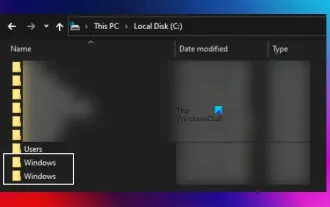 There are two Windows folders in the C drive; what should I do?
Mar 06, 2024 am 11:55 AM
There are two Windows folders in the C drive; what should I do?
Mar 06, 2024 am 11:55 AM
The Windows folder contains the Windows operating system and is an important folder in a Windows computer. By default, Windows is installed on the C drive. Therefore, C is the default directory for Windows folders. Every Windows computer has a Windows folder. However, some users reported that two Windows folders were found in the C drive. In this article, we will explain what you can do if you encounter such a situation. Two Windows folders in C drive It is rare to have two Windows folders in C drive. However, if you encounter such a situation, you can use the following suggestions: Run an anti-malware scan to try to find the correct
 Windows 11 Folder Sharing Guide: Easily Share Your Files and Data
Mar 13, 2024 am 11:49 AM
Windows 11 Folder Sharing Guide: Easily Share Your Files and Data
Mar 13, 2024 am 11:49 AM
In daily life and work, we often need to share files and folders between different devices. Windows 11 system provides convenient built-in folder sharing functions, allowing us to easily and safely share the content we need with others within the same network while protecting the privacy of personal files. This feature makes file sharing simple and efficient without worrying about leaking private information. Through the folder sharing function of Windows 11 system, we can cooperate, communicate and collaborate more conveniently, improving work efficiency and life convenience. In order to successfully configure a shared folder, we first need to meet the following conditions: All devices (participating in sharing) are connected to the same network. Enable Network Discovery and configure sharing. Know the target device
 How to resolve an incompatible software attempt to load with Edge?
Mar 15, 2024 pm 01:34 PM
How to resolve an incompatible software attempt to load with Edge?
Mar 15, 2024 pm 01:34 PM
When we use the Edge browser, sometimes incompatible software attempts to be loaded together, so what is going on? Let this site carefully introduce to users how to solve the problem of trying to load incompatible software with Edge. How to solve an incompatible software trying to load with Edge Solution 1: Search IE in the start menu and access it directly with IE. Solution 2: Note: Modifying the registry may cause system failure, so operate with caution. Modify registry parameters. 1. Enter regedit during operation. 2. Find the path\HKEY_LOCAL_MACHINE\SOFTWARE\Policies\Micros