
Windows 11 now automatically manages your Airpods profiles right out of the box. This means that when you connect your Airpods to a PC with Windows 11, they no longer display two headphone profiles; one for stereo audio and one for mono audio with a microphone. These profiles are no longer available in any application, and the operating system seems to smartly switch between the two based on your needs and requirements.
However, the switching process is still in beta and can sometimes be glitchy, to say the least, when you need it most to switch between profiles. A good example is how Airpods are used and displayed while making a video call on your PC. In our case, the buds switched to mono audio for microphone use and simply refused to switch back to stereo audio. The only way to fix this is to reconnect, put the headphones back in the case and take them out after a few seconds, or continue using Mono Audio during a video call.
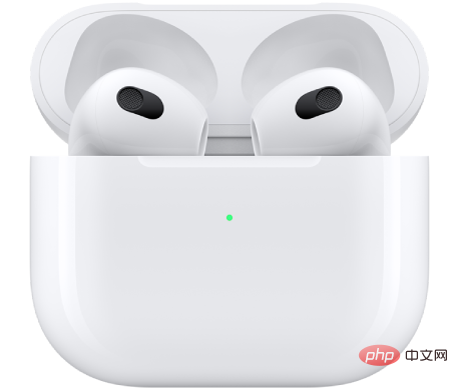
Before we start the repair, we It is recommended that you read more about how to reconnect Airpods to Windows 11 after pairing. You may have noticed that Airpods can now effectively reconnect to Windows 11 when the case is open, however, that's only before you connect the Airpods to another device. Once connected, the Airpods will no longer connect to your Windows 11 device, even if you open the case and try to connect manually.
The trick here is that you need to enter pairing mode on your Airpods and then tap Connect in the Settings app. Press and hold the settings button on the back of your Airpods with the lid open until you see a flashing white light. This means you are in pairing mode and you can now click Connect on your PC.
When reconnecting, you don't have to remove and re-pair your Airpods on your PC every time, but you do have to enter pairing mode on your Airpods to reconnect. Apart from this, if you don't have your Airpods connected to another device, then you can just turn on Bluetooth on your PC and open the Airpods lid to enjoy automatic connection.
To re-pair your Airpods, make sure you have restarted your PC and Bluetooth on your PC is turned on. Now open the lid of your Airpods case and press and hold the "Settings" button on the back until the light starts flashing "white". This means you are in pairing mode on your Airpods and you can now pair them with your PC using the tutorial below.
Press Windows i keyboard and click "Bluetooth and Devices" on the left.
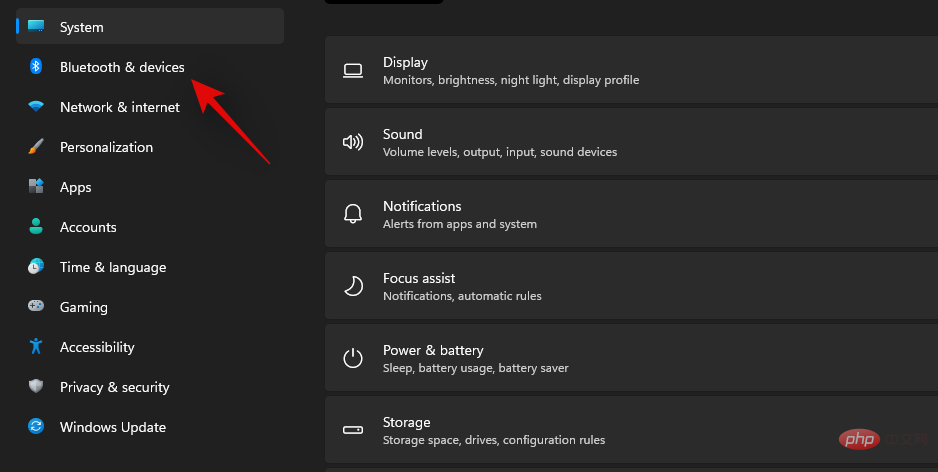
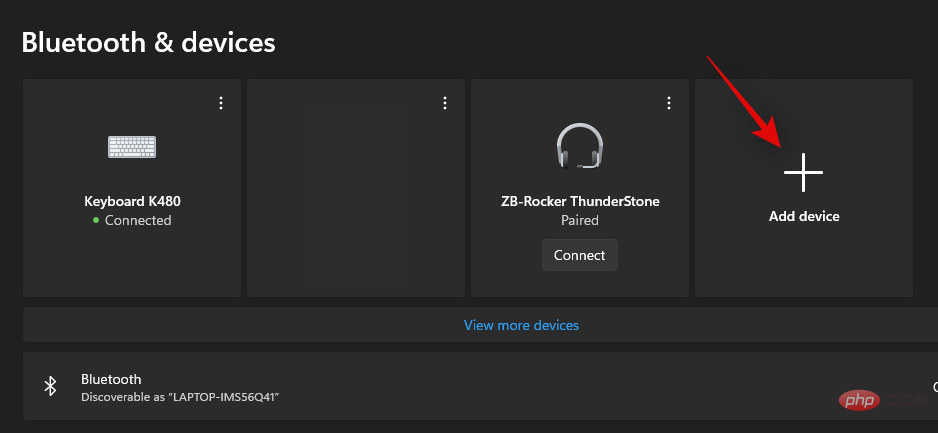
Click "Add Device" at the top.
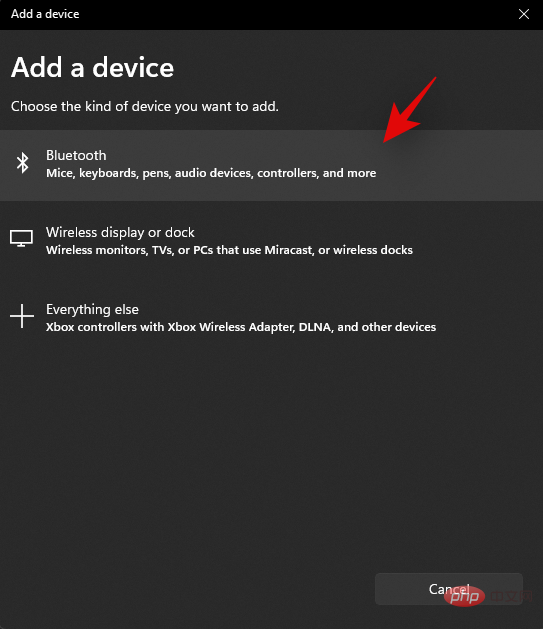
Now click on “Bluetooth”.
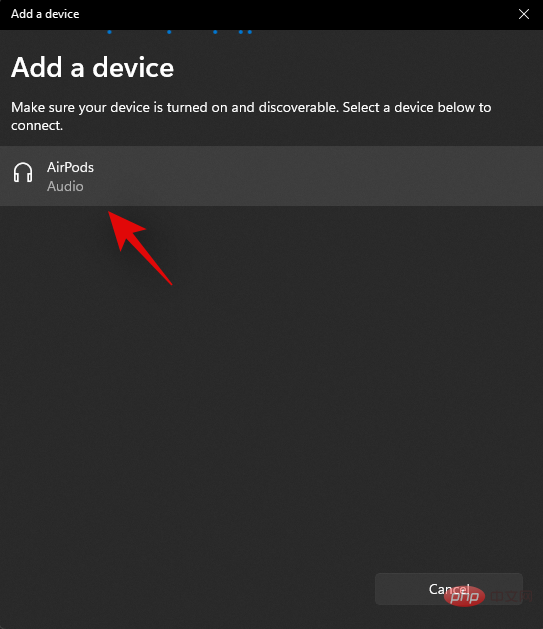
Once they appear in the list, click on "Airpods".
Click "Finish" once the pairing process is complete.
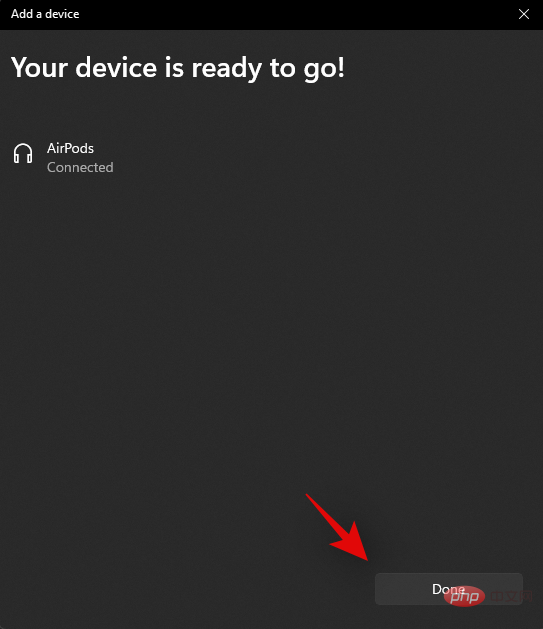
#Your earphones should now pair automatically, and if everything is fine, you should now be able to use your Airpods on your Windows 11 PC without any issues.
When you connect your AirPods to your PC, let’s make sure you select the correct output and input devices in Windows 11. This is a simple check, but if you use multiple Bluetooth and audio output devices in your system, this may be an issue for you.
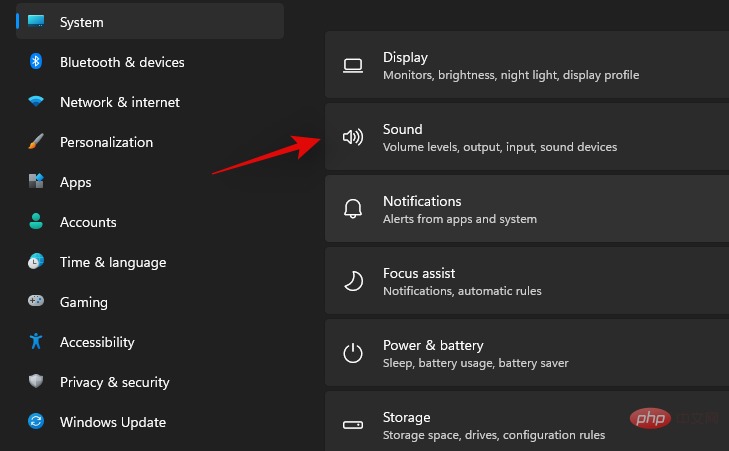
Press Windows i keyboard and click "Sounds" on the right.
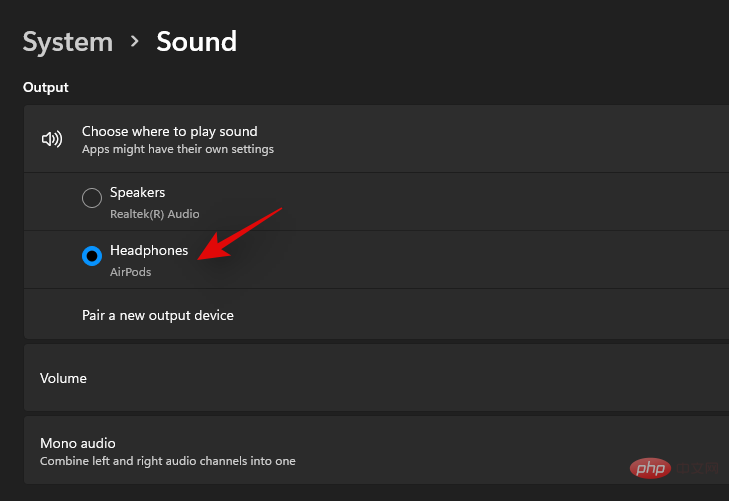
Now click and select "Headphones" under "Output".
Likewise, if you have multiple input devices connected to the system, select "Airpods" under the "Inputs" section. If not, the Airpods microphone should be selected by default.

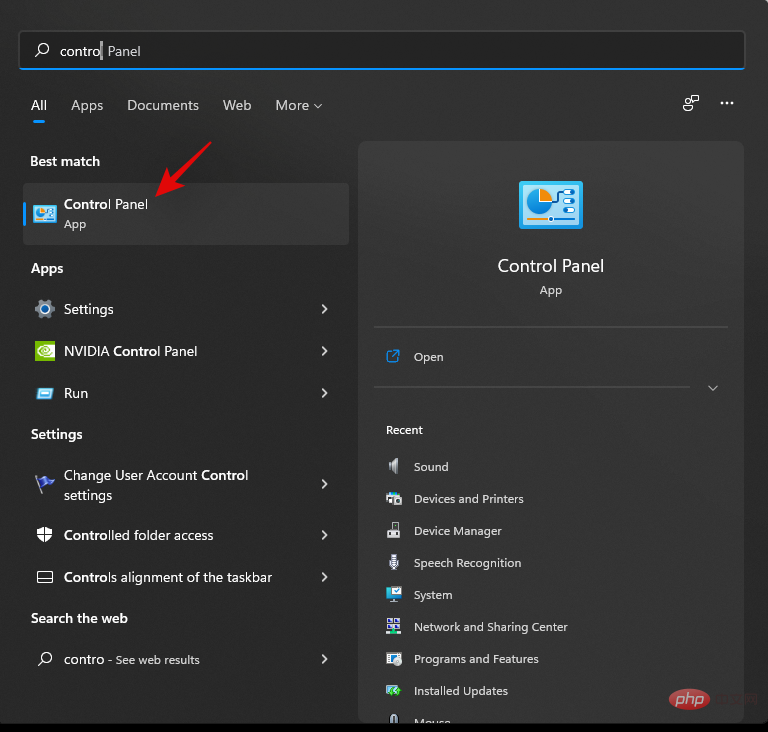
Now launch the Start menu, search for Control Panel and launch it from the search results.
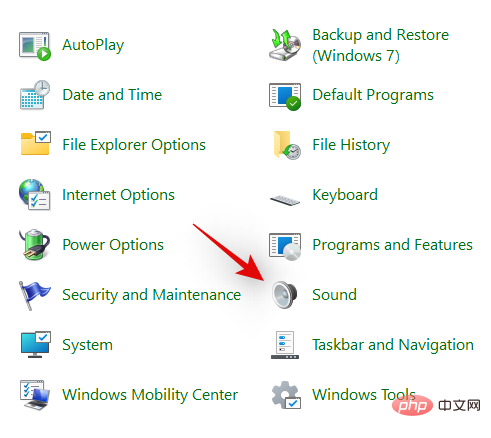
Click the drop-down menu in the upper right corner and select "Large Icons."

Now click on "Sound".
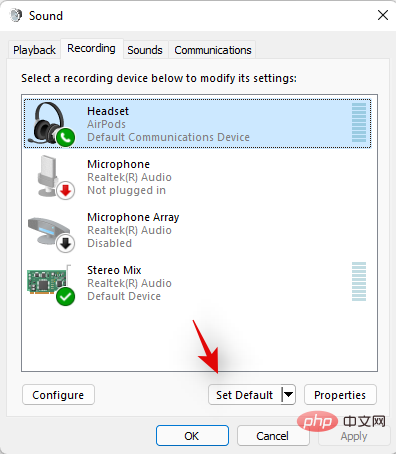
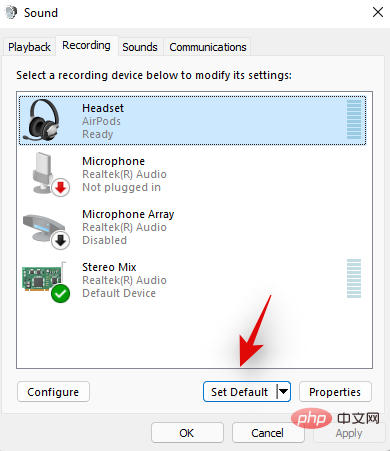
Click and select "Airpods" and then click "Set Defaults" at the bottom of the window.
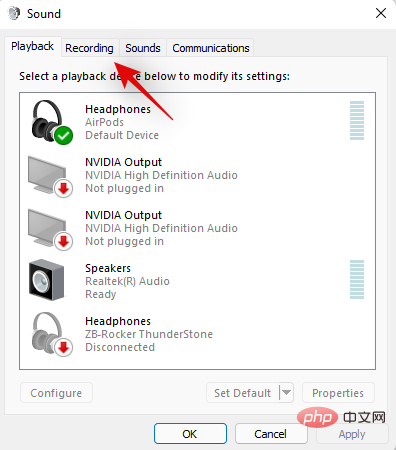
Switch to the "Recording" tab at the top by clicking on the same.
Select the AirPods again and click Set Default.
Click "OK" to close the window.
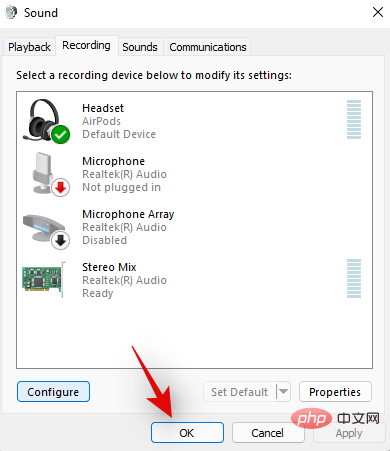
If Airpods are your default device in all of these places, then you have passed this check and continue reading the tutorial. However, if Airpods are not selected as the default device, then we recommend you to do the same and try using your Airpods before proceeding with the tutorial.
Despite Microsoft’s efforts, somehow Devices and Printers is still the settings page where you can properly manage all connected device without any problems. A common issue affecting BT devices in Windows 11 is that the device will appear as connected in the Settings app, but will not be available on the Devices & Printers page. Restarting will usually resolve the issue, but if your Airpods won't display indefinitely, you may have driver or pairing issues. We recommend you check out your Airpods using the following tutorial.
Launch the Start menu, search for Control Panel, and launch it from the search results.

Click the drop-down menu in the upper right corner of the screen and select "Large Icons."

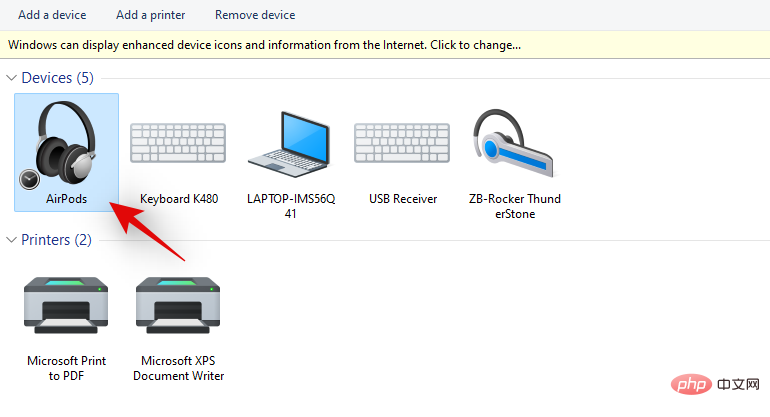
Check the Airpods in this list, if found, click and select the same and press Alt Enter on your keyboard.
 Now switch to the Hardware tab and check if there are any conflicting drivers. You should see a "?" or hazard sign next to each conflict driver.
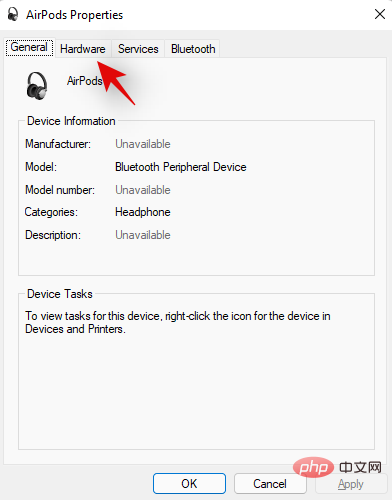
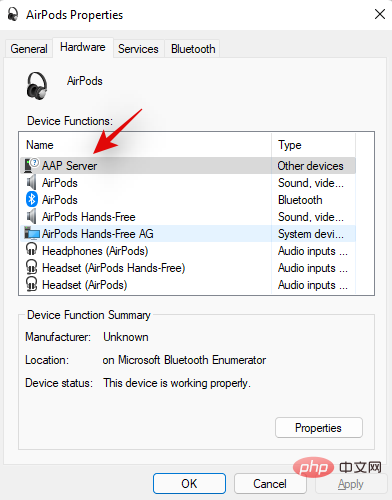
However, if the Airpods show up without any driver conflicts, then you can use other fixes in this list to resolve your issue. Still, we recommend you try re-pairing as it is known to fix most connection issues on Windows 11.
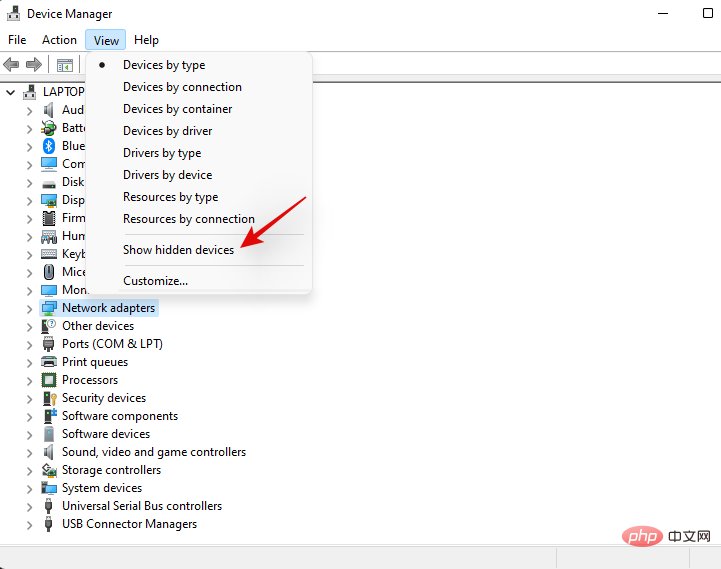
We now recommend you to delete all hidden Airpods entries from Device Manager. This is a known issue in Windows 10 and appears to still exist in Windows 11. Removing the hidden entries should help your operating system default to the properly installed device, which should help you get everything back up and running on your system again. Use the tutorial below to get you started.
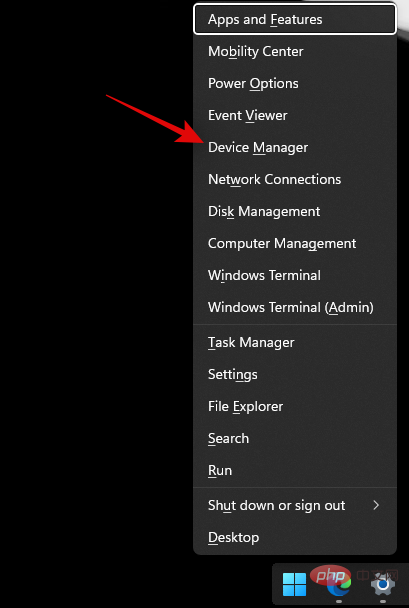
Press Windows X keyboard and select "Device Manager".
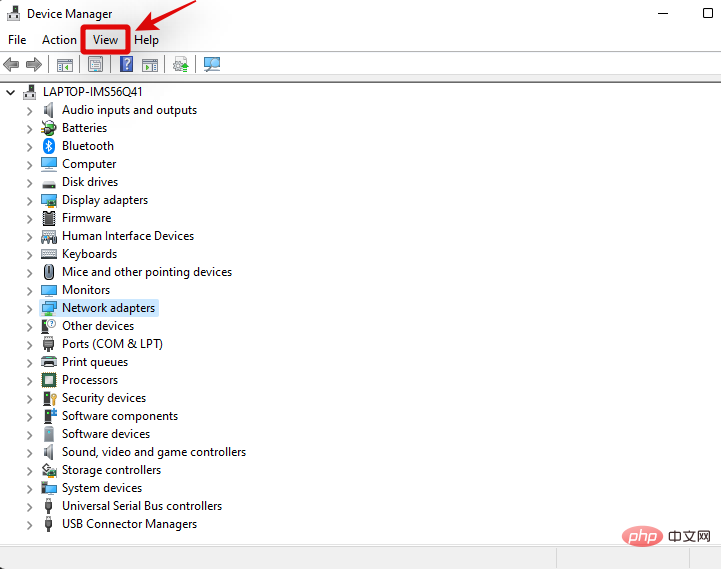
Select "Show hidden devices".
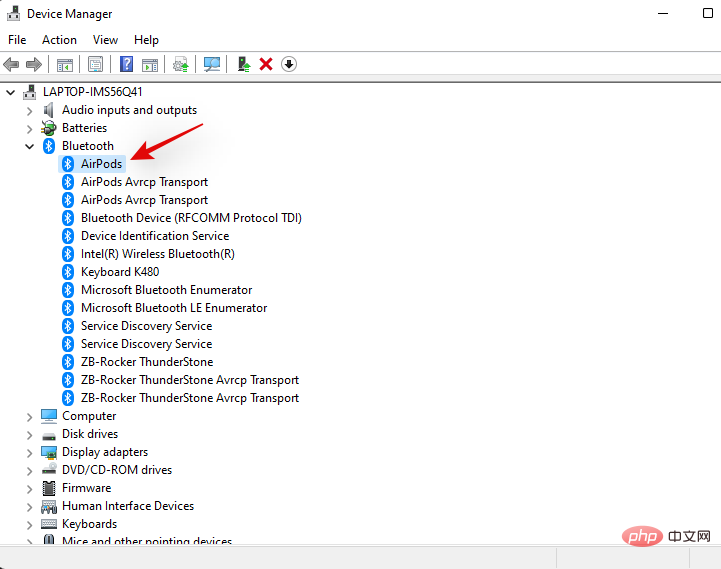
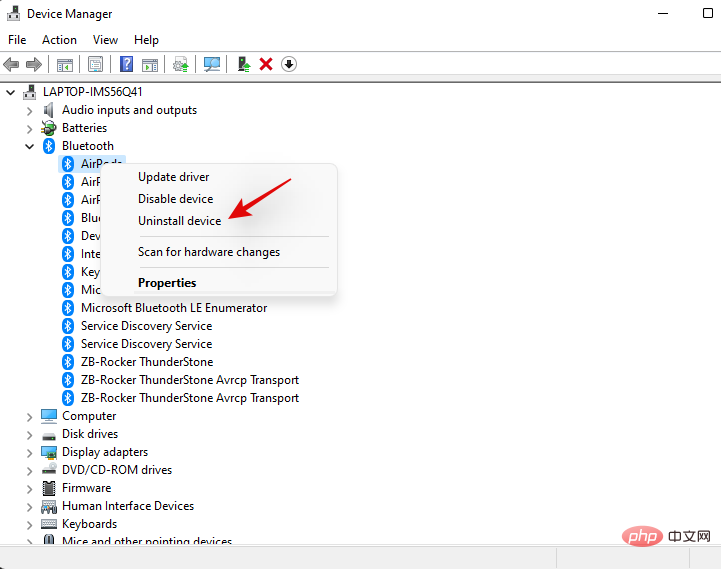
Click "Uninstall Device".
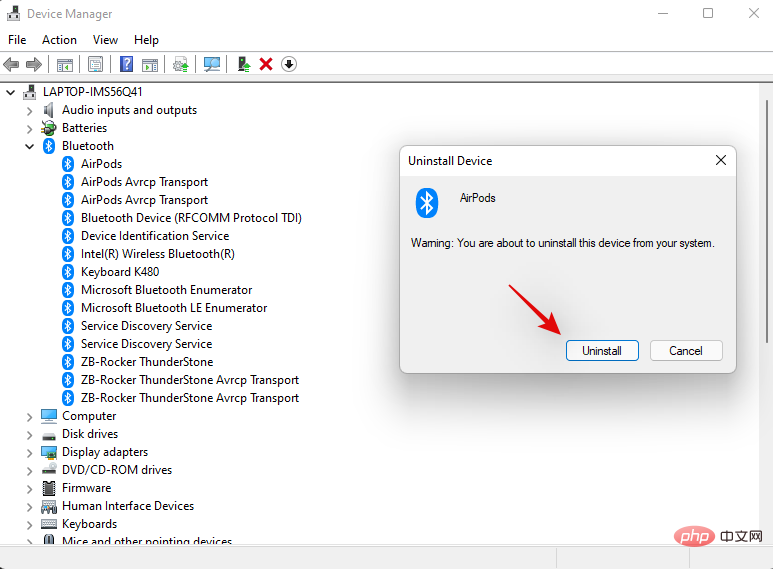
The selected device will now be uninstalled from your system. Repeat the above steps to remove any other grayed-out devices related to Airpods from your PC.
As a precaution, look for other Bluetooth devices and adapters on your PC, especially if you are using an external Bluetooth adapter. Repeat the above steps if you find any Airpods related device installed on your PC.
After deletion, restart the system for good results. You can now try using/reconnecting your Airpods again and they should work without any issues.
If removing the hidden entries does not work for you, or if you do not find any hidden entries for your Airpods, then we now recommend that you completely remove and re-pair on Windows 11 Airpods. Use the following tutorial to get started.
Launch the Start menu, search for Control Panel and launch it from the search results.


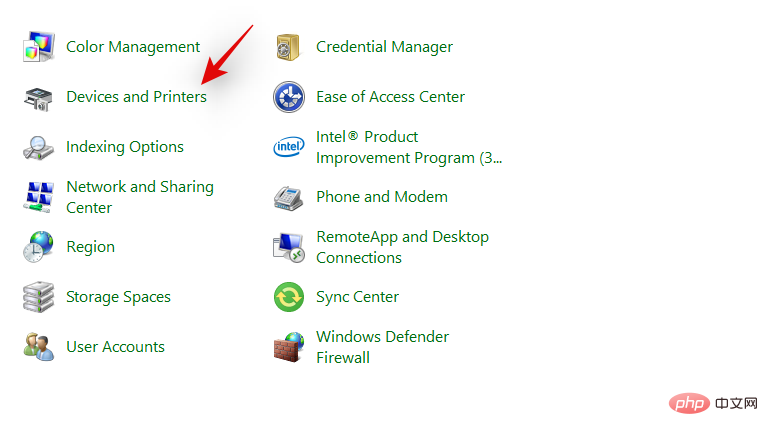
Now click on “Devices and Printers”.

Right-click on "Airpods" and select "Remove Device".
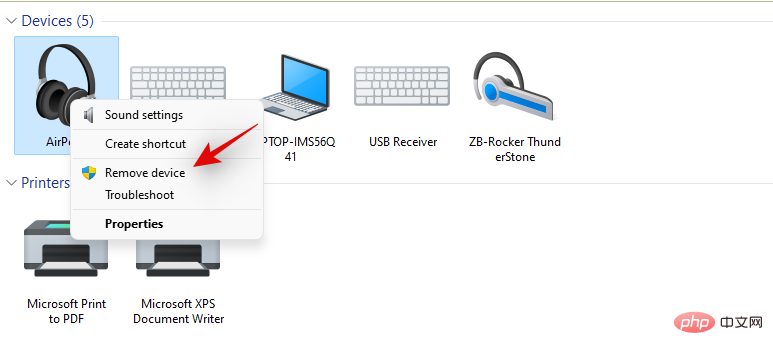
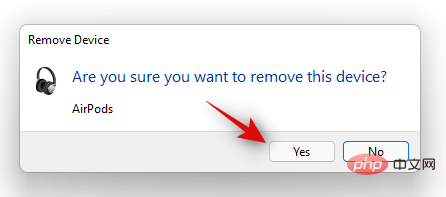
Airpods will now be removed from your device. We now recommend that you use the following tutorial to remove all subsequent Airpods entries from Device Manager.
Let’s remove Airpods from the device manager of the system. Use the tutorial below to get you started.
Press Windows X keyboard and select "Device Manager".

Now click "View" at the top.


Double-click and expand your Bluetooth adapter. In our case it simply reads "Bluetooth". If you find any gray entry related to "Airpods", right-click on it.


Click again to confirm your choice.

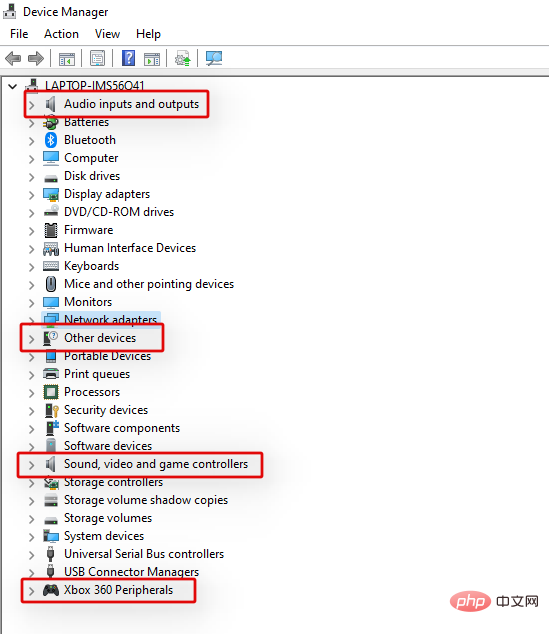
After removal, we recommend you to proceed to the next step and restart your PC.
At this point, we recommend that you restart your PC. This will help remove any cached drivers, refresh and restart BT services, and clean all necessary data stored in Airpods on PC. After restarting your PC, you can use the following tutorial to re-pair your Airpods.
Bluetooth vulnerability exploitation is very common these days, and Apple regularly releases multiple firmware updates for all its devices. This means you may face driver and firmware conflicts, where the current firmware of your Airpods is incompatible with your old Bluetooth driver version.
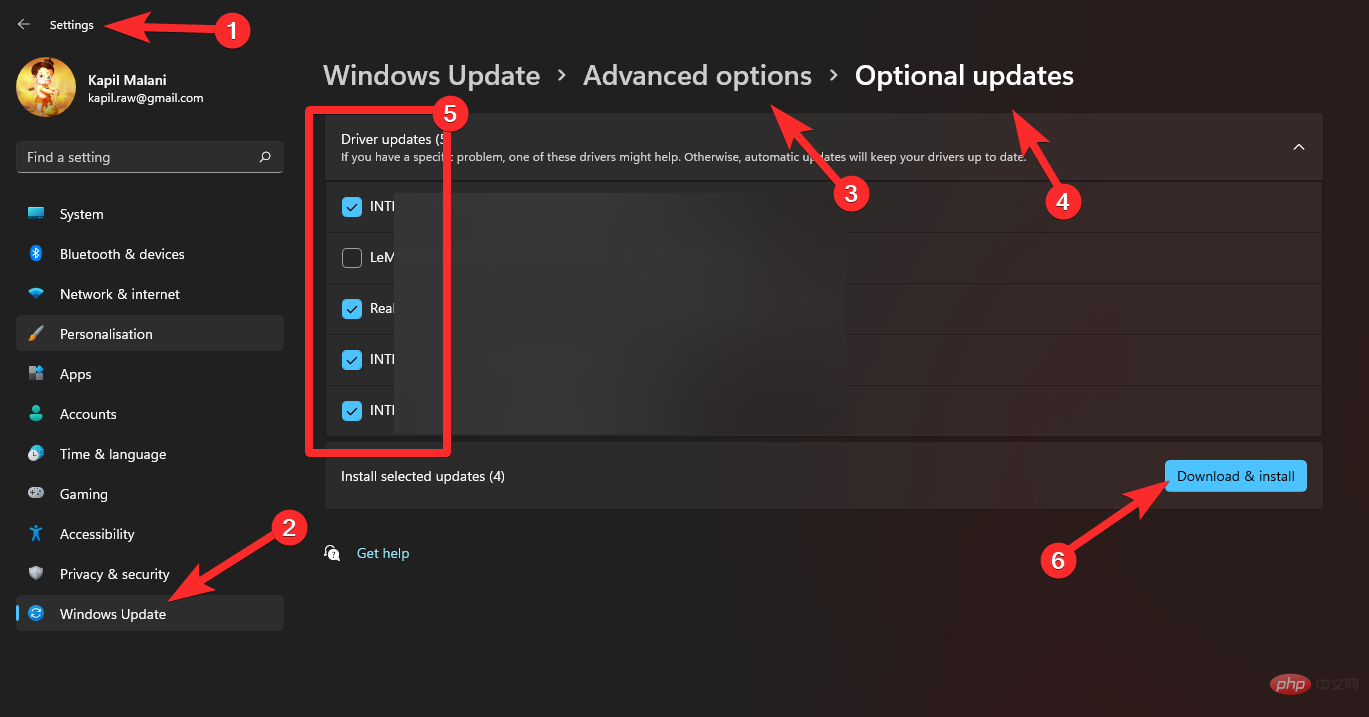
We recommend that you check for any driver updates or use your OEM support website to obtain the latest driver for your Bluetooth adapter. You can also check for optional driver updates in Windows 11 by going to Settings > Windows Update > Advanced Options > Optional Updates > Driver Updates .

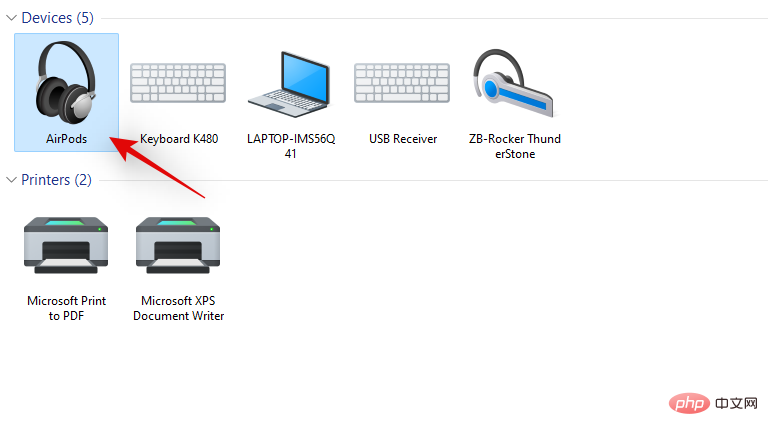
 Click "Devices and Printers".

Alt Enter on your keyboard.
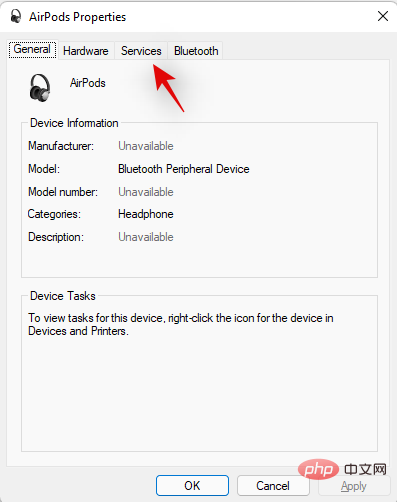
Switch to the Services tab by clicking the Services tab at the top of the window.
 Click "OK" when finished.
Windows 11 now offers native playback support for all Airpods gestures, which is great news. In our initial tests, we were able to control playback in all popular web applications for media consumption, such as YouTube, Twitch, Discord, and more. These controls also work with native apps for Spotify, Apple Music, Deezer, and more. However, the remote connection service run by these playback controls can cause connection issues on Windows 11, especially if you have Airpods (1st generation) or Airpods (2nd generation). Use the following tutorial to disable these services and fix connectivity issues on your system.
NOTE: Needless to say, you will lose the ability to use play gestures in Windows 11.
Launch the Start menu, search for "Control Panel" and launch it from the search results.

Click the drop-down menu in the upper right corner and select "Large Icons."

After selecting, click "Devices and Printers".

Now select the Airpods and hit Alt Enter on your keyboard.

Click and switch to the Services tab at the top.
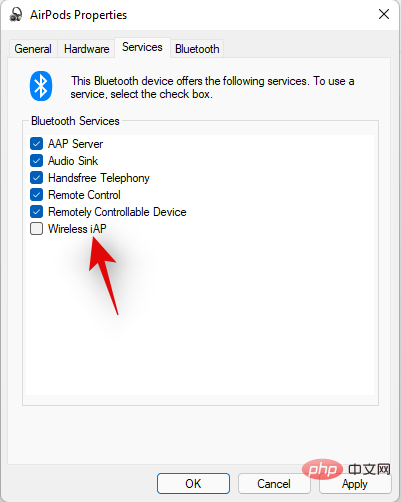
 Now uncheck the checkboxes for the following services.
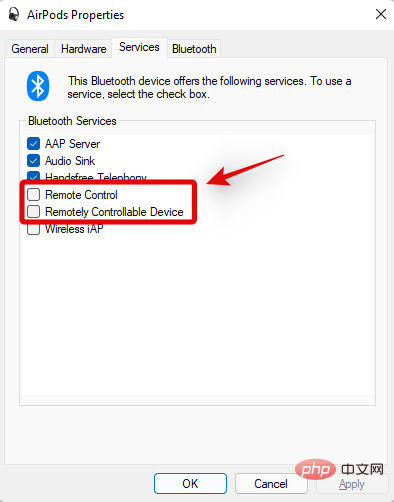
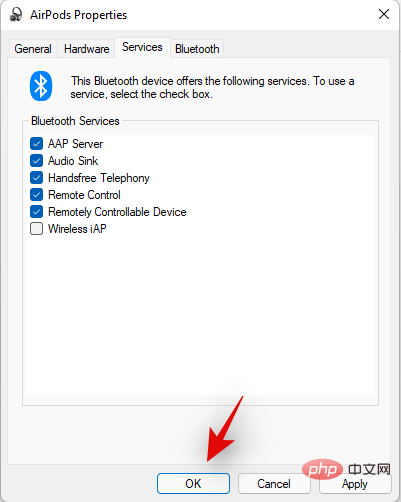
Click "OK" when finished.
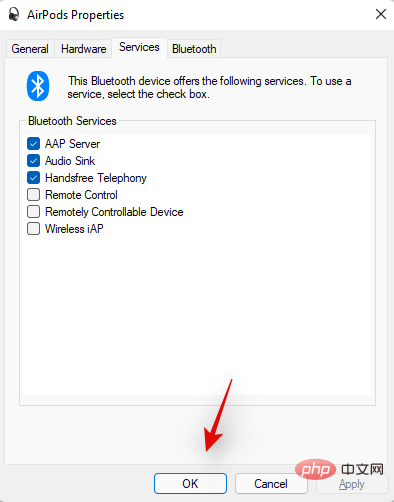
We now recommend that you restart your PC to be safe and test your Airpods again. If everything works fine, you should no longer face Airpods connection issues on your Windows 11 PC.
Launch the Start menu, search for "Control Panel" and launch it from the search results.


Click "Devices and Printers".

Alt Enter on your keyboard. 
Switch to the Services tab by clicking the Services tab at the top of the screen.

Uncheck the "Hands-Free Phone" checkbox.
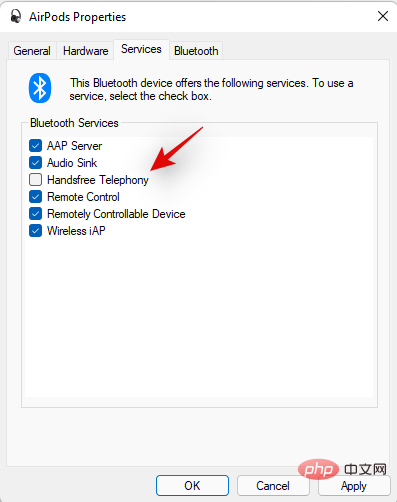
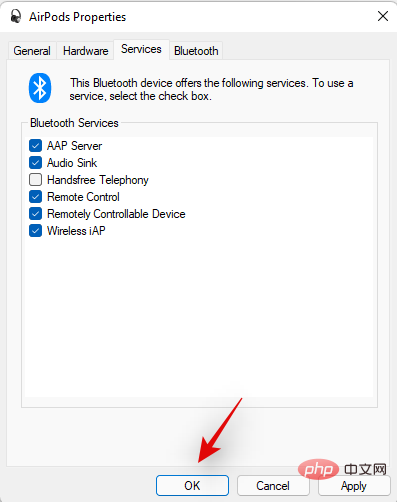
The audio should now automatically switch and start using stereo audio, which will help you get high-quality audio when using your Airpods.
If you are experiencing low volume issues or intermittent connections when using your Airpods, we recommend disabling absolute volume for BT devices on your system. This setting helps to correctly control the volume of BT audio devices remotely on modern devices, but it can cause issues with some unique devices that use a different or older protocol, like Airpods. Disabling absolute volume should help resolve connection and volume issues on your system. Here's how to disable it on your system.
Press the Windows R keyboard, enter the following, and then press Enter.
regedit

Locate the following location in the Registry Editor. You can also copy-paste the path given below in the address bar at the top.
Computer\HKEY_LOCAL_MACHINE\SYSTEM\ControlSet001\Control\Bluetooth\Audio\AVRCP\CT

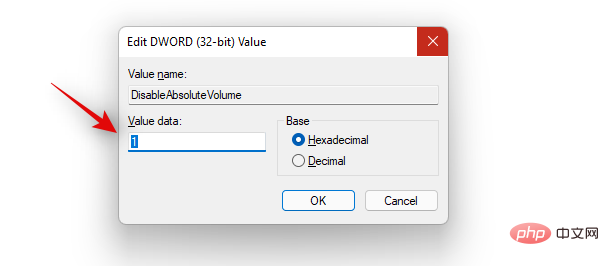
Double-click "DisableAbsoluteVolume" on the right.

Set "Value Data" to "1".
Click "OK" when finished.
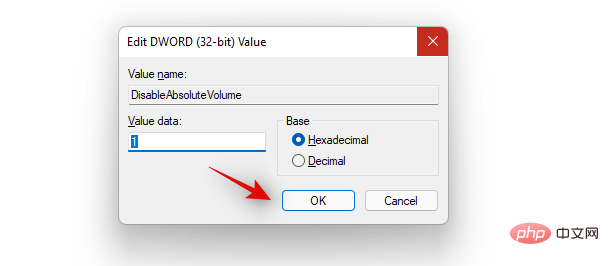
Absolute Volume is now disabled on your system and we now recommend that you reboot your system at the earliest opportunity. You can then re-pair your Airpods with Windows 11 and you should no longer experience connection issues on your system.
This can be inconvenient as you have to re-pair your Airpods with every device you own, however, for those you use on Windows For most issues you may encounter with audio or connectivity, this is a known fix. Resetting your Airpods will allow you to start over and pair them with Windows first, which will help get everything working as expected. Use the tutorial below to reset your pairing, then use the tutorial above to connect it to Windows.
Note: Make sure to remove the Airpods as a device from the PC. We recommend that you use the tutorial in this article to first remove it from Control Panel and then from Device Manager if it appears.
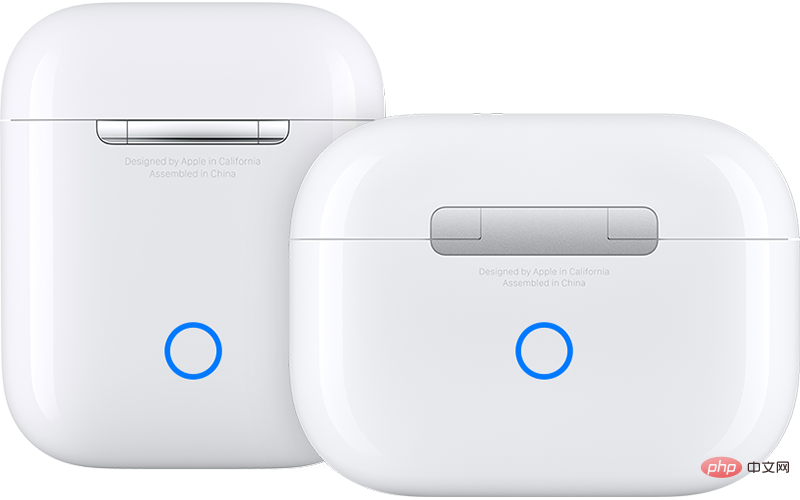
Resetting your Airpods is a fairly simple process, place your Airpods into their protective case and leave them there for a few minutes. Now come back, open the lid and hold the settings button on the back of your Airpods for about 15 seconds. You should then see the light flash amber and then white. Now close the lid, enter pairing mode and try to connect them to your Windows 11 PC as a new device. If everything works fine, you should have audio and connectivity on your device. You can now configure your Airpods as expected using the tutorial above.
If you are still facing connection issues with your Airpods, then it’s time to try some troubleshooting. We first recommend you perform the following checks to make sure everything on your system is set up correctly.
NOTE: We recommend that you connect and pair your Airpods with your PC to perform these troubleshooting fixes as expected.
This is very picky and depends on your BT driver version and whether you are using Windows 11 or Windows 10. If you're using Windows 10, your Airpods will appear as two different devices, one called 'Airpods Hands-Free' and the other 'Airpods Stereo'. If you have a recent PC that's compatible with Windows 11, your Airpods will now appear as a Smart Switch-enabled device in most cases. However, if you have an older BT adapter or older BT driver then it does appear as two devices on your system.
The trick here is to select "Airpods Hands-Free Calling" when trying to use Airpods in a video conferencing app if you have two devices. If you have one, you will need to re-enable your phone service if you previously disabled it. You will then have to increase your microphone level to get manageable audio quality on your system. We tested the following video conferencing apps using Airpods (1st generation) and here’s what our experience was like.
We first tested Google Meet, where the Airpods appeared as three different audio and video devices. Choosing either one has no effect. Audio output and input default to the right earbud, there is no modification to switch input or output.
Then we tested Microsoft Teams and the results were equally disappointing. Teams does a good job of automatically switching between stereo and mono audio as you speak or listen, until it doesn't happen very often. Then the microphone stopped working, and toggling the mute button after the first or second try seemed to fix the problem. In the worst-case scenario, you'll have to put the buds back in the case, wait a few seconds, and then wear them again to get everything working. That sounds great, but if you have to do it every 10 minutes, Airpods aren't worth using. It's better to have one flawless bud than two buds that have very little work. We're sure this is fairly new and Microsoft is looking to improve it over time.
The above is the detailed content of Can't connect Airpods to Windows computer? 11 attempts to fix. For more information, please follow other related articles on the PHP Chinese website!


