How to use Gradle to build java projects
1. Related introduction
Gradle is an easy-to-use build tool. The reasons for using it are:
The amount of configuration-related dependency code is small, and there will not be too much xml like maven.
It is packaged, compiled, tested and released, and it is easy to use
Use custom tasks to complete the functions you want
2. Installation
Download address http://services.gradle.org/distributions/, Download the corresponding version you need. What I downloaded here is gradle-4.7-bin.zip. After downloading, unzip it to the directory you want, and then set the environment variables:


View in cmd mode, the following information appears Prove that the installation is successful:

Then we can configure gradle’s default warehouse address in the environment variable (not the same as maven):

3. Use in IED
1. IDEA
Use idea to create a web Gradle project
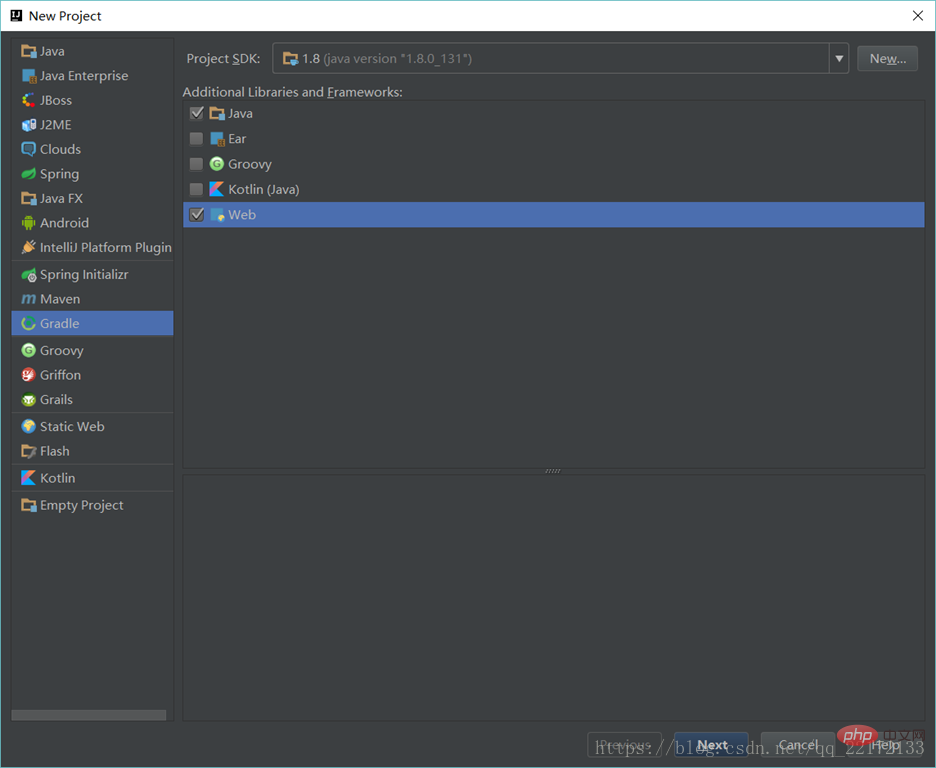
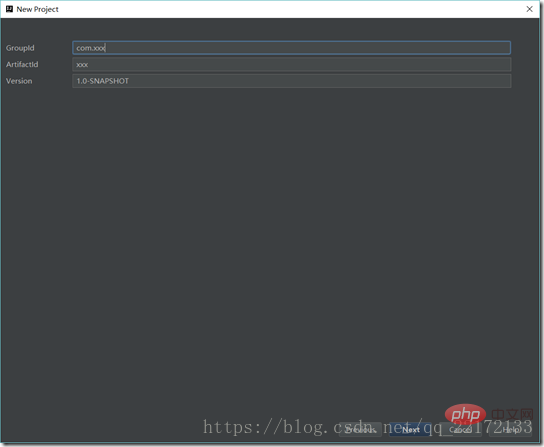
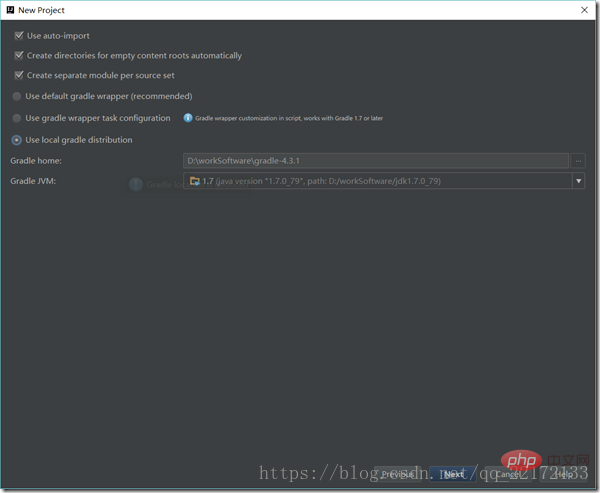
Then package and run the project:
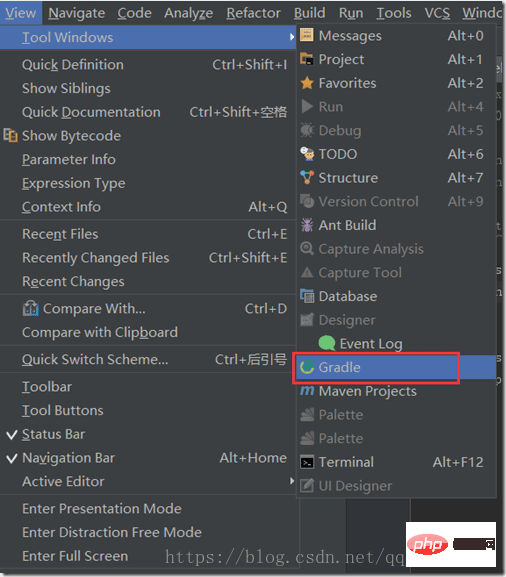
Double-click war
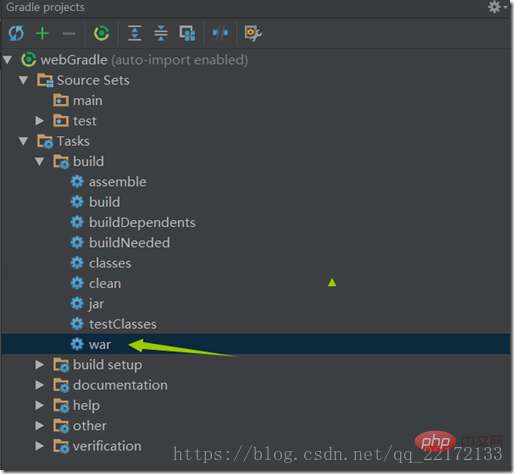
After the packaging is completed, the war file will be in:
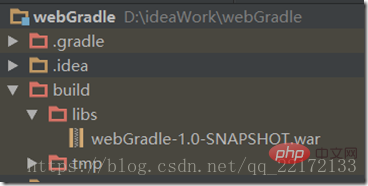
Then just put the war into the corresponding tomcat directory. I won’t explain it here.
2. Eclipse
You need to install the plug-in yourself in eclipse. The plug-in path is:
https://download.eclipse.org/buildship/updates/e46/releases/ 2.x/
4. Problem description
1. Explanation of build.gradle and settings.gradle
First, a project contains group, name, and version. settings.gradle is used to manage multiple projects, which contains the name of the project

In build.gradle, apply is the application plug-in, such as:

Here we use java and war plug-ins. Dependencies are used to declare which jars this project depends on

It is explained here Yes, we rely on junit's jar during the test compilation phase. These include compile (compile time) runtime (run time) testCompile (test compile time) testRuntime (test run time). Repositories is a warehouse. Gradle will search for jars in the warehouse in order from top to bottom

Here our default is a maven central warehouse, from the gradle source code We see that the address is like this
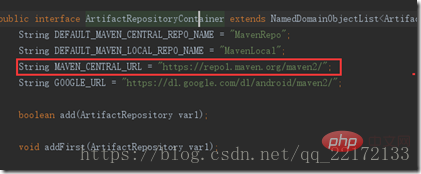
You can configure it here, where mavenLocal() means using the local maven warehouse; mavenCentral() uses the maven central warehouse. Use a fixed address, you can use Alibaba Cloud here
(maven {url 'http://maven.aliyun.com/nexus/content/groups/public/'})
The mirror download speed will be faster, and you can also use the company's internal private server address.
Additional, here is a spring boot gradle configuration file, which can be compared with the maven build
// buildscript 代码块中脚本优先执行
buildscript {
	// ext 用于定义动态属性
	ext {
		springBootVersion = '1.5.2.RELEASE'
	}
	// 自定义  Thymeleaf 和 Thymeleaf Layout Dialect 的版本
	ext['thymeleaf.version'] = '3.0.3.RELEASE'
	ext['thymeleaf-layout-dialect.version'] = '2.2.0'
	// 自定义  Hibernate 的版本
	ext['hibernate.version'] = '5.2.8.Final'
	// 使用了 Maven 的中央仓库(你也可以指定其他仓库)
	repositories {
		//mavenCentral()
		maven {
			url 'http://maven.aliyun.com/nexus/content/groups/public/'
		}
	}
	// 依赖关系
	dependencies {
		// classpath 声明说明了在执行其余的脚本时,ClassLoader 可以使用这些依赖项
		classpath("org.springframework.boot:spring-boot-gradle-plugin:${springBootVersion}")
	}
}
// 使用插件
apply plugin: 'java'
apply plugin: 'eclipse'
apply plugin: 'org.springframework.boot'
// 打包的类型为 jar,并指定了生成的打包的文件名称和版本
jar {
	baseName = 'springboot-test'
	version = '1.0.0'
}
// 指定编译 .java 文件的 JDK 版本
sourceCompatibility = 1.8
// 默认使用了 Maven 的中央仓库。这里改用自定义的镜像库
repositories {
	//mavenCentral()
	maven {
		url 'http://maven.aliyun.com/nexus/content/groups/public/'
	}
}
// 依赖关系
dependencies {
	// 该依赖对于编译发行是必须的
	compile('org.springframework.boot:spring-boot-starter-web')
	// 添加 Thymeleaf 的依赖
	compile('org.springframework.boot:spring-boot-starter-thymeleaf')
	// 添加  Spring Security 依赖
	compile('org.springframework.boot:spring-boot-starter-security')
	// 添加 Spring Boot 开发工具依赖
 	//compile("org.springframework.boot:spring-boot-devtools")
	// 添加 Spring Data JPA 的依赖
	compile('org.springframework.boot:spring-boot-starter-data-jpa')
	// 添加 MySQL连接驱动 的依赖
	compile('mysql:mysql-connector-java:6.0.5')
	// 添加   Thymeleaf Spring Security 依赖,与 Thymeleaf 版本一致都是 3.x
	compile('org.thymeleaf.extras:thymeleaf-extras-springsecurity4:3.0.2.RELEASE')
	// 添加  Apache Commons Lang 依赖
	compile('org.apache.commons:commons-lang3:3.5')
	// 该依赖对于编译测试是必须的,默认包含编译产品依赖和编译时依
	testCompile('org.springframework.boot:spring-boot-starter-test')
}The above is the detailed content of How to use Gradle to build java projects. For more information, please follow other related articles on the PHP Chinese website!

Hot AI Tools

Undresser.AI Undress
AI-powered app for creating realistic nude photos

AI Clothes Remover
Online AI tool for removing clothes from photos.

Undress AI Tool
Undress images for free

Clothoff.io
AI clothes remover

AI Hentai Generator
Generate AI Hentai for free.

Hot Article

Hot Tools

Notepad++7.3.1
Easy-to-use and free code editor

SublimeText3 Chinese version
Chinese version, very easy to use

Zend Studio 13.0.1
Powerful PHP integrated development environment

Dreamweaver CS6
Visual web development tools

SublimeText3 Mac version
God-level code editing software (SublimeText3)

Hot Topics
 Square Root in Java
Aug 30, 2024 pm 04:26 PM
Guide to Square Root in Java. Here we discuss how Square Root works in Java with example and its code implementation respectively.
 Perfect Number in Java
Aug 30, 2024 pm 04:28 PM
Guide to Perfect Number in Java. Here we discuss the Definition, How to check Perfect number in Java?, examples with code implementation.
 Random Number Generator in Java
Aug 30, 2024 pm 04:27 PM
Guide to Random Number Generator in Java. Here we discuss Functions in Java with examples and two different Generators with ther examples.
 Armstrong Number in Java
Aug 30, 2024 pm 04:26 PM
Guide to the Armstrong Number in Java. Here we discuss an introduction to Armstrong's number in java along with some of the code.
 Weka in Java
Aug 30, 2024 pm 04:28 PM
Guide to Weka in Java. Here we discuss the Introduction, how to use weka java, the type of platform, and advantages with examples.
 Smith Number in Java
Aug 30, 2024 pm 04:28 PM
Guide to Smith Number in Java. Here we discuss the Definition, How to check smith number in Java? example with code implementation.
 Java Spring Interview Questions
Aug 30, 2024 pm 04:29 PM
In this article, we have kept the most asked Java Spring Interview Questions with their detailed answers. So that you can crack the interview.
 Break or return from Java 8 stream forEach?
Feb 07, 2025 pm 12:09 PM
Java 8 introduces the Stream API, providing a powerful and expressive way to process data collections. However, a common question when using Stream is: How to break or return from a forEach operation? Traditional loops allow for early interruption or return, but Stream's forEach method does not directly support this method. This article will explain the reasons and explore alternative methods for implementing premature termination in Stream processing systems. Further reading: Java Stream API improvements Understand Stream forEach The forEach method is a terminal operation that performs one operation on each element in the Stream. Its design intention is


