Fix: This app cannot be opened error when opening Snipping Tool
Whenever a new application upgrade comes, bugs are bound to follow. Things were no different when Windows replaced its classic Snipping Tool with a brand new Snip and Sketch tool. We now have a Snipping Tool that has us all a little frustrated with its bugs. On the other hand, this is an excellent upgrade to the classic Snipping Tool app, and fixing the minor bugs is worth all the effort.
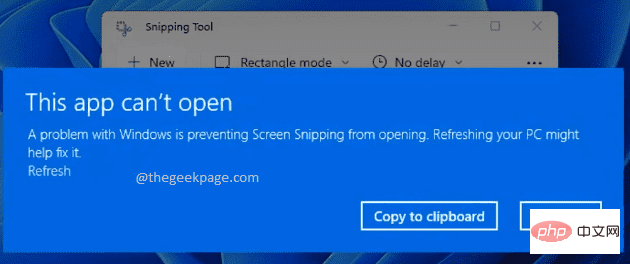
In this article, we focus on one major Snipping Tool error message, This application cannot be opened, when the user tries to click the Snipping Tool's New button Got this error message. While this may disappoint you a bit, you might be surprised to learn that this problem can be solved easily.
In this article, we explain all the possible solutions you can try to solve this problem. Please try them one by one and we’re sure you won’t leave with a sad face.
Solution 1: Temporarily disable the automatic time and set it manually
Step 1: Press WIN simultaneously I key to launch the "Settings" window.
In the left pane, click the Time and Language tile. In the right pane, click the Date and Time tile.
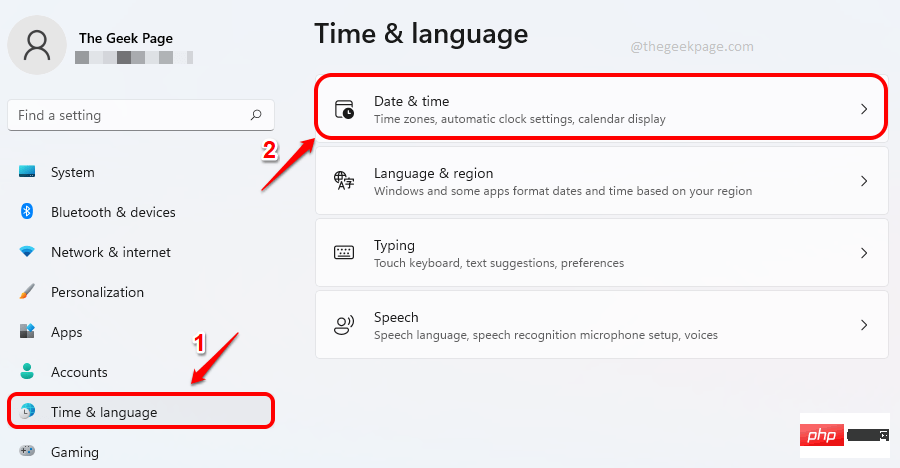
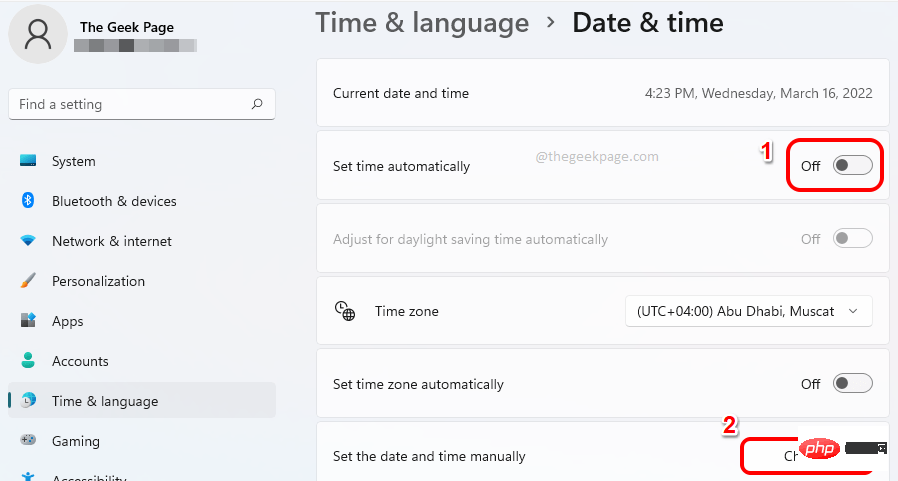
Step 2: Now in the Date and Time settings window, turn off the optionAutomaticSet time switch button.
Next, click the button named Change that corresponds to the Manually Set Date and Time option.
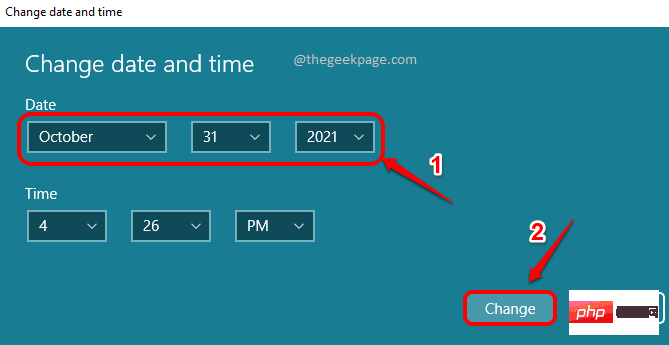
Step 3: In the Change Date and Time window, set the date to October 31, 2021 and click the Change button.
NOTE: Somehow the last date in October is working around this issue.
That's it. Try restartingSnipping Tool once and click the New button. This issue should probably be addressed.
After the problem is resolved, you can return to the Date and Time Settings window and turn the toggle button on to automatically set the time . This will instantly set your system time based on your geographic time zone.
Even if following this solution does not solve your problem, you still need to set the toggle button On to Automatically set time.
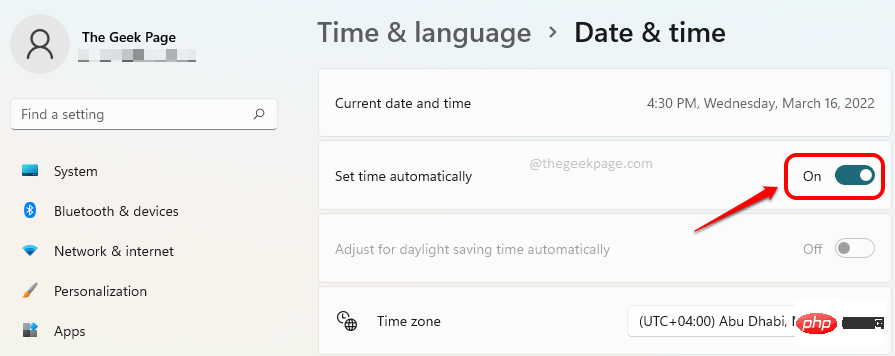
The above solution works for most users. If it doesn't work for you, you can try the other solutions listed below.
Solution 2: Get the latest Windows updates
Getting the latest Windows updates is the best solution for most Windows problems. Please follow the steps below to update your Windows to the latest version.
Step 1: Press the Win I keys simultaneously to launch the "Settings" window.
In the left pane, click the Windows Update tile.
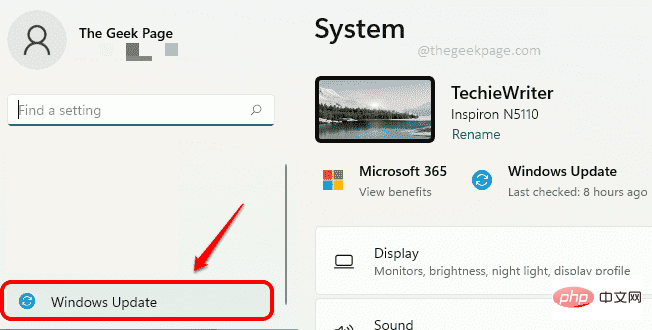
Step 2: In the right pane, you can now see the settings for Windows Update.
Click the button named Check for Updates to scan for the latest updates available.
After you find and download the updates, Install them.
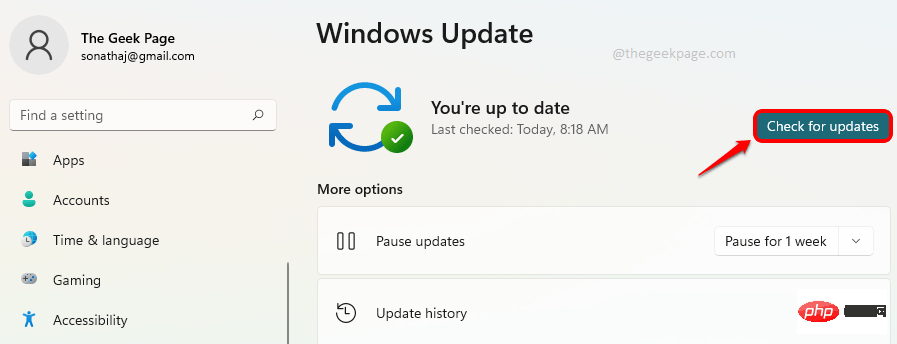
That's it. Please try to restart your computer after the update and try to launch the Snipping Tool and click the "New" button to check if the issue is resolved. If the problem is still not resolved, try the next solution.
Solution 3: Uninstall the KB5006674 security update
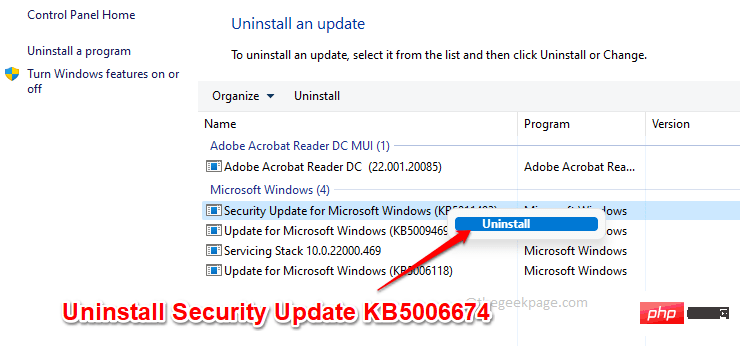
Sometimes, the problem may be caused by a Microsoft security update called KB5006674. For some users, uninstalling the update resolves the issue.
Step 1: Click the Search icon on the taskbar.

Step 2: Enter Control Panel, then select from Best Match Section Click Control Panel Applications.
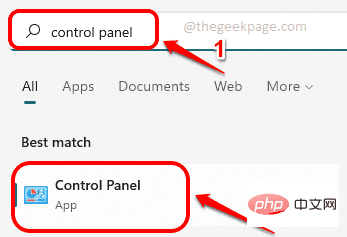
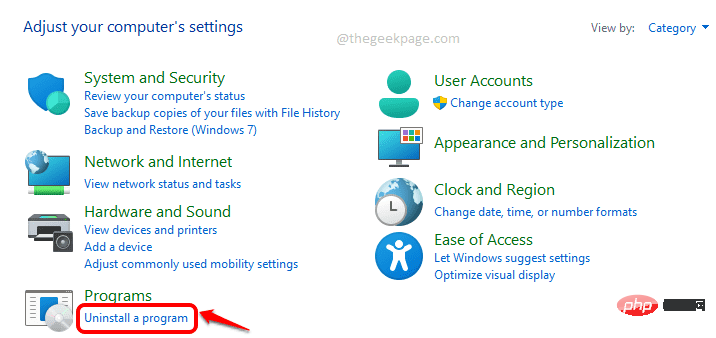
Step 3: In the "Control Panel" settings window, click "Uninstall" under the "Programs" category Program" button.
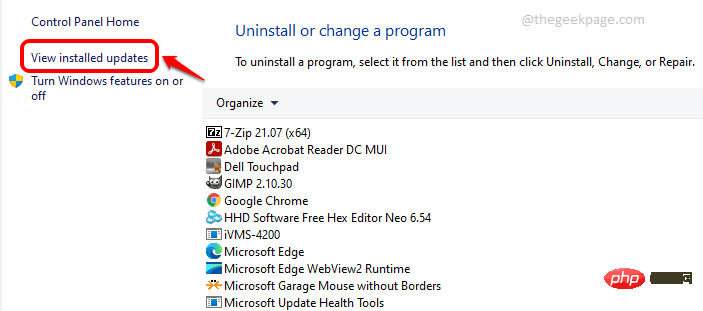
Step 4: In the subsequent window, in the left pane, click link View installed updates.
Step 5: In the Uninstall Updates window, look for the ID KB5006674 of updates. If you find it, right-click it and click the "Uninstall" button.
If not found, you can jump to the next solution.
After uninstalling the update, reopen the Snipping Tool and check if the problem disappears.
Solution 4: Open Clipboard History
Step 1: Press the Win and I keys simultaneously to open Settingswindow.
In the left pane, click the "System" tab, in the right pane, Scroll down and click on the "Clipboard" tab.
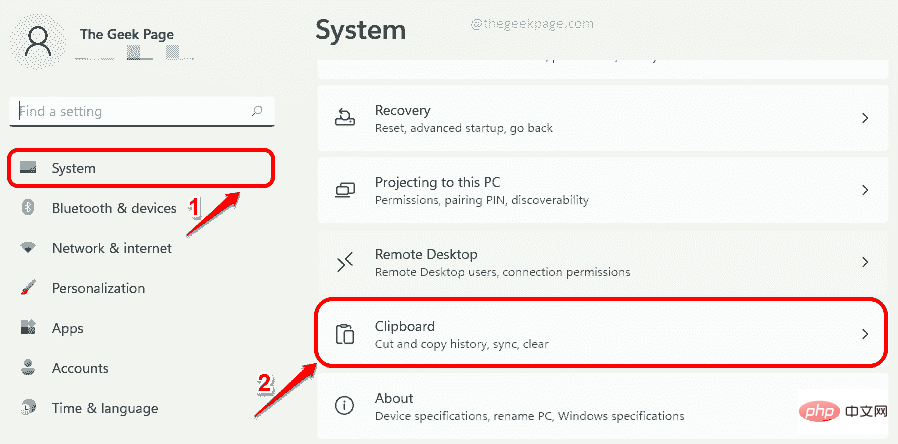
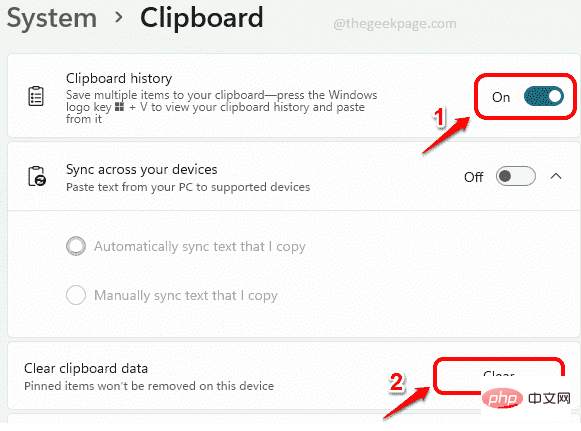
Step 2: Now in the Clipboard settings window, open the corresponding optionToggle button for clipboard history. This feature allows you to have multiple items on the clipboard and allows you to view the clipboard history and paste items from it. To view your clipboard history, you need to press the Win V keys simultaneously.
Next, press the Clear button corresponding to the option ClearClipboard Data.
Solution 5: Turn on background application permissions of Snipping Tool
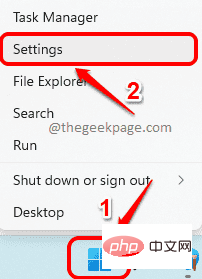
Step 1:Right clickWindowsStart Menu icon, then click Settings options.
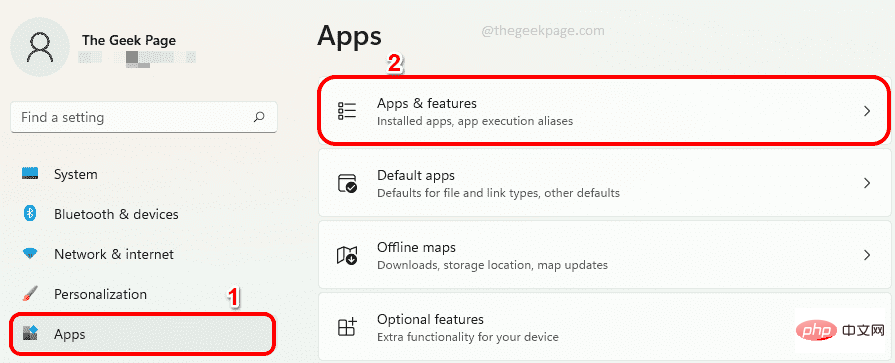
Step 2: Now in the left pane, click on "Applications tile, and then in the right pane, click the Apps & Featurestab.
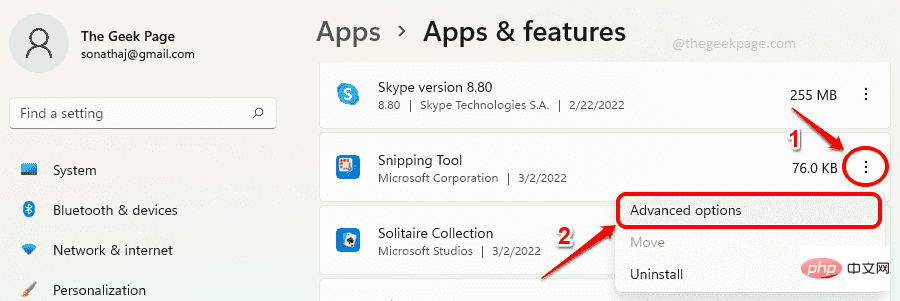
Step 3: Now click on # related to Snipping Tool under Apps section ##3 vertical dots icon and click Advanced options.
Step 4: Now under the "Background App Permissions" section, make sure that "Let this The drop-down menu for the "Apps run in the background" option is set to "Power Optimization (Recommended)" or "Always".
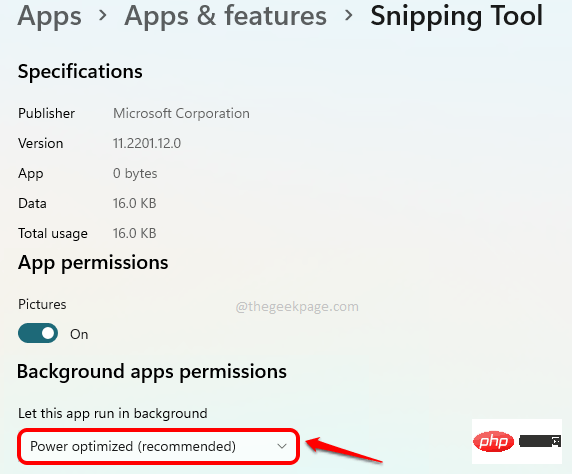
Step 1: Press the Win and I keys simultaneously to bring up the Settings window.
In theleft pane, click the Apps tile, and then in the right pane click Apps Programs & Features tile.

Step 2: Scroll all the waydown in the right pane And find Snipping Tool.
Click the3 vertical dots icon associated with it, then click Advanced Options.

Step 3: Now Scroll down to find the section called Terminate. Under the Terminate section, first click on the Termination button.
Next, reset section, click on the button namedRepair to repair the application.
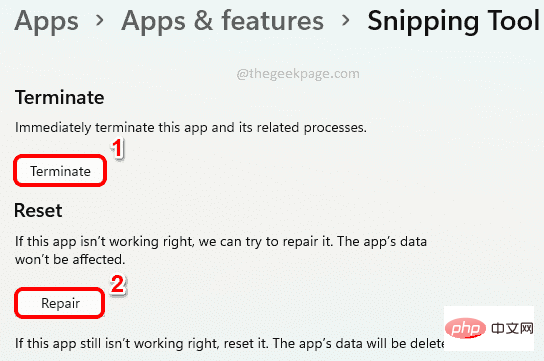
Step 1: Just like the previous method, first open the Settings app and simultaneously press Press the Win I key.
Now in the left pane, click Applications and then in the right pane, click Applications and Function tab.

Step 2: Scroll down to find# under the "Applications" section ##Snipping Tool .
Click the3 vertical dots icon and then click Advanced Options.

Step 3: Click the Terminate button under the Terminate section and then click Reset "Reset" button under the "section.
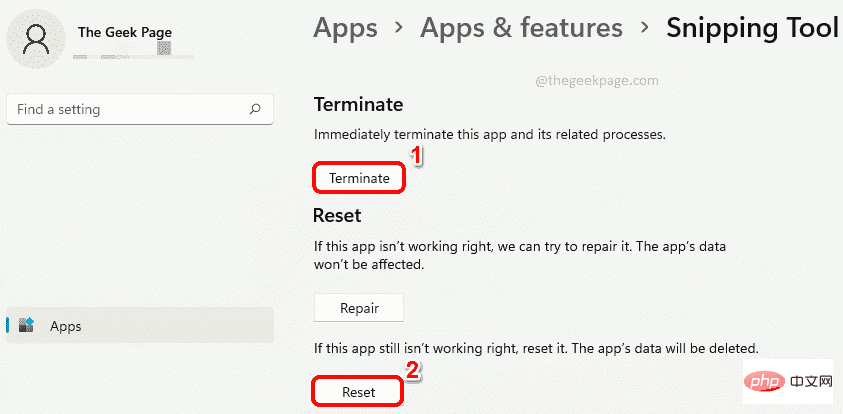
starting it and check if the problem goes away.
Solution 8: Uninstall and reinstall the Snipping Tool from PowerShellIf you are still having issues after trying all the solutions listed above, let’s try uninstalling and reinstalling the app once program.Step 1: Click the Search icon on the taskbar.

Step 2: In the search column, enter PowerShell And click on the Run as administrator option to launch PowerShell with administrator privileges.
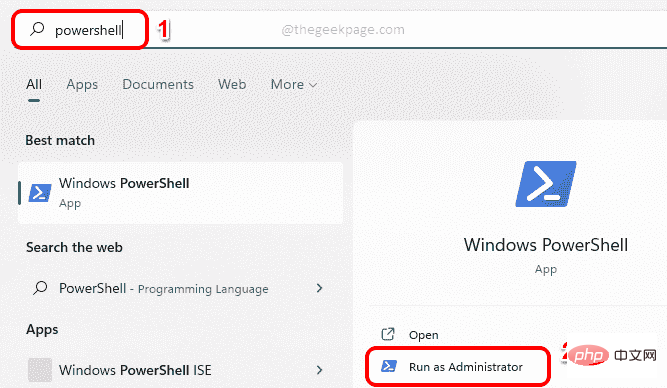
Step 3: Next, copy and paste the following command into the PowerShell window and press Enter key to uninstall the Snipping Tool package from your computer.
Get-AppxPackage *Microsoft.ScreenSketch* -AllUsers | 删除-AppxPackage

Step 4: Finally, execute the following command to reinstall the Snipping Tool.
Get-AppxPackage -allusers Microsoft.ScreenSketch | Foreach {Add-AppxPackage -DisableDevelopmentMode -Register "$($_.InstallLocation)\AppXManifest.xml"}
The above is the detailed content of Fix: This app cannot be opened error when opening Snipping Tool. For more information, please follow other related articles on the PHP Chinese website!

Hot AI Tools

Undresser.AI Undress
AI-powered app for creating realistic nude photos

AI Clothes Remover
Online AI tool for removing clothes from photos.

Undress AI Tool
Undress images for free

Clothoff.io
AI clothes remover

AI Hentai Generator
Generate AI Hentai for free.

Hot Article

Hot Tools

Notepad++7.3.1
Easy-to-use and free code editor

SublimeText3 Chinese version
Chinese version, very easy to use

Zend Studio 13.0.1
Powerful PHP integrated development environment

Dreamweaver CS6
Visual web development tools

SublimeText3 Mac version
God-level code editing software (SublimeText3)

Hot Topics
 1377
1377
 52
52
 This Apple ID is not yet in use in the iTunes Store: Fix
Jun 10, 2024 pm 05:42 PM
When logging into iTunesStore using AppleID, this error saying "This AppleID has not been used in iTunesStore" may be thrown on the screen. There are no error messages to worry about, you can fix them by following these solution sets. Fix 1 – Change Shipping Address The main reason why this prompt appears in iTunes Store is that you don’t have the correct address in your AppleID profile. Step 1 – First, open iPhone Settings on your iPhone. Step 2 – AppleID should be on top of all other settings. So, open it. Step 3 – Once there, open the “Payment & Shipping” option. Step 4 – Verify your access using Face ID. step
 How to fix red-eye on iPhone
Feb 23, 2024 pm 04:31 PM
So, you took some great photos at your last party, but unfortunately, most of the photos you took were of red eyes. The photo itself is great, but the red eyes in it kind of ruin the image. Not to mention, some of those party photos might be from your friends’ phones. Today we'll look at how to remove red eye from photos. What causes the red eyes in the photo? Red-eye often occurs when taking photos with flash. This is because the light from the flash shines directly into the back of the eye, causing the blood vessels under the eye to reflect the light, giving the effect of red eyes in the photo. Fortunately, with the continuous advancement of technology, some cameras are now equipped with red-eye correction functions that can effectively solve this problem. By using this feature, the camera takes pictures
 How to solve the problem of Win11 failing to verify credentials?
Jan 30, 2024 pm 02:03 PM
When a Win11 user uses credentials to log in, he or she receives an error message stating that your credentials cannot be verified. What is going on? After the editor investigated this problem, I found that there may be several different situations that directly or indirectly cause this problem. Let's take a look with the editor.
 An easy guide to fixing Windows 11 blue screen issues
Dec 27, 2023 pm 02:26 PM
Many friends always encounter blue screens when using computer operating systems. Even the latest win11 system cannot escape the fate of blue screens. Therefore, today I have brought you a tutorial on how to repair win11 blue screens. No matter whether you have encountered a blue screen or not, you can learn it first in case you need it. How to fix win11 blue screen method 1. If we encounter a blue screen, first restart the system and check whether it can start normally. 2. If it can start normally, right-click "Computer" on the desktop and select "Manage" 3. Then expand "System Tools" on the left side of the pop-up window and select "Event Viewer" 4. In the event viewer, we will You can see what specific problem caused the blue screen. 5. Then just follow the blue screen situation and events
 Comprehensive Guide to PHP 500 Errors: Causes, Diagnosis and Fixes
Mar 22, 2024 pm 12:45 PM
A Comprehensive Guide to PHP 500 Errors: Causes, Diagnosis, and Fixes During PHP development, we often encounter errors with HTTP status code 500. This error is usually called "500InternalServerError", which means that some unknown errors occurred while processing the request on the server side. In this article, we will explore the common causes of PHP500 errors, how to diagnose them, and how to fix them, and provide specific code examples for reference. Common causes of 1.500 errors 1.
 How to fix the volume cannot be adjusted in WIN10
Mar 27, 2024 pm 05:16 PM
1. Press win+r to open the run window, enter [regedit] and press Enter to open the registry editor. 2. In the opened registry editor, click to expand [HKEY_LOCAL_MACHINESOFTWAREMicrosoftWindowsCurrentVersionRun]. In the blank space on the right, right-click and select [New - String Value], and rename it to [systray.exe]. 3. Double-click to open systray.exe, modify its numerical data to [C:WindowsSystem32systray.exe], and click [OK] to save the settings.
 Table 'table_name' is marked as crashed and should be repaired - How to solve MySQL error: Table is marked as crashed and needs to be repaired
Oct 05, 2023 am 09:25 AM
Title: Table'table_name'ismarkedascrashedandshouldberepaired-How to solve MySQL error: The table is marked as crashed and needs to be repaired. Specific code examples are required. Article text: MySQL is a powerful relational database management system that is widely used in various websites and The application is under development. However, due to various reasons, sometimes we may encounter some errors and problems. in
 How to solve the blue screen problem caused by csrss.exe
Dec 28, 2023 pm 06:24 PM
If your computer often displays a blue screen after starting up, it may be caused by a serious error (stop code 0xF4) caused by the Windows system to the csrss.exe file. Now let’s see how to fix it! How to fix the csrss.exe blue screen. First, press the "Ctrl+Alt+Del" keys at the same time. At this time, the interface from the Microsoft Windows Task Manager will pop up. Click the "Task Manager" tab, and the screen will list all running programs and the resources they occupy and other information. Click again to enter the "Processes" tab, click "Image Name" again, and then find the "csrss.exe" file in the list. Click the "End Process" button


