

3 Easy Ways to Change Windows 11 Control Panel to Classic View

With the rollout of Windows 11, Microsoft has been slowly deprioritizing some Control Panel features and moving them into the Settings app.
While Control Panel is still relevant for some of its basic functions, a full switch to the Settings app is inevitable.
However, many users are not used to the changed interface in Windows 11 and prefer the previous way. For example, open the Windows 11 Control Panel in Classic view.
So, while you are still adjusting to the Windows 11 interface, this article will guide you on how to change to the classic Control Panel in Windows 11.
What’s new in Windows 11 Control Panel?
Here are some changes in the app that you must be aware of:
- You can now change network adapter settings through the Windows 11 Settings app. Just follow the path Network & Internet > Advanced Network Settings and enable or disable network connections from this page.
- You can now change sound settings via System > Sound in the Settings app instead of navigating to the Sound window via Control Panel. Here you can change sound settings, such as adjusting volume, testing input and output levels, accessing the mixer, and more.
- Advanced storage settings layout helps you free up hard drive space by clearing any redundant files, managing disk volumes, and more.
- Check battery and power consumption using charts that provide detailed information.
Having said that, the Windows Control Panel is still essential for changing advanced settings such as changing firewall settings, power settings, uninstalling programs or updates, etc.
How to switch to Control Panel classic view in Windows 11?
1. Change the view to small icons
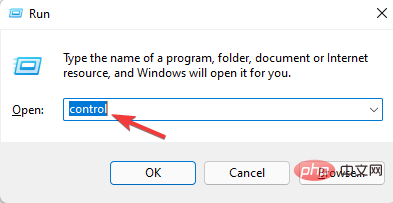
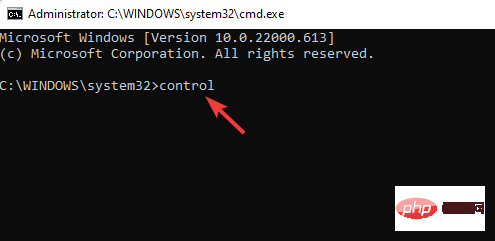
- To open Run Command, press the Win R keys at the same time.
- Enter control in the search bar and click to open EnterControl Panel.

- In the Control Panel window, navigate to the View as field located in the upper right corner.
- Select the small icon from the drop-down list next to it.
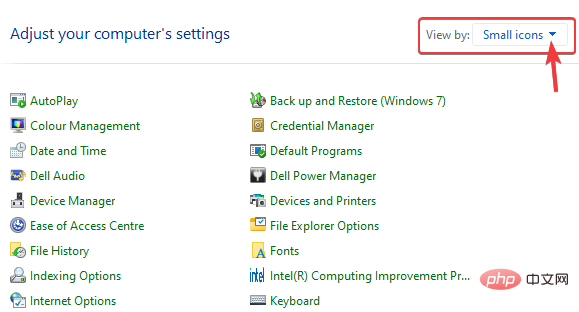
This will change your Windows 11 Control Panel to Classic view.

Notes To return to the normal Windows 11 Control Panel view, go to View as in the upper right corner and set it to Categories or Large Icons.
2. Pin Control Panel to Start or Taskbar
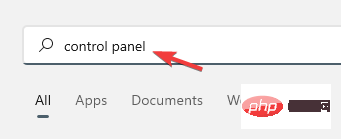
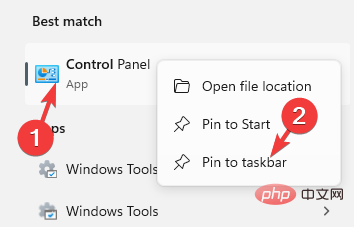
- Go to Start and type control panel in the Windows search bar.
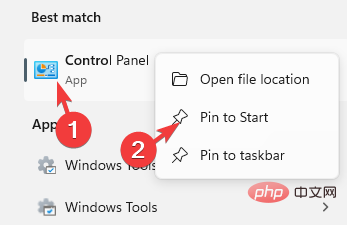
- Under Best match, right-click Control Panel and select Pin to Start.
- This will pin the Control Panel application to the Start menu.
- Alternatively, when you search for Control Panel in Windows Search, right-click the app and select Pin to taskbar.
- This will pin the app to Taskbar.
This will also ensure you have quick access to the control panel.
Notes To unpin an app, search for Control Panel again in the Windows search bar, right-click on it and select Unpin from Start or Unpin from Taskbar.
3. Create a desktop shortcut for Control Panel
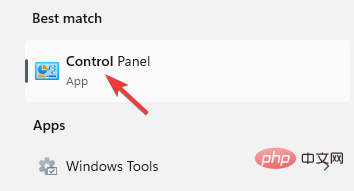
- Click Start and type Control Panel in the Windows search bar.
- Click on Control Panel under Best Match to open the application.
- Now, navigate to the small Control Panel icon to the left of the address bar, then press and drag it to the desktop.
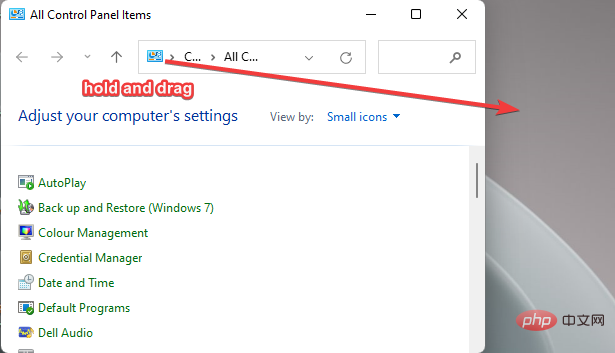
This will immediately create a desktop shortcut to the Control Panel application. When you double-click to open the app, it will automatically open in Windows 11’s Control Panel Classic view.
What are the key points?
In Windows 11, you can still open Control Panel just like in Windows 10:
- Go to Windows Search, type Control and select Control Panel from the best matching results.
- Press the Win R shortcut key to open the running console. Type Control or Control.exeEnter in the search bar and click.
Alternatively, you can open the Control Panel via Command Prompt (Admin). That's it:
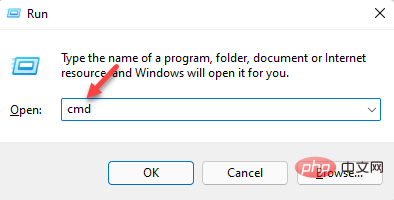
- Right-click Start and select Run to open the Run console.
- In the search field, type cmd and simultaneously press the Ctrl Shift Enter key to enter in the admin Start the command prompt in administrator mode.
- Now, run the following command in an elevated command prompt Control and hit .Enter
- It will open Control panel application.

After opening the control panel, switch to classic view as described above.
While the new Control Panel and changed layout may be a little overwhelming for new users, once you get used to the pattern, it should be just as easy as it was on Windows 10.
The above is the detailed content of 3 Easy Ways to Change Windows 11 Control Panel to Classic View. For more information, please follow other related articles on the PHP Chinese website!

Hot AI Tools

Undresser.AI Undress
AI-powered app for creating realistic nude photos

AI Clothes Remover
Online AI tool for removing clothes from photos.

Undress AI Tool
Undress images for free

Clothoff.io
AI clothes remover

AI Hentai Generator
Generate AI Hentai for free.

Hot Article
Hot Tools

Notepad++7.3.1
Easy-to-use and free code editor

SublimeText3 Chinese version
Chinese version, very easy to use

Zend Studio 13.0.1
Powerful PHP integrated development environment

Dreamweaver CS6
Visual web development tools

SublimeText3 Mac version
God-level code editing software (SublimeText3)
Hot Topics
 1376
1376
 52
52

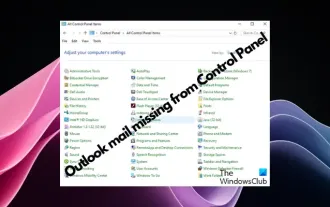 Outlook emails lost from control panel in Windows 11
Feb 29, 2024 pm 03:16 PM
Outlook emails lost from control panel in Windows 11
Feb 29, 2024 pm 03:16 PM
Is the Outlook mail icon missing from Windows 11's Control Panel? This unexpected situation has caused confusion and concern among some individuals who rely on OutlookMail for their communication needs. Why don't my Outlook emails show up in Control Panel? There may be several possible reasons why there are no Outlook mail icons in Control Panel: Outlook is not installed correctly. Installing Office applications from the Microsoft Store does not add the Mail applet to Control Panel. The location of the mlcfg32.cpl file in Control Panel is missing. The path to the mlcfg32.cpl file in the registry is incorrect. The operating system is not currently configured to run this application
 What to do if WPS Office cannot open the PPT file - What to do if WPS Office cannot open the PPT file
Mar 04, 2024 am 11:40 AM
What to do if WPS Office cannot open the PPT file - What to do if WPS Office cannot open the PPT file
Mar 04, 2024 am 11:40 AM
Recently, many friends have asked me what to do if WPSOffice cannot open PPT files. Next, let us learn how to solve the problem of WPSOffice not being able to open PPT files. I hope it can help everyone. 1. First open WPSOffice and enter the homepage, as shown in the figure below. 2. Then enter the keyword "document repair" in the search bar above, and then click to open the document repair tool, as shown in the figure below. 3. Then import the PPT file for repair, as shown in the figure below.
 What software is crystaldiskmark? -How to use crystaldiskmark?
Mar 18, 2024 pm 02:58 PM
What software is crystaldiskmark? -How to use crystaldiskmark?
Mar 18, 2024 pm 02:58 PM
CrystalDiskMark is a small HDD benchmark tool for hard drives that quickly measures sequential and random read/write speeds. Next, let the editor introduce CrystalDiskMark to you and how to use crystaldiskmark~ 1. Introduction to CrystalDiskMark CrystalDiskMark is a widely used disk performance testing tool used to evaluate the read and write speed and performance of mechanical hard drives and solid-state drives (SSD). Random I/O performance. It is a free Windows application and provides a user-friendly interface and various test modes to evaluate different aspects of hard drive performance and is widely used in hardware reviews
 CrystalDiskinfo usage tutorial-What software is CrystalDiskinfo?
Mar 18, 2024 pm 04:50 PM
CrystalDiskinfo usage tutorial-What software is CrystalDiskinfo?
Mar 18, 2024 pm 04:50 PM
CrystalDiskInfo is a software used to check computer hardware devices. In this software, we can check our own computer hardware, such as reading speed, transmission mode, interface, etc.! So in addition to these functions, how to use CrystalDiskInfo and what exactly is CrystalDiskInfo? Let me sort it out for you! 1. The Origin of CrystalDiskInfo As one of the three major components of a computer host, a solid-state drive is the storage medium of a computer and is responsible for computer data storage. A good solid-state drive can speed up file reading and affect consumer experience. When consumers receive new devices, they can use third-party software or other SSDs to
 How to set the keyboard increment in Adobe Illustrator CS6 - How to set the keyboard increment in Adobe Illustrator CS6
Mar 04, 2024 pm 06:04 PM
How to set the keyboard increment in Adobe Illustrator CS6 - How to set the keyboard increment in Adobe Illustrator CS6
Mar 04, 2024 pm 06:04 PM
Many users are using the Adobe Illustrator CS6 software in their offices, so do you know how to set the keyboard increment in Adobe Illustrator CS6? Then, the editor will bring you the method of setting the keyboard increment in Adobe Illustrator CS6. Interested users can take a look below. Step 1: Start Adobe Illustrator CS6 software, as shown in the figure below. Step 2: In the menu bar, click the [Edit] → [Preferences] → [General] command in sequence. Step 3: The [Keyboard Increment] dialog box pops up, enter the required number in the [Keyboard Increment] text box, and finally click the [OK] button. Step 4: Use the shortcut key [Ctrl]
 Where is the preferred graphics processor in the nvidia control panel - Introduction to the location of the preferred graphics processor in the nvidia control panel
Mar 04, 2024 pm 01:50 PM
Where is the preferred graphics processor in the nvidia control panel - Introduction to the location of the preferred graphics processor in the nvidia control panel
Mar 04, 2024 pm 01:50 PM
Friends, do you know where the preferred graphics processor of the nvidia control panel is? Today I will explain the location of the preferred graphics processor of the nvidia control panel. If you are interested, come and take a look with the editor. I hope it can help you. . 1. We need to right-click a blank space on the desktop and open the "nvidia Control Panel" (as shown in the picture). 2. Then enter "Manage 3D Settings" under "3D Settings" on the left (as shown in the picture). 3. After entering, you can find "Preferred Graphics Processor" on the right (as shown in the picture).
 How to resolve an incompatible software attempt to load with Edge?
Mar 15, 2024 pm 01:34 PM
How to resolve an incompatible software attempt to load with Edge?
Mar 15, 2024 pm 01:34 PM
When we use the Edge browser, sometimes incompatible software attempts to be loaded together, so what is going on? Let this site carefully introduce to users how to solve the problem of trying to load incompatible software with Edge. How to solve an incompatible software trying to load with Edge Solution 1: Search IE in the start menu and access it directly with IE. Solution 2: Note: Modifying the registry may cause system failure, so operate with caution. Modify registry parameters. 1. Enter regedit during operation. 2. Find the path\HKEY_LOCAL_MACHINE\SOFTWARE\Policies\Micros
 How to delete recently opened files in Adobe Reader XI - How to delete recently opened files in Adobe Reader XI
Mar 04, 2024 am 11:13 AM
How to delete recently opened files in Adobe Reader XI - How to delete recently opened files in Adobe Reader XI
Mar 04, 2024 am 11:13 AM
Recently, many friends have asked me how to delete recently opened files in Adobe Reader XI. Next, let us learn how to delete recently opened files in Adobe Reader XI. I hope it can help everyone. Step 1: First, use the "win+R" shortcut key to open the run, enter "regedit", and press Enter to open it, as shown in the picture. Step 2: After entering the new interface, click "HKEY_CURRENT_USERSoftwareAdobeAcrobatReader11.0AVGeneralcRecentFiles" on the left, select "c1", right-click and select the "Delete" option, as shown in the figure. Step 3: Then pop up