

Awesome, breaking a world record using Python!


Hello everyone,
Used Python OpenCV to implement automatic mine clearance and broke the world record. Let’s take a look at the effect first.
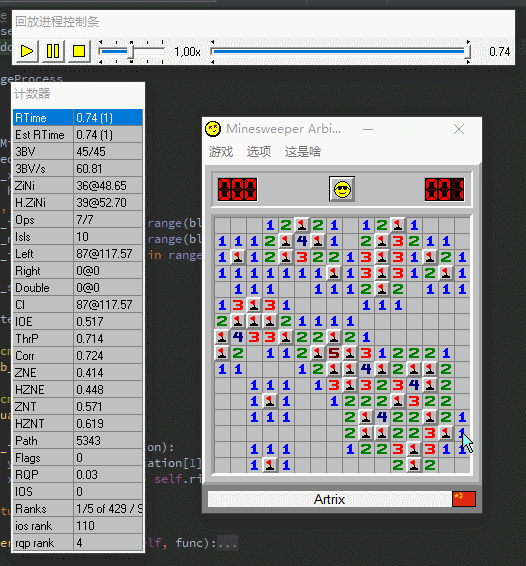
Intermediate - 0.74 seconds 3BV/S=60.81
I believe many people have known about Minesweeper, a classic game (graphics card test) for a long time (Software), many people have heard of the Chinese Thunder Saint, Guo Weijia, who is also the number one minesweeper in China and second in the world. As a classic game that was born in the Windows 9x era, Minesweeper still has its unique charm from the past to the present: fast-paced and high-precision mouse operation requirements, quick response capabilities, and the thrill of setting records. These are all the things Minesweeper brings to The unique excitement brought by minesweeper friends is unique to Minesweeper.
1. Preparation
Before preparing to create a set of automated mine clearance software, you need to prepare the following tools/software/environment
- Development environment
- Python3 environment - 3.6 or above is recommended [Anaconda3 is more recommended, many of the following dependent libraries do not need to be installed]
- numpy dependent library [if you have Anaconda, no need to install]
- PIL dependent library [such as If you have Anaconda, you don’t need to install it]
- opencv-python
- win32gui, win32api dependent library
- IDE that supports Python [Optional, if you can tolerate using a text editor to write programs Also]
- Minesweeper Software
· Minesweeper Arbiter (MS-Arbiter must be used for minesweeper!)
Okay, then our preparations have been All done! Let’s get started~
2. Implementation ideas
What is the most important thing before doing something? It is to build a step-by-step framework in your mind for what you are going to do. Only in this way can we ensure that the process of doing this thing is as thoughtful as possible, so that there will be a good result in the end. When we write programs, we should try our best to have a general idea in mind before officially starting development.
For this project, the general development process is as follows:
- Complete the form content interception part
- Complete the thunder block segmentation part
- Complete the mine block type identification part
- Complete the mine clearing algorithm
Okay, now that we have an idea, let’s roll up our sleeves and work hard!
1. Form interception
In fact, for this project, form interception is a logically simple but quite troublesome part to implement, and it is also an indispensable part. We got the following two pieces of information through Spy:
class_name = "TMain"
title_name = "Minesweeper Arbiter "
- The main window category of ms_arbiter.exe is "TMain"
- The main window of ms_arbiter.exe The body name is "Minesweeper Arbiter"
Did you notice? There is a space after the name of the main form. It was this space that troubled the author for a while. Only by adding this space can win32gui obtain the handle of the form normally.
This project uses win32gui to obtain the position information of the form. The specific code is as follows:
hwnd = win32gui.FindWindow(class_name, title_name)
if hwnd:
left, top, right, bottom = win32gui.GetWindowRect(hwnd)
Through the above code, we get the form relative to the entire screen s position. After that, we need to use PIL to intercept the chessboard of the minesweeper interface.
We need to import the PIL library first
from PIL import ImageGrab
and then perform specific operations.
left += 15
top += 101
right -= 15
bottom -= 43
rect = (left, top, right, bottom)
img = ImageGrab.grab().crop(rect)
If you are smart, you must have noticed those weird Magic Numbers at a glance. Yes, these are indeed Magic Numbers. They are the relative shapes of the entire chessboard that we get through a little bit of fine adjustment. position on the form.
Note: These data are only tested under Windows 10. If used under other Windows systems, the correctness of the relative position is not guaranteed, because older versions of the system may have different widths of form borders.
 The orange area is what we need
Okay, we have the image of the chessboard. The next step is to segment the images of each mine block~
2. Mine block segmentation

Before segmenting the mine block, we need to know the size of the mine block and its border size in advance. According to the author's measurement, under ms_arbiter, the size of each mine block is 16px*16px.
Knowing the size of the thunder block, we can cut each thunder block. First we need to know the number of mine blocks in both horizontal and vertical directions.
block_width, block_height = 16, 16
blocks_x = int((right - left) / block_width)
blocks_y = int((bottom - top) / block_height)
After that, we create a two-dimensional array to store the image of each mine block, segment the image, and save it in the previously created array.
def crop_block(hole_img, x, y):
x1, y1 = x * block_width, y * block_height
x2, y2 = x1 + block_width, y1 + block_height
return hole_img.crop((x1, y1, x2, y2))
blocks_img = [[0 for i in range(blocks_y)] for i in range(blocks_x)]
for y in range(blocks_y):
for x in range(blocks_x):
blocks_img[x][y] = crop_block(img, x, y)
Encapsulate the entire image acquisition and segmentation part into a library, which can be called at any time~ In the author's implementation, we encapsulate this part into imageProcess.py, in which the function get_frame() is used Complete the above image acquisition and segmentation process.
3. 雷块识别
这一部分可能是整个项目里除了扫雷算法本身之外最重要的部分了。笔者在进行雷块检测的时候采用了比较简单的特征,高效并且可以满足要求。
def analyze_block(self, block, location):
block = imageProcess.pil_to_cv(block)
block_color = block[8, 8]
x, y = location[0], location[1]
# -1:Not opened
# -2:Opened but blank
# -3:Un initialized
# Opened
if self.equal(block_color, self.rgb_to_bgr((192, 192, 192))):
if not self.equal(block[8, 1], self.rgb_to_bgr((255, 255, 255))):
self.blocks_num[x][y] = -2
self.is_started = True
else:
self.blocks_num[x][y] = -1
elif self.equal(block_color, self.rgb_to_bgr((0, 0, 255))):
self.blocks_num[x][y] = 1
elif self.equal(block_color, self.rgb_to_bgr((0, 128, 0))):
self.blocks_num[x][y] = 2
elif self.equal(block_color, self.rgb_to_bgr((255, 0, 0))):
self.blocks_num[x][y] = 3
elif self.equal(block_color, self.rgb_to_bgr((0, 0, 128))):
self.blocks_num[x][y] = 4
elif self.equal(block_color, self.rgb_to_bgr((128, 0, 0))):
self.blocks_num[x][y] = 5
elif self.equal(block_color, self.rgb_to_bgr((0, 128, 128))):
self.blocks_num[x][y] = 6
elif self.equal(block_color, self.rgb_to_bgr((0, 0, 0))):
if self.equal(block[6, 6], self.rgb_to_bgr((255, 255, 255))):
# Is mine
self.blocks_num[x][y] = 9
elif self.equal(block[5, 8], self.rgb_to_bgr((255, 0, 0))):
# Is flag
self.blocks_num[x][y] = 0
else:
self.blocks_num[x][y] = 7
elif self.equal(block_color, self.rgb_to_bgr((128, 128, 128))):
self.blocks_num[x][y] = 8
else:
self.blocks_num[x][y] = -3
self.is_mine_form = False
if self.blocks_num[x][y] == -3 or not self.blocks_num[x][y] == -1:
self.is_new_start = False
可以看到,我们采用了读取每个雷块的中心点像素的方式来判断雷块的类别,并且针对插旗、未点开、已点开但是空白等情况进行了进一步判断。具体色值是笔者直接取色得到的,并且屏幕截图的色彩也没有经过压缩,所以通过中心像素结合其他特征点来判断类别已经足够了,并且做到了高效率。
在本项目中,我们实现的时候采用了如下标注方式:
- 1-8:表示数字1到8
- 9:表示是地雷
- 0:表示插旗
- -1:表示未打开
- -2:表示打开但是空白
- -3:表示不是扫雷游戏中的任何方块类型
通过这种简单快速又有效的方式,我们成功实现了高效率的图像识别。
4. 扫雷算法实现
这可能是本篇文章最激动人心的部分了。在这里我们需要先说明一下具体的扫雷算法思路:
- 遍历每一个已经有数字的雷块,判断在它周围的九宫格内未被打开的雷块数量是否和本身数字相同,如果相同则表明周围九宫格内全部都是地雷,进行标记。
- 再次遍历每一个有数字的雷块,取九宫格范围内所有未被打开的雷块,去除已经被上一次遍历标记为地雷的雷块,记录并且点开。
- 如果以上方式无法继续进行,那么说明遇到了死局,选择在当前所有未打开的雷块中随机点击。(当然这个方法不是最优的,有更加优秀的解决方案,但是实现相对麻烦)
基本的扫雷流程就是这样,那么让我们来亲手实现它吧~
首先我们需要一个能够找出一个雷块的九宫格范围的所有方块位置的方法。因为扫雷游戏的特殊性,在棋盘的四边是没有九宫格的边缘部分的,所以我们需要筛选来排除掉可能超过边界的访问。
def generate_kernel(k, k_width, k_height, block_location):
 ls = []
 loc_x, loc_y = block_location[0], block_location[1]
for now_y in range(k_height):
for now_x in range(k_width):
if k[now_y][now_x]:
 rel_x, rel_y = now_x - 1, now_y - 1
 ls.append((loc_y + rel_y, loc_x + rel_x))
return ls
 kernel_width, kernel_height = 3, 3
# Kernel mode:[Row][Col]
 kernel = [[1, 1, 1], [1, 1, 1], [1, 1, 1]]
# Left border
if x == 0:
for i in range(kernel_height):
 kernel[i][0] = 0
# Right border
if x == self.blocks_x - 1:
for i in range(kernel_height):
 kernel[i][kernel_width - 1] = 0
# Top border
if y == 0:
for i in range(kernel_width):
 kernel[0][i] = 0
# Bottom border
if y == self.blocks_y - 1:
for i in range(kernel_width):
 kernel[kernel_height - 1][i] = 0
# Generate the search map
 to_visit = generate_kernel(kernel, kernel_width, kernel_height, location)
我们在这一部分通过检测当前雷块是否在棋盘的各个边缘来进行核的删除(在核中,1为保留,0为舍弃),之后通过generate_kernel函数来进行最终坐标的生成。
def count_unopen_blocks(blocks):
count = 0
for single_block in blocks:
if self.blocks_num[single_block[1]][single_block[0]] == -1:
count += 1
return count
def mark_as_mine(blocks):
for single_block in blocks:
if self.blocks_num[single_block[1]][single_block[0]] == -1:
self.blocks_is_mine[single_block[1]][single_block[0]] = 1
unopen_blocks = count_unopen_blocks(to_visit)
if unopen_blocks == self.blocks_num[x][y]:
 mark_as_mine(to_visit)
在完成核的生成之后,我们有了一个需要去检测的雷块“地址簿”:to_visit。之后,我们通过count_unopen_blocks函数来统计周围九宫格范围的未打开数量,并且和当前雷块的数字进行比对,如果相等则将所有九宫格内雷块通过mark_as_mine函数来标注为地雷。
def mark_to_click_block(blocks):
for single_block in blocks:
# Not Mine
if not self.blocks_is_mine[single_block[1]][single_block[0]] == 1:
# Click-able
if self.blocks_num[single_block[1]][single_block[0]] == -1:
# Source Syntax: [y][x] - Converted
if not (single_block[1], single_block[0]) in self.next_steps:
self.next_steps.append((single_block[1], single_block[0]))
def count_mines(blocks):
count = 0
for single_block in blocks:
if self.blocks_is_mine[single_block[1]][single_block[0]] == 1:
count += 1
return count
mines_count = count_mines(to_visit)
if mines_count == block:
mark_to_click_block(to_visit)
扫雷流程中的第二步我们也采用了和第一步相近的方法来实现。先用和第一步完全一样的方法来生成需要访问的雷块的核,之后生成具体的雷块位置,通过count_mines函数来获取九宫格范围内所有雷块的数量,并且判断当前九宫格内所有雷块是否已经被检测出来。
如果是,则通过mark_to_click_block函数来排除九宫格内已经被标记为地雷的雷块,并且将剩余的安全雷块加入next_steps数组内。
# Analyze the number of blocks
self.iterate_blocks_image(BoomMine.analyze_block)
# Mark all mines
self.iterate_blocks_number(BoomMine.detect_mine)
# Calculate where to click
self.iterate_blocks_number(BoomMine.detect_to_click_block)
if self.is_in_form(mouseOperation.get_mouse_point()):
for to_click in self.next_steps:
 on_screen_location = self.rel_loc_to_real(to_click)
 mouseOperation.mouse_move(on_screen_location[0], on_screen_location[1])
 mouseOperation.mouse_click()
在最终的实现内,笔者将几个过程都封装成为了函数,并且可以通过iterate_blocks_number方法来对所有雷块都使用传入的函数来进行处理,这有点类似Python中Filter的作用。
之后笔者做的工作就是判断当前鼠标位置是否在棋盘之内,如果是,就会自动开始识别并且点击。具体的点击部分,笔者采用了作者为"wp"的一份代码(从互联网搜集而得),里面实现了基于win32api的窗体消息发送工作,进而完成了鼠标移动和点击的操作。具体实现封装在mouseOperation.py中,可以在查看完整代码:
https://www.php.cn/link/b8a6550662b363eb34145965d64d0cfb
The above is the detailed content of Awesome, breaking a world record using Python!. For more information, please follow other related articles on the PHP Chinese website!

Hot AI Tools

Undresser.AI Undress
AI-powered app for creating realistic nude photos

AI Clothes Remover
Online AI tool for removing clothes from photos.

Undress AI Tool
Undress images for free

Clothoff.io
AI clothes remover

AI Hentai Generator
Generate AI Hentai for free.

Hot Article
Hot Tools

Notepad++7.3.1
Easy-to-use and free code editor

SublimeText3 Chinese version
Chinese version, very easy to use

Zend Studio 13.0.1
Powerful PHP integrated development environment

Dreamweaver CS6
Visual web development tools

SublimeText3 Mac version
God-level code editing software (SublimeText3)
Hot Topics
 1382
1382
 52
52

 PHP and Python: Code Examples and Comparison
Apr 15, 2025 am 12:07 AM
PHP and Python: Code Examples and Comparison
Apr 15, 2025 am 12:07 AM
PHP and Python have their own advantages and disadvantages, and the choice depends on project needs and personal preferences. 1.PHP is suitable for rapid development and maintenance of large-scale web applications. 2. Python dominates the field of data science and machine learning.
 How is the GPU support for PyTorch on CentOS
Apr 14, 2025 pm 06:48 PM
How is the GPU support for PyTorch on CentOS
Apr 14, 2025 pm 06:48 PM
Enable PyTorch GPU acceleration on CentOS system requires the installation of CUDA, cuDNN and GPU versions of PyTorch. The following steps will guide you through the process: CUDA and cuDNN installation determine CUDA version compatibility: Use the nvidia-smi command to view the CUDA version supported by your NVIDIA graphics card. For example, your MX450 graphics card may support CUDA11.1 or higher. Download and install CUDAToolkit: Visit the official website of NVIDIACUDAToolkit and download and install the corresponding version according to the highest CUDA version supported by your graphics card. Install cuDNN library:
 Detailed explanation of docker principle
Apr 14, 2025 pm 11:57 PM
Detailed explanation of docker principle
Apr 14, 2025 pm 11:57 PM
Docker uses Linux kernel features to provide an efficient and isolated application running environment. Its working principle is as follows: 1. The mirror is used as a read-only template, which contains everything you need to run the application; 2. The Union File System (UnionFS) stacks multiple file systems, only storing the differences, saving space and speeding up; 3. The daemon manages the mirrors and containers, and the client uses them for interaction; 4. Namespaces and cgroups implement container isolation and resource limitations; 5. Multiple network modes support container interconnection. Only by understanding these core concepts can you better utilize Docker.
 Python vs. JavaScript: Community, Libraries, and Resources
Apr 15, 2025 am 12:16 AM
Python vs. JavaScript: Community, Libraries, and Resources
Apr 15, 2025 am 12:16 AM
Python and JavaScript have their own advantages and disadvantages in terms of community, libraries and resources. 1) The Python community is friendly and suitable for beginners, but the front-end development resources are not as rich as JavaScript. 2) Python is powerful in data science and machine learning libraries, while JavaScript is better in front-end development libraries and frameworks. 3) Both have rich learning resources, but Python is suitable for starting with official documents, while JavaScript is better with MDNWebDocs. The choice should be based on project needs and personal interests.
 MiniOpen Centos compatibility
Apr 14, 2025 pm 05:45 PM
MiniOpen Centos compatibility
Apr 14, 2025 pm 05:45 PM
MinIO Object Storage: High-performance deployment under CentOS system MinIO is a high-performance, distributed object storage system developed based on the Go language, compatible with AmazonS3. It supports a variety of client languages, including Java, Python, JavaScript, and Go. This article will briefly introduce the installation and compatibility of MinIO on CentOS systems. CentOS version compatibility MinIO has been verified on multiple CentOS versions, including but not limited to: CentOS7.9: Provides a complete installation guide covering cluster configuration, environment preparation, configuration file settings, disk partitioning, and MinI
 How to operate distributed training of PyTorch on CentOS
Apr 14, 2025 pm 06:36 PM
How to operate distributed training of PyTorch on CentOS
Apr 14, 2025 pm 06:36 PM
PyTorch distributed training on CentOS system requires the following steps: PyTorch installation: The premise is that Python and pip are installed in CentOS system. Depending on your CUDA version, get the appropriate installation command from the PyTorch official website. For CPU-only training, you can use the following command: pipinstalltorchtorchvisiontorchaudio If you need GPU support, make sure that the corresponding version of CUDA and cuDNN are installed and use the corresponding PyTorch version for installation. Distributed environment configuration: Distributed training usually requires multiple machines or single-machine multiple GPUs. Place
 How to choose the PyTorch version on CentOS
Apr 14, 2025 pm 06:51 PM
How to choose the PyTorch version on CentOS
Apr 14, 2025 pm 06:51 PM
When installing PyTorch on CentOS system, you need to carefully select the appropriate version and consider the following key factors: 1. System environment compatibility: Operating system: It is recommended to use CentOS7 or higher. CUDA and cuDNN:PyTorch version and CUDA version are closely related. For example, PyTorch1.9.0 requires CUDA11.1, while PyTorch2.0.1 requires CUDA11.3. The cuDNN version must also match the CUDA version. Before selecting the PyTorch version, be sure to confirm that compatible CUDA and cuDNN versions have been installed. Python version: PyTorch official branch
 How to install nginx in centos
Apr 14, 2025 pm 08:06 PM
How to install nginx in centos
Apr 14, 2025 pm 08:06 PM
CentOS Installing Nginx requires following the following steps: Installing dependencies such as development tools, pcre-devel, and openssl-devel. Download the Nginx source code package, unzip it and compile and install it, and specify the installation path as /usr/local/nginx. Create Nginx users and user groups and set permissions. Modify the configuration file nginx.conf, and configure the listening port and domain name/IP address. Start the Nginx service. Common errors need to be paid attention to, such as dependency issues, port conflicts, and configuration file errors. Performance optimization needs to be adjusted according to the specific situation, such as turning on cache and adjusting the number of worker processes.
