

A brief analysis of TCP and UDP in Node


Node is a network-oriented platform. It is event-driven, non-blocking, single-threaded and has good scalability, making it It is very lightweight and suitable for playing various roles in distributed networks.
Node provides net, dgram, http, http2, https and other modules are used to process TCP, UDP, HTTP, HTTPS respectively, suitable for both server and client .
Building TCP services
TCP Services are very common in network applications, and most of the current applications are based on TCP Built, its full name is Transmission Control Protocol, which belongs to the transport layer protocol in the OSI model. Many application layer protocols are built based on TCP, and the typical HTTP , SMTP, IMAP and other protocols. I won’t talk about TCP related knowledge points here. If you are interested, you can follow my Computer Network column to learn.
Create TCP server
After basically understanding the working principle of TCP, we can start to create a TCP The server side accepts network requests. The net module provides an asynchronous network API for creating TCP# based on stream ## or IPC server and client. [Related tutorial recommendations: nodejs video tutorial, Programming teaching]
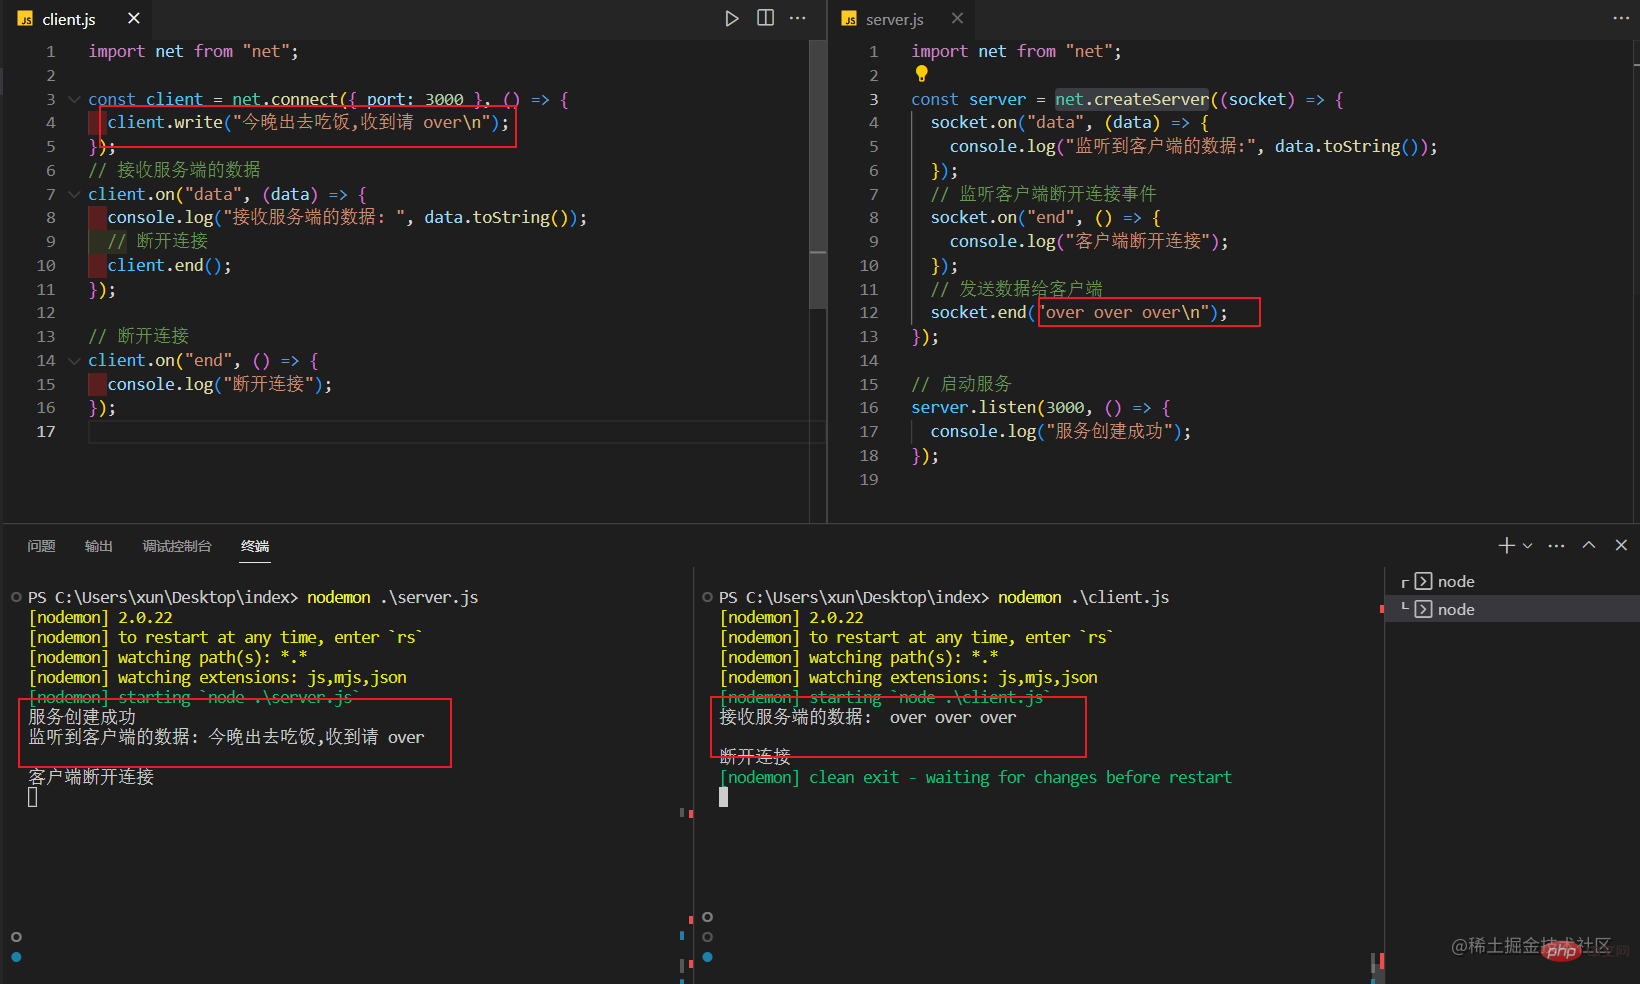
server.js file The following code is as follows:
import net from "net";

const server = net.createServer((socket) => {
  socket.on("data", (data) => {
    console.log("监听到客户端的数据:", data.toString());
  });
  // 监听客户端断开连接事件
  socket.on("end", () => {
    console.log("客户端断开连接");
  });
  // 发送数据给客户端
  socket.end("over over over\n");
});

// 启动服务
server.listen(3000, () => {
  console.log("服务创建成功");
});TCP server through net.createServer(listener). The parameter of this function is the link event The listener for connection.
The service is created successfully and the output is in the terminal.
nodemon .\server.js
net.createServer, then we use net.connect to create a client for session, the specific code is as follows As shown:
import net from "net";

const client = net.connect({ port: 3000 }, () => {
  client.write("今晚出去吃饭,收到请 over\n");
});
// 接收服务端的数据
client.on("data", (data) => {
  console.log("接收服务端的数据: ", data.toString());
  // 断开连接
  client.end();
});

// 断开连接
client.on("end", () => {
  console.log("断开连接");
});

client.write() has sent data multiple times, but only the data other than setTimeout is normal. The continuous data sent in setTimeout does not seem to be one every time. Instead of returning, they will be randomly merged and returned, and sticky packets will appear here.
TCP There are certain optimization strategies for small data packets in the network: Negle Algorithm, if only one byte of content is sent at a time without optimization, the network It will be filled with datagrams with only a very small amount of valid data, which will be a great waste of network resources. For this situation, this algorithm requires the data in the buffer to reach a certain amount or a certain time before sending it out, so the small data packet will be sent out by the buffer. Algorithms are combined to optimize the network. Although this optimization enables efficient use of the network, data may be delayed in sending.
Node, since TCP enables the Negle algorithm by default, you can call socket.setNoDelay(true) Remove the Negle algorithm so that write() can send data to the network immediately:
 ##Close
The algorithm is not always effective, because it completes the merging on the server side. TCP The received data will be stored in its own buffer first, and then the application will be notified to receive it. The application layer will be blocked due to network or other problems. The reason is that if the data cannot be retrieved from the TCP buffer in time, multiple data blocks will be stored in the TCP buffer, which will cause sticky packets.
In
Node, calling createServer() is equivalent to calling new Server() , the specific results are shown in the figure below:
这主要的原因它在 Node 源码中有如下定义,所以调用 createServer() 函数实际上调用的是 new Server(),具体代码如下图所示:
function createServer(options, connectionListener) {
  return new Server(options, connectionListener);
}该构造函数的定义主要有如下所示:
function Server(options, connectionListener) {
  EventEmitter.call(this);
  // 注册连接到来时执行的回调
  if (typeof options === "function") {
    connectionListener = options;
    options = {};
    this.on("connection", connectionListener);
  } else if (options == null || typeof options === "object") {
    options = { ...options };

    if (typeof connectionListener === "function") {
      this.on("connection", connectionListener);
    }
  }
  // 服务器建立的连接数
  this._connections = 0;

  this[async_id_symbol] = -1;
  this._handle = null;
  this._usingWorkers = false;
  this._workers = [];
  this._unref = false;
  // 服务器下的所有连接是否允许半连接
  this.allowHalfOpen = options.allowHalfOpen || false;
  // 有连接时是否注册读事件
  this.pauseOnConnect = !!options.pauseOnConnect;
  this.noDelay = Boolean(options.noDelay);
  // 是否支持keepAlive
  this.keepAlive = Boolean(options.keepAlive);
  this.keepAliveInitialDelay = ~~(options.keepAliveInitialDelay / 1000);
}
ObjectSetPrototypeOf(Server.prototype, EventEmitter.prototype);
ObjectSetPrototypeOf(Server, EventEmitter);listen
它返回的是一个普通的 JavaScript 对象,接着调用 listen 函数监听端口,listen 方法支持多种使用方式主要有以下这几种方法:
- 传入的是一个已经创建的
TCP服务器,而不是需要创建的一个服务器; - 传进来是一个对象,并且带了
fd字段; - 创建了一个
TCP服务器,并启动该服务器,如果传入了host会对其进行域名解析;
该方法的的主要逻辑有如下代码所示:
Server.prototype.listen = function (...args) {
  /*
         处理入参,根据文档我们知道listen可以接收好几个参数,
          假设我们这里是只传了端口号9297
        */
  var normalized = normalizeArgs(args);
  //  normalized = [{port: 9297}, null];
  var options = normalized[0];
  var cb = normalized[1];
  // 第一次listen的时候会创建,如果非空说明已经listen过
  if (this._handle) {
    throw new errors.Error("ERR_SERVER_ALREADY_LISTEN");
  }
  // listen成功后执行的回调
  var hasCallback = cb !== null;
  if (hasCallback) {
    // listen成功的回调
    this.once("listening", cb);
  }

  options = options._handle || options.handle || options;
  // 第一种情况,传进来的是一个TCP服务器,而不是需要创建一个服务器
  if (options instanceof TCP) {
    this._handle = options;
    this[async_id_symbol] = this._handle.getAsyncId();
    listenIncluster(this, null, -1, -1, backlogFromArgs);
    return this;
  }
  // 第二种,传进来一个对象,并且带了fd
  if (typeof options.fd === "number" && options.fd >= 0) {
    listenIncluster(this, null, null, null, backlogFromArgs, options.fd);
    return this;
  }
  // 创建一个tcp服务器
  var backlog;
  if (typeof options.port === "number" || typeof options.port === "string") {
    backlog = options.backlog || backlogFromArgs;
    // 第三种 启动一个TCP服务器,传了host则先进行DNS解析
    if (options.host) {
      lookupAndListen(
        this,
        options.port | 0,
        options.host,
        backlog,
        options.exclusive
      );
    } else {
      listenIncluster(
        this,
        null,
        options.port | 0,
        4,
        backlog,
        undefined,
        options.exclusive
      );
    }
    return this;
  }
};listenInCluster
在每种方式的最后丢回调用 listenIncluster 方法,该方法主要做的事情是区分 master 进程 和 worker 进程,采用不同的处理策略:
mastr进程: 直接调用server._listen启动监听;worker进程: 使用cluster._getServer处理传入的server对象,修改server._handle再调用了server._listen启动监听;
构建 UDP 服务
UDP 又称用户数据包协议,与 TCP 一样同属于网络层传输层。UDP 和 TCP 最大的不同是 UDP 不是面向链接的。
创建 <span style="font-size: 18px;">UDP</span> 服务
创建 UDP 套接字十分简单,UDP 套接字一旦创建,既可以作为客户端发送数据,也可以作为服务端接收数据,下面的代码创建了一个 UDP 套接字,具体代码如下所示:
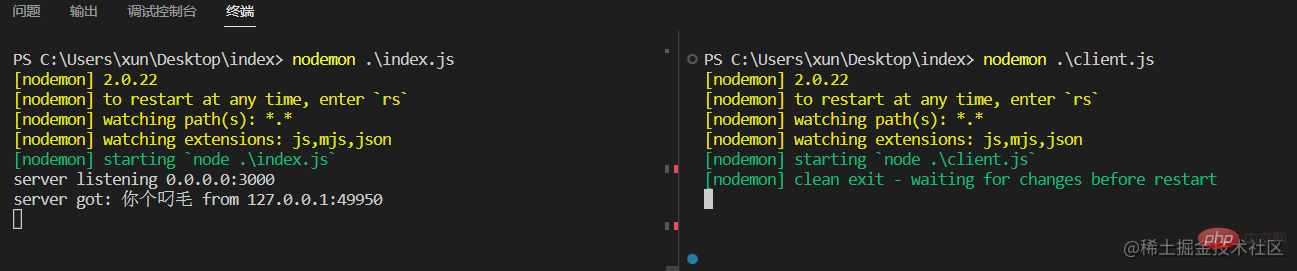
import dgram from "node:dgram";

const server = dgram.createSocket("udp4");

server.on("error", (err) => {
  console.error(`server error:\n${err.stack}`);
  server.close();
});

server.on("message", (msg, rinfo) => {
  console.log(`server got: ${msg} from ${rinfo.address}:${rinfo.port}`);
});

server.on("listening", () => {
  const address = server.address();
  console.log(`server listening ${address.address}:${address.port}`);
});

server.bind(3000);该套接字将接收所有网课上 3000 端口上的消息,在绑定完成后,将触发 listening 事件,会终端执行,会输出 server listening 0.0.0.0:3000 字段。
接下来我们创建一个客户端和服务端进行对话,具体代码如下所示:
import dgram from "node:dgram";
import { Buffer } from "node:buffer";

const message = Buffer.from("你个叼毛");
const client = dgram.createSocket("udp4");

client.send(message, 0, message.length, 3000, "localhost", () => {
  client.close();
});终端的最终输出结果如下图所示
UDP 广播
在 dgram 模块中,可以使用 socket 端口对象的 setBroadcast 方法来进行数据的广播:
socket.setBroadcast(flag);
flag: 当flag为true时,UDP服务器或者客户端可以利用其所用的socket端口对象的send方法中的地址修改为广播地址。
服务端的代码定义在 server.js 文件,具体代码如下所示:
import dgram from "dgram";

const server = dgram.createSocket("udp4");

server.on("message", function (msg, rinfo) {
  console.log(
    "server got: " + msg + " from " + rinfo.address + ":" + rinfo.port
  );
});

server.on("listening", function () {
  var address = server.address();
  console.log("server listening " + address.address + ":" + address.port);
});

server.bind(3000);客户端的代码定义在 server.js 文件,具体代码如下定义:
import dgram from "dgram";
import { Buffer } from "buffer";

const socket = dgram.createSocket("udp4");
const params = process.argv.splice(2);

socket.bind(function () {
  socket.setBroadcast(true);
});

const message = Buffer.from(...params);

socket.send(message, 0, message.length, 3000, "255.255.255.255", () => {
  socket.close();
});具体运行效果如下图所示:
更多node相关知识,请访问:nodejs 教程!
The above is the detailed content of A brief analysis of TCP and UDP in Node. For more information, please follow other related articles on the PHP Chinese website!

Hot AI Tools

Undresser.AI Undress
AI-powered app for creating realistic nude photos

AI Clothes Remover
Online AI tool for removing clothes from photos.

Undress AI Tool
Undress images for free

Clothoff.io
AI clothes remover

AI Hentai Generator
Generate AI Hentai for free.

Hot Article
Hot Tools

Notepad++7.3.1
Easy-to-use and free code editor

SublimeText3 Chinese version
Chinese version, very easy to use

Zend Studio 13.0.1
Powerful PHP integrated development environment

Dreamweaver CS6
Visual web development tools

SublimeText3 Mac version
God-level code editing software (SublimeText3)
Hot Topics
 1377
1377
 52
52

 PHP and Vue: a perfect pairing of front-end development tools
Mar 16, 2024 pm 12:09 PM
PHP and Vue: a perfect pairing of front-end development tools
Mar 16, 2024 pm 12:09 PM
PHP and Vue: a perfect pairing of front-end development tools. In today's era of rapid development of the Internet, front-end development has become increasingly important. As users have higher and higher requirements for the experience of websites and applications, front-end developers need to use more efficient and flexible tools to create responsive and interactive interfaces. As two important technologies in the field of front-end development, PHP and Vue.js can be regarded as perfect tools when paired together. This article will explore the combination of PHP and Vue, as well as detailed code examples to help readers better understand and apply these two
 Questions frequently asked by front-end interviewers
Mar 19, 2024 pm 02:24 PM
Questions frequently asked by front-end interviewers
Mar 19, 2024 pm 02:24 PM
In front-end development interviews, common questions cover a wide range of topics, including HTML/CSS basics, JavaScript basics, frameworks and libraries, project experience, algorithms and data structures, performance optimization, cross-domain requests, front-end engineering, design patterns, and new technologies and trends. . Interviewer questions are designed to assess the candidate's technical skills, project experience, and understanding of industry trends. Therefore, candidates should be fully prepared in these areas to demonstrate their abilities and expertise.
 Simple JavaScript Tutorial: How to Get HTTP Status Code
Jan 05, 2024 pm 06:08 PM
Simple JavaScript Tutorial: How to Get HTTP Status Code
Jan 05, 2024 pm 06:08 PM
JavaScript tutorial: How to get HTTP status code, specific code examples are required. Preface: In web development, data interaction with the server is often involved. When communicating with the server, we often need to obtain the returned HTTP status code to determine whether the operation is successful, and perform corresponding processing based on different status codes. This article will teach you how to use JavaScript to obtain HTTP status codes and provide some practical code examples. Using XMLHttpRequest
 Is Django front-end or back-end? check it out!
Jan 19, 2024 am 08:37 AM
Is Django front-end or back-end? check it out!
Jan 19, 2024 am 08:37 AM
Django is a web application framework written in Python that emphasizes rapid development and clean methods. Although Django is a web framework, to answer the question whether Django is a front-end or a back-end, you need to have a deep understanding of the concepts of front-end and back-end. The front end refers to the interface that users directly interact with, and the back end refers to server-side programs. They interact with data through the HTTP protocol. When the front-end and back-end are separated, the front-end and back-end programs can be developed independently to implement business logic and interactive effects respectively, and data exchange.
 Exploring Go language front-end technology: a new vision for front-end development
Mar 28, 2024 pm 01:06 PM
Exploring Go language front-end technology: a new vision for front-end development
Mar 28, 2024 pm 01:06 PM
As a fast and efficient programming language, Go language is widely popular in the field of back-end development. However, few people associate Go language with front-end development. In fact, using Go language for front-end development can not only improve efficiency, but also bring new horizons to developers. This article will explore the possibility of using the Go language for front-end development and provide specific code examples to help readers better understand this area. In traditional front-end development, JavaScript, HTML, and CSS are often used to build user interfaces
 Combination of Golang and front-end technology: explore how Golang plays a role in the front-end field
Mar 19, 2024 pm 06:15 PM
Combination of Golang and front-end technology: explore how Golang plays a role in the front-end field
Mar 19, 2024 pm 06:15 PM
Combination of Golang and front-end technology: To explore how Golang plays a role in the front-end field, specific code examples are needed. With the rapid development of the Internet and mobile applications, front-end technology has become increasingly important. In this field, Golang, as a powerful back-end programming language, can also play an important role. This article will explore how Golang is combined with front-end technology and demonstrate its potential in the front-end field through specific code examples. The role of Golang in the front-end field is as an efficient, concise and easy-to-learn
 How to get HTTP status code in JavaScript the easy way
Jan 05, 2024 pm 01:37 PM
How to get HTTP status code in JavaScript the easy way
Jan 05, 2024 pm 01:37 PM
Introduction to the method of obtaining HTTP status code in JavaScript: In front-end development, we often need to deal with the interaction with the back-end interface, and HTTP status code is a very important part of it. Understanding and obtaining HTTP status codes helps us better handle the data returned by the interface. This article will introduce how to use JavaScript to obtain HTTP status codes and provide specific code examples. 1. What is HTTP status code? HTTP status code means that when the browser initiates a request to the server, the service
 Django: A magical framework that can handle both front-end and back-end development!
Jan 19, 2024 am 08:52 AM
Django: A magical framework that can handle both front-end and back-end development!
Jan 19, 2024 am 08:52 AM
Django: A magical framework that can handle both front-end and back-end development! Django is an efficient and scalable web application framework. It is able to support multiple web development models, including MVC and MTV, and can easily develop high-quality web applications. Django not only supports back-end development, but can also quickly build front-end interfaces and achieve flexible view display through template language. Django combines front-end development and back-end development into a seamless integration, so developers don’t have to specialize in learning
