

How to fix Quick Access not showing recent files in Windows 11 or 10?

Windows 11 has a Quick Access feature in File Explorer that provides a list of regularly browsed folders and recently accessed files. This list keeps changing over time as you access different files and folders on your PC. Recently, users have reported that they are unable to see their recently accessed files in Quick Access in File Explorer. There may be several reasons why the Recent Files section is not showing up in the Quick Access area of File Explorer.
Are you facing the issue of recent files section missing in Quick Access or Quick Access not showing recently accessed files? Then you have landed on the correct page. Here, we have curated some solutions that can help you get back your recent files in quick access.
Fix 1 – Make sure jump lists are turned on
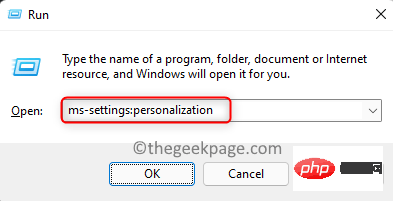
1. Just hold down the Windows and R keys to open the Run dialog frame.
2. Enter ms-settings:personalization and press Enter to enter the personalization settings.
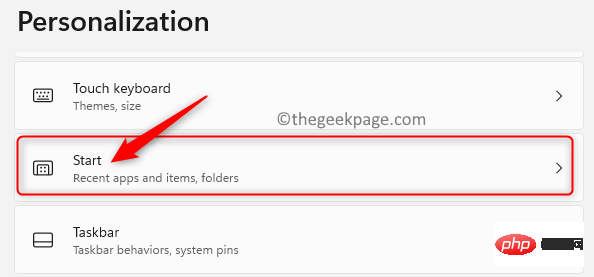
3. Scroll down and select option to get started.
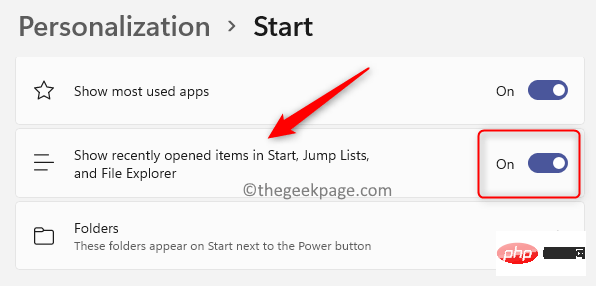
4.OpenShow recently opened items in Start, Jump List, and File Explorer toggle next to the option.
#5. Close the Settings application.
6. Now, open any file on your system and you should be able to see it in the Recent Files section of Quick Access.
Fix 2 – Open Recent Files feature in Folder Options
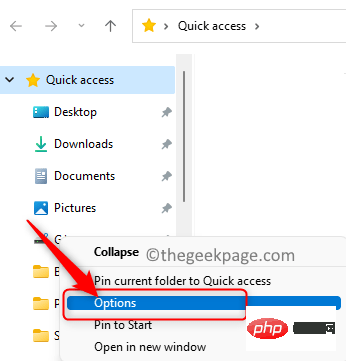
1. Use the Windows E key combination to open File Explorer.
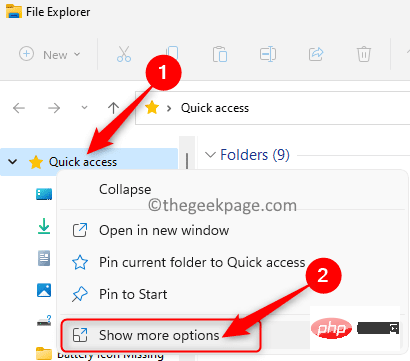
2. In the left pane of File Explorer, you will see Quick Access.
3.Right-click on it and select Show more options.
4. In the small menu, select Options to open Folder Options.
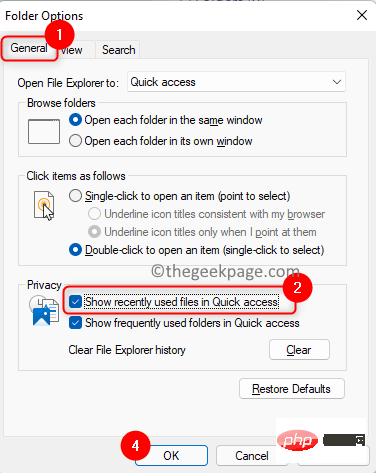
#5. Now, make sure is in the tab.
6. Make sure the box next to Show recently used files in Quick Access is checked in the Privacy section at the bottom.
7. Click Apply and then click OK for the changes to take effect.
#8. After trying to open any file, check if your recent files are visible in the quick access area.
Fix 3 – Clear File Explorer History
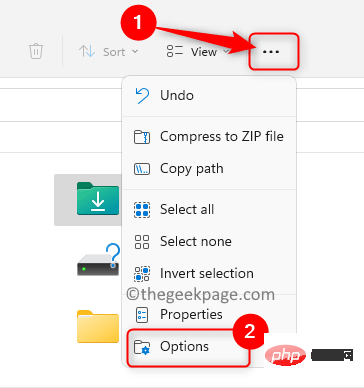
1. Press Windows E to open File Explorer.
2. Click the three horizontal dots at the top next to the Viewmenu.
3. In the menu that appears, select Options to open Folder Options.
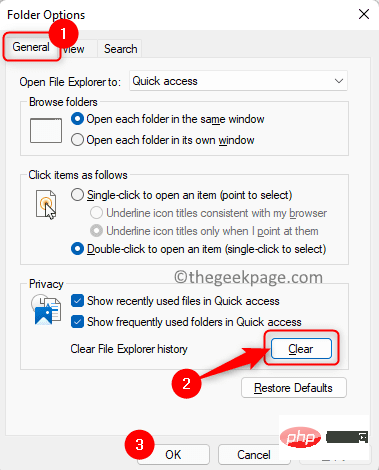
4. In the Privacy section, click the next to Clear File Explorer History Clear button.
5. Click OK to close the folder options.
#6. Check whether the problem of quick access not showing recent files has been resolved.
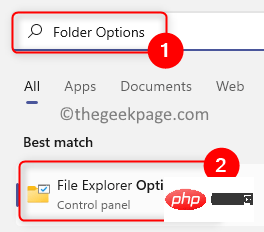
Fix 4 – Disabling and Re-enabling Quick Access
1. Click the Windows key and enter Folder Options in the Windows search bar.
2. Click File Explorer Options in the search results that appear to open Folder Options.
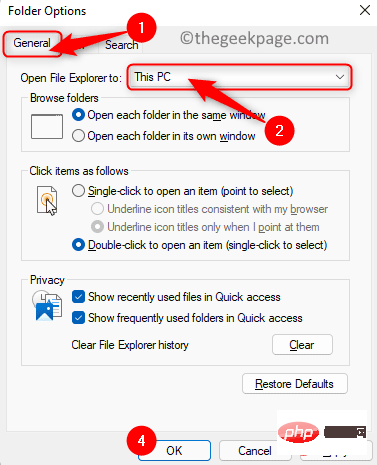
3. Under the "General" tab, use the drop-down menu to select "Open File Explorer" ## The value of the # option is set to "This PC".
4. ClickApply and then click OK.
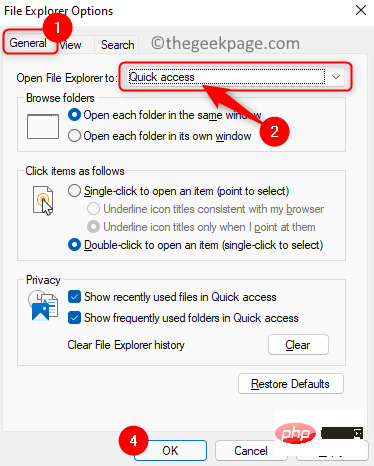
5. Use steps 1 and 2 above to open Folder Options.
6. Now, use the drop-down menu to change "Open File Explorer" to "Quick Access".
7. Click Apply and then click OK. Quick Access will now be re-enabled when you open File Explorer.
#8. Try to open any file and check if you can see the recently accessed files in Quick Access.
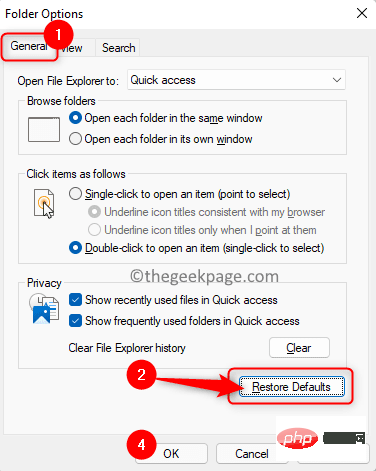
Fix 5 – Reset Folder Options to Defaults
1. Open File Explorer (Windows E).
2. Go to the folder options mentioned in the above fix.
3. In the Folder Options window, make sure the Generaltab is selected.
4. Click the Restore Defaults button at the bottom.
5. Next, click Apply and then OK to confirm the changes in the folder options.
#6. Check whether the problem of recent files not showing up in Quick Access has been resolved.
Fix 6 – Create a new local user account
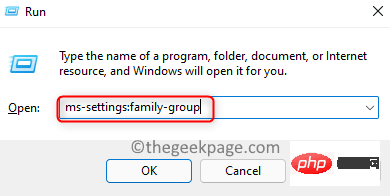
1. Press Windows R to open the Run dialog box.
2. Enter ms-settings:family-group and press Enter key to open "Family" in "Account Settings" and other users" page.
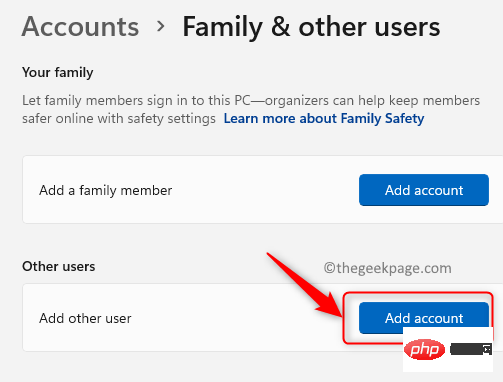
3. Here, in the Other Users section, click the Add Account button to Add another user.
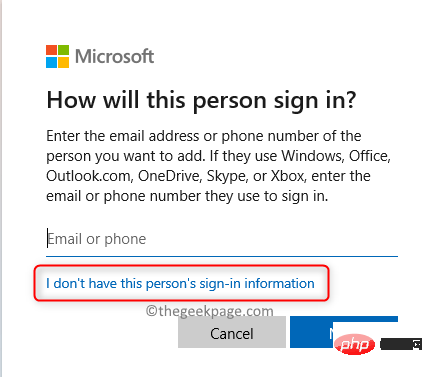
4. In the Microsoft Account window, click I don’t have a login for this person.
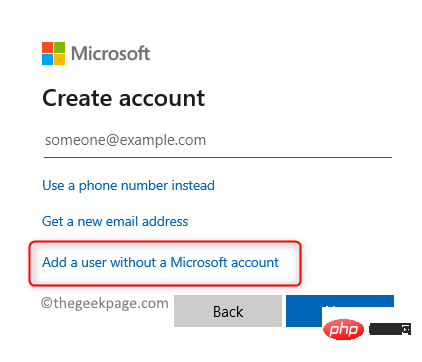
5. Now click on Add users without Microsoft accounts in the Create Account window.
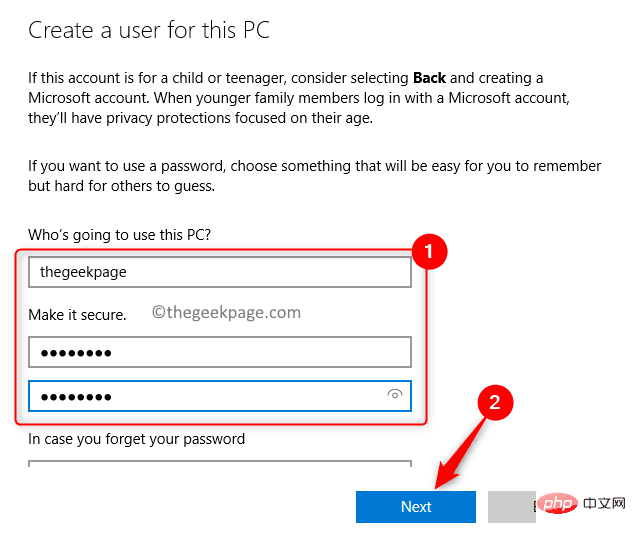
6. In the Create a user for this PC window, provide username for the new user and enter password. Click Next.
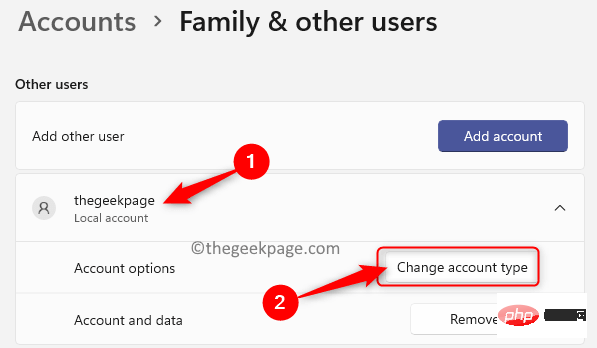
7. Once you create a new user, you will see the new user account under the "Other Users" section.
8. Click the username of the new user to expand.
9. Then, click the Change Account Type button associated with the Account option.
10. In the pop-up Change Account Type window, use the drop-down menu to set the Account Type to Management member.
11. Click OK.

#12. Now, log in with the new user account and check if you are able to see the Recent Files section in Quick Access.
The above is the detailed content of How to fix Quick Access not showing recent files in Windows 11 or 10?. For more information, please follow other related articles on the PHP Chinese website!

Hot AI Tools

Undresser.AI Undress
AI-powered app for creating realistic nude photos

AI Clothes Remover
Online AI tool for removing clothes from photos.

Undress AI Tool
Undress images for free

Clothoff.io
AI clothes remover

Video Face Swap
Swap faces in any video effortlessly with our completely free AI face swap tool!

Hot Article
Hot Tools

Notepad++7.3.1
Easy-to-use and free code editor

SublimeText3 Chinese version
Chinese version, very easy to use

Zend Studio 13.0.1
Powerful PHP integrated development environment

Dreamweaver CS6
Visual web development tools

SublimeText3 Mac version
God-level code editing software (SublimeText3)
Hot Topics
 1386
1386
 52
52

 This Apple ID is not yet in use in the iTunes Store: Fix
Jun 10, 2024 pm 05:42 PM
This Apple ID is not yet in use in the iTunes Store: Fix
Jun 10, 2024 pm 05:42 PM
When logging into iTunesStore using AppleID, this error saying "This AppleID has not been used in iTunesStore" may be thrown on the screen. There are no error messages to worry about, you can fix them by following these solution sets. Fix 1 – Change Shipping Address The main reason why this prompt appears in iTunes Store is that you don’t have the correct address in your AppleID profile. Step 1 – First, open iPhone Settings on your iPhone. Step 2 – AppleID should be on top of all other settings. So, open it. Step 3 – Once there, open the “Payment & Shipping” option. Step 4 – Verify your access using Face ID. step
 What to do if the 0x80004005 error code appears. The editor will teach you how to solve the 0x80004005 error code.
Mar 21, 2024 pm 09:17 PM
What to do if the 0x80004005 error code appears. The editor will teach you how to solve the 0x80004005 error code.
Mar 21, 2024 pm 09:17 PM
When deleting or decompressing a folder on your computer, sometimes a prompt dialog box "Error 0x80004005: Unspecified Error" will pop up. How should you solve this situation? There are actually many reasons why the error code 0x80004005 is prompted, but most of them are caused by viruses. We can re-register the dll to solve the problem. Below, the editor will explain to you the experience of handling the 0x80004005 error code. Some users are prompted with error code 0X80004005 when using their computers. The 0x80004005 error is mainly caused by the computer not correctly registering certain dynamic link library files, or by a firewall that does not allow HTTPS connections between the computer and the Internet. So how about
 Comprehensive Guide to PHP 500 Errors: Causes, Diagnosis and Fixes
Mar 22, 2024 pm 12:45 PM
Comprehensive Guide to PHP 500 Errors: Causes, Diagnosis and Fixes
Mar 22, 2024 pm 12:45 PM
A Comprehensive Guide to PHP 500 Errors: Causes, Diagnosis, and Fixes During PHP development, we often encounter errors with HTTP status code 500. This error is usually called "500InternalServerError", which means that some unknown errors occurred while processing the request on the server side. In this article, we will explore the common causes of PHP500 errors, how to diagnose them, and how to fix them, and provide specific code examples for reference. Common causes of 1.500 errors 1.
 How to transfer files from Quark Cloud Disk to Baidu Cloud Disk?
Mar 14, 2024 pm 02:07 PM
How to transfer files from Quark Cloud Disk to Baidu Cloud Disk?
Mar 14, 2024 pm 02:07 PM
Quark Netdisk and Baidu Netdisk are currently the most commonly used Netdisk software for storing files. If you want to save the files in Quark Netdisk to Baidu Netdisk, how do you do it? In this issue, the editor has compiled the tutorial steps for transferring files from Quark Network Disk computer to Baidu Network Disk. Let’s take a look at how to operate it. How to save Quark network disk files to Baidu network disk? To transfer files from Quark Network Disk to Baidu Network Disk, you first need to download the required files from Quark Network Disk, then select the target folder in the Baidu Network Disk client and open it. Then, drag and drop the files downloaded from Quark Cloud Disk into the folder opened by the Baidu Cloud Disk client, or use the upload function to add the files to Baidu Cloud Disk. Make sure to check whether the file was successfully transferred in Baidu Cloud Disk after the upload is completed. That's it
 Different uses of slashes and backslashes in file paths
Feb 26, 2024 pm 04:36 PM
Different uses of slashes and backslashes in file paths
Feb 26, 2024 pm 04:36 PM
A file path is a string used by the operating system to identify and locate a file or folder. In file paths, there are two common symbols separating paths, namely forward slash (/) and backslash (). These two symbols have different uses and meanings in different operating systems. The forward slash (/) is a commonly used path separator in Unix and Linux systems. On these systems, file paths start from the root directory (/) and are separated by forward slashes between each directory. For example, the path /home/user/Docume
 What is hiberfil.sys file? Can hiberfil.sys be deleted?
Mar 15, 2024 am 09:49 AM
What is hiberfil.sys file? Can hiberfil.sys be deleted?
Mar 15, 2024 am 09:49 AM
Recently, many netizens have asked the editor, what is the file hiberfil.sys? Can hiberfil.sys take up a lot of C drive space and be deleted? The editor can tell you that the hiberfil.sys file can be deleted. Let’s take a look at the details below. hiberfil.sys is a hidden file in the Windows system and also a system hibernation file. It is usually stored in the root directory of the C drive, and its size is equivalent to the size of the system's installed memory. This file is used when the computer is hibernated and contains the memory data of the current system so that it can be quickly restored to the previous state during recovery. Since its size is equal to the memory capacity, it may take up a larger amount of hard drive space. hiber
 How to fix the volume cannot be adjusted in WIN10
Mar 27, 2024 pm 05:16 PM
How to fix the volume cannot be adjusted in WIN10
Mar 27, 2024 pm 05:16 PM
1. Press win+r to open the run window, enter [regedit] and press Enter to open the registry editor. 2. In the opened registry editor, click to expand [HKEY_LOCAL_MACHINESOFTWAREMicrosoftWindowsCurrentVersionRun]. In the blank space on the right, right-click and select [New - String Value], and rename it to [systray.exe]. 3. Double-click to open systray.exe, modify its numerical data to [C:WindowsSystem32systray.exe], and click [OK] to save the settings.
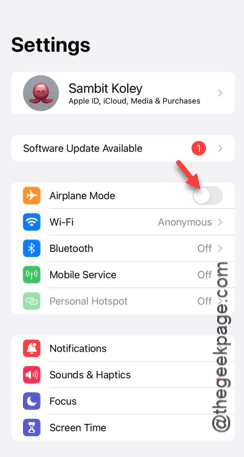 iPhone stuck in airplane mode: How to fix it
Jun 15, 2024 pm 02:16 PM
iPhone stuck in airplane mode: How to fix it
Jun 15, 2024 pm 02:16 PM
Airplane mode is very convenient in some situations. However, the same airplane mode may give you a headache if your iPhone suddenly gets stuck on it. In this article, we have designed this set of solutions to get your iPhone out of airplane mode. Quick fix – 1. Try disabling Airplane Mode directly from Control Center. 2. If you are unable to disable Airplane Mode from Control Center, you can disable Airplane Mode directly from the Settings tab – If these tips don’t work, follow the fixes below to resolve the issue. Fix 1 – Force Restart Your Device The process of force restarting your device is very simple. All you have to do is follow these step-by-step instructions. Step 1 – You can start the process by pressing and releasing the Volume Up button. step