How to integrate Junit between Java and Spring?
1 Problems and solutions in the test class
1.1 Problem
In the test class, every Each test method has the following two lines of code:
- ##ApplicationContext ac = new ClassPathXmlApplicationContext("bean.xml");
- IAccountService as = ac.getBean("accountService",IAccountService.class);
- The function of these two lines of code is to obtain the container. If you do not write it, it will directly prompt empty Pointer exception. So it cannot be deleted easily.
- In view of the above problems, what is needed is that the program can
automatically create containers.
- junit cannot know whether the spring framework is used and cannot create a spring container, but junit exposes an annotation that can replace its runner.
- You need to rely on the runner provided by the spring framework. You can read the configuration file (or annotations) to create the container. You only need to tell it where the configuration file is.
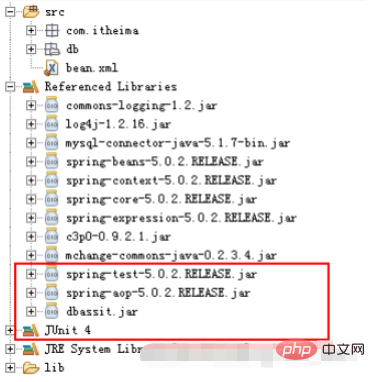
- This It should be noted that when importing a jar package, you need to import a jar package of aop in spring.

@RunWith(SpringJUnit4ClassRunner.class)
public class AccountServiceTest {
}
Copy after login
2.3 Step 3: Use @ContextConfiguration Specify the location of the spring configuration file @RunWith(SpringJUnit4ClassRunner.class)
public class AccountServiceTest {
}@RunWith(SpringJUnit4ClassRunner.class)
@ContextConfiguration(locations= {"classpath:bean.xml"})
public class AccountServiceTest {
}Copy after login
@RunWith(SpringJUnit4ClassRunner.class)
@ContextConfiguration(locations= {"classpath:bean.xml"})
public class AccountServiceTest {
}- @ContextConfiguration Note:
- locations attribute: used to specify the location of the configuration file. If it is on the classpath, you need to use classpath: to indicate
- classes attribute: used to specify the annotated classes. When not using xml configuration, you need to use this attribute to specify the location of the annotation class.
@RunWith(SpringJUnit4ClassRunner.class)
@ContextConfiguration(locations= {"classpath:bean.xml"})
public class AccountServiceTest {

    @Autowired
    private IAccountService as ;
}
Copy after login
3 Reasons for not assigning the test class to xml
@RunWith(SpringJUnit4ClassRunner.class)
@ContextConfiguration(locations= {"classpath:bean.xml"})
public class AccountServiceTest {
@Autowired
private IAccountService as ;
}- First: When a bean is configured in xml and spring loads the configuration file to create the container, the object will be created.
- Second: The test class is only used when testing functions. In the project, it does not participate in the program logic and will not solve the demand problems, so after it is created, there is no use. Then storing it in the container will cause a waste of resources.
The above is the detailed content of How to integrate Junit between Java and Spring?. For more information, please follow other related articles on the PHP Chinese website!

Hot AI Tools

Undresser.AI Undress
AI-powered app for creating realistic nude photos

AI Clothes Remover
Online AI tool for removing clothes from photos.

Undress AI Tool
Undress images for free

Clothoff.io
AI clothes remover

AI Hentai Generator
Generate AI Hentai for free.

Hot Article

Hot Tools

Notepad++7.3.1
Easy-to-use and free code editor

SublimeText3 Chinese version
Chinese version, very easy to use

Zend Studio 13.0.1
Powerful PHP integrated development environment

Dreamweaver CS6
Visual web development tools

SublimeText3 Mac version
God-level code editing software (SublimeText3)

Hot Topics
 1371
1371
 52
52
 Square Root in Java
Aug 30, 2024 pm 04:26 PM
Guide to Square Root in Java. Here we discuss how Square Root works in Java with example and its code implementation respectively.
 Perfect Number in Java
Aug 30, 2024 pm 04:28 PM
Guide to Perfect Number in Java. Here we discuss the Definition, How to check Perfect number in Java?, examples with code implementation.
 Armstrong Number in Java
Aug 30, 2024 pm 04:26 PM
Guide to the Armstrong Number in Java. Here we discuss an introduction to Armstrong's number in java along with some of the code.
 Random Number Generator in Java
Aug 30, 2024 pm 04:27 PM
Guide to Random Number Generator in Java. Here we discuss Functions in Java with examples and two different Generators with ther examples.
 Weka in Java
Aug 30, 2024 pm 04:28 PM
Guide to Weka in Java. Here we discuss the Introduction, how to use weka java, the type of platform, and advantages with examples.
 Smith Number in Java
Aug 30, 2024 pm 04:28 PM
Guide to Smith Number in Java. Here we discuss the Definition, How to check smith number in Java? example with code implementation.
 Java Spring Interview Questions
Aug 30, 2024 pm 04:29 PM
In this article, we have kept the most asked Java Spring Interview Questions with their detailed answers. So that you can crack the interview.
 Break or return from Java 8 stream forEach?
Feb 07, 2025 pm 12:09 PM
Java 8 introduces the Stream API, providing a powerful and expressive way to process data collections. However, a common question when using Stream is: How to break or return from a forEach operation? Traditional loops allow for early interruption or return, but Stream's forEach method does not directly support this method. This article will explain the reasons and explore alternative methods for implementing premature termination in Stream processing systems. Further reading: Java Stream API improvements Understand Stream forEach The forEach method is a terminal operation that performs one operation on each element in the Stream. Its design intention is


