
 Backend Development
Python Tutorial
Implementing dynamic arrays in Python: from beginner to proficient
Backend Development
Python Tutorial
Implementing dynamic arrays in Python: from beginner to proficient
Implementing dynamic arrays in Python: from beginner to proficient

Part1 Let’s talk about the essence of Python sequence types
In this blog, let’s talk about Python’s various “sequence” classes and the three built-in commonly used data structures-list class (list) , the essence of tuple class (tuple) and string class (str).
I don’t know if you have noticed it, but these classes have an obvious commonality. They can all be used to save multiple data elements. The most important function is: each class supports subscript (index) access to the data. Elements of a sequence, such as using the syntax Seq[i]. In fact, each of the above classes is represented by a simple data structure such as an array.
But readers who are familiar with Python may know that these three data structures have some differences: for example, tuples and strings cannot be modified, but lists can be modified.
1. Array structure in computer memory
In computer architecture, we know that computer main memory is composed of bit information. These bits are usually classified into larger units, and these units are Depends on precise system architecture. A typical unit is a byte, which is equivalent to 8 bits.
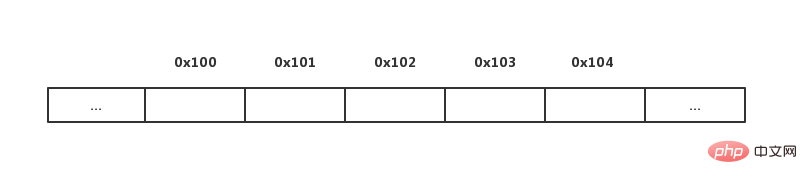
Computer systems have a huge number of storage bytes, so how can we find which byte of our information exists? The answer is the storage address that everyone usually knows. Based on the storage address, any byte in main memory can be effectively accessed. In fact, each byte of storage is associated with a unique binary number that serves as its address. As shown in the figure below, each byte is assigned a storage address:
# Generally speaking, the programming language records the relationship between the address where the identifier and its associated value are stored. relation. For example, when we declare that the identifier x may be associated with a certain value in memory, the identifier y may be associated with some other value. A group of related variables can be stored one after another in a contiguous area of computer memory. We call this approach an array.
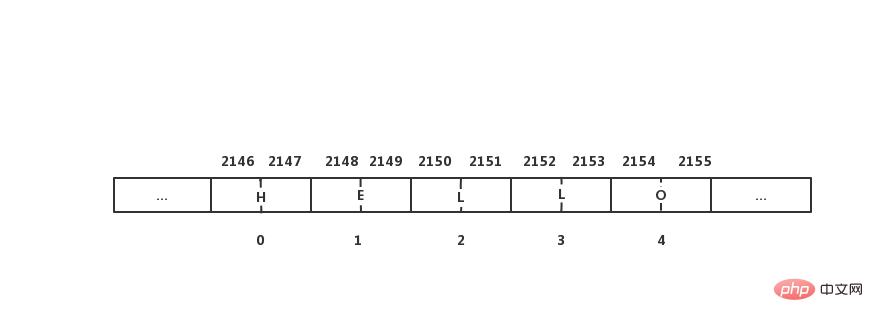
Let's look at an example in Python. A text string HELLO is stored as a column of ordered characters. It is assumed that each Unicode character of the string requires two bytes of storage space. The bottom number is the index value of the string.
We can see that arrays can store multiple values without the need to construct multiple variables with specific indexes to specify each item in it, and in almost all programming languages (such as C, Java, C#, C), but Python has more advantages. When Python builds a list, familiar readers may know that there is no need to predefine the size of the array or list. On the contrary, in Python, the list has a dynamic nature, and we can continuously add the data elements we want to the list. Next, let's look at the knowledge of Python lists (readers who are already familiar with it can quickly browse or skip it).
2. Python list
Operations of Python list
- The syntax format of creating a list:
[ele1, ele2, ele3 , ele4, ...]
- Syntax format for creating tuples:
(ele1, ele2, ele3, ele4, ...)
Tuples have higher memory space utilization than lists because tuples are fixed, so there is no need to create a dynamic array with remaining space.
We first create a list in Python's IDE, and then take a rough look at the built-in operations of the list. We first create a list named test_list, and then modify (insert or delete) elements, reverse or clear them. The list is as follows:
>>> test_list = []# 创建名为test_list的空列表
>>> test_list.append("Hello")
>>> test_list.append("World")
>>> test_list
['Hello', 'World']
>>> test_list = ["Hello", "Array", 2019, "easy learning", "DataStructure"]# 重新给test_list赋值
>>> len(test_list)# 求列表的长度
5
>>> test_list[2] = 1024# 修改列表元素
>>> test_list
['Hello', 'Array', 1024, 'easy learning', 'DataStructure']
>>>
>>> test_list.insert(1, "I love")# 向列表中指定位置中插入一个元素
>>> test_list
['Hello', 'I love', 'Array', 1024, 'easy learning', 'DataStructure']
>>> test_list.append(2020)# 向列表末尾增加一个元素
>>> test_list
['Hello', 'I love', 'Array', 1024, 'easy learning', 'DataStructure', 2020]
>>>
>>> test_list.pop(1)# 删除指定位置的元素
'I love'
>>> test_list.remove(2020)# 删除指定元素
>>>
>>> test_list.index('Hello')# 查找某个元素的索引值
0
>>> test_list.index('hello')# 如果查找某个元素不在列表中,返回ValueError错误
Traceback (most recent call last):
File "<pyshell#11>", line 1, in <module>
test_list.index('hello')
ValueError: 'hello' is not in list
>>>
>>> test_list.reverse()# 反转整个列表
>>> test_list
['DataStructure', 'easy learning', 2019, 'Array', 'Hello']
>>> test_list.clear()# 清空列表
>>> test_list
[]When we look at the above code, we can see the related operations of the list - add, delete, modify and check. It is already very powerful. There are also some built-in methods that are not shown here and are left to the readers. Discover and experience it yourself.
The Basics Behind Memory Allocation of Python Lists
So let’s look at this extra through coding practice and the relationship between the actual size of the array held in memory and the given size space demonstration.
Go to Jupyter notebook to practice. Or use any editor or development environment of your choice. Copy the code written below.
# 导入sys模块能方便我们使用gestsizeof函数
import sys

# set n
n = 20
# set empty list
list = []
for i in range(n):
a = len(list)
# 调用getsizeof函数用于给出Python中存储对象的真实字节数
b = sys.getsizeof(list)
print('Length:{0:3d}; Size of bytes:{1:4d}'.format(a, b))
# Increase length by one
list.append(n)Run the code and you can see the following output:
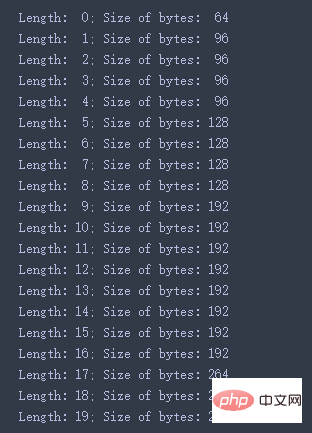
Now, as we increase the length of the list, the bytes also increase. Let's analyze it. When the element at position Length: 1
is filled in the list, the number of bytes jumps from 64 to 96, an increase of 32 bytes. Because this experiment was run on a 64-bit machine, this means that each memory address is 64 bits (i.e. 8 bytes). The additional 32 bytes are the size of the array allocated to store 4 object references. When adding the 2nd, 3rd or 4th element, there is no change in memory usage. The number of bytes 96 can provide references to 4 objects.
96 = 64 8 times 4
when Length:10
时,字节数从一开始的64跳到192,能存下16个对象的引用,
192 = 64 + 8 times 16
一直到Length: 17
后又开始跳转,所以理论上264个字节数应该可以存下25个对象
264 = 64 + 8 times 25
但因为我们在代码中设置n=20,然后程序就终止了。
我们可以看到Python内置的list类足够智能,知道当需要额外的空间来分配数据时,它会为它们提供额外的大小,那么这究竟是如何被实现的呢?
好吧,答案是动态数组。说到这里,不知道大家学Python列表的时候是不是这样想的——列表很简单嘛,就是list()类、用中括号[]括起来,然后指导书籍或文档上的各类方法append、insert、pop...在各种IDE一顿操作过后,是的我觉得我学会了。
但其实背后的原理真的很不简单,比如我举个例子:A[-1]这个操作怎么实现?列表切片功能怎么实现?如何自己写pop()默认删除列表最右边的元素(popleft删除最左边简单)?...这些功能用起来爽,但真的自己实现太难了(我也还在学习中,大佬们请轻喷!)如果我们能学习并理解,肯定可以加强我们对数组这一结构的理解。
3、动态数组
什么是动态数组
动态数组是内存的连续区域,其大小随着插入新数据而动态增长。在静态数组中,我们需要在分配时指定大小。在定义数组的时候,其实计算机已经帮我们分配好了内存来存储,实际上我们不能扩展数组,因为它的大小是固定的。比如:我们分配一个大小为10的数组,则不能插入超过10个项目。
但是动态数组会在需要的时候自动调整其大小。这一点有点像我们使用的Python列表,可以存储任意数量的项目,而无需在分配时指定大小。
所以实现一个动态数组的实现的关键是——如何扩展数组?当列表list1的大小已满时,而此时有新的元素要添加进列表,我们会执行一下步骤来克服其大小限制的缺点:
- 分配具有更大容量的新数组list2
- 设置list2[i] = list1[i] (i=0,1,2,...,n-1),其中n是该项目的当前编号
- 设置list1 = list2,也就是说,list2正在作为新的数组来引用我们的新列表。
- 然后,只要将新的元素插入(添加)到我们的列表list1即可。
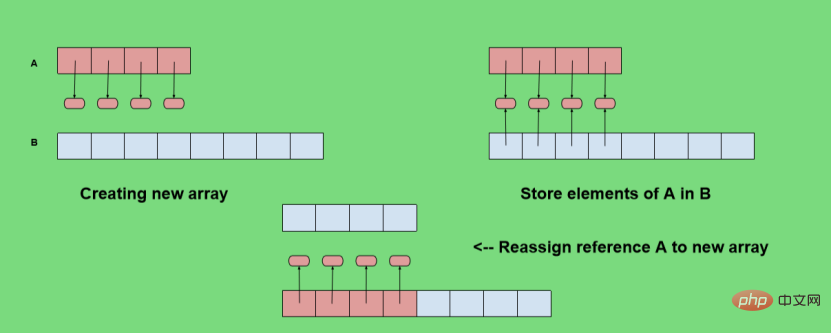
接下来要思考的问题是,新数组应该多大?通常我们得做法是:新数组的大小是已满的旧数组的2倍。我们将在Python中编程实现动态数组的概念,并创建一个简单的代码,很多功能不及Python强大。
实现动态数组的Python代码
在Python中,我们利用ctypes的内置库来创建自己的动态数组类,因为ctypes模块提供对原始数组的支持,为了更快的对数组进行学习,所以对ctypes的知识可以查看官方文档进行学习。关于Python的公有方法与私有方法,我们在方法名称前使用双下划线**__**使其保持隐藏状态,代码如下:
# -*- coding: utf-8 -*-
# @Time: 2019-11-01 17:10
# @Author: yuzhou_1su
# @ContactMe : https://blog.csdn.net/yuzhou_1shu
# @File: DynamicArray.py
# @Software: PyCharm

import ctypes


class DynamicArray:
"""A dynamic array class akin to a simplified Python list."""

def __init__(self):
"""Create an empty array."""
self.n = 0 # count actual elements
self.capacity = 1# default array capacity
self.A = self._make_array(self.capacity)# low-level array

def is_empty(self):
""" Return True if array is empty"""
return self.n == 0

def __len__(self):
"""Return numbers of elements stored in the array."""
return self.n

def __getitem__(self, i):
"""Return element at index i."""
if not 0 <= i < self.n:
# Check it i index is in bounds of array
raise ValueError('invalid index')
return self.A[i]

def append(self, obj):
"""Add object to end of the array."""
if self.n == self.capacity:
# Double capacity if not enough room
self._resize(2 * self.capacity)
self.A[self.n] = obj# Set self.n index to obj
self.n += 1

def _resize(self, c):
"""Resize internal array to capacity c."""
B = self._make_array(c) # New bigger array
for k in range(self.n):# Reference all existing values
B[k] = self.A[k]
self.A = B# Call A the new bigger array
self.capacity = c # Reset the capacity

@staticmethod
def _make_array(c):
"""Return new array with capacity c."""
return (c * ctypes.py_object)()

def insert(self, k, value):
"""Insert value at position k."""
if self.n == self.capacity:
self._resize(2 * self.capacity)
for j in range(self.n, k, -1):
self.A[j] = self.A[j-1]
self.A[k] = value
self.n += 1

def pop(self, index=0):
"""Remove item at index (default first)."""
if index >= self.n or index < 0:
raise ValueError('invalid index')
for i in range(index, self.n-1):
self.A[i] = self.A[i+1]
self.A[self.n - 1] = None
self.n -= 1

def remove(self, value):
"""Remove the first occurrence of a value in the array."""
for k in range(self.n):
if self.A[k] == value:
for j in range(k, self.n - 1):
self.A[j] = self.A[j+1]
self.A[self.n - 1] = None
self.n -= 1
return
raise ValueError('value not found')

def _print(self):
"""Print the array."""
for i in range(self.n):
print(self.A[i], end=' ')
print()测试动态数组Python代码
上面我们已经实现了一个动态数组的类,相信都很激动,接下来让我们来测试一下,看能不能成功呢?在同一个文件下,写的测试代码如下:
def main():
# Instantiate
mylist = DynamicArray()

# Append new element
mylist.append(10)
mylist.append(9)
mylist.append(8)
# Insert new element in given position
mylist.insert(1, 1024)
mylist.insert(2, 2019)
# Check length
print('The array length is: ', mylist.__len__())
# Print the array
print('Print the array:')
mylist._print()
# Index
print('The element at index 1 is :', mylist[1])
# Remove element
print('Remove 2019 in array:')
mylist.remove(2019)
mylist._print()
# Pop element in given position
print('Pop pos 2 in array:')
# mylist.pop()
mylist.pop(2)
mylist._print()


if __name__ == '__main__':
main()测试结果
激动人心的时刻揭晓,测试结果如下。请结合测试代码和数组的结构进行理解,如果由疏漏,欢迎大家指出。
The array length is:5
Print the array:
10 1024 2019 9 8
The element at index 1 is : 1024
Remove 2019 in array:
10 1024 9 8
Pop pos 2 in array:
10 1024 8
Part2总结
通过以上的介绍,我们知道了数组存在静态和动态类型。而在本博客中,我们着重介绍了什么是动态数组,并通过Python代码进行实现。希望你能从此以复杂的方式学会数组。总结发言,其实越是简单的操作,背后实现原理可能很复杂。
The above is the detailed content of Implementing dynamic arrays in Python: from beginner to proficient. For more information, please follow other related articles on the PHP Chinese website!

Hot AI Tools

Undresser.AI Undress
AI-powered app for creating realistic nude photos

AI Clothes Remover
Online AI tool for removing clothes from photos.

Undress AI Tool
Undress images for free

Clothoff.io
AI clothes remover

AI Hentai Generator
Generate AI Hentai for free.

Hot Article
Hot Tools

Notepad++7.3.1
Easy-to-use and free code editor

SublimeText3 Chinese version
Chinese version, very easy to use

Zend Studio 13.0.1
Powerful PHP integrated development environment

Dreamweaver CS6
Visual web development tools

SublimeText3 Mac version
God-level code editing software (SublimeText3)
Hot Topics
 1376
1376
 52
52

 Do mysql need to pay
Apr 08, 2025 pm 05:36 PM
Do mysql need to pay
Apr 08, 2025 pm 05:36 PM
MySQL has a free community version and a paid enterprise version. The community version can be used and modified for free, but the support is limited and is suitable for applications with low stability requirements and strong technical capabilities. The Enterprise Edition provides comprehensive commercial support for applications that require a stable, reliable, high-performance database and willing to pay for support. Factors considered when choosing a version include application criticality, budgeting, and technical skills. There is no perfect option, only the most suitable option, and you need to choose carefully according to the specific situation.
 How to use mysql after installation
Apr 08, 2025 am 11:48 AM
How to use mysql after installation
Apr 08, 2025 am 11:48 AM
The article introduces the operation of MySQL database. First, you need to install a MySQL client, such as MySQLWorkbench or command line client. 1. Use the mysql-uroot-p command to connect to the server and log in with the root account password; 2. Use CREATEDATABASE to create a database, and USE select a database; 3. Use CREATETABLE to create a table, define fields and data types; 4. Use INSERTINTO to insert data, query data, update data by UPDATE, and delete data by DELETE. Only by mastering these steps, learning to deal with common problems and optimizing database performance can you use MySQL efficiently.
 MySQL download file is damaged and cannot be installed. Repair solution
Apr 08, 2025 am 11:21 AM
MySQL download file is damaged and cannot be installed. Repair solution
Apr 08, 2025 am 11:21 AM
MySQL download file is corrupt, what should I do? Alas, if you download MySQL, you can encounter file corruption. It’s really not easy these days! This article will talk about how to solve this problem so that everyone can avoid detours. After reading it, you can not only repair the damaged MySQL installation package, but also have a deeper understanding of the download and installation process to avoid getting stuck in the future. Let’s first talk about why downloading files is damaged. There are many reasons for this. Network problems are the culprit. Interruption in the download process and instability in the network may lead to file corruption. There is also the problem with the download source itself. The server file itself is broken, and of course it is also broken when you download it. In addition, excessive "passionate" scanning of some antivirus software may also cause file corruption. Diagnostic problem: Determine if the file is really corrupt
 MySQL can't be installed after downloading
Apr 08, 2025 am 11:24 AM
MySQL can't be installed after downloading
Apr 08, 2025 am 11:24 AM
The main reasons for MySQL installation failure are: 1. Permission issues, you need to run as an administrator or use the sudo command; 2. Dependencies are missing, and you need to install relevant development packages; 3. Port conflicts, you need to close the program that occupies port 3306 or modify the configuration file; 4. The installation package is corrupt, you need to download and verify the integrity; 5. The environment variable is incorrectly configured, and the environment variables must be correctly configured according to the operating system. Solve these problems and carefully check each step to successfully install MySQL.
 Solutions to the service that cannot be started after MySQL installation
Apr 08, 2025 am 11:18 AM
Solutions to the service that cannot be started after MySQL installation
Apr 08, 2025 am 11:18 AM
MySQL refused to start? Don’t panic, let’s check it out! Many friends found that the service could not be started after installing MySQL, and they were so anxious! Don’t worry, this article will take you to deal with it calmly and find out the mastermind behind it! After reading it, you can not only solve this problem, but also improve your understanding of MySQL services and your ideas for troubleshooting problems, and become a more powerful database administrator! The MySQL service failed to start, and there are many reasons, ranging from simple configuration errors to complex system problems. Let’s start with the most common aspects. Basic knowledge: A brief description of the service startup process MySQL service startup. Simply put, the operating system loads MySQL-related files and then starts the MySQL daemon. This involves configuration
 How to optimize MySQL performance for high-load applications?
Apr 08, 2025 pm 06:03 PM
How to optimize MySQL performance for high-load applications?
Apr 08, 2025 pm 06:03 PM
MySQL database performance optimization guide In resource-intensive applications, MySQL database plays a crucial role and is responsible for managing massive transactions. However, as the scale of application expands, database performance bottlenecks often become a constraint. This article will explore a series of effective MySQL performance optimization strategies to ensure that your application remains efficient and responsive under high loads. We will combine actual cases to explain in-depth key technologies such as indexing, query optimization, database design and caching. 1. Database architecture design and optimized database architecture is the cornerstone of MySQL performance optimization. Here are some core principles: Selecting the right data type and selecting the smallest data type that meets the needs can not only save storage space, but also improve data processing speed.
 How to optimize database performance after mysql installation
Apr 08, 2025 am 11:36 AM
How to optimize database performance after mysql installation
Apr 08, 2025 am 11:36 AM
MySQL performance optimization needs to start from three aspects: installation configuration, indexing and query optimization, monitoring and tuning. 1. After installation, you need to adjust the my.cnf file according to the server configuration, such as the innodb_buffer_pool_size parameter, and close query_cache_size; 2. Create a suitable index to avoid excessive indexes, and optimize query statements, such as using the EXPLAIN command to analyze the execution plan; 3. Use MySQL's own monitoring tool (SHOWPROCESSLIST, SHOWSTATUS) to monitor the database health, and regularly back up and organize the database. Only by continuously optimizing these steps can the performance of MySQL database be improved.
 Does mysql need the internet
Apr 08, 2025 pm 02:18 PM
Does mysql need the internet
Apr 08, 2025 pm 02:18 PM
MySQL can run without network connections for basic data storage and management. However, network connection is required for interaction with other systems, remote access, or using advanced features such as replication and clustering. Additionally, security measures (such as firewalls), performance optimization (choose the right network connection), and data backup are critical to connecting to the Internet.
