

6 Ways to Fix Sleep Mode Issues on Windows 11

Sleep mode is one of the most valuable features of the Windows 11 operating system. It puts your device into a low-power state and gets you back to exactly where you left off.
This is a great way to save power without shutting down your system and avoid the hassle of having to open all your apps again.
Best used when you step away from the computer for a short while. Sleep modes such as hibernation ensure that your power supply does not overheat from prolonged use.
In this tutorial, we will show you the best ways to fix issues with this great feature on Windows 11.
Why doesn’t my Windows 11 hibernate?
If Windows 11 does not go to sleep, it may be because the display driver is out of date. You can fix this problem by updating them manually or using a dedicated tool.
Wrong power settings may also cause this problem. You just need to make adjustments here and things should be back to normal.
What is the difference between sleep and hibernation mode?
Windows 11 also has a hibernation mode that is similar to sleep mode but has significant differences.
Sleep mode puts the computer in a low-power state, while hibernation mode causes the computer to consume minimal power while saving all current settings on the hard drive. After that, it goes into an almost completely closed state.
#When the computer exits this state, hibernation mode takes longer to turn on. You can use this mode when you won't be using your laptop for a long time but don't want to lose anything.
Check out our excellent tutorial for a more detailed comparison between hibernation and sleep mode.
How to fix sleep mode on Windows 11?
1. Manually set the sleep mode time
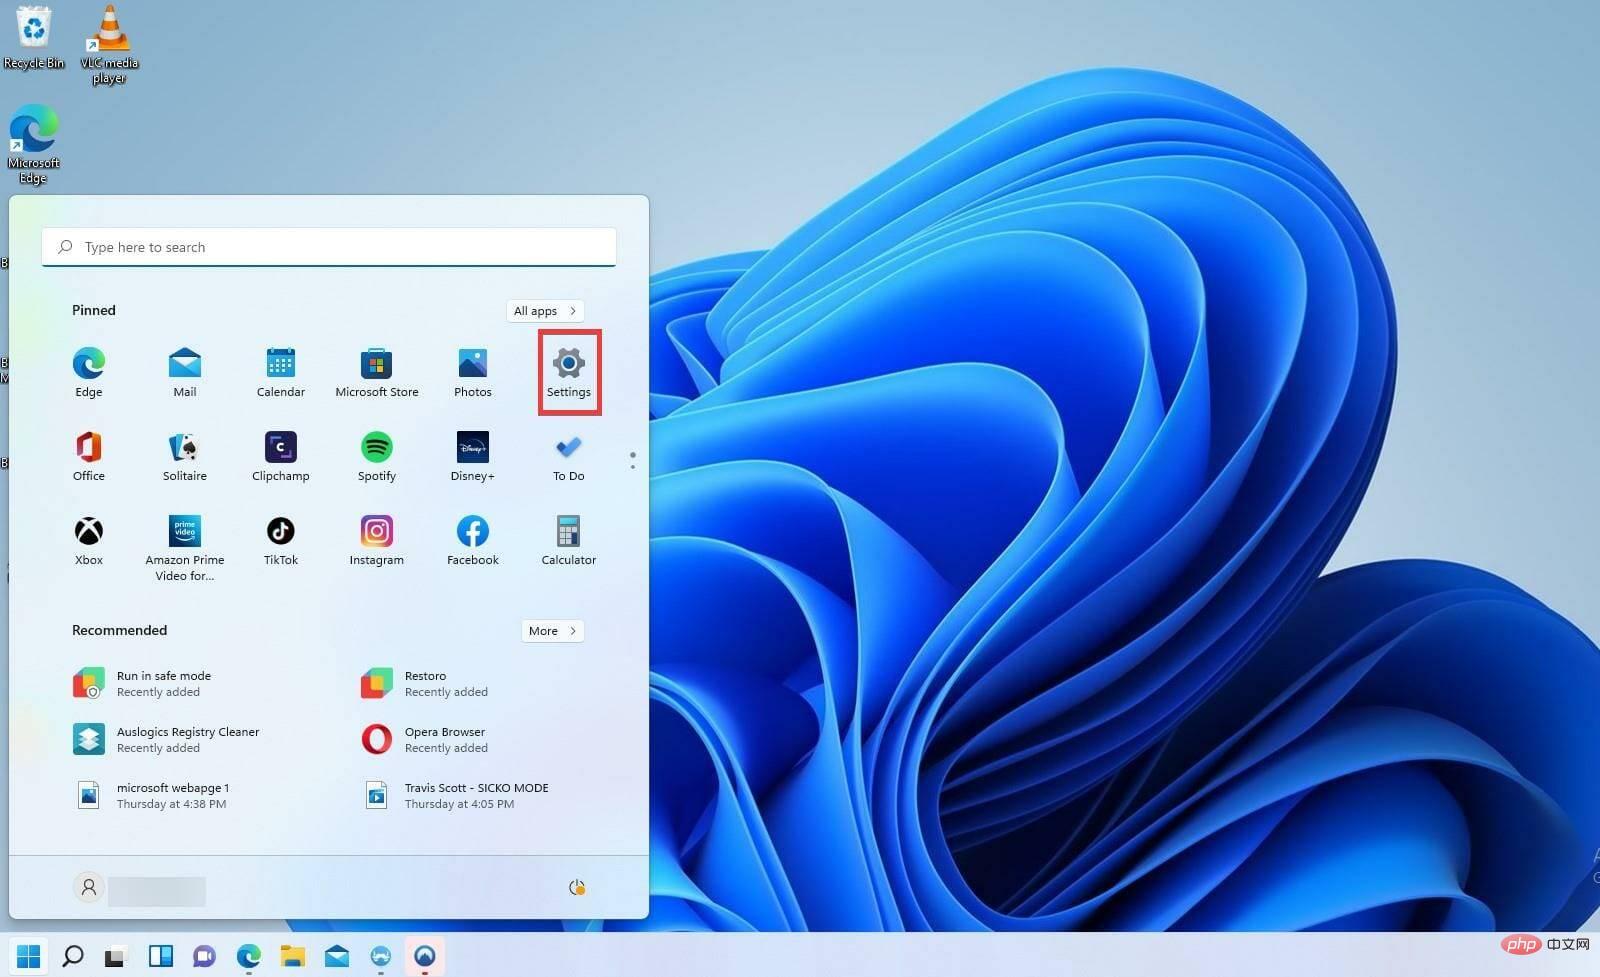
- Open the Windows Start menu by clicking the Start menu icon in the taskbar.
- Search for the settings icon and click on it.

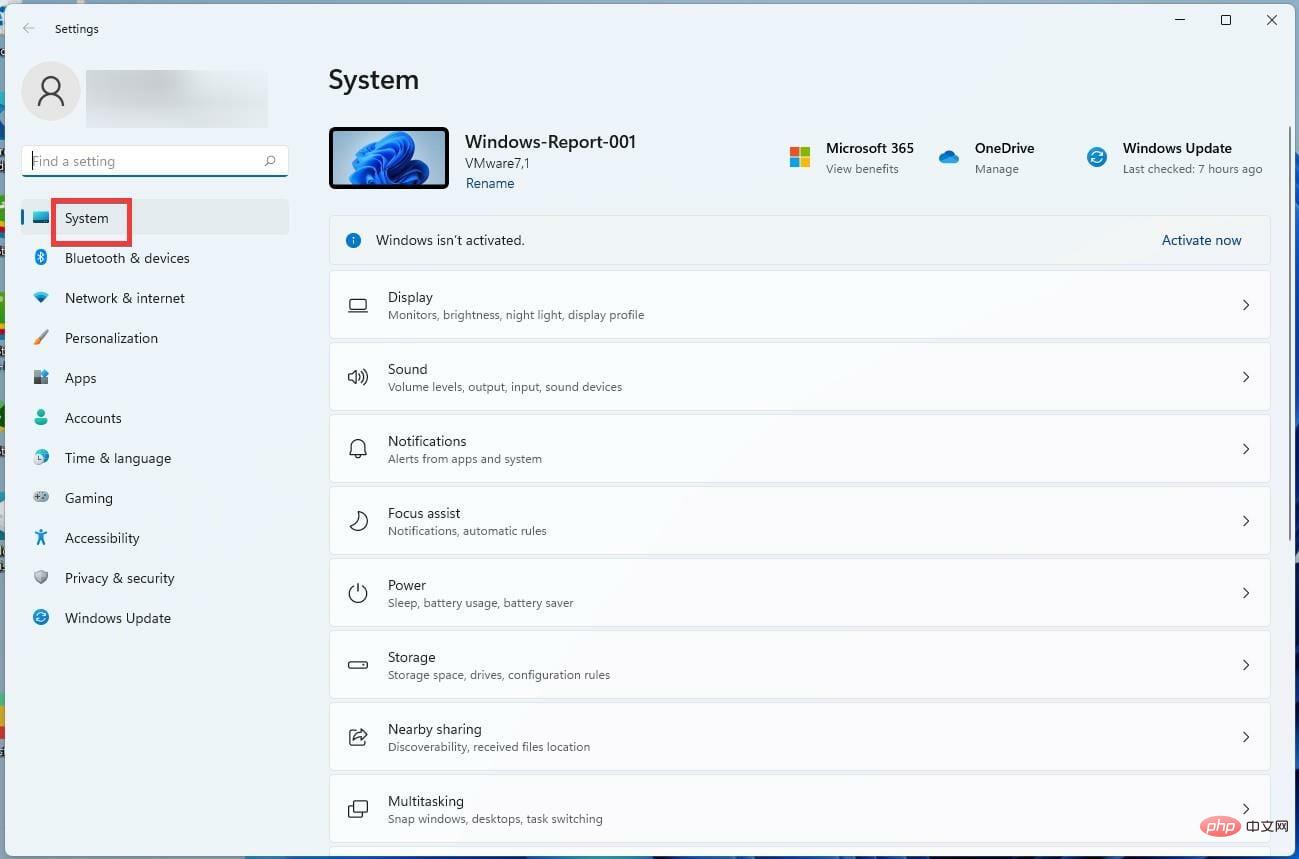
- Click on the System tab.
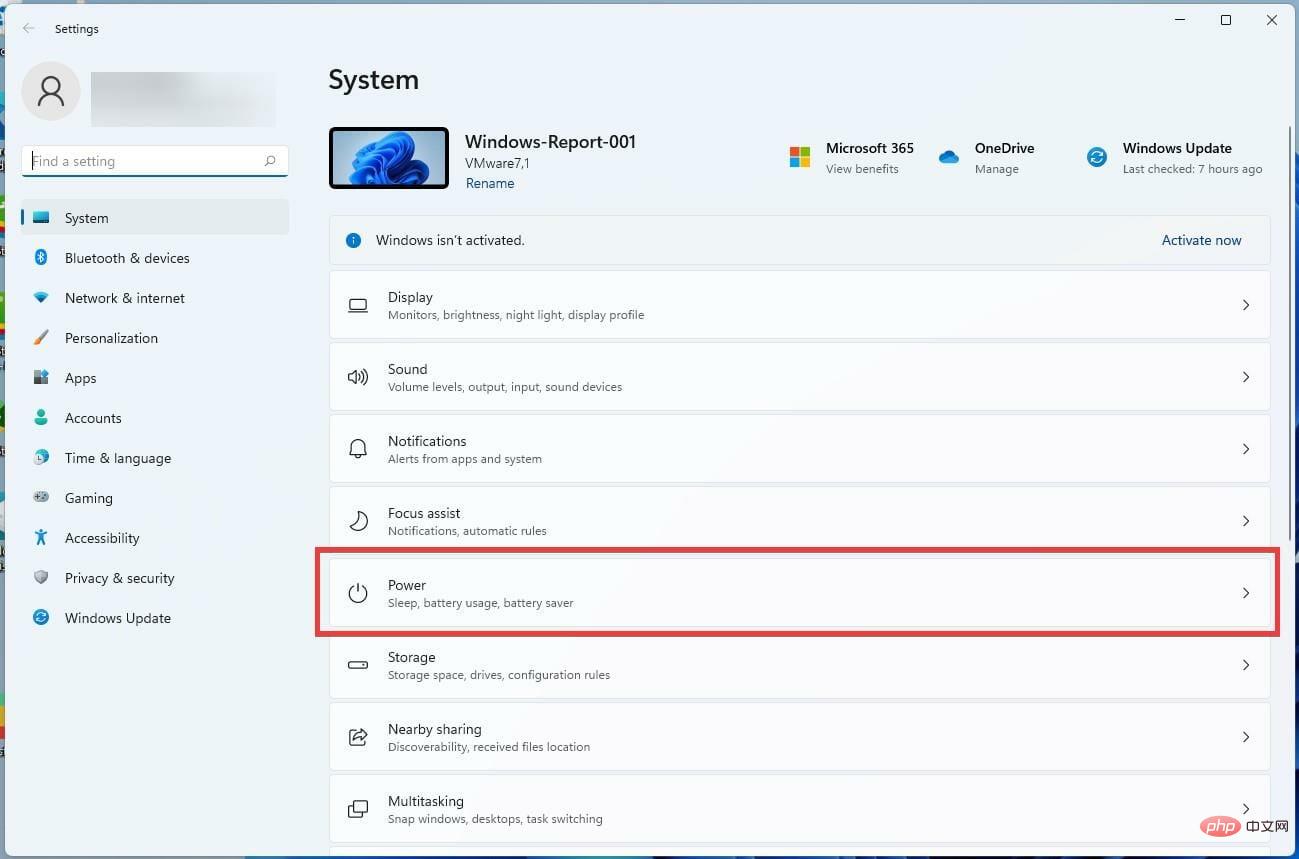
- In the System section, scroll down to the Power tab.
- In the next window, click Screen and Sleep Options.
- Customize the specific time the computer will go to sleep.
- After setting the time, close the window.
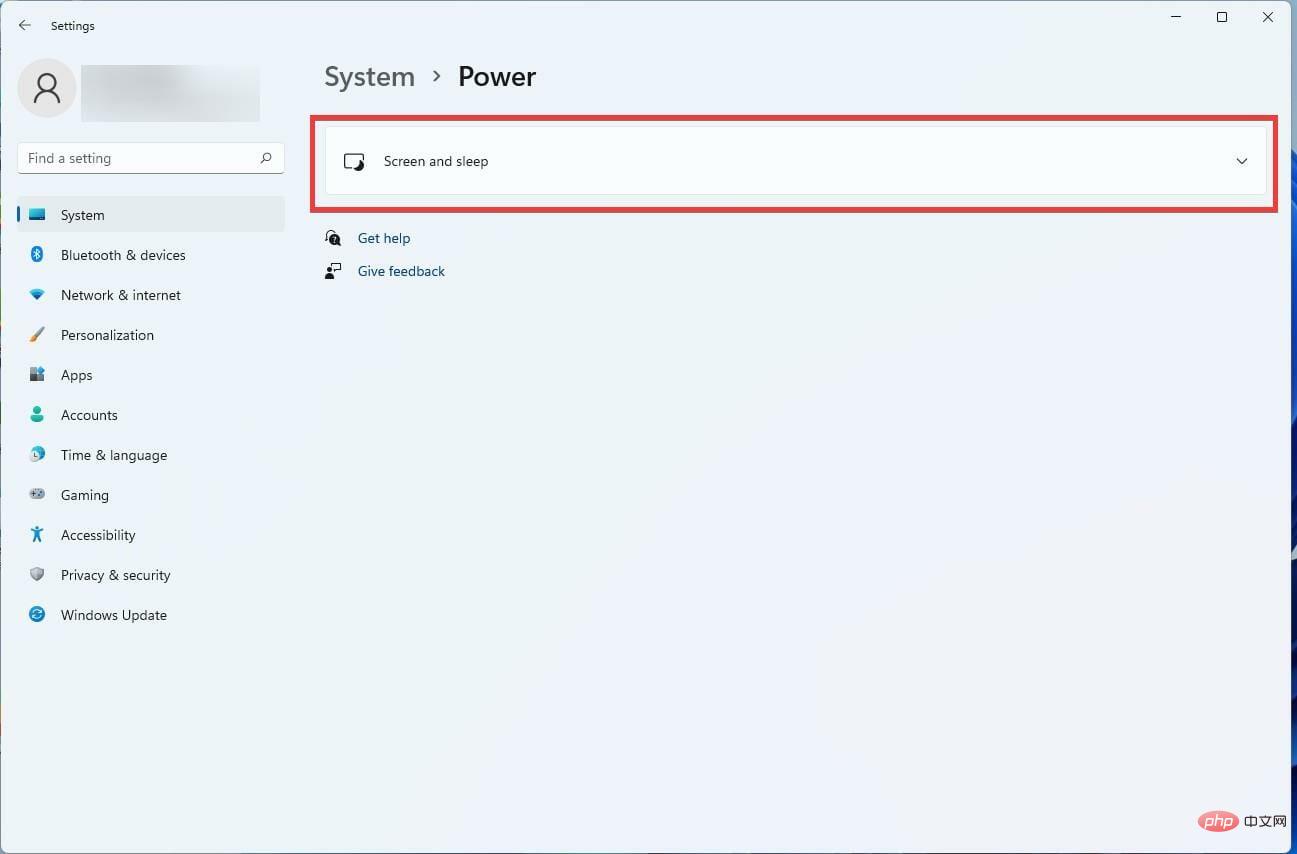

If sleep mode does not run automatically on Windows 11, it may be because the time is set too long. By setting the timer yourself you should be able to solve the problem.
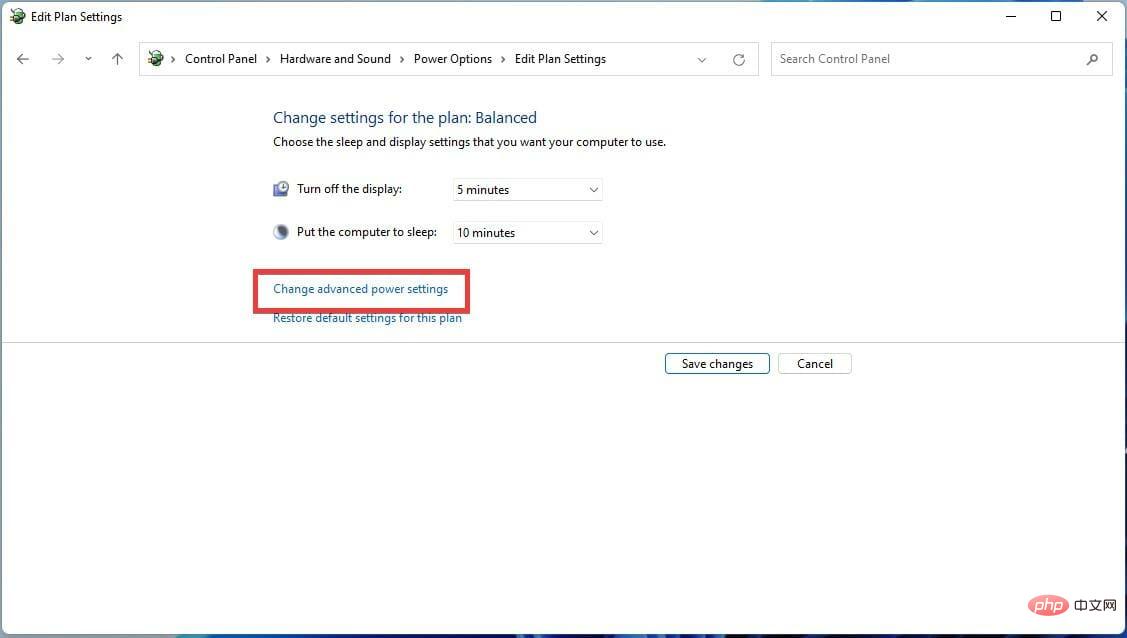
2. Edit Power Plan Settings
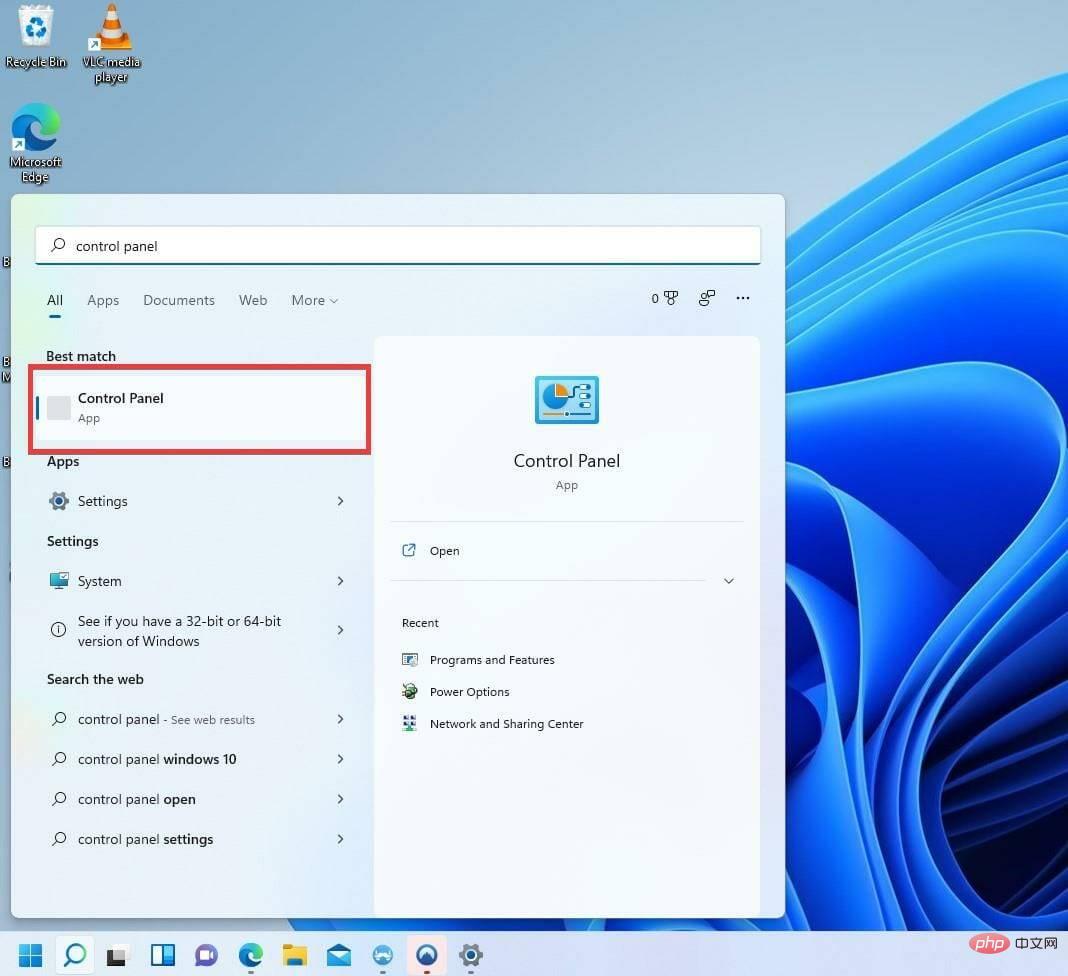
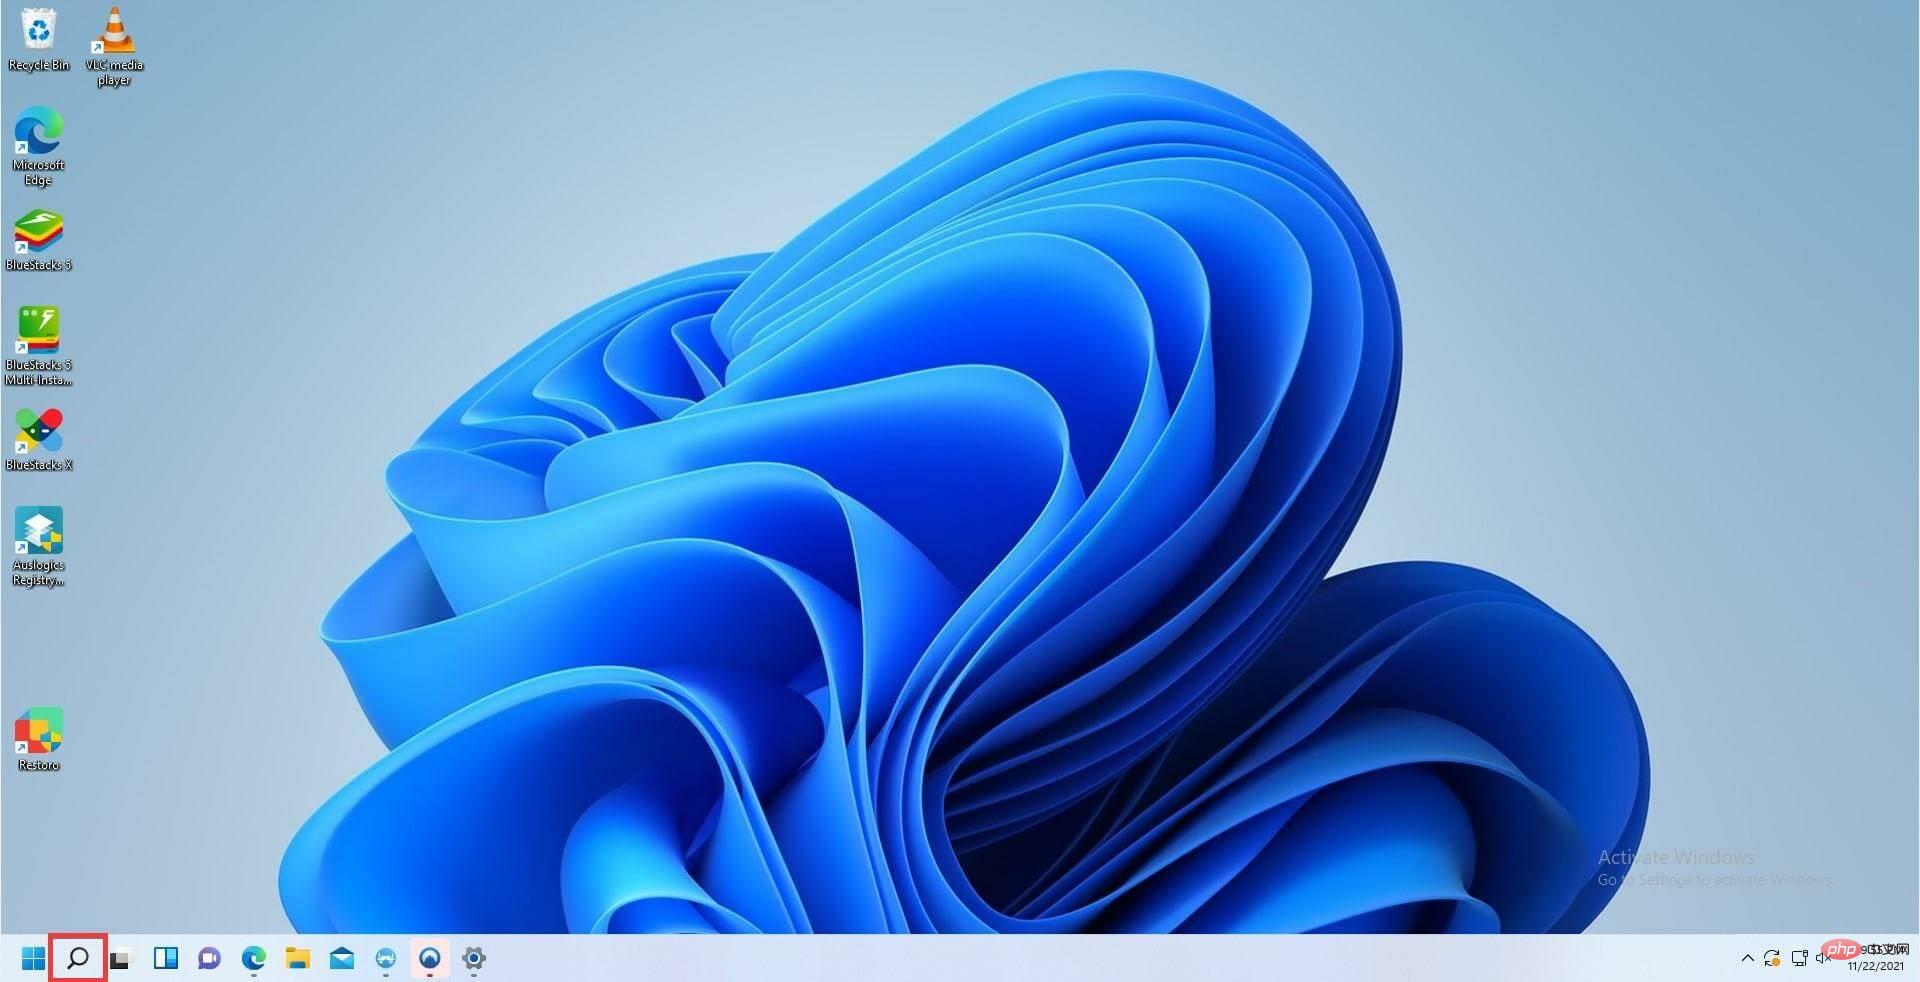
- Click the magnifying glass icon on the taskbar to bring up the search bar.
- Type control panel in the search bar.
- Open the first entry you see.
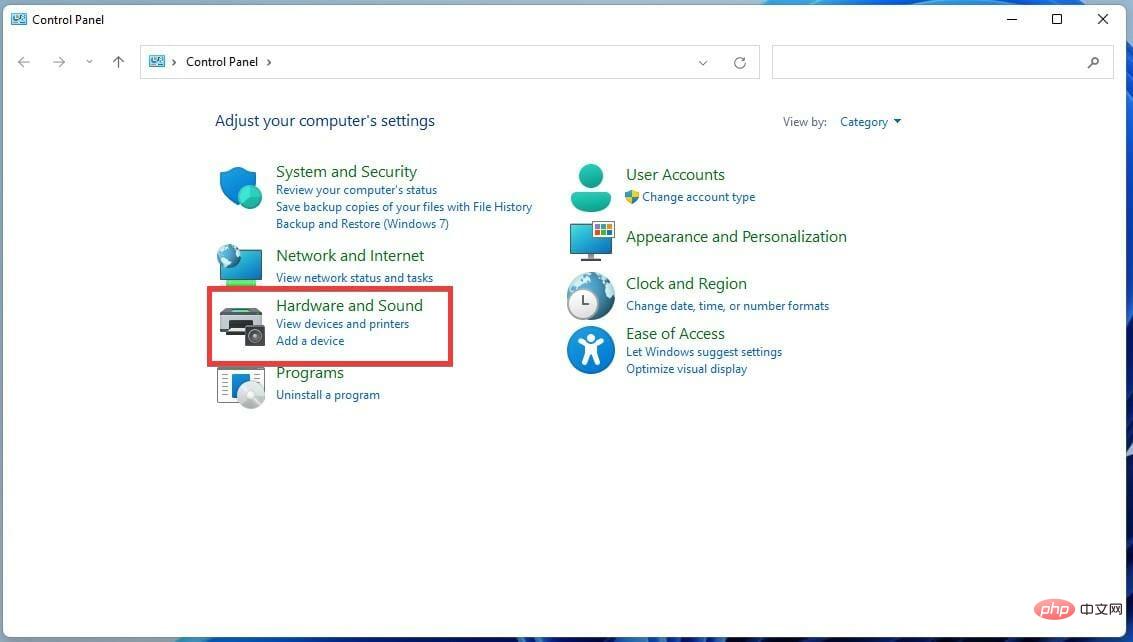
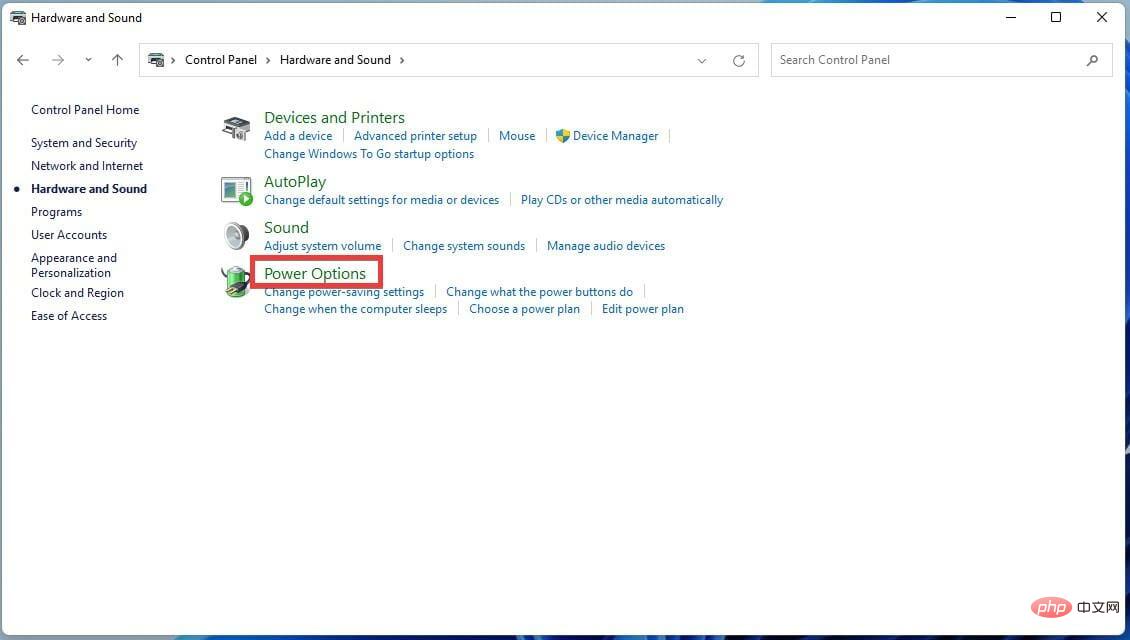
- In the Control Panel window, click the Hardware and Sound option.
- In the next window, find and click Power Options.
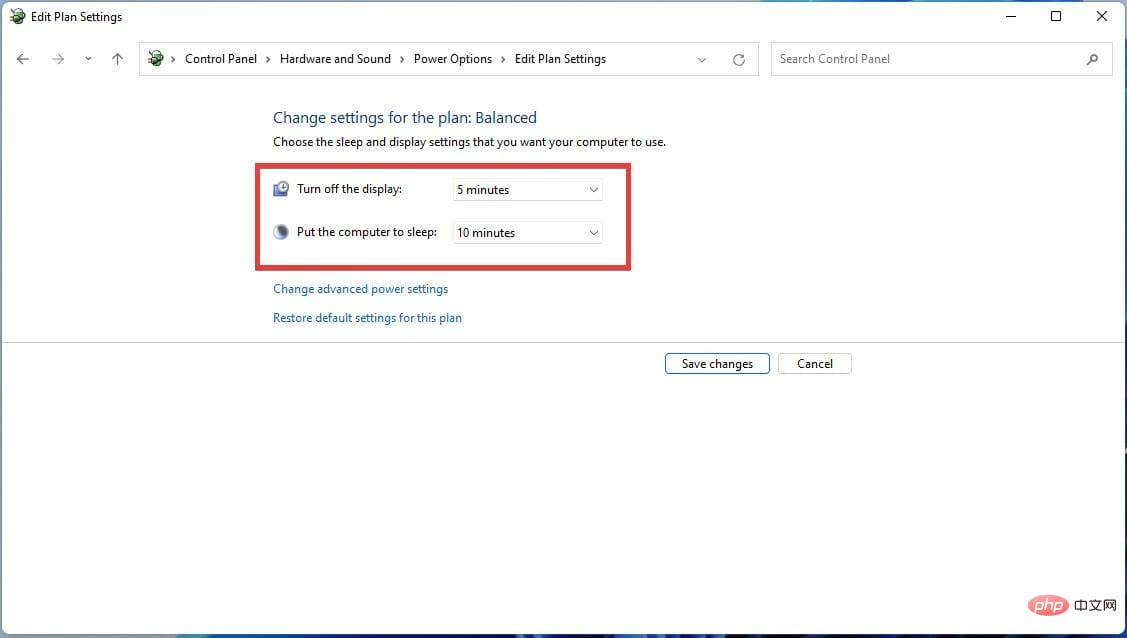
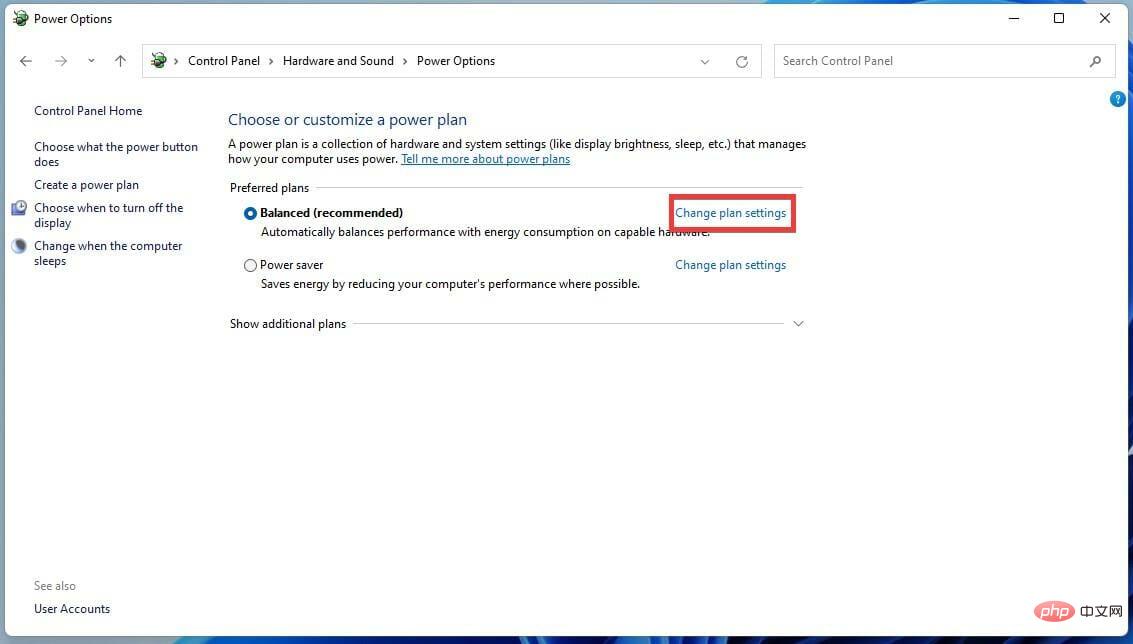
- On the left, select Change when computer sleeps.
- Configure the setting to the desired time the computer will go to sleep. As shown in this example, the display will turn off after 5 minutes and the computer will sleep for 10 minutes.


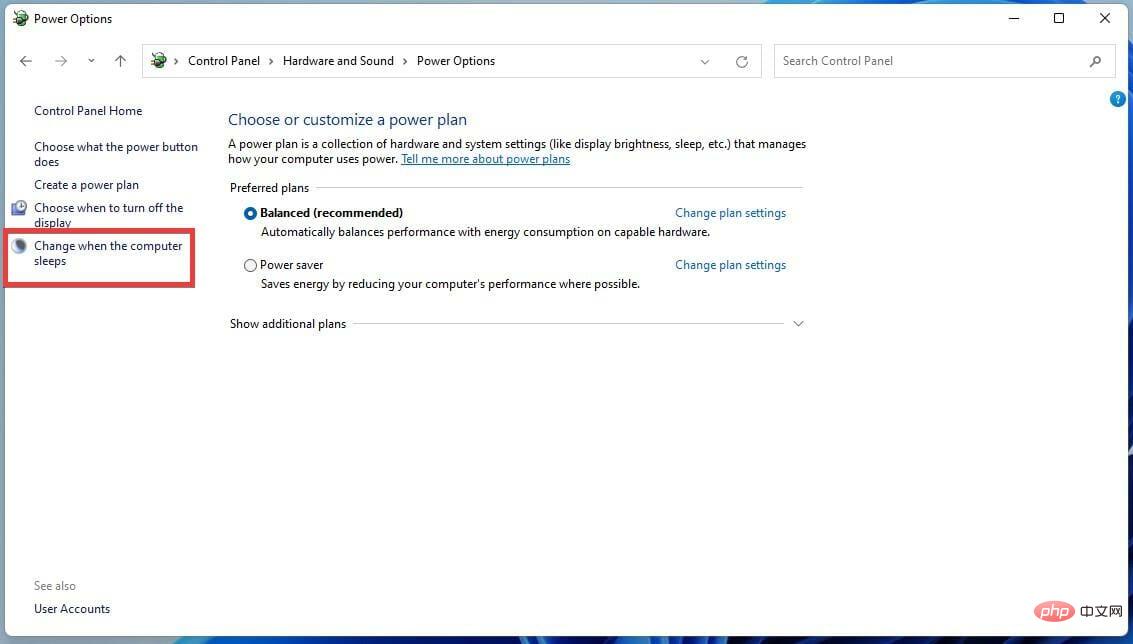
If the processor fan is still running after activating sleep mode on Windows 11, it may have something to do with your power settings. In this case, this fix should restore normalcy.
3. Update the display driver
3.1. Manually update the driver
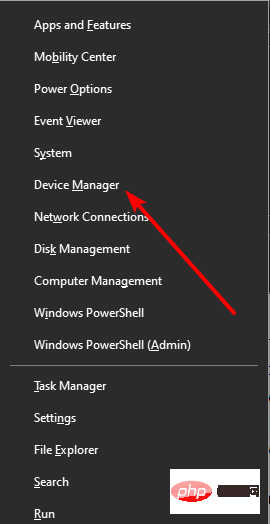
- Press theWindows keyX and selectDevice Manager .
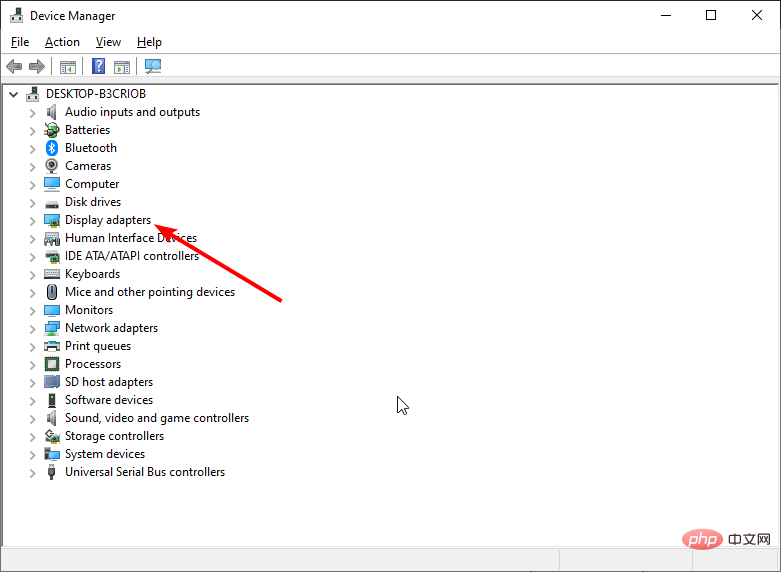
- Double-click the Display Adapters option to expand it.
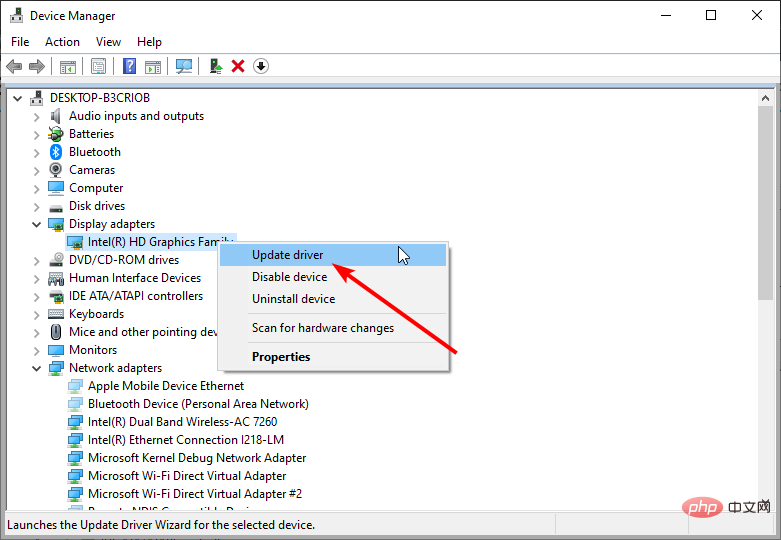
- Right-click on each driver there and select Update Driver.
- Select Automatically search for drivers.
- This will scan and display any available updates.
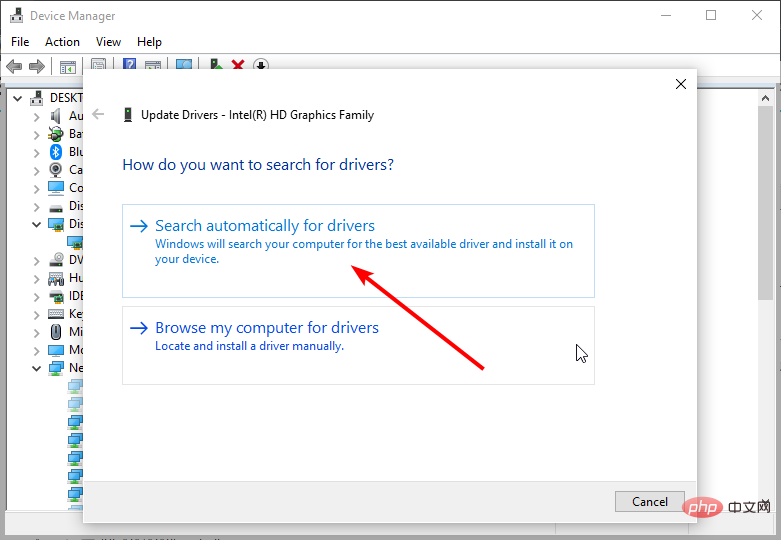
After updating the driver, check if Windows 11 sleep mode is still not working properly.
3.2. Using Driver Updater
There may be an issue where sleep mode does not work on Windows 11 due to outdated display drivers on your PC.
To resolve power state issues, update your graphics card driver with the latest version. You can do this using the control panel and search your system for available drivers.
However, this process will consume a lot of time. But luckily, you have dedicated software called DriverFix that can update old or corrupted drivers instantly.
The tool will scan your system for outdated drivers in seconds and find official drivers from its extensive online database.
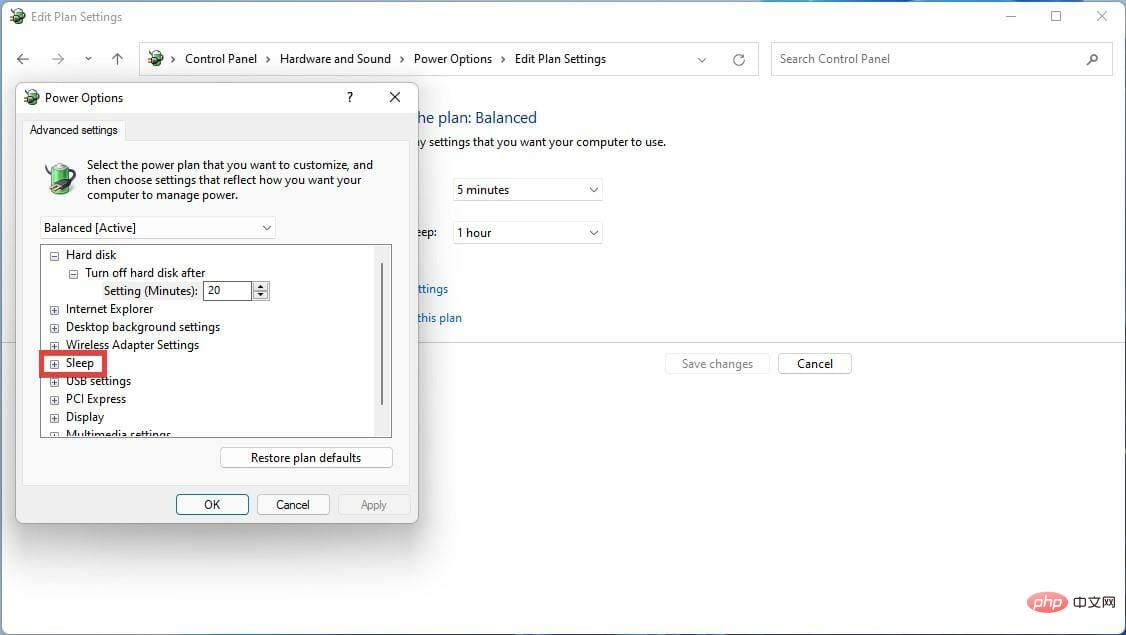
4. Disable Hybrid Mode
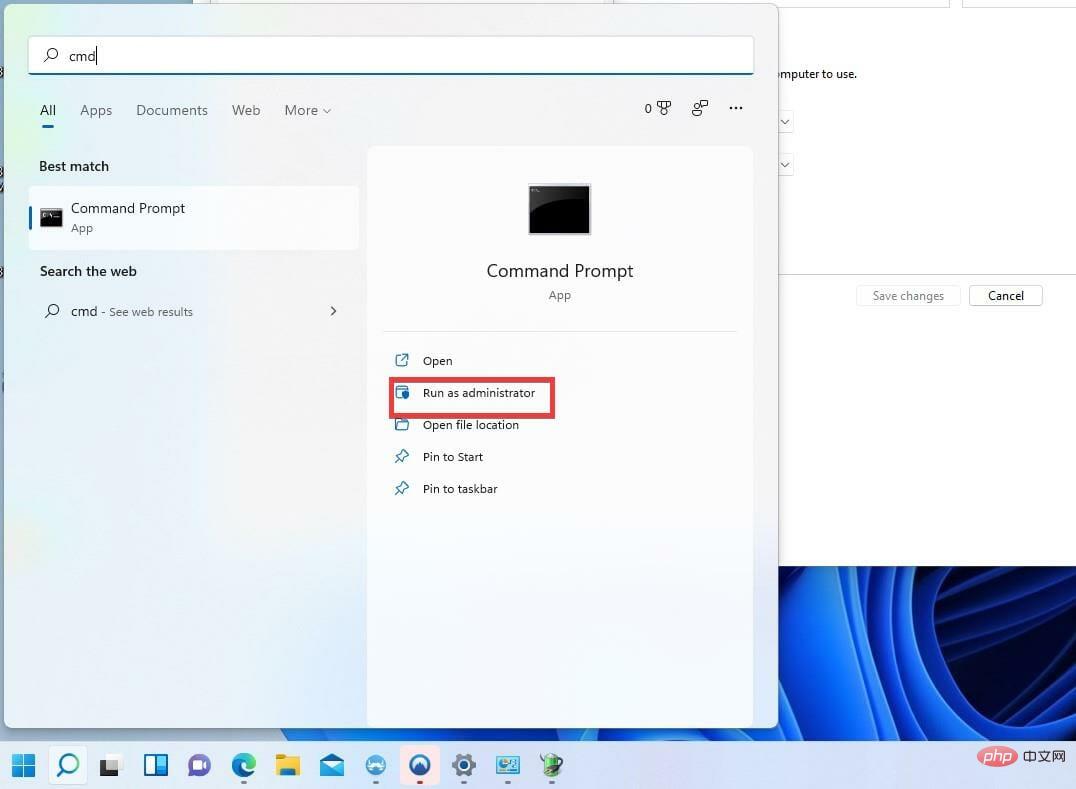
- It will help if you first make sure hibernation mode is turned on. Then, click the magnifying glass icon on the taskbar to bring up the search bar.
- In the search bar, enter cmd to bring up the command prompt.
- Click to run as administrator.
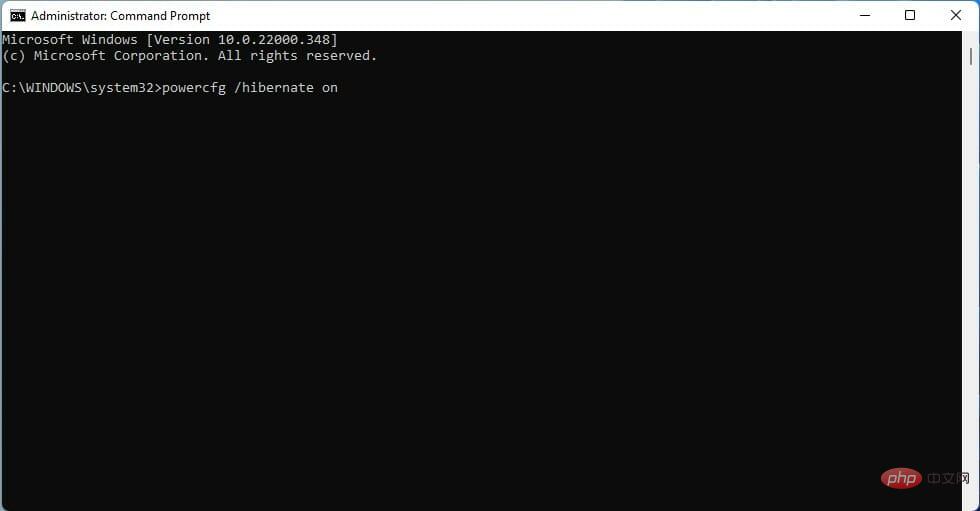
- Type the following command and press Enter:
<strong>powercfg /hibernate on</strong> - Restart your computer.
- After restarting, click the magnifying glass icon again.
- Type control panel and open the first entry.
- Click on the Hardware and Sound option.
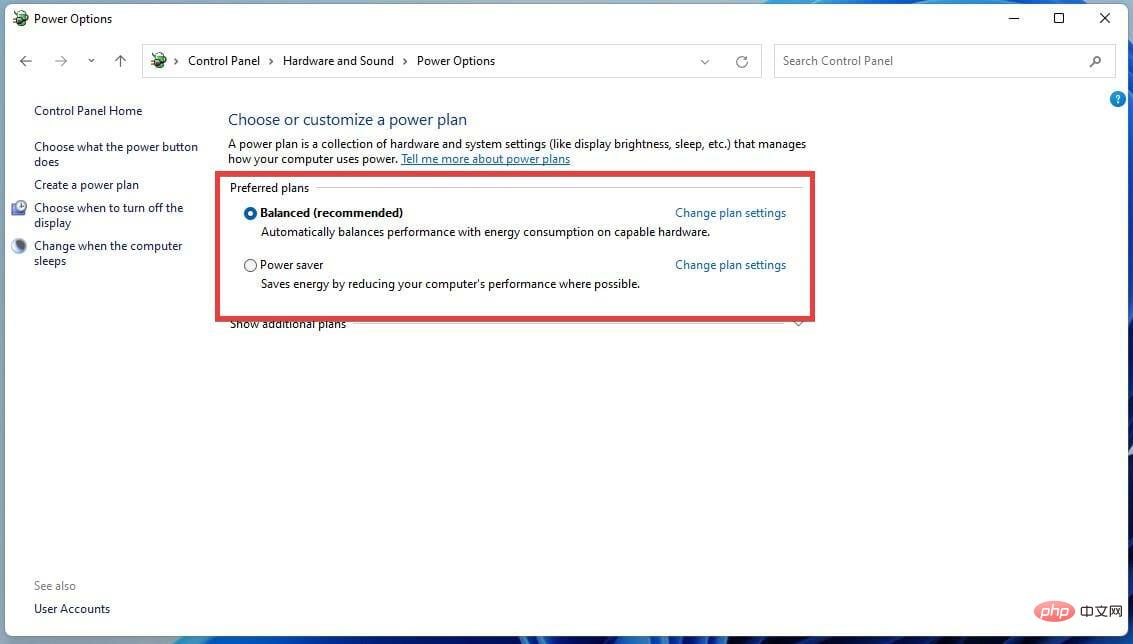
- Click Power Options.
- Find the Preferred Plan section in the middle of the screen.
- Click next to Balance (recommended) to change plan settings.
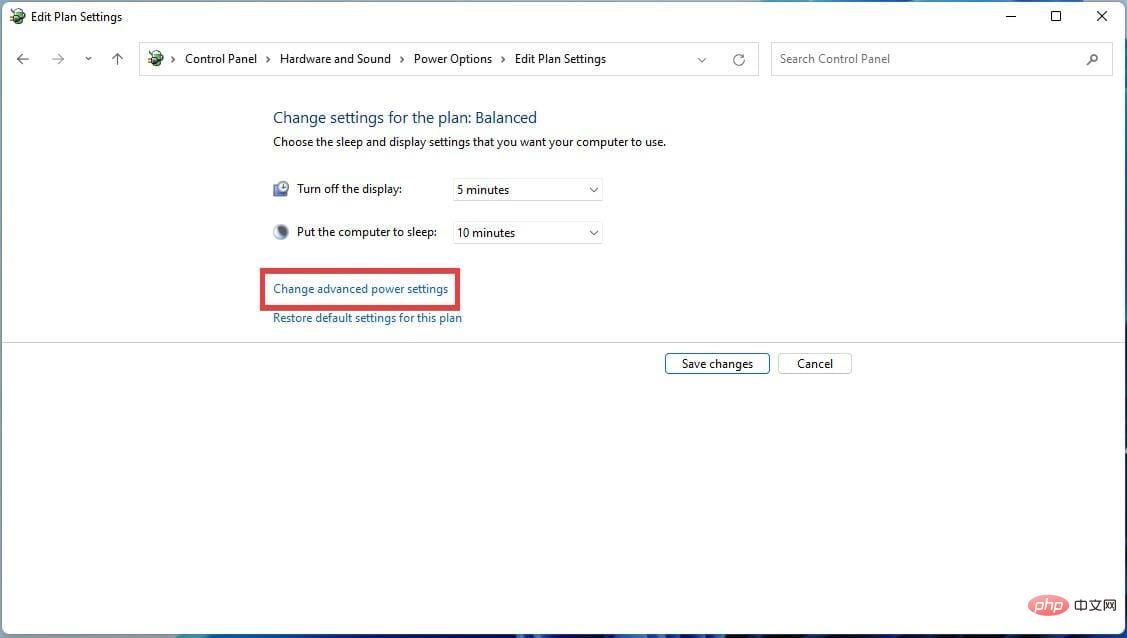
- In the next window, click Change advanced power settings.
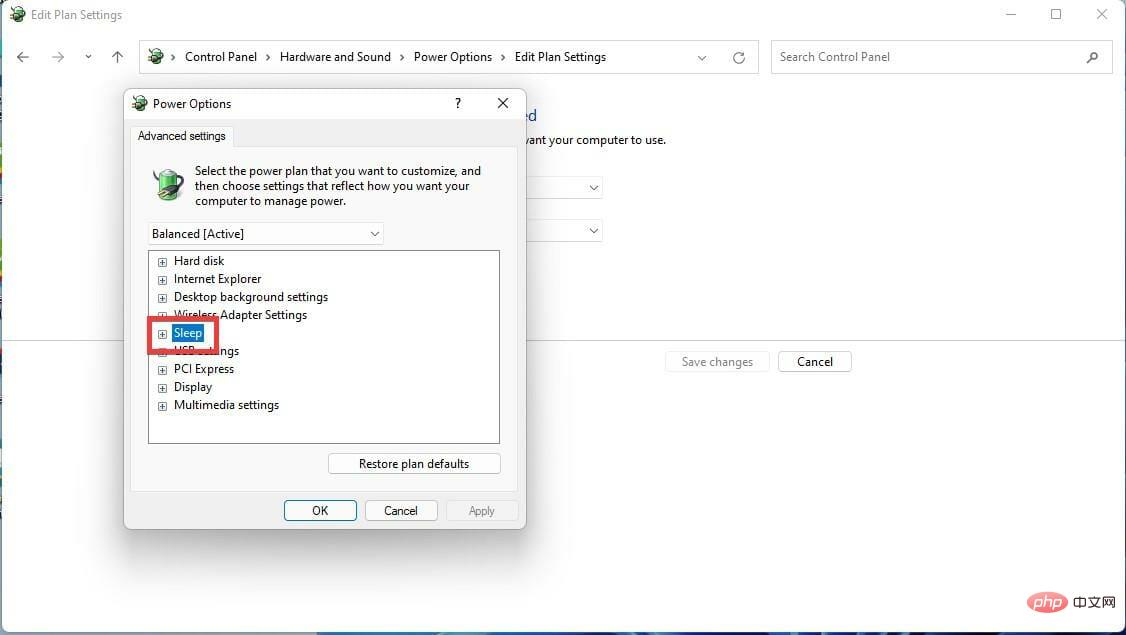
- A small window will appear. Find the Sleep option.
- Click the ( ) plus icon next to Sleep to expand the set of options.
- Click Allow Hybrid Sleep to display another drop-down menu.
- Click Settings and turn off Blending Mode.
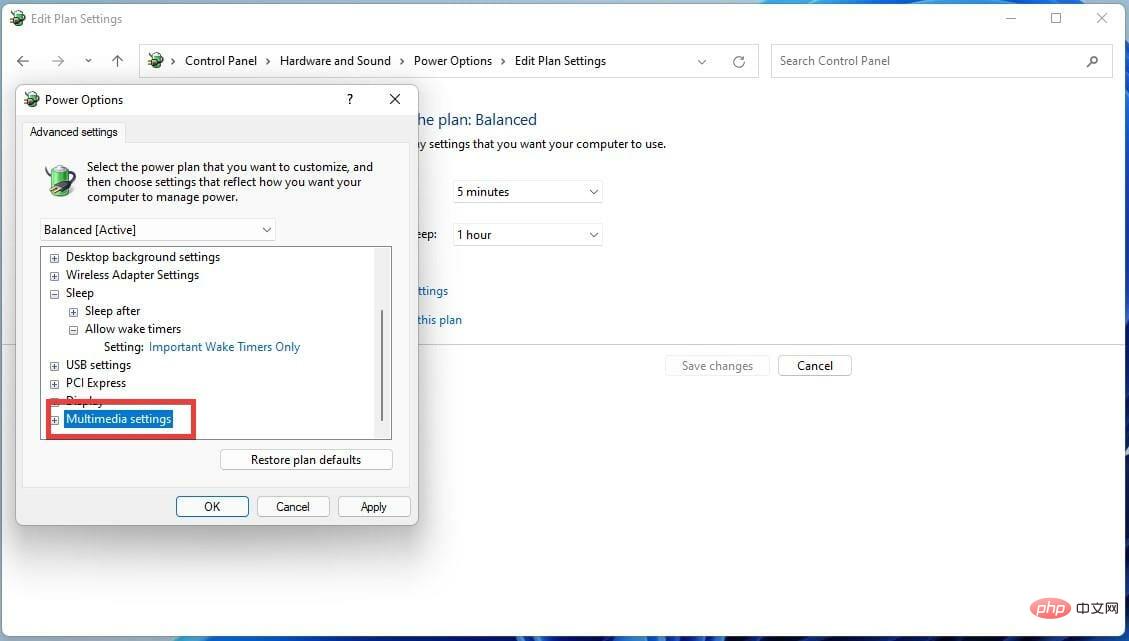
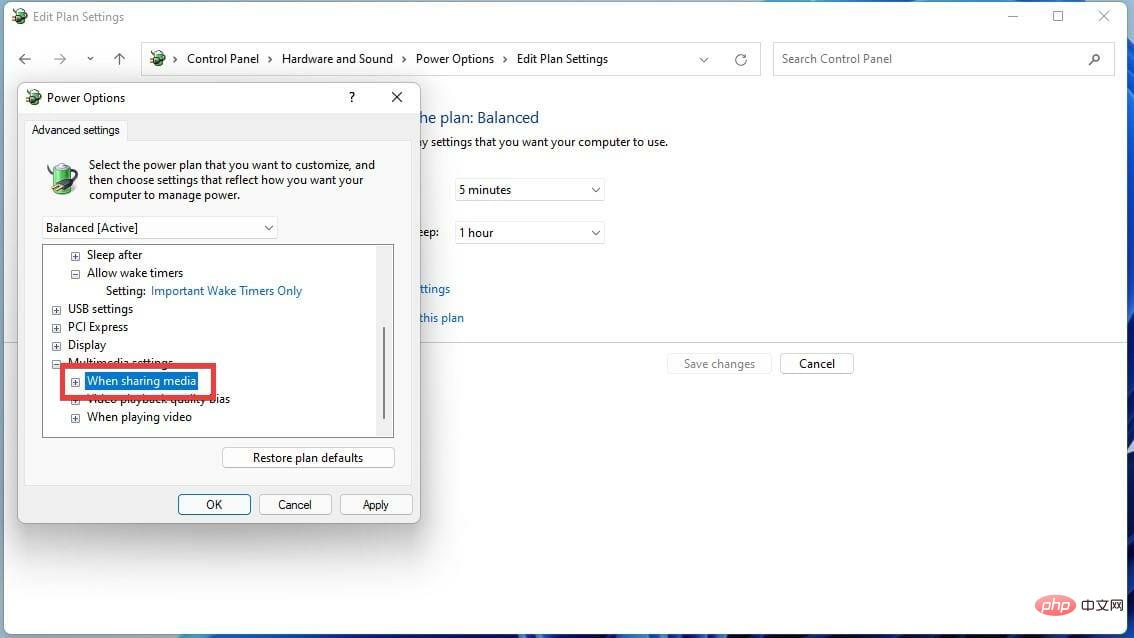
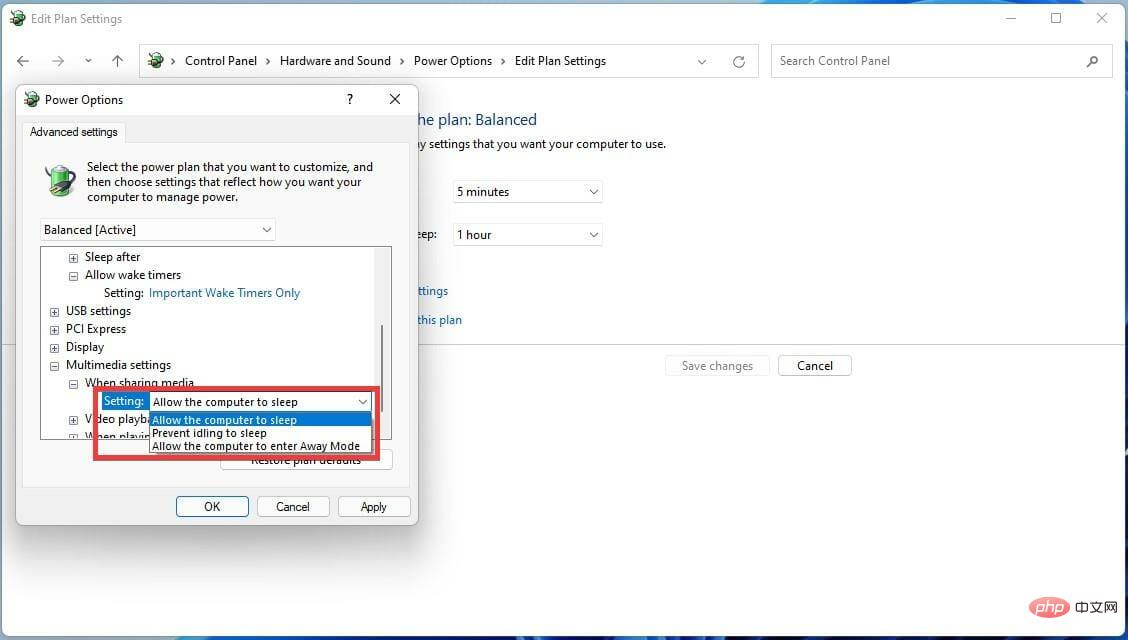
- Then, move to Multimedia Settings and click the ( ) plus sign icon next to the entry.
- Click when sharing media.
- Click Prevent Idle to Sleep next to Settings.
- SelectAllow the computer to sleep in the drop-down menu.
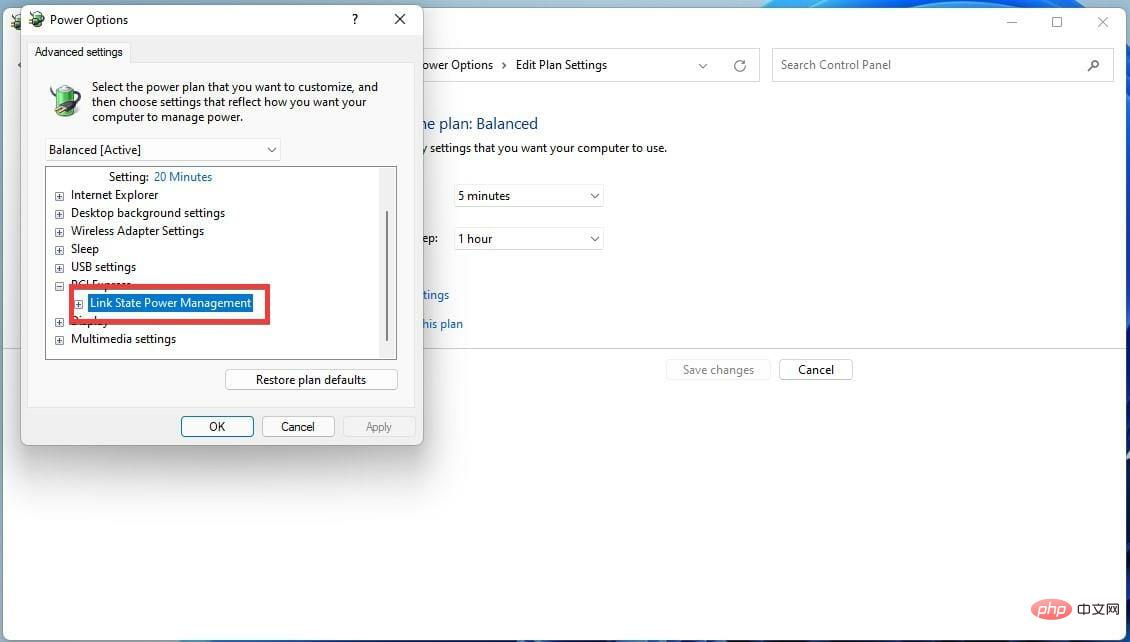
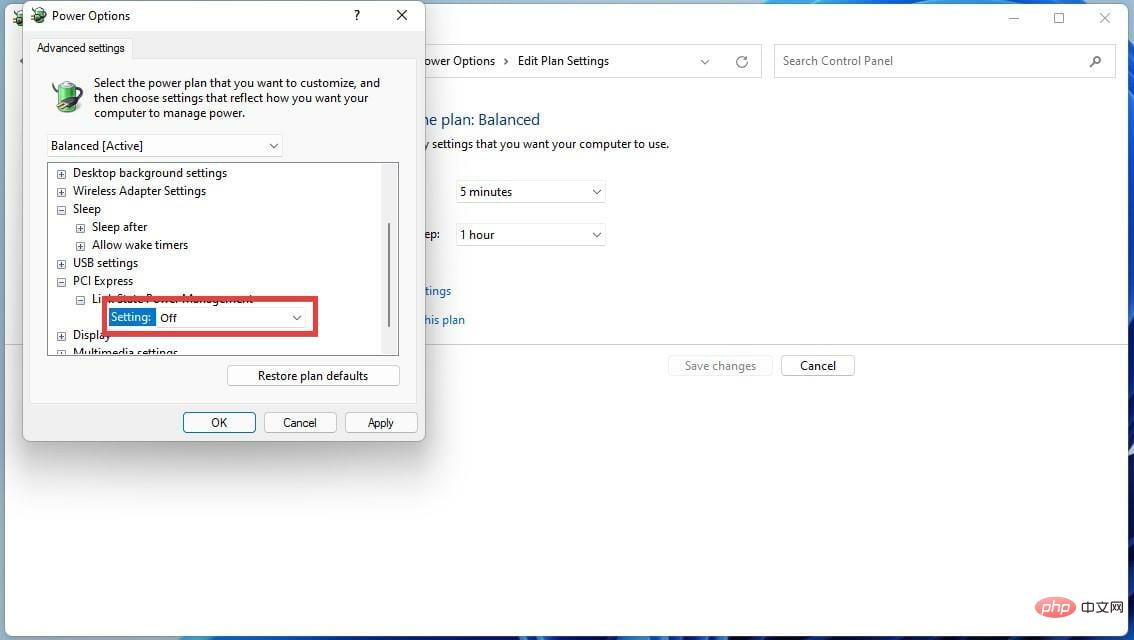
- Locate PCI Express and click the ( ) plus sign icon to bring up the drop-down menu.
- Click the ( ) plus sign next to the link State Power Management.
- Next to Settings, click the drop-down menu and close it.
- Once it closes, click Apply, and then OK.


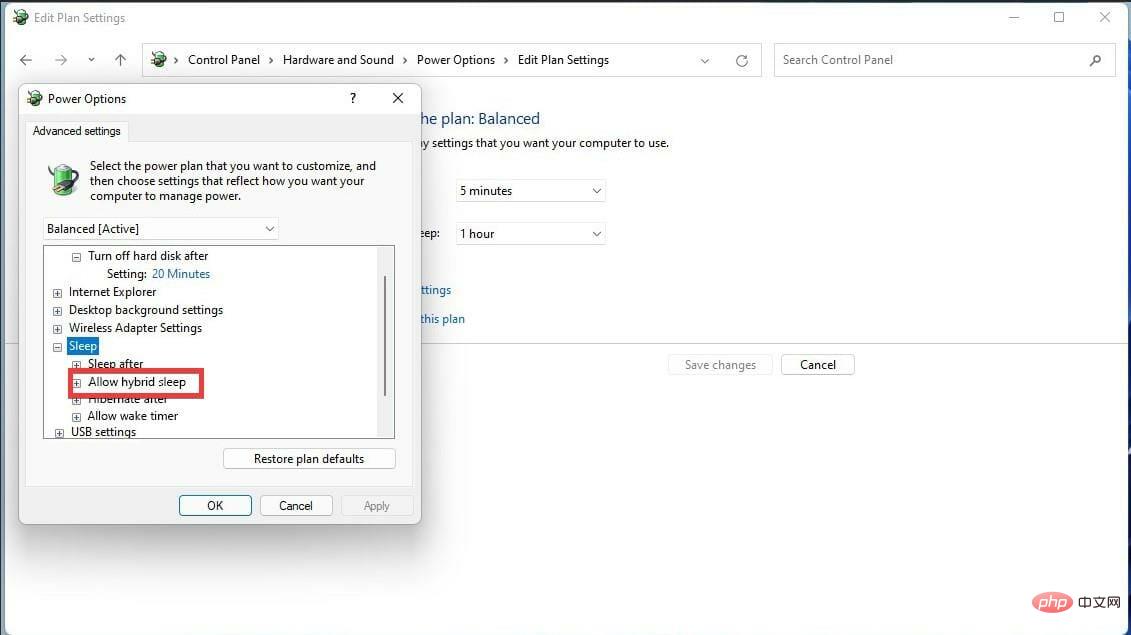


Mixed mode may be the reason why sleep mode is not working on Windows 11. While this feature is nice, combining sleep and hibernation may affect sleep patterns.
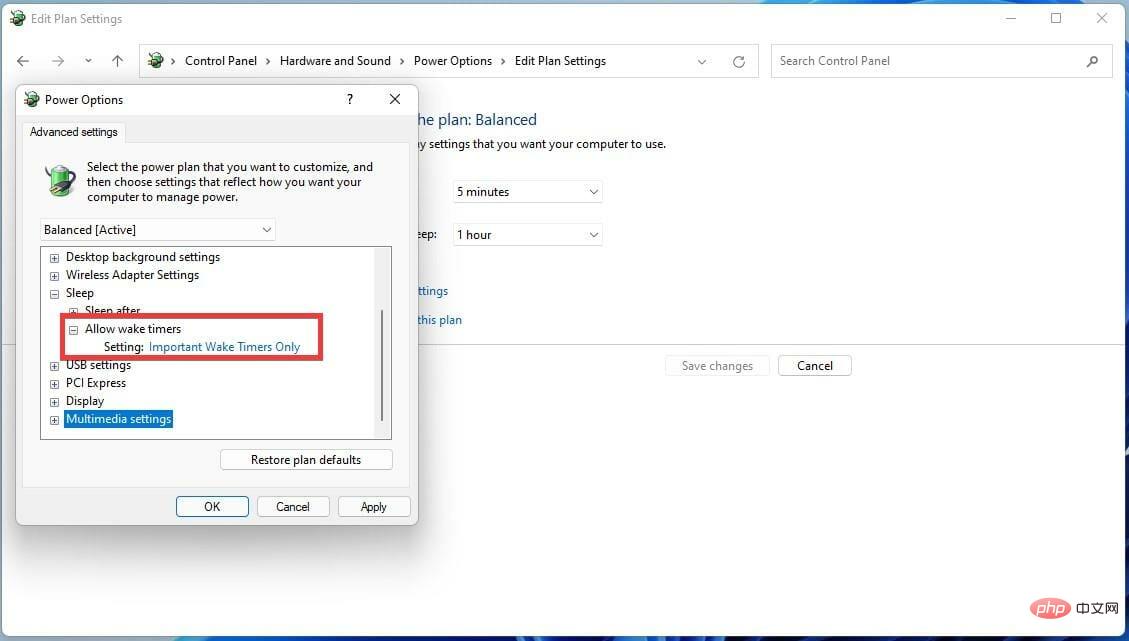
5. Disable wake timer
- Click the magnifying glass icon on the taskbar to open the search bar.
- Enter Control Panel and click on the first entry.
- ClickHardware and Sound.
- In this new window, click Power Options.
- Next to the Balanced (Recommended) plan, click Change plan settings.
- Click Change Advanced Settings.
- Find "Sleep" in these new windows and click the plus sign ( ) icon next to it.
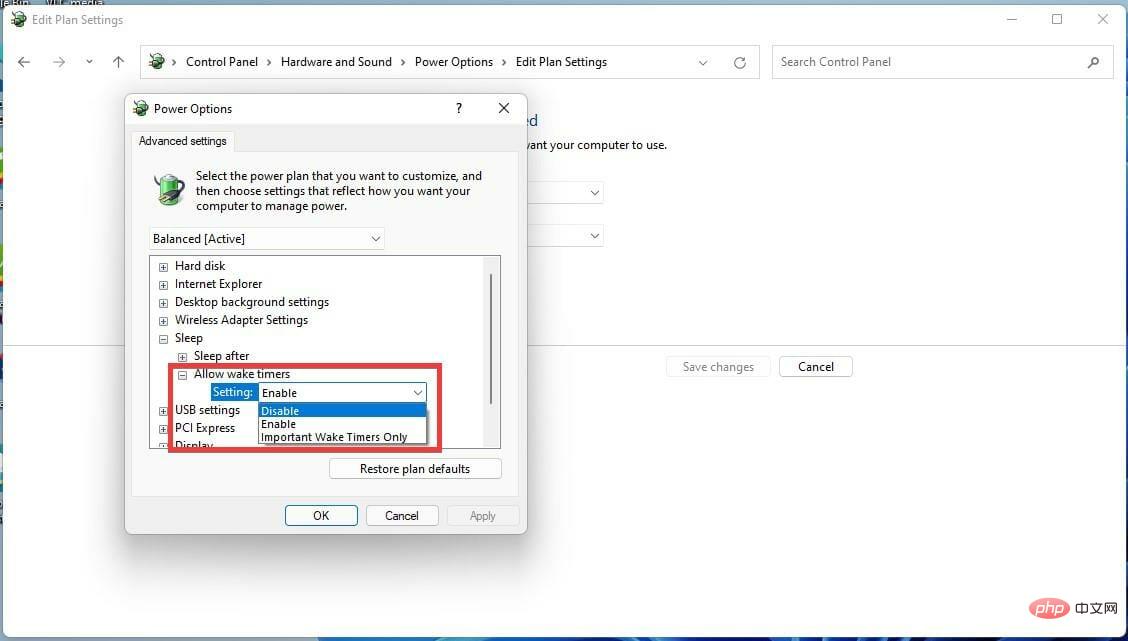
- Click Allow wake timer and then click Settings to display the drop-down menu.
- In this new menu, select Disable.


6. Disable Quick Start
- Click the magnifying glass icon on the taskbar to bring up the search bar.
- Search for Control Panel and open the first entry you see.
- In Control Panel, click Hardware and Sound.
- Click Power Options.
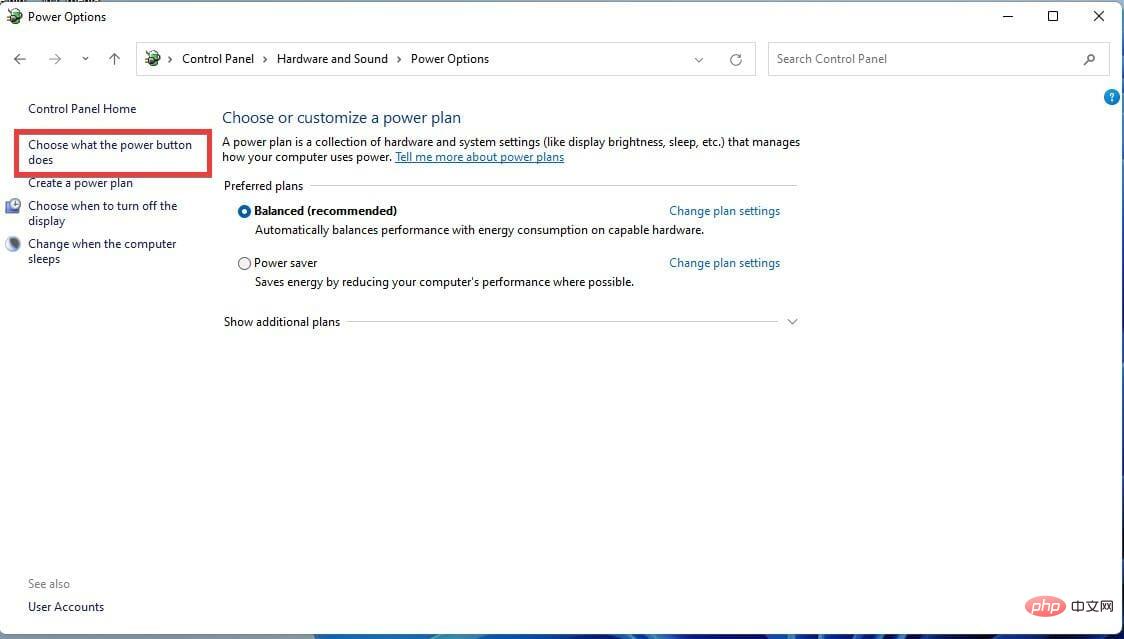
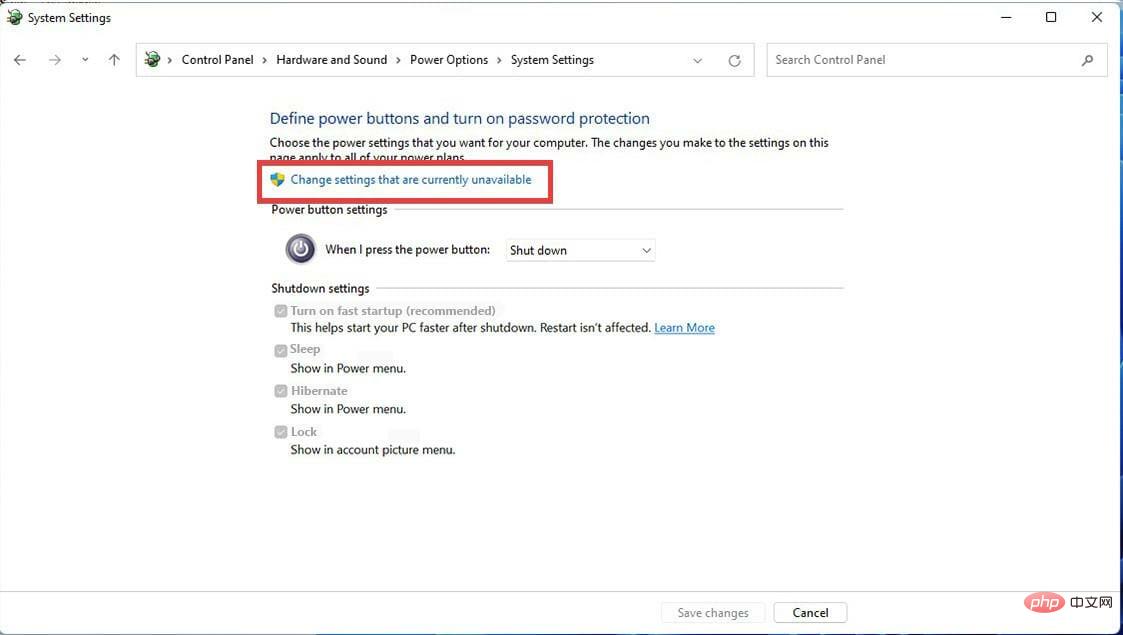
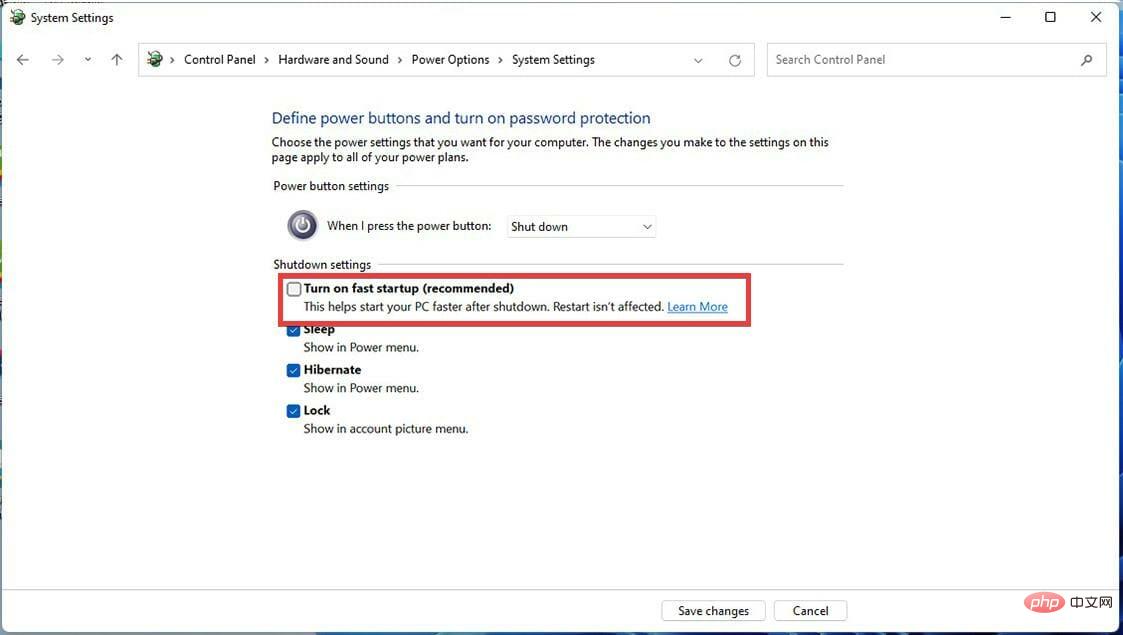
- Click the in the upper left corner to choose what the power button does.
- In the next window, click Change settings that are currently unavailable.
- Click Open Quick Start to turn it off and disable the feature.


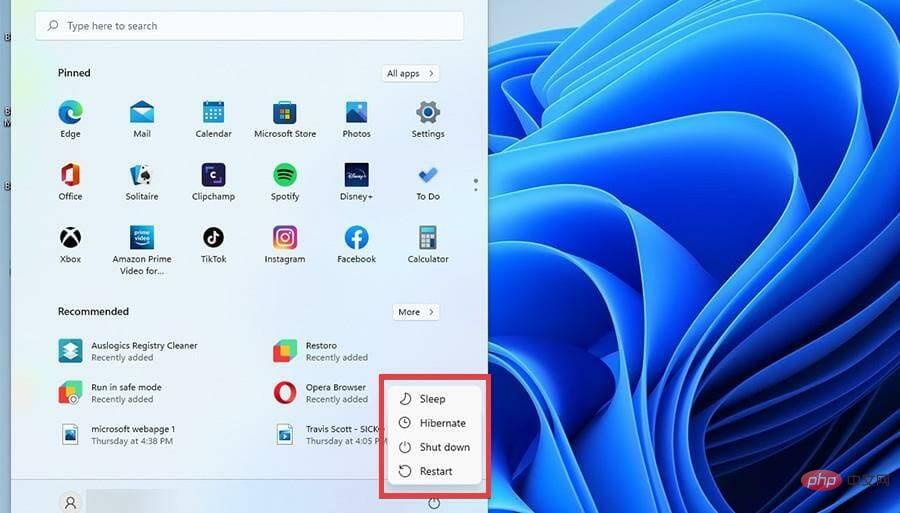
How to force sleep in Windows 11?
If your Windows 11 PC doesn't enter sleep mode automatically, you can use the power button or keyboard shortcuts to put it to sleep.
You can use the Alt F4 shortcut or Windows# via Advanced User Settings ## Put Windows 11 to sleep. XAlso, you can force it to sleep by pressing the power button once.
Sleep mode issues on Windows 11 can be frustrating because it takes away an important power- and time-saving feature. But with the fixes in this tutorial, you should be able to resolve the issue effectively.The above is the detailed content of 6 Ways to Fix Sleep Mode Issues on Windows 11. For more information, please follow other related articles on the PHP Chinese website!

Hot AI Tools

Undresser.AI Undress
AI-powered app for creating realistic nude photos

AI Clothes Remover
Online AI tool for removing clothes from photos.

Undress AI Tool
Undress images for free

Clothoff.io
AI clothes remover

Video Face Swap
Swap faces in any video effortlessly with our completely free AI face swap tool!

Hot Article
Hot Tools

Notepad++7.3.1
Easy-to-use and free code editor

SublimeText3 Chinese version
Chinese version, very easy to use

Zend Studio 13.0.1
Powerful PHP integrated development environment

Dreamweaver CS6
Visual web development tools

SublimeText3 Mac version
God-level code editing software (SublimeText3)
Hot Topics
 1389
1389
 52
52

 What is the reason why PS keeps showing loading?
Apr 06, 2025 pm 06:39 PM
What is the reason why PS keeps showing loading?
Apr 06, 2025 pm 06:39 PM
PS "Loading" problems are caused by resource access or processing problems: hard disk reading speed is slow or bad: Use CrystalDiskInfo to check the hard disk health and replace the problematic hard disk. Insufficient memory: Upgrade memory to meet PS's needs for high-resolution images and complex layer processing. Graphics card drivers are outdated or corrupted: Update the drivers to optimize communication between the PS and the graphics card. File paths are too long or file names have special characters: use short paths and avoid special characters. PS's own problem: Reinstall or repair the PS installer.
 How to solve the problem of loading when PS is always showing that it is loading?
Apr 06, 2025 pm 06:30 PM
How to solve the problem of loading when PS is always showing that it is loading?
Apr 06, 2025 pm 06:30 PM
PS card is "Loading"? Solutions include: checking the computer configuration (memory, hard disk, processor), cleaning hard disk fragmentation, updating the graphics card driver, adjusting PS settings, reinstalling PS, and developing good programming habits.
 How to speed up the loading speed of PS?
Apr 06, 2025 pm 06:27 PM
How to speed up the loading speed of PS?
Apr 06, 2025 pm 06:27 PM
Solving the problem of slow Photoshop startup requires a multi-pronged approach, including: upgrading hardware (memory, solid-state drive, CPU); uninstalling outdated or incompatible plug-ins; cleaning up system garbage and excessive background programs regularly; closing irrelevant programs with caution; avoiding opening a large number of files during startup.
 Is slow PS loading related to computer configuration?
Apr 06, 2025 pm 06:24 PM
Is slow PS loading related to computer configuration?
Apr 06, 2025 pm 06:24 PM
The reason for slow PS loading is the combined impact of hardware (CPU, memory, hard disk, graphics card) and software (system, background program). Solutions include: upgrading hardware (especially replacing solid-state drives), optimizing software (cleaning up system garbage, updating drivers, checking PS settings), and processing PS files. Regular computer maintenance can also help improve PS running speed.
 How to solve the problem of loading when the PS opens the file?
Apr 06, 2025 pm 06:33 PM
How to solve the problem of loading when the PS opens the file?
Apr 06, 2025 pm 06:33 PM
"Loading" stuttering occurs when opening a file on PS. The reasons may include: too large or corrupted file, insufficient memory, slow hard disk speed, graphics card driver problems, PS version or plug-in conflicts. The solutions are: check file size and integrity, increase memory, upgrade hard disk, update graphics card driver, uninstall or disable suspicious plug-ins, and reinstall PS. This problem can be effectively solved by gradually checking and making good use of PS performance settings and developing good file management habits.
 How to use mysql after installation
Apr 08, 2025 am 11:48 AM
How to use mysql after installation
Apr 08, 2025 am 11:48 AM
The article introduces the operation of MySQL database. First, you need to install a MySQL client, such as MySQLWorkbench or command line client. 1. Use the mysql-uroot-p command to connect to the server and log in with the root account password; 2. Use CREATEDATABASE to create a database, and USE select a database; 3. Use CREATETABLE to create a table, define fields and data types; 4. Use INSERTINTO to insert data, query data, update data by UPDATE, and delete data by DELETE. Only by mastering these steps, learning to deal with common problems and optimizing database performance can you use MySQL efficiently.
 Can mysql run on android
Apr 08, 2025 pm 05:03 PM
Can mysql run on android
Apr 08, 2025 pm 05:03 PM
MySQL cannot run directly on Android, but it can be implemented indirectly by using the following methods: using the lightweight database SQLite, which is built on the Android system, does not require a separate server, and has a small resource usage, which is very suitable for mobile device applications. Remotely connect to the MySQL server and connect to the MySQL database on the remote server through the network for data reading and writing, but there are disadvantages such as strong network dependencies, security issues and server costs.
 Is PS slow loading related to other programs that are running?
Apr 06, 2025 pm 06:03 PM
Is PS slow loading related to other programs that are running?
Apr 06, 2025 pm 06:03 PM
The secrets to mastering Office software include: understanding different versions and platforms, correctly installing and configuring, proficient in using the software interface, in-depth understanding of feature operations, application collaboration and sharing functions, utilizing templates and styles, mastering advanced skills, and solving common problems. In addition, you need to choose a version that suits your needs, make good use of templates and styles, develop backup habits, and learn shortcut keys and advanced techniques to improve efficiency.