

How to implement simple GUI login and registration interface in Java

Look at the renderings first:
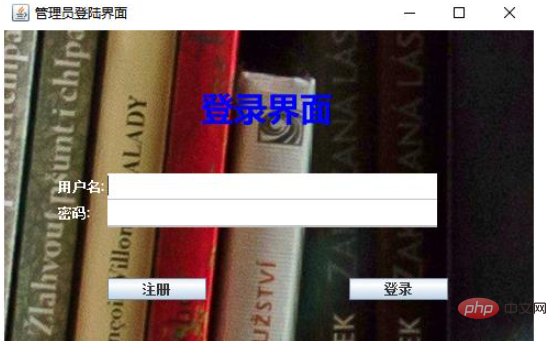
Login interface:
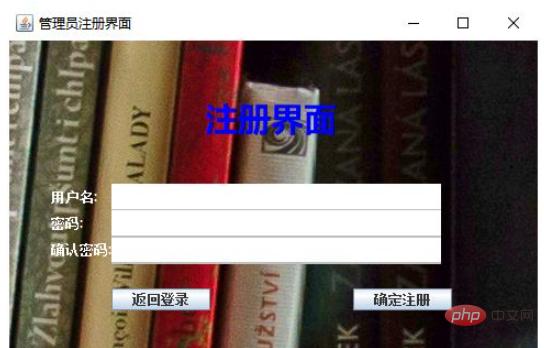
Registration interface:
The implementation code is as follows:
1. Login interface
package cn.bms.view;

import java.awt.Color;
import java.awt.Dimension;
import java.awt.Font;
import java.awt.event.ActionEvent;
import java.awt.event.ActionListener;

import javax.swing.ImageIcon;
import javax.swing.JButton;
import javax.swing.JFrame;
import javax.swing.JLabel;
import javax.swing.JPanel;
import javax.swing.JTextField;
import javax.swing.border.MatteBorder;

import cn.bms.tools.GUITools;

/*
 * 登录窗口
 */
@SuppressWarnings("serial")
public class AdminLogin extends JFrame {
    private JPanel contentPanel = new JPanel();
    // Label标签存放背景图片
    private JLabel label;
    // 设置按钮组件
    private JButton login = new JButton("登录"), register = new JButton("注册");

    private JLabel jlb1 = new JLabel("用户名:"), jlb2 = new JLabel("密码:"), jlbtitle = new JLabel("登录界面");
    // 设置文本框组件
    private JTextField admin = new JTextField(), password = new JTextField();

    public AdminLogin() {
        this.init();
        this.addListener();
    }

    private void init() {
        this.setTitle("管理员登陆界面");
        this.setSize(500, 350);
        GUITools.center(this);
        ImageIcon image1 = new ImageIcon("837878.jpg"); // 界面背景图片
        JLabel backLabel = new JLabel();
        backLabel.setIcon(image1);
        label = new JLabel(image1);
        label.setBounds(0, 0, 1000, 400);
        // 在LayeredPane最底层上添加两个带图片的标签,并且label2在label上方
        this.getLayeredPane().add(label, new Integer(Integer.MIN_VALUE));
        // 将内容面板设置为透明,就能够看见添加在LayeredPane上的背景。
        ((JPanel) this.getContentPane()).setOpaque(false);

        /*
         * 添加组件到contentPanel容器中 布局方式为自由布局。
         */
        contentPanel.setLayout(null);
        add(admin);
        add(password);
        add(login);
        add(register);
        add(jlb1);
        add(jlb2);
        add(jlbtitle);

        /*
         * 组件绝对位置
         */
        jlb1.setBounds(50, 130, 90, 25);
        jlb1.setForeground(Color.WHITE);
        admin.setBounds(95, 130, 300, 25);
        password.setBounds(95, 154, 300, 25);
        jlb2.setBounds(50, 154, 90, 25);
        jlb2.setForeground(Color.WHITE);
        register.setBounds(95, 225, 90, 20);
        login.setBounds(315, 225, 90, 20);
        jlbtitle.setBounds(180, 45, 200, 50);
        Font f = new Font("微软雅黑", Font.BOLD, 30);
        jlbtitle.setFont(f);
        jlbtitle.setForeground(Color.BLUE);

        /*
         * 组件透明化
         */
        admin.setOpaque(true);
        password.setOpaque(true);
        contentPanel.setOpaque(false);
        getContentPane().add(contentPanel);

        /*
         * 组件边框颜色
         */
        textSet(admin);
        textSet(password);
    }

    /*
     * JTextField文本框设置方法.
     */
    private void textSet(JTextField field) {
        field.setBackground(new Color(255, 255, 255));
        field.setPreferredSize(new Dimension(150, 28));
        MatteBorder border = new MatteBorder(0, 0, 2, 0, new Color(192, 192, 192));
        field.setBorder(border);
    }

    /*
     * 事件监听
     */
    private void addListener() {
        login.addActionListener(new ActionListener() {
            @Override
            public void actionPerformed(ActionEvent e) {
                forLogin(admin.getText(), password.getText());
            }

        });
        register.addActionListener(new ActionListener() {
            @Override
            public void actionPerformed(ActionEvent e) {
                forRegister();
            }

        });
    }

    // 登录方法
    public void forLogin(String admin, String pwd) {
    }

    // 注册方法
    public void forRegister() {
    }
}2. Registration interface:
package cn.bms.view;

import java.awt.Color;
import java.awt.Dimension;
import java.awt.Font;
import java.awt.event.ActionEvent;
import java.awt.event.ActionListener;

import javax.swing.ImageIcon;
import javax.swing.JButton;
import javax.swing.JFrame;
import javax.swing.JLabel;
import javax.swing.JPanel;
import javax.swing.JTextField;
import javax.swing.border.MatteBorder;

import cn.bms.controller.AdminLoginController;
import cn.bms.tools.GUITools;

/*
 * 注册窗口
 */
@SuppressWarnings("serial")
public class AdminRegister extends JFrame {
    private JPanel contentPanel = new JPanel();
    // Label标签存放背景图片
    private JLabel label;
    // 设置按钮组件
    private JButton ok = new JButton("确定注册"), back = new JButton("返回登录");

    private JLabel jlb1 = new JLabel("用户名:"), jlb2 = new JLabel("密码:"), jlb3 = new JLabel("确认密码:"),
            jlbtitle = new JLabel("注册界面");
    // 设置文本框组件
    private JTextField admin = new JTextField(), password1 = new JTextField(), password2 = new JTextField();

    public AdminRegister() {
        this.init();
        this.addListener();
    }

    private void init() {
        this.setTitle("管理员注册界面");
        this.setSize(500, 350);
        GUITools.center(this);
        ImageIcon image1 = new ImageIcon("837878.jpg"); // 界面背景图片
        JLabel backLabel = new JLabel();
        backLabel.setIcon(image1);
        label = new JLabel(image1);
        label.setBounds(0, 0, 1000, 400);
        // 在LayeredPane最底层上添加两个带图片的标签,并且label2在label上方
        this.getLayeredPane().add(label, new Integer(Integer.MIN_VALUE));
        // 将内容面板设置为透明,就能够看见添加在LayeredPane上的背景。
        ((JPanel) this.getContentPane()).setOpaque(false);

        /*
         * 添加组件到contentPanel容器中 布局方式为自由布局。
         */
        contentPanel.setLayout(null);
        add(admin);
        add(password1);
        add(password2);
        add(ok);
        add(back);
        add(jlb1);
        add(jlb2);
        add(jlb3);
        add(jlbtitle);

        /*
         * 组件绝对位置
         */
        jlb1.setBounds(40, 130, 90, 25);
        jlb1.setForeground(Color.WHITE);
        admin.setBounds(95, 130, 300, 25);

        password1.setBounds(95, 154, 300, 25);
        jlb2.setBounds(40, 154, 90, 25);
        jlb2.setForeground(Color.WHITE);

        password2.setBounds(95, 178, 300, 25);
        jlb3.setBounds(40, 178, 90, 25);
        jlb3.setForeground(Color.WHITE);

        ok.setBounds(315, 225, 90, 20);
        back.setBounds(95, 225, 90, 20);

        jlbtitle.setBounds(180, 45, 200, 50);
        Font f = new Font("微软雅黑", Font.BOLD, 30);
        jlbtitle.setFont(f);
        jlbtitle.setForeground(Color.BLUE);

        /*
         * 组件透明化
         */
        admin.setOpaque(true);
        password1.setOpaque(true);
        password2.setOpaque(true);
        contentPanel.setOpaque(false);
        getContentPane().add(contentPanel);

        /*
         * 组件边框颜色
         */
        textSet(admin);
        textSet(password1);
        textSet(password2);
    }

    /*
     * JTextField文本框设置方法.
     */
    private void textSet(JTextField field) {
        field.setBackground(new Color(255, 255, 255));
        field.setPreferredSize(new Dimension(150, 28));
        MatteBorder border = new MatteBorder(0, 0, 2, 0, new Color(192, 192, 192));
        field.setBorder(border);
    }

    /*
     * 事件监听
     */
    private void addListener() {
        ok.addActionListener(new ActionListener() {
            @Override
            public void actionPerformed(ActionEvent e) {
                setRegister(admin.getText(), password1.getText(), password2.getText());
            }
        });
        back.addActionListener(new ActionListener() {
            @Override
            public void actionPerformed(ActionEvent e) {
                new AdminLoginController().setVisible(true);
            }
        });
    }

    // 实现注册账户方法
    public void setRegister(String admin, String pwd1, String pwd2) {
    }
}The above is the detailed content of How to implement simple GUI login and registration interface in Java. For more information, please follow other related articles on the PHP Chinese website!

Hot AI Tools

Undresser.AI Undress
AI-powered app for creating realistic nude photos

AI Clothes Remover
Online AI tool for removing clothes from photos.

Undress AI Tool
Undress images for free

Clothoff.io
AI clothes remover

AI Hentai Generator
Generate AI Hentai for free.

Hot Article
Hot Tools

Notepad++7.3.1
Easy-to-use and free code editor

SublimeText3 Chinese version
Chinese version, very easy to use

Zend Studio 13.0.1
Powerful PHP integrated development environment

Dreamweaver CS6
Visual web development tools

SublimeText3 Mac version
God-level code editing software (SublimeText3)
Hot Topics
 1385
1385
 52
52

 Perfect Number in Java
Aug 30, 2024 pm 04:28 PM
Perfect Number in Java
Aug 30, 2024 pm 04:28 PM
Guide to Perfect Number in Java. Here we discuss the Definition, How to check Perfect number in Java?, examples with code implementation.
 Weka in Java
Aug 30, 2024 pm 04:28 PM
Weka in Java
Aug 30, 2024 pm 04:28 PM
Guide to Weka in Java. Here we discuss the Introduction, how to use weka java, the type of platform, and advantages with examples.
 Smith Number in Java
Aug 30, 2024 pm 04:28 PM
Smith Number in Java
Aug 30, 2024 pm 04:28 PM
Guide to Smith Number in Java. Here we discuss the Definition, How to check smith number in Java? example with code implementation.
 Java Spring Interview Questions
Aug 30, 2024 pm 04:29 PM
Java Spring Interview Questions
Aug 30, 2024 pm 04:29 PM
In this article, we have kept the most asked Java Spring Interview Questions with their detailed answers. So that you can crack the interview.
 Break or return from Java 8 stream forEach?
Feb 07, 2025 pm 12:09 PM
Break or return from Java 8 stream forEach?
Feb 07, 2025 pm 12:09 PM
Java 8 introduces the Stream API, providing a powerful and expressive way to process data collections. However, a common question when using Stream is: How to break or return from a forEach operation? Traditional loops allow for early interruption or return, but Stream's forEach method does not directly support this method. This article will explain the reasons and explore alternative methods for implementing premature termination in Stream processing systems. Further reading: Java Stream API improvements Understand Stream forEach The forEach method is a terminal operation that performs one operation on each element in the Stream. Its design intention is
 TimeStamp to Date in Java
Aug 30, 2024 pm 04:28 PM
TimeStamp to Date in Java
Aug 30, 2024 pm 04:28 PM
Guide to TimeStamp to Date in Java. Here we also discuss the introduction and how to convert timestamp to date in java along with examples.
 Java Program to Find the Volume of Capsule
Feb 07, 2025 am 11:37 AM
Java Program to Find the Volume of Capsule
Feb 07, 2025 am 11:37 AM
Capsules are three-dimensional geometric figures, composed of a cylinder and a hemisphere at both ends. The volume of the capsule can be calculated by adding the volume of the cylinder and the volume of the hemisphere at both ends. This tutorial will discuss how to calculate the volume of a given capsule in Java using different methods. Capsule volume formula The formula for capsule volume is as follows: Capsule volume = Cylindrical volume Volume Two hemisphere volume in, r: The radius of the hemisphere. h: The height of the cylinder (excluding the hemisphere). Example 1 enter Radius = 5 units Height = 10 units Output Volume = 1570.8 cubic units explain Calculate volume using formula: Volume = π × r2 × h (4
 How to Run Your First Spring Boot Application in Spring Tool Suite?
Feb 07, 2025 pm 12:11 PM
How to Run Your First Spring Boot Application in Spring Tool Suite?
Feb 07, 2025 pm 12:11 PM
Spring Boot simplifies the creation of robust, scalable, and production-ready Java applications, revolutionizing Java development. Its "convention over configuration" approach, inherent to the Spring ecosystem, minimizes manual setup, allo
