

Fix for BlueStacks not functioning properly after enabling Hyper-V

Are you seeing " BlueStacks can't start when Hyper-V is enabled " when trying to start the BlueStacks application on your system? Actually, older versions of BlueStacks do directly conflict with Hypervisor or Hyper-V. However, some versions of Bluestacks officially support Hyper-V. Therefore, there are two simple ways to solve this problem.
Method 1 – Disable Hyper-V functionality
Method 2 – Install new Bluestacks with Hyper-V support
We have described both processes in detail so that you can Choose the right solution that best suits your situation.
Method 1 – Disable Hyper-V Feature
Hyper-V is an optional feature on your system and may conflict with some Bluestacks clients. Therefore, you can disable Hyper-V in the future. However, it can affect other virtual machines. There are two methods for disabling Hyper-V functionality.
Fix 1 – Using Windows Features
You can easily disable this feature by following these simple steps.
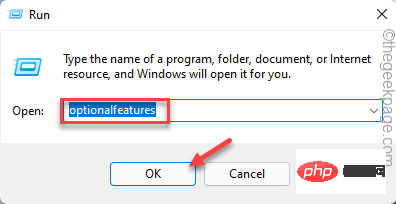
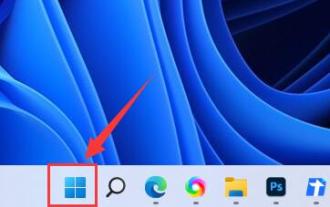
1. Just press the Windows key and R key combination to open the running terminal.
2. Then, click "OK".
#The Windows Function Panel will open in a few seconds.
3. Slowly scroll down to find the "Hyper-V" function.
4. Simply, uncheck the box next to "Hyper-V". Now, just click OK at the bottom to disable these Hyper-V features.
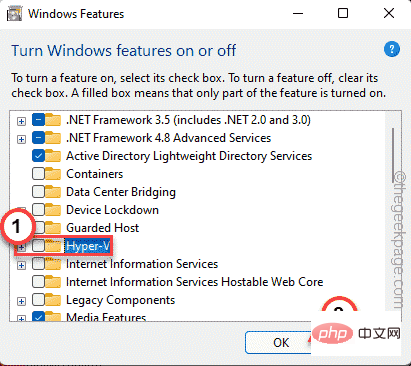
Restart" to restart the system.
This is critical because Windows completes the process when the system restarts.
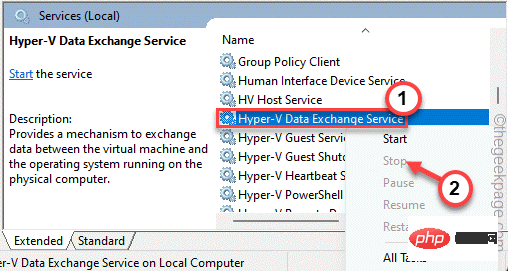
Win key and the R key at the same time.
2. Enter "services.msc" and press Enter key.

Hyper-V Data Exchange Service" service.
4. Once you find the service, right-click it and "Stop" to stop the service.
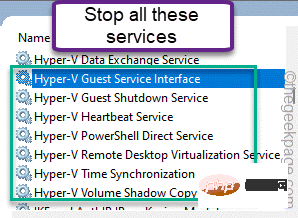
Hyper-V 访客服务接口Hyper-V PowerShell 直接服务Hyper-V 时间同步服务
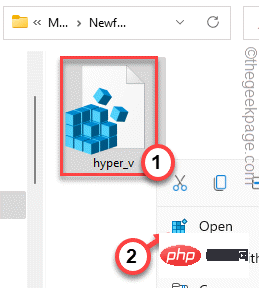
extract the registry file directly from the zip file.
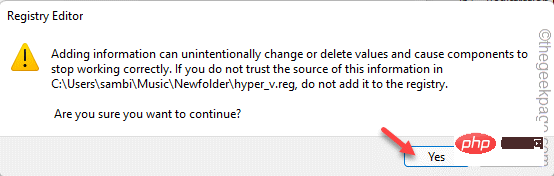
hyper_v " file and click "Open" to merge the registry file with your system registry.
is" to merge the registry files.
restart the system. Once completed, further try opening Hyper-v again. Test if this works.
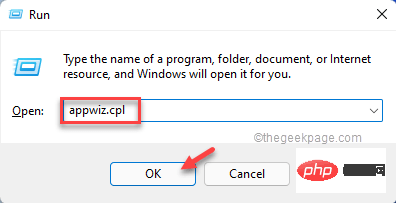
Method 2 – Uninstall BlueStacksYou can uninstall BlueStacks that interferes with Hyper-V and then reinstall the version that supports Hyper-V natively. Step 1 – Uninstall BLUESTACKSJust uninstall Bluestacks from your system.1. Uninstalling BlueStacks from your system is very easy. To do this, just press the Win key and the R key at the same time.
2. Then, enter “ appwiz.cpl ” and click “ OK ”.
3. Once opened, look for the “ Bluestacks ” application among all other installed applications.
4. Simply right-click on the application and click "Uninstall" to uninstall the application from the system.
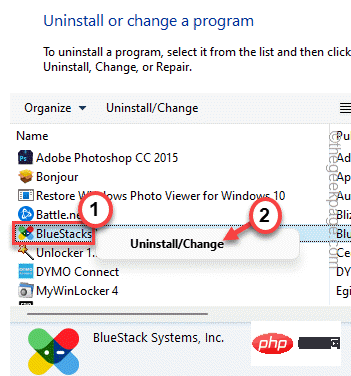
#4. In the uninstaller window, make sure the "Delete Bluestacks User Data" box is checked.
5. Then, click on “Uninstall” to uninstall BlueStacks from the system.

restart the system.
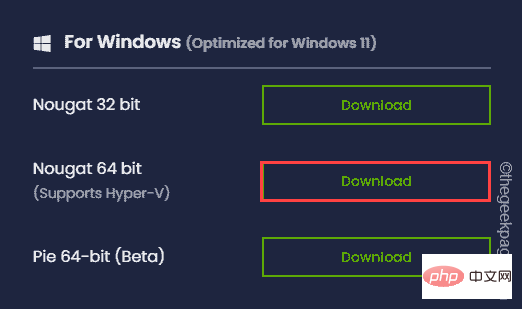
Step 2 – Download and install BLUESTACKS for Hyper-V supportYou can download and install Bluestacks for Hyper-V support. 1. Open the blue stack. 2. Once you reach the website, click "View all versions" under the download section.

Download" next to "Nougat 64 bit" to download it.
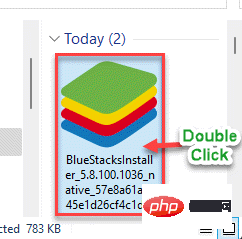
double-click the bluestacks installer you just downloaded.
The above is the detailed content of Fix for BlueStacks not functioning properly after enabling Hyper-V. For more information, please follow other related articles on the PHP Chinese website!

Hot AI Tools

Undresser.AI Undress
AI-powered app for creating realistic nude photos

AI Clothes Remover
Online AI tool for removing clothes from photos.

Undress AI Tool
Undress images for free

Clothoff.io
AI clothes remover

AI Hentai Generator
Generate AI Hentai for free.

Hot Article
Hot Tools

Notepad++7.3.1
Easy-to-use and free code editor

SublimeText3 Chinese version
Chinese version, very easy to use

Zend Studio 13.0.1
Powerful PHP integrated development environment

Dreamweaver CS6
Visual web development tools

SublimeText3 Mac version
God-level code editing software (SublimeText3)
Hot Topics
 1378
1378
 52
52

 Fix: WD My Cloud doesn't show up on the network in Windows 11
Oct 02, 2023 pm 11:21 PM
Fix: WD My Cloud doesn't show up on the network in Windows 11
Oct 02, 2023 pm 11:21 PM
If WDMyCloud is not showing up on the network in Windows 11, this can be a big problem, especially if you store backups or other important files in it. This can be a big problem for users who frequently need to access network storage, so in today's guide, we'll show you how to fix this problem permanently. Why doesn't WDMyCloud show up on Windows 11 network? Your MyCloud device, network adapter, or internet connection is not configured correctly. The SMB function is not installed on the computer. A temporary glitch in Winsock can sometimes cause this problem. What should I do if my cloud doesn't show up on the network? Before we start fixing the problem, you can perform some preliminary checks:
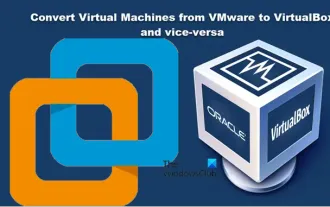 Convert VMware to VirtualBox and vice versa
Feb 19, 2024 pm 05:57 PM
Convert VMware to VirtualBox and vice versa
Feb 19, 2024 pm 05:57 PM
Virtual machines are an affordable way to experience and use multiple operating systems on a single computer. VMWare and VirtualBox are the two major brands in the virtual machine industry. You can easily convert a VMware virtual machine to a VirtualBox virtual machine and vice versa, giving you the flexibility to switch machines between them without having to recreate them. Migrating a virtual machine from VMWare to VirtualBox or vice versa is not complicated. Just follow the instructions below and it's easy to do. How to convert VMware to VirtualBoxVMwareVM is stored in .vmx format and then converted to .ovf, this is VirtualBox and VMWare
 How to install, configure and use the 'Windows Sandbox' feature
Feb 19, 2024 pm 01:00 PM
How to install, configure and use the 'Windows Sandbox' feature
Feb 19, 2024 pm 01:00 PM
Windows Sandbox is a feature built into the Windows 11 and Windows 10 operating systems that allows users to install and test unverified applications or visit websites in a lightweight virtual environment while protecting the main system from potential threats. Overall, this system provides a safe and isolated testing environment, similar to a virtual machine, but easier to use. Next, this article will introduce the detailed steps to install, configure and use the Windows Sandbox feature on Windows 11. Introduction to Windows Sandbox Features Windows Sandbox (also known as Windows Sandbox) is essentially a lightweight virtualization solution focused on providing efficient and secure virtual environments. compared to traditional
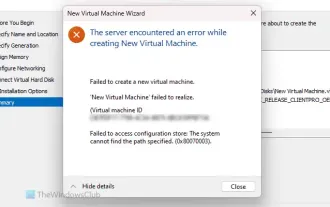 The server encountered an error, 0x80070003, while creating a new virtual machine.
Feb 19, 2024 pm 02:30 PM
The server encountered an error, 0x80070003, while creating a new virtual machine.
Feb 19, 2024 pm 02:30 PM
If you encounter error code 0x80070003 when using Hyper-V to create or start a virtual machine, it may be caused by permission issues, file corruption, or configuration errors. Solutions include checking file permissions, repairing damaged files, ensuring correct configuration, and more. This problem can be solved by ruling out the different possibilities one by one. The entire error message looks like this: The server encountered an error while creating [virtual machine name]. Unable to create new virtual machine. Unable to access configuration store: The system cannot find the path specified. (0x80070003). Some possible causes of this error include: The virtual machine file is corrupted. This can happen due to malware, virus or adware attacks. Although the likelihood of this happening is low, you can't completely
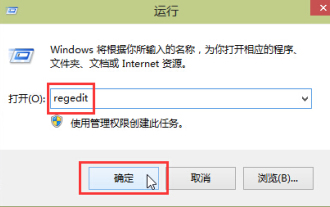 How to improve computer startup speed by modifying Windows 10 registry
Apr 19, 2024 am 08:01 AM
How to improve computer startup speed by modifying Windows 10 registry
Apr 19, 2024 am 08:01 AM
In the process of using the Windows 10 operating system, many users find that it takes a long time to start up their computers, which affects the user experience. In order to optimize the boot speed, some people have suggested that the purpose can be achieved by modifying the system registry. In response to this demand, this article will provide an in-depth analysis of how to effectively improve computer startup speed by properly adjusting Windows 10 registry settings. Let’s take a look below. Operation method 1. Use the "win+R" shortcut key to start running, enter "regedit", and click "OK" to open. 2. After entering the Registry Editor, click "HKEY_CURRENT_USERSoftwareMicrosoftWindowsCurren" in the left column
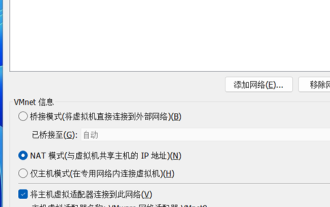 How to solve the problem that win11 virtual machine cannot connect to the network
Jan 04, 2024 pm 07:00 PM
How to solve the problem that win11 virtual machine cannot connect to the network
Jan 04, 2024 pm 07:00 PM
Many users have installed virtual machines on the win11 system after updating it, but many of them will be unable to connect to the network. So today I will bring you the solution to the problem that the win11 virtual machine cannot connect to the network. Come and see how to solve it. . What to do if the win11 virtual machine cannot connect to the network 1. First open the virtual machine and click "Edit - Virtual Network Editor - Restore Default Settings" in order. After doing this, it can be used. 2. In fact, in many cases it is due to changes in the network driver that the network cannot operate normally. You only need to reinstall the network module once! 3. If you encounter the problem that the network is suddenly cut off during use, even if the adapter has been configured correctly, the network will still be displayed.
 Detailed introduction to the location of the win11 virtual machine?
Jan 16, 2024 pm 08:00 PM
Detailed introduction to the location of the win11 virtual machine?
Jan 16, 2024 pm 08:00 PM
In win11, many friends want to use other operating systems through virtual machines, but they don’t know where the win11 virtual machine is. In fact, we only need to download a virtual machine software. Where is the win11 virtual machine: 1. Virtual machine platform 1. If we want to enable the virtual machine platform function, just click on the "Start Menu" first 2. Then search above and open "Turn on or off Windows features" 3. After turning it on, check Select "Hyper-V" and click "OK" to save. 2. Virtual machine 1. If we want to use a virtual machine similar to an emulator. 2. Then just download a "VMware" virtual machine software. If we want to use VMware, we also need to enable the above virtual machine
 How to convert a virtual machine to a physical machine?
Feb 19, 2024 am 11:40 AM
How to convert a virtual machine to a physical machine?
Feb 19, 2024 am 11:40 AM
Converting a virtual machine (VM) to a physical machine is the process of migrating a virtual instance and associated application software to a physical hardware platform. This conversion helps optimize operating system performance and hardware resource utilization. This article aims to provide an in-depth look at how to make this conversion. How to implement migration from virtual machine to physical machine? Typically, the conversion process between a virtual machine and a physical machine is performed outside the virtual machine by third-party software. This process consists of multiple stages involving the configuration of virtual machines and the transfer of resources. Prepare the physical machine: The first step is to ensure that the physical machine meets the hardware requirements for Windows. We need to back up the data on a physical machine as the conversion process will overwrite the existing data. *Username and password for an administrator account with administrator rights to create system images. will be virtual