 Technology peripherals
 AI
AI
 Customized training of deep learning models using transfer learning techniques
Customized training of deep learning models using transfer learning techniques
Translator|Zhu Xianzhong
Reviewer|Sun Shujuan
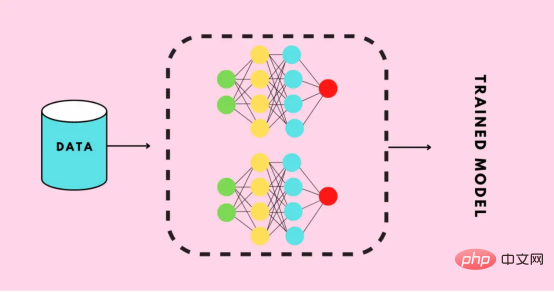
Transfer learning is a type of machine learning. It is an application that has been trained or Pre-trained neural network methods, and these pre-trained neural networks are trained using millions of data points.

The most famous use of this technology is to train deep neural networks, because this method shows good performance when using less data to train deep neural networks . In fact, this technique is also useful in the field of data science, because most real-world data usually does not have millions of data points to train a robust deep learning model.
Currently, many models exist that are trained using millions of data points, and these models can be used to train complex deep learning neural networks with maximum accuracy.
In this tutorial, you will learn the complete process of how to use transfer learning technology to train a deep neural network.
Implementing transfer learning using Keras programs
Before building or training a deep neural network, you must understand what options are available for transfer learning and which one must be used Solution to train complex deep neural networks for projects.
The Keras application is an advanced deep learning model that provides pre-trained weights that can be used for prediction, feature extraction, and fine-tuning. There are many ready-to-use models built into the Keras library, some of the popular models include:
- Xception
- VGG16 and VGG19
- ResNet Series
- MobileNet
【Supplement】The Keras application provides a set of deep learning models that can be used with pre-trained weights. For more specific content on these models, please refer to the Keras official website. In this article, you will learn about the application of MobileNet model in transfer learning.
Training a Deep Learning Model
In this section, you will learn how to build a custom deep learning model for image recognition in just a few steps , instead of writing any series of convolutional neural networks (CNN), you can just fine-tune the pre-trained model to train your model on the training data set. In this article, we build a deep learning model that will be able to recognize images of gesture language digits. Next, let’s get started building this custom deep learning model.
Get the data setTo start the process of building a deep learning model, you first need to prepare the data. You can do this by visiting a website called Kaggle, from Easily select the right dataset among millions of datasets. Of course, there are many other websites that provide available data sets for building deep learning or machine learning models. But the data set that this article will use is taken from the American Sign Language Digit Data Set provided by the Kaggle website.
Data PreprocessingAfter downloading the dataset and saving it to local storage, it is now time to perform some preprocessing on the dataset Such as preparing data, splitting data into train directory, valid directory and test directory, defining their paths and creating batch processing for training purposes, etc.
Preparing data
When downloading the data set, it contains a directory of data from 0 to 9, with three subfolders corresponding to input images, output images, and a name. A folder for CSV.
Next, delete the output images and CSV folders from each directory, move the contents of the input images folder to the main directory, and then delete the input images folder. Each master directory of the dataset now holds 500 images, and you can choose to keep all images. But for demonstration purposes, only 200 images from each directory are used in this article.
Finally, the structure of the data set will be as shown below:

Folder structure of the dataset
Split the dataset
Now, let’s start with Start by splitting the data set into three subdirectories: train, valid, and test.
- The train directory will contain the training data that will serve as input data to our model for learning patterns and irregularities.
- Thevalid directory will contain the validation data that will be fed into the model and will be the first unseen data seen by the model, which will help achieve maximum accuracy.
- The test directory will contain the test data used to test the model.
First, let’s import the libraries that will be used further in the code.
# 导入需要的库
import os
import shutil
import random
Below is the code to generate the required directory and move the data to a specific directory.
#创建三个子目录:train、valid和test,并把数据组织到其下
os.chdir('D:SACHINJupyterHand Sign LanguageHand_Sign_Language_DL_ProjectAmerican-Sign-Language-Digits-Dataset')

#如果目录不存在则创建相应的子目录
if os.path.isdir('train/0/') is False:
os.mkdir('train')
os.mkdir('valid')
os.mkdir('test')

for i in range(0, 10):
#把0-9子目录移动到train子目录下
shutil.move(f'{i}', 'train')
os.mkdir(f'valid/{i}')
os.mkdir(f'test/{i}')

#从valid子目录下取90个样本图像
valid_samples = random.sample(os.listdir(f'train/{i}'), 90)
for j in valid_samples:
#把样本图像从子目录train移动到valid子目录
shutil.move(f'train/{i}/{j}', f'valid/{i}')

#从test子目录下取90个样本图像
test_samples = random.sample(os.listdir(f'train/{i}'), 10)
for k in test_samples:
#把样本图像从子目录train移动到test子目录
shutil.move(f'train/{i}/{k}', f'test/{i}')

os.chdir('../..')In the above code, we first change the directory corresponding to the data set in local storage, and then check whether the train/0 directory already exists; if not, we will create the train, valid and test sub-directories respectively. Table of contents.
Then, we create subdirectories 0 to 9, move all data to the train directory, and create subdirectories 0 to 9 under the valid and test subdirectories.
We then iterate over subdirectories 0 to 9 within the train directory and randomly obtain 90 image data from each subdirectory and move them to the corresponding subdirectories within the valid directory.
The same is true for the test directory test.
【Supplement】 shutil module to perform advanced file operations in Python (manually copying or moving files or folders from one directory to another can be a very painful thing. For detailed tips, please Reference article https://medium.com/@geekpython/perform-high-level-file-operations-in-python-shutil-module-dfd71b149d32).
Define the path to each directory
After creating the required directory, you now need to define the three subdirectories of train, valid and test path.
#为三个子目录train、valid和test分别指定路径
train_path = 'D:/SACHIN/Jupyter/Hand Sign Language/Hand_Sign_Language_DL_Project/American-Sign-Language-Digits-Dataset/train'
valid_path = 'D:/SACHIN/Jupyter/Hand Sign Language/Hand_Sign_Language_DL_Project/American-Sign-Language-Digits-Dataset/valid'
test_path = 'D:/SACHIN/Jupyter/Hand Sign Language/Hand_Sign_Language_DL_Project/American-Sign-Language-Digits-Dataset/test'
Preprocessing
Pretrained deep learning models require some preprocessed data, which is very suitable for training. Therefore, the data needs to be in the format required by the pretrained model.
Before applying any preprocessing, let us import TensorFlow and its utilities, which will be used further in the code.
#导入TensorFlow及其实用程序
import tensorflow as tf
from tensorflow import keras
from tensorflow.keras.layers import Dense, Activation
from tensorflow.keras.optimizers import Adam
from tensorflow.keras.metrics import categorical_crossentropy
from tensorflow.keras.preprocessing.image import ImageDataGenerator
from tensorflow.keras.preprocessing import image
from tensorflow.keras.models import Model
from tensorflow.keras.models import load_model
#创建训练、校验和测试图像的批次,并使用Mobilenet的预处理模型进行预处理
train_batches = ImageDataGenerator(preprocessing_function=tf.keras.applications.mobilenet.preprocess_input).flow_from_directory(
directory=train_path, target_size=(224,224), batch_size=10, shuffle=True)
valid_batches = ImageDataGenerator(preprocessing_function=tf.keras.applications.mobilenet.preprocess_input).flow_from_directory(
directory=valid_path, target_size=(224,224), batch_size=10, shuffle=True)
test_batches = ImageDataGenerator(preprocessing_function=tf.keras.applications.mobilenet.preprocess_input).flow_from_directory(
directory=test_path, target_size=(224,224), batch_size=10, shuffle=False)
We use ImageDatagenerator, which takes a parameter preprocessing_function, in which we preprocess the image provided by the MobileNet model.
Next, call the flow_from_directory function, where we provide the path to the directory and dimensions of the images to be trained, since the MobileNet model is trained for images with 224x224 dimensions.
Next, the batch size is defined - defining how many images can be processed in one iteration, and then we randomly shuffle the order of image processing. Here, we do not randomly shuffle the images of the test data because the test data will not be used for training.
After running the above code snippet in Jupyter notebook or Google Colab, you will see the following results.

The output of the above code
The general application scenario of ImageDataGenerator is to augment data. The following is a guide to performing data augmentation using the ImageDataGenerator in the Keras framework.
Create the modelBefore fitting the training and validation data into the model, the deep learning model MobileNet needs to be created by adding output layers, removing unnecessary layers, and using Some layers are not trainable, allowing for better accuracy for fine-tuning.
The following code will download the MobileNet model from Keras and store it in the mobile variable. You need to be connected to the Internet the first time you run the following code snippet.
mobile = tf.keras.applications.mobilenet.MobileNet()
如果您运行以下代码,那么您将看到模型的摘要信息,在其中你可以看到一系列神经网络层的输出信息。
mobile.summary()
现在,我们将在模型中添加以10为单位的全连接输出层(也称“稠密层”)——因为从0到9将有10个输出。此外,我们从MobileNet模型中删除了最后六个层。
# 删除最后6层并添加一个输出层
x = mobile.layers[-6].output
output = Dense(units=10, activation='softmax')(x)
然后,我们将所有输入和输出层添加到模型中。
model = Model(inputs=mobile.input, outputs=output)
现在,我们将最后23层设置成不可训练的——其实这是一个相对随意的数字。一般来说,这一具体数字是通过多次试验和错误获得的。该代码的唯一目的是通过使某些层不可训练来提高精度。
#我们不会训练最后23层——这里的23是一个相对随意的数字
for layer in mobile.layers[:-23]:
layer.trainable=False
如果您看到了微调模型的摘要输出,那么您将注意到与前面看到的原始摘要相比,不可训练参数和层的数量存在一些差异。
model.summary()
接下来,我们要编译名为Adam的优化器,选择学习率为0.0001,以及损失函数,还有衡量模型的准确性的度量参数。
model.compile(optimizer=Adam(learning_rate=0.0001), loss='categorical_crossentropy', metrics=['accuracy'])
现在是准备好模型并根据训练和验证数据来开始训练的时候了。在下面的代码中,我们提供了训练和验证数据以及训练的总体轮回数。详细信息只是为了显示准确性进度,在这里您可以指定一个数字参数值为0、1或者2。
# 运行共10个轮回(epochs)
model.fit(x=train_batches, validation_data=valid_batches, epochs=10, verbose=2)
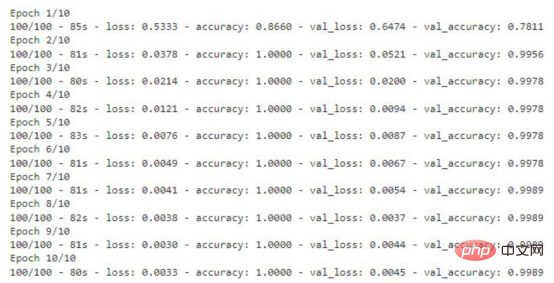
如果您运行上面的代码片断,那么您将看到训练数据丢失和准确性的轮回的每一步的输出内容。对于验证数据,您也能够看到这样的输出结果。

显示有精度值的训练轮回步数
存储模型
该模型现在已准备就绪,准确度得分为99%。现在请记住一件事:这个模型可能存在过度拟合,因此有可能对于给定数据集图像以外的图像表现不佳。
#检查模型是否存在;否则,保存模型
if os.path.isfile("D:/SACHIN/Models/Hand-Sign-Digit-Language/digit_model.h5") is False:
model.save("D:/SACHIN/Models/Hand-Sign-Digit-Language/digit_model.h5")上面的代码将检查是否已经有模型的副本。如果没有,则通过调用save函数在指定的路径中保存模型。
测试模型
至此,模型已经经过训练,可以用于识别图像了。本节将介绍加载模型和编写准备图像、预测结果以及显示和打印预测结果的函数。
在编写任何代码之前,需要导入一些将在代码中进一步使用的必要的库。
import numpy as np
import matplotlib.pyplot as plt
from PIL import Image
加载定制的模型
对图像的预测将使用上面使用迁移学习技术创建的模型进行。因此,我们首先需要加载该模型,以供后面使用。
my_model = load_model("D:/SACHIN/Models/Hand-Sign-Digit-Language/digit_model.h5")在此,我们通过使用load_model函数,实现从指定路径加载模型,并将其存储在my_model变量中,以便在后面代码中进一步使用。
准备输入图像
在向模型提供任何用于预测或识别的图像之前,我们需要提供模型所需的格式。
def preprocess_img(img_path):
open_img = image.load_img(img_path, target_size=(224, 224))
img_arr = image.img_to_array(open_img)/255.0
img_reshape = img_arr.reshape(1, 224,224,3)
return img_reshape
首先,我们要定义一个获取图像路径的函数preprocess_img,然后使用image实用程序中的load_img函数加载该图像,并将目标大小设置为224x224。然后将该图像转换成一个数组,并将该数组除以255.0,这样就将图像的像素值转换为0和1,然后将图像数组重新调整为形状(224,224,3),最后返回转换形状后的图像。
编写预测函数
def predict_result(predict):
pred = my_model.predict(predict)
return np.argmax(pred[0], axis=-1)
这里,我们定义了一个函数predict_result,它接受predict参数,此参数基本上是一个预处理的图像。然后,我们调用模型的predict函数来预测结果。最后,从预测结果中返回最大值。
显示与预测图像
首先,我们将创建一个函数,它负责获取图像的路径,然后显示图像和预测结果。
#显示和预测图像的函数
def display_and_predict(img_path_input):
display_img = Image.open(img_path_input)
plt.imshow(display_img)
plt.show()
img = preprocess_img(img_path_input)
pred = predict_result(img)
print("Prediction: ", pred)上面这个函数display_and_predict首先获取图像的路径并使用PIL库中的Image.open函数打开该图像,然后使用matplotlib库来显示图像,然后将图像传递给preprep_img函数以便输出预测结果,最后使用predict_result函数获得结果并最终打印。
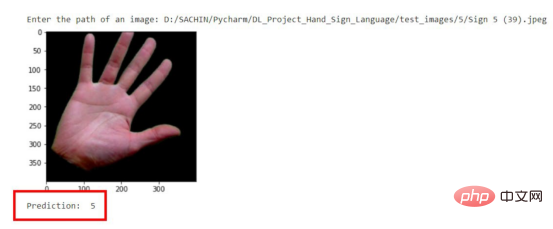
img_input = input("Enter the path of an image: ")
display_and_predict(img_input)如果您运行上面的程序片断并输入数据集中图像的路径,那么您将得到所期望的输出。

预测结果示意图
请注意,到目前为止该模型是使用迁移学习技术成功创建的,而无需编写任何一系列神经网络层相关代码。
现在,这个模型可以用于开发能够进行图像识别的Web应用程序了。文章的最后所附链接处提供了如何将该模型应用到Flask应用程序中的完整实现源码。
结论
本文中我们介绍了使用预先训练的模型或迁移学习技术来制作一个定制的深度学习模型的过程。
到目前为止,您已经了解了创建一个完整的深度学习模型所涉及的每一步。归纳起来看,所使用的总体步骤包括:
- 准备数据集
- 预处理数据
- 创建模型
- 保存自定义模型
- 测试自定义模型
最后,您可以从GitHub上获取本文示例项目完整的源代码。
译者介绍
朱先忠,51CTO社区编辑,51CTO专家博客、讲师,潍坊一所高校计算机教师,自由编程界老兵一枚。
原文标题:Trained A Custom Deep Learning Model Using A Transfer Learning Technique,作者:Sachin Pal
The above is the detailed content of Customized training of deep learning models using transfer learning techniques. For more information, please follow other related articles on the PHP Chinese website!

Hot AI Tools

Undresser.AI Undress
AI-powered app for creating realistic nude photos

AI Clothes Remover
Online AI tool for removing clothes from photos.

Undress AI Tool
Undress images for free

Clothoff.io
AI clothes remover

Video Face Swap
Swap faces in any video effortlessly with our completely free AI face swap tool!

Hot Article

Hot Tools

Notepad++7.3.1
Easy-to-use and free code editor

SublimeText3 Chinese version
Chinese version, very easy to use

Zend Studio 13.0.1
Powerful PHP integrated development environment

Dreamweaver CS6
Visual web development tools

SublimeText3 Mac version
God-level code editing software (SublimeText3)

Hot Topics
 1386
1386
 52
52
 This article will take you to understand SHAP: model explanation for machine learning
Jun 01, 2024 am 10:58 AM
In the fields of machine learning and data science, model interpretability has always been a focus of researchers and practitioners. With the widespread application of complex models such as deep learning and ensemble methods, understanding the model's decision-making process has become particularly important. Explainable AI|XAI helps build trust and confidence in machine learning models by increasing the transparency of the model. Improving model transparency can be achieved through methods such as the widespread use of multiple complex models, as well as the decision-making processes used to explain the models. These methods include feature importance analysis, model prediction interval estimation, local interpretability algorithms, etc. Feature importance analysis can explain the decision-making process of a model by evaluating the degree of influence of the model on the input features. Model prediction interval estimate
 Identify overfitting and underfitting through learning curves
Apr 29, 2024 pm 06:50 PM
This article will introduce how to effectively identify overfitting and underfitting in machine learning models through learning curves. Underfitting and overfitting 1. Overfitting If a model is overtrained on the data so that it learns noise from it, then the model is said to be overfitting. An overfitted model learns every example so perfectly that it will misclassify an unseen/new example. For an overfitted model, we will get a perfect/near-perfect training set score and a terrible validation set/test score. Slightly modified: "Cause of overfitting: Use a complex model to solve a simple problem and extract noise from the data. Because a small data set as a training set may not represent the correct representation of all data." 2. Underfitting Heru
 Transparent! An in-depth analysis of the principles of major machine learning models!
Apr 12, 2024 pm 05:55 PM
In layman’s terms, a machine learning model is a mathematical function that maps input data to a predicted output. More specifically, a machine learning model is a mathematical function that adjusts model parameters by learning from training data to minimize the error between the predicted output and the true label. There are many models in machine learning, such as logistic regression models, decision tree models, support vector machine models, etc. Each model has its applicable data types and problem types. At the same time, there are many commonalities between different models, or there is a hidden path for model evolution. Taking the connectionist perceptron as an example, by increasing the number of hidden layers of the perceptron, we can transform it into a deep neural network. If a kernel function is added to the perceptron, it can be converted into an SVM. this one
 The evolution of artificial intelligence in space exploration and human settlement engineering
Apr 29, 2024 pm 03:25 PM
In the 1950s, artificial intelligence (AI) was born. That's when researchers discovered that machines could perform human-like tasks, such as thinking. Later, in the 1960s, the U.S. Department of Defense funded artificial intelligence and established laboratories for further development. Researchers are finding applications for artificial intelligence in many areas, such as space exploration and survival in extreme environments. Space exploration is the study of the universe, which covers the entire universe beyond the earth. Space is classified as an extreme environment because its conditions are different from those on Earth. To survive in space, many factors must be considered and precautions must be taken. Scientists and researchers believe that exploring space and understanding the current state of everything can help understand how the universe works and prepare for potential environmental crises
 Implementing Machine Learning Algorithms in C++: Common Challenges and Solutions
Jun 03, 2024 pm 01:25 PM
Common challenges faced by machine learning algorithms in C++ include memory management, multi-threading, performance optimization, and maintainability. Solutions include using smart pointers, modern threading libraries, SIMD instructions and third-party libraries, as well as following coding style guidelines and using automation tools. Practical cases show how to use the Eigen library to implement linear regression algorithms, effectively manage memory and use high-performance matrix operations.
 Five schools of machine learning you don't know about
Jun 05, 2024 pm 08:51 PM
Machine learning is an important branch of artificial intelligence that gives computers the ability to learn from data and improve their capabilities without being explicitly programmed. Machine learning has a wide range of applications in various fields, from image recognition and natural language processing to recommendation systems and fraud detection, and it is changing the way we live. There are many different methods and theories in the field of machine learning, among which the five most influential methods are called the "Five Schools of Machine Learning". The five major schools are the symbolic school, the connectionist school, the evolutionary school, the Bayesian school and the analogy school. 1. Symbolism, also known as symbolism, emphasizes the use of symbols for logical reasoning and expression of knowledge. This school of thought believes that learning is a process of reverse deduction, through existing
 Explainable AI: Explaining complex AI/ML models
Jun 03, 2024 pm 10:08 PM
Translator | Reviewed by Li Rui | Chonglou Artificial intelligence (AI) and machine learning (ML) models are becoming increasingly complex today, and the output produced by these models is a black box – unable to be explained to stakeholders. Explainable AI (XAI) aims to solve this problem by enabling stakeholders to understand how these models work, ensuring they understand how these models actually make decisions, and ensuring transparency in AI systems, Trust and accountability to address this issue. This article explores various explainable artificial intelligence (XAI) techniques to illustrate their underlying principles. Several reasons why explainable AI is crucial Trust and transparency: For AI systems to be widely accepted and trusted, users need to understand how decisions are made
 To provide a new scientific and complex question answering benchmark and evaluation system for large models, UNSW, Argonne, University of Chicago and other institutions jointly launched the SciQAG framework
Jul 25, 2024 am 06:42 AM
Editor |ScienceAI Question Answering (QA) data set plays a vital role in promoting natural language processing (NLP) research. High-quality QA data sets can not only be used to fine-tune models, but also effectively evaluate the capabilities of large language models (LLM), especially the ability to understand and reason about scientific knowledge. Although there are currently many scientific QA data sets covering medicine, chemistry, biology and other fields, these data sets still have some shortcomings. First, the data form is relatively simple, most of which are multiple-choice questions. They are easy to evaluate, but limit the model's answer selection range and cannot fully test the model's ability to answer scientific questions. In contrast, open-ended Q&A


