

How to enter text and formulas into cells in Microsoft Excel

Adding formulas to cells in Excel is easy. Adding text is even easier. But how to add text and formula at the same time in one cell? Tried and failed? Well, not anymore, when Geek Page is here to help you.
In this article, we will detail how to easily add both text and formulas to a cell in an Excel worksheet with the help of multiple examples. You can make your content dynamic, so your various requirements for this can be easily fulfilled by following the steps detailed in our article. Hope you like it!
Example Scenario
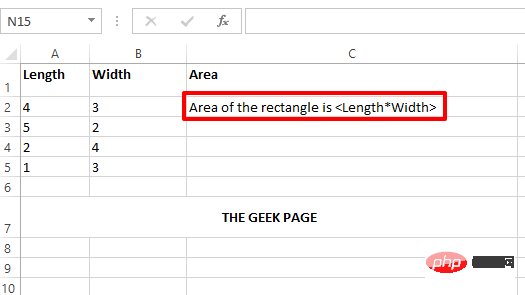
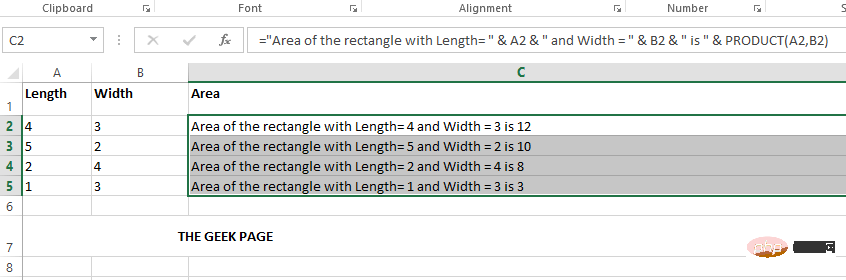
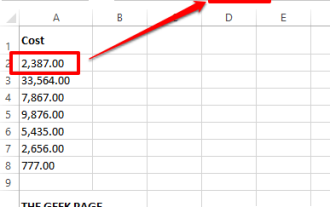
Suppose you have the following Excel table, which contains the Length column and the Width column. You need to fill the
This is just a sample scenario. By following the solution detailed here, you can include any text and any formula in the cells of your Excel worksheet.
Solution
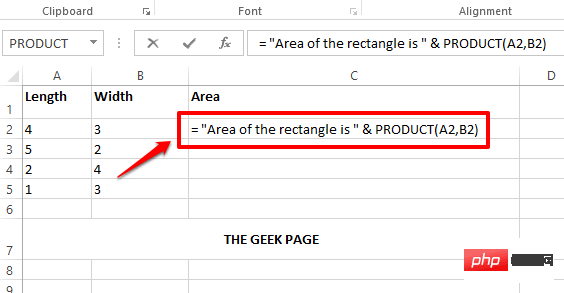
Step 1: First, enter a = symbol. Then, if you are typing text, enclose it in double quotes. To connect a formula to it, or add a variable in between, or add any dynamics, use the Connectionoperator&.
For example, in the example scenario mentioned in this article, you would place the rectangular text area first. So you need to double click on your cell and write the content as = "The rectangular area is". We enclose this part in double quotes because it is a text.
Now we need to calculate the area and append it to the text. So, put the concatenation operator & next. Then write the formula PRODUCT(A2, B2). PRODUCT formula will calculate the product of the given 2 cell values.
So, for this particular case, your final cell content will look like this.
="矩形的面积是" & PRODUCT(A2,B2)
Note: Dynamic means something that changes its value. For example, Area varies based on length and width. Dynamic content does not have double quotes. Static means something that does not change its value. For example, text content is static and should be enclosed in double quotes.
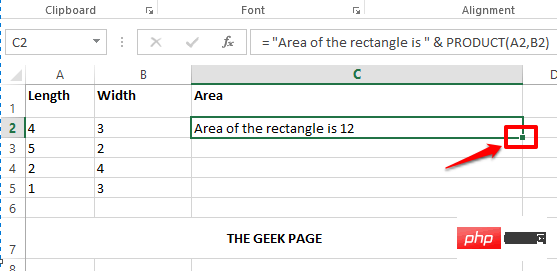
Step 2: After formatting all the cell contents, press Enter, you can see the area of the rectangle Calculated correctly and value replaced successfully.

Step 3: You can click on the cell and then click and drag the cell down in the lower right corner of the cell to apply the same formula and text to all cells in the same column.
Step 4 : Below is a screenshot showing how the formula is applied to the entire column .

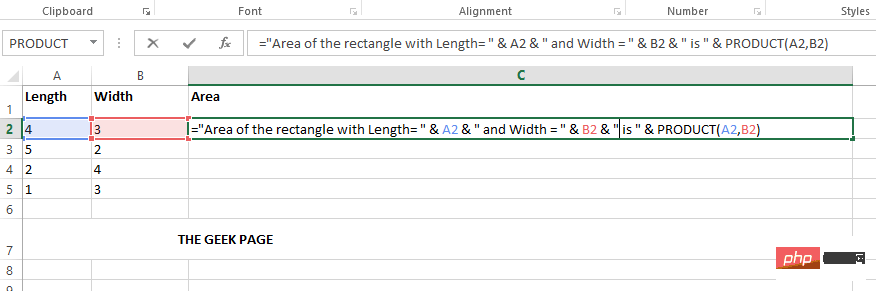
Step 5: Now let’s make your cells more dynamic. Suppose you want the text in cell to be formatted as a rectangular area with Length =
="Length= " & A2 & " 和 Width = " & B2 & " 的矩形区域是 " & PRODUCT(A2,B2)
Explanation
- First, I placed the = operator.
- Then enclose the text content in double quotes. That is, a rectangular area of length = is enclosed in double quotes.
- Next, I placed a & character to connect the dynamic content.
- Then include dynamic content by giving a cell id which is the length of the rectangle.
- Next, I need to put another & because I want to append a text.
- Then write the text again and surround it with double quotes. This time the text is " and Width = ".
- Similarly, & B2 & is placed to dynamically include the width into our cell value.
- The last text in our cell is "is".
- Finally, we need to append the PRODUCT formula, you need to add a & at the end.
- Then write the formula PRODUCT(A2,B2).
Follow the above steps and you can form any dynamic content inside the cell, it’s that simple. Just remember one golden rule. All dynamic need to be connected using & characters without double quotes, and all static ones need to be placed within double quotes.
Step 6: If you press the Enter key, you can see that all values are dynamically replaced, you can also Drag the same format to all cells in the same column as described in step 3.
The above is the detailed content of How to enter text and formulas into cells in Microsoft Excel. For more information, please follow other related articles on the PHP Chinese website!

Hot AI Tools

Undresser.AI Undress
AI-powered app for creating realistic nude photos

AI Clothes Remover
Online AI tool for removing clothes from photos.

Undress AI Tool
Undress images for free

Clothoff.io
AI clothes remover

AI Hentai Generator
Generate AI Hentai for free.

Hot Article
Hot Tools

Notepad++7.3.1
Easy-to-use and free code editor

SublimeText3 Chinese version
Chinese version, very easy to use

Zend Studio 13.0.1
Powerful PHP integrated development environment

Dreamweaver CS6
Visual web development tools

SublimeText3 Mac version
God-level code editing software (SublimeText3)
Hot Topics
 1378
1378
 52
52

 Excel found a problem with one or more formula references: How to fix it
Apr 17, 2023 pm 06:58 PM
Excel found a problem with one or more formula references: How to fix it
Apr 17, 2023 pm 06:58 PM
Use an Error Checking Tool One of the quickest ways to find errors with your Excel spreadsheet is to use an error checking tool. If the tool finds any errors, you can correct them and try saving the file again. However, the tool may not find all types of errors. If the error checking tool doesn't find any errors or fixing them doesn't solve the problem, then you need to try one of the other fixes below. To use the error checking tool in Excel: select the Formulas tab. Click the Error Checking tool. When an error is found, information about the cause of the error will appear in the tool. If it's not needed, fix the error or delete the formula causing the problem. In the Error Checking Tool, click Next to view the next error and repeat the process. When not
 How to set the print area in Google Sheets?
May 08, 2023 pm 01:28 PM
How to set the print area in Google Sheets?
May 08, 2023 pm 01:28 PM
How to Set GoogleSheets Print Area in Print Preview Google Sheets allows you to print spreadsheets with three different print areas. You can choose to print the entire spreadsheet, including each individual worksheet you create. Alternatively, you can choose to print a single worksheet. Finally, you can only print a portion of the cells you select. This is the smallest print area you can create since you could theoretically select individual cells for printing. The easiest way to set it up is to use the built-in Google Sheets print preview menu. You can view this content using Google Sheets in a web browser on your PC, Mac, or Chromebook. To set up Google
 How to embed a PDF document in an Excel worksheet
May 28, 2023 am 09:17 AM
How to embed a PDF document in an Excel worksheet
May 28, 2023 am 09:17 AM
It is usually necessary to insert PDF documents into Excel worksheets. Just like a company's project list, we can instantly append text and character data to Excel cells. But what if you want to attach the solution design for a specific project to its corresponding data row? Well, people often stop and think. Sometimes thinking doesn't work either because the solution isn't simple. Dig deeper into this article to learn how to easily insert multiple PDF documents into an Excel worksheet, along with very specific rows of data. Example Scenario In the example shown in this article, we have a column called ProductCategory that lists a project name in each cell. Another column ProductSpeci
 Convert VirtualBox fixed disk to dynamic disk and vice versa
Mar 25, 2024 am 09:36 AM
Convert VirtualBox fixed disk to dynamic disk and vice versa
Mar 25, 2024 am 09:36 AM
When creating a virtual machine, you will be asked to select a disk type, you can select fixed disk or dynamic disk. What if you choose fixed disks and later realize you need dynamic disks, or vice versa? Good! You can convert one to the other. In this post, we will see how to convert VirtualBox fixed disk to dynamic disk and vice versa. A dynamic disk is a virtual hard disk that initially has a small size and grows in size as you store data in the virtual machine. Dynamic disks are very efficient at saving storage space because they only take up as much host storage space as needed. However, as disk capacity expands, your computer's performance may be slightly affected. Fixed disks and dynamic disks are commonly used in virtual machines
 How to convert dynamic disk to basic disk on Windows 11
Sep 23, 2023 pm 11:33 PM
How to convert dynamic disk to basic disk on Windows 11
Sep 23, 2023 pm 11:33 PM
If you want to convert a dynamic disk to a basic disk in Windows 11, you should create a backup first as the process will erase all data in it. Why should you convert dynamic disk to basic disk in Windows 11? According to Microsoft, dynamic disks have been deprecated from Windows and their use is no longer recommended. Additionally, Windows Home Edition does not support dynamic disks, so you will not be able to access these logical drives. If you want to combine more disks into a larger volume, it is recommended to use Basic Disks or Storage Spaces. In this article, we will show you how to convert dynamic disk to basic disk on Windows 11 How to convert dynamic disk to basic disk in Windows 11? In the beginning
 How to remove commas from numeric and text values in Excel
Apr 17, 2023 pm 09:01 PM
How to remove commas from numeric and text values in Excel
Apr 17, 2023 pm 09:01 PM
On numeric values, on text strings, using commas in the wrong places can really get annoying, even for the biggest Excel geeks. You may even know how to get rid of commas, but the method you know may be time-consuming for you. Well, no matter what your problem is, if it is related to a comma in the wrong place in your Excel worksheet, we can tell you one thing, all your problems will be solved today, right here! Dig deeper into this article to learn how to easily remove commas from numbers and text values in the simplest steps possible. Hope you enjoy reading. Oh, and don’t forget to tell us which method catches your eye the most! Section 1: How to Remove Commas from Numerical Values When a numerical value contains a comma, there are two possible situations:
 How to find and delete merged cells in Excel
Apr 20, 2023 pm 11:52 PM
How to find and delete merged cells in Excel
Apr 20, 2023 pm 11:52 PM
How to Find Merged Cells in Excel on Windows Before you can delete merged cells from your data, you need to find them all. It's easy to do this using Excel's Find and Replace tool. Find merged cells in Excel: Highlight the cells where you want to find merged cells. To select all cells, click in an empty space in the upper left corner of the spreadsheet or press Ctrl+A. Click the Home tab. Click the Find and Select icon. Select Find. Click the Options button. At the end of the FindWhat settings, click Format. Under the Alignment tab, click Merge Cells. It should contain a check mark rather than a line. Click OK to confirm the format
 How to prevent Excel from removing leading zeros
Feb 29, 2024 am 10:00 AM
How to prevent Excel from removing leading zeros
Feb 29, 2024 am 10:00 AM
Is it frustrating to automatically remove leading zeros from Excel workbooks? When you enter a number into a cell, Excel often removes the leading zeros in front of the number. By default, it treats cell entries that lack explicit formatting as numeric values. Leading zeros are generally considered irrelevant in number formats and are therefore omitted. Additionally, leading zeros can cause problems in certain numerical operations. Therefore, zeros are automatically removed. This article will teach you how to retain leading zeros in Excel to ensure that the entered numeric data such as account numbers, zip codes, phone numbers, etc. are in the correct format. In Excel, how to allow numbers to have zeros in front of them? You can preserve leading zeros of numbers in an Excel workbook, there are several methods to choose from. You can set the cell by