How to bypass Windows 11 system requirements for installation

Microsoft’s Windows 11 announcement caused a lot of confusion and criticism due to strict hardware requirements. Windows 11 officially requires an 8th generation or newer Intel processor, 4GB RAM, 64GB storage, TPM 2.0 UEFI, and Secure Boot enabled.
While TPM 2.0 is not a major issue for most users, Windows 11 CPU requirements prevent many machines from upgrading to the new operating system.
The reason is that it will improve the performance and security of the latest operating systems. The problem is that relatively modern and powerful hardware can't keep up with the CPU requirements, meaning only the latest generation processors are eligible for upgrades.
As you probably know, there are many ways to bypass Windows 11’s CPU, TPM, and even RAM requirements. Microsoft has also published a tutorial on how to bypass the requirements and upgrade existing Windows 10 machines to Windows 11 without officially meeting the required specifications.
The official process requires users to manually modify the registry. If you don't want to change the registry yourself, you can now use Rufus to perform an in-place upgrade to Windows 11.
For those who don’t know, Rufus is a third-party tool that makes it easy to create a USB drive to install Windows on. Additionally, you can use Rufus to perform in-place upgrades to any version of Windows.

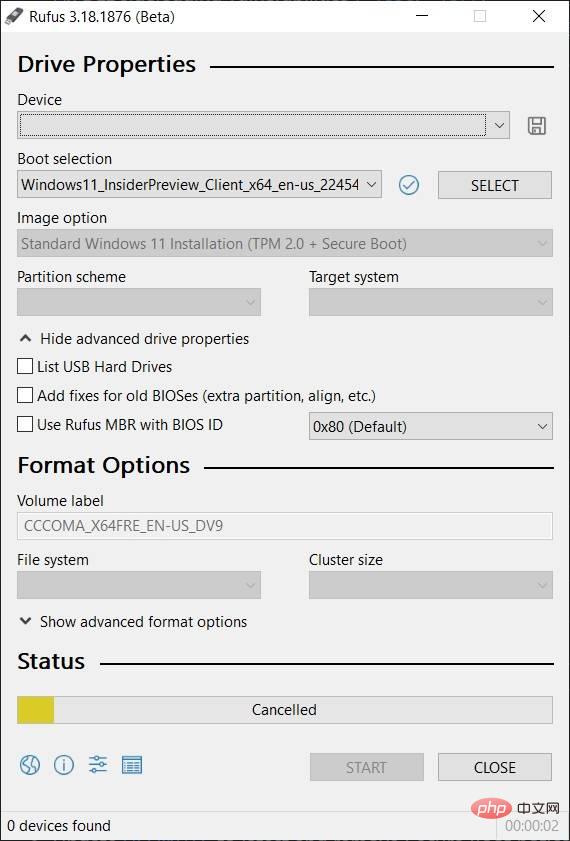
Starting with Rufus 3.18, you can create bootable Windows 11 media and easily bypass TPM 2.0 or the TPM itself.
First, install Rufus 3.18 beta from Github, download the Windows 11 ISO, plug in the USB device, and select the "Standard Windows 11 Installation (TPM 2.0 Secure Boot)" option if the configuration includes TPM, or select No TPM Second option on your device.
Bypassing Windows 11 CPU Requirements
If you wish to bypass these requirements without using a third-party application like Rufus, the registry cracking process is also simple:
- Execute Win r and type regedit.
- Navigate to HKEY_LOCAL_MACHINE\SYSTEM\Setup\MoSetup
- Right click on the left and create a new DWORD (32-bit) value.
- Set its name to AllowUpgradesWithUnsupportedTPMOrCPU.
- Switch the value to 1.
The Rufus or register hack method should help you install the operating system on unsupported hardware. For registry hacking, you must meet the TPM requirements anyway. If you don't have a TPM, make sure to follow the first method, which involves a third-party tool like Rufus.
The above is the detailed content of How to bypass Windows 11 system requirements for installation. For more information, please follow other related articles on the PHP Chinese website!

Hot AI Tools

Undresser.AI Undress
AI-powered app for creating realistic nude photos

AI Clothes Remover
Online AI tool for removing clothes from photos.

Undress AI Tool
Undress images for free

Clothoff.io
AI clothes remover

AI Hentai Generator
Generate AI Hentai for free.

Hot Article

Hot Tools

Notepad++7.3.1
Easy-to-use and free code editor

SublimeText3 Chinese version
Chinese version, very easy to use

Zend Studio 13.0.1
Powerful PHP integrated development environment

Dreamweaver CS6
Visual web development tools

SublimeText3 Mac version
God-level code editing software (SublimeText3)

Hot Topics
 How to solve the problem of location services being grayed out in Windows 10/11?
Apr 26, 2023 pm 03:49 PM
Location services are an important feature for some applications on Windows, depending on the location of your system. So if you see the Location Services option grayed out on your system, you can't even toggle it manually. Usually, some system glitch causes this issue and you can easily fix it by following these simple solutions. Fix 1 – Adjust the registry You can adjust the registry to fix this greyed out location services issue. 1. Press the Win key and type "Registry". 2. Then, click "Registry Editor" to open the Registry Editor on your system. 3. You will delete a specific registry subdirectory. Usually, it won't affect your system at all. However, it is recommended that you perform a system backup. one. After opening the Registry Editor, click
 Check if Lenovo laptop supports TPM? How to turn on and off TPM on Lenovo laptop?
Mar 14, 2024 am 08:30 AM
Recently, some Lenovo notebook partners have upgraded their systems to Win11. At this time, they need to check the computer to see if it supports TPM. If the computer supports TPM, it can be turned on in the motherboard BIOS. But how to enable the tpm function on Lenovo computers? Does it support opening? The following tutorial will introduce in detail the TPM activation of Lenovo notebooks. 1. Check whether TPM is supported 1. Right-click the start menu-Run (or press the Win+R keys on the keyboard), enter TPM.msc-press Enter. 2. As shown in the red box in the figure below, "TPM is ready for use" indicates that the machine supports TPM, and the version is version 2.0 shown in the red box below. 3. If
 Fix: WD My Cloud doesn't show up on the network in Windows 11
Oct 02, 2023 pm 11:21 PM
If WDMyCloud is not showing up on the network in Windows 11, this can be a big problem, especially if you store backups or other important files in it. This can be a big problem for users who frequently need to access network storage, so in today's guide, we'll show you how to fix this problem permanently. Why doesn't WDMyCloud show up on Windows 11 network? Your MyCloud device, network adapter, or internet connection is not configured correctly. The SMB function is not installed on the computer. A temporary glitch in Winsock can sometimes cause this problem. What should I do if my cloud doesn't show up on the network? Before we start fixing the problem, you can perform some preliminary checks:
 How to disable core parking on Windows 10
May 16, 2023 pm 01:07 PM
If you are a Windows user and want to disable the core parking functionality in your system, this article will guide you through the process. What is core parking? The core parking function is a power saving mechanism. It puts some of your processors into a sleep mode that doesn't perform any tasks and consumes very little or no power. This helps reduce energy consumption and therefore heat in the system. These cores are unparked when needed. Few users need to disable this feature, especially gamers. Disabling this feature will improve your system performance. Disable Windows Core Parking using Windows Registry Editor Step 1: Use Windows + R keys simultaneously to open the run prompt. Step 2: At the run prompt
 Fix: Time sync fails on Windows 11
May 03, 2023 pm 08:46 PM
If your PC is not set with the correct date and time, then you will face multiple system-related issues. It is worth noting that multitasking on your PC will be hindered if the time is not synchronized or the time is set incorrectly. For example, if you download or save a file on your PC, the file information will contain adulterated information due to incorrect time. Since it's the system clock your PC uses to timestamp files, it's important to keep the time and date correct. Software or updates also rely on Internet-based authorization times, and if the time set on your PC is incorrect, then your PC may refuse these updates or install software. Normally, Windows 11 uses NTP (i.e. Network Time Protocol) to
 How to add jump list items on Windows 10 and 11
May 11, 2023 pm 04:31 PM
Jump list on Windows provides easy access to recent files. If you want to add jump list items on Windows, this tutorial will help you get started. Jump Lists on Windows 10 and Windows 11 allow easy access to recently used files, folders, and websites. However, you may want to display more than the 10 most recent items that Windows displays by default. You can make Windows display more items in your jump list by adjusting the registry. For example, you can set it to display about 15-20 items, which will display well on most monitors. This tutorial will show you how to use Windows 10 and Windows 10
 10 Ways to Fix Corrupted Registry Keys in Windows 11: A Step-by-Step Guide
May 15, 2023 pm 04:10 PM
Click to enter: ChatGPT tool plug-in navigation. Ordinary Windows users may never have to access the Windows registry, but various applications and Windows services do. If the registry keys go bad, you will experience various issues such as higher CPU usage, random system crashes, extended startup and shutdown times, and sub-par global performance. Needless to say, the registry must remain functioning properly. What is the Windows Registry? The Windows Registry is a system-wide repository of files and settings that stores important information about Windows, user preferences, applications, hardware, and many other important parts that make up your personal computer. This data is stored in "
 How to turn off notifications on Windows 11?
Apr 23, 2023 pm 01:28 PM
How to Block Notifications on Windows 11 You can easily block notifications on Windows 11 by following the steps below. To block your notifications: Open the Start menu and select Settings. Alternatively, you can directly press Windows key + I to open Settings. When settings open, click System in the list on the left, then click Notifications on the right. On the following screen, turn off notification options. Exit the Settings application. Going forward, application and system notifications will stop showing on the desktop. However, it's worth noting that some apps have their own built-in notification settings. In this case, you'll need to disable notifications directly from the app - but this is rare. By turning off notifications in Settings, you will eliminate


