How to Fix Volume Mixer Not Saving Settings on Windows 10/11
In Windows, Volume Mixer is used to adjust speaker sound and system sound for each device and application. But sometimes users face the problem that if they make any modifications in the volume mixer settings, they are not saved. This issue is mainly due to file corruption, outdated drivers, any setting changes required, etc. In this article, we have some solutions to fix volume mixer not saving any settings issue. Apply them and get rid of the problem. let's start!
Basic Check
Before applying any of the solutions below, please perform a basic check on your device to see if the issue has been resolved.
First, if you are using headphones or earphones, please check if the volume button is damaged. If damaged, replace the headset and check if the problem is resolved.
Second, restart the system and follow the steps below
Step 1 –Use the Windows I key together to open Window Settings
Step 2 –Click System
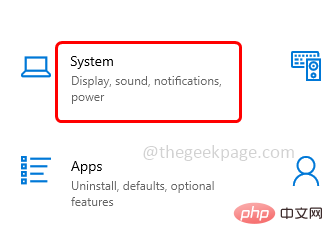
##Step 3 –On the left, click Sound
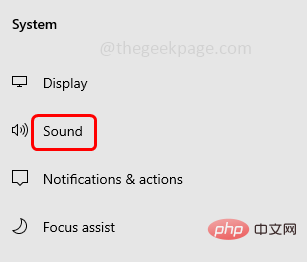
Step 4 –On the right side, scroll down and click on under Advanced Sound Options Application Volume and Device Preferences
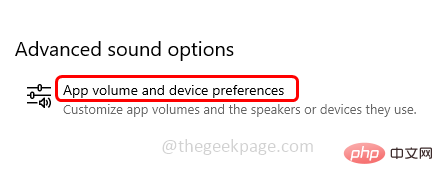
Mixer Options in the window search bar and press EnterKey
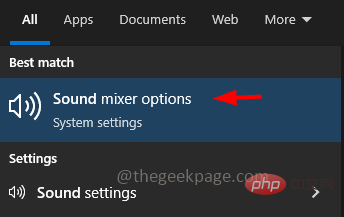
Step 5 –Find System Sound and move the slider to the right and adjust The volume of the application. Then check if the problem is resolved.
Advertising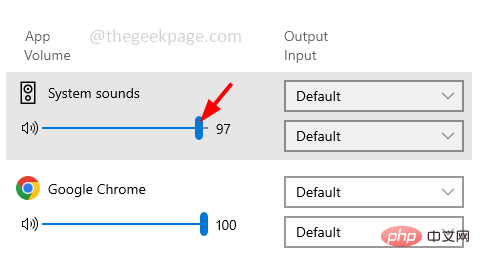 #If the above basic methods cannot solve the problem , please follow the solutions below.
Step 1 –
Also use the Windows R key to open Run Tip
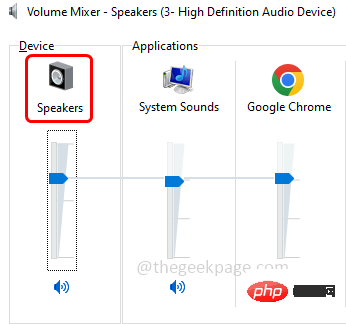
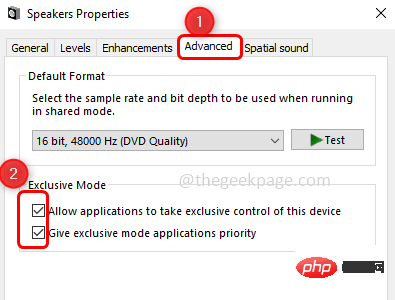
Step 2 –Type sndvol in the run prompt and press the Enter key. This will open the volume mixer window Step 3 –In the Devices section, click on Speakers ## Step 4 – Go to the Advanced tab Step 5 – In the Exclusive Mode section, Enable this Two options to allow applications to exclusively control this device and to give exclusive mode applications priority by clicking the checkbox next to them (a tick should be present in the checkbox No.) Step 6 –To save changes, click Apply and OK". Now check if the settings are being saved. Step 1 –Use the Windows I key to open Window Settings Step 2 –Click on Update and Security Step 3 – on the left side, click Troubleshooting Select Other Troubleshooting# on the right ##Step 5 – option and click the Run Troubleshooter button Step 6 – Method 3 – Update Audio Driver key to open the run promptStep 2 –Then type in the run prompt and press Enter key. This will open the Device Manager window Step 3 – Step 4 – Right-click on the name of the audio device and click
Step 5 – . If there is any latest driver then it will be installed Step 6 – Restart the Method 4 – Roll Back Audio Driver key to open the run promptStep 2 –Then type in the run prompt and press Enter key. This will open the Device Manager window Step 3 – Step 4 – Right-click the name of the audio device and click
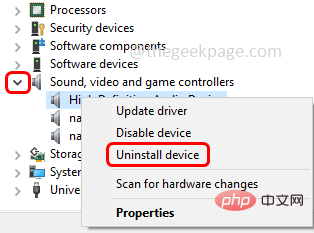
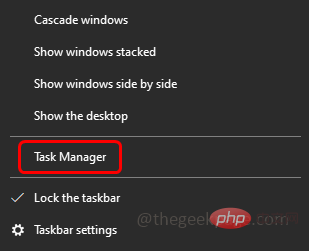
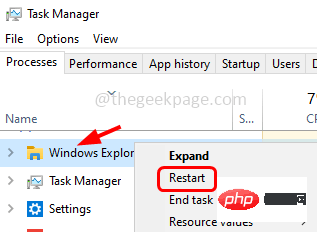
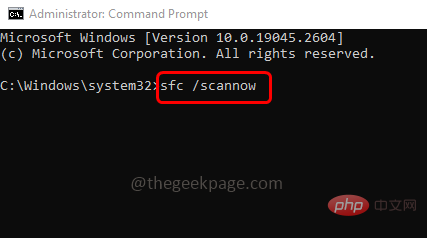
Step 5 – Tab Step 6 – Click button (if highlighted). If it's not highlighted, you don't have any previous drivers to rollback Step 7 – Restart the computer and check if the issue is resolved. Step 1 –Also use the Windows R key to open the run prompt Step 2 –Then type devmgmt.msc in the run prompt and press Enter key. This will open the Device Manager window Step 3 – Scroll down and expand Sound, Video by clicking on the arrow mark next to it and Game Controllers Step 4 – Right-click on the name of the audio device and clickUninstall Device Step 5 –In the confirmation pop-up, click UninstallButton Step 6 – Restart the computer and the driver will be installed automatically. Then check if the problem is resolved. Step 1 – Right click on the Tasksbar and Click Task Manager Step 2 –In the Task Manager window, right-clickWindow Explorer under the Processes tab Step 3 –From the list that appears, click Restart Step 4 –Now modify the settings in the volume mixer as needed and check if it is saving the settings and the issue is resolved Step 1 –Open Command Prompt# as Administrator ##. To do this, type cmd in the window search, then hold down the Ctrl Shift key and press the Enter key Steps 2 –A User Account Control window will open, click"Yes" Step 3 –In the command promptTypethe following command and then pressEnter key Step 4 – It will take a few seconds to complete the process. Once completed Restart the computer and check if the problem is resolved. 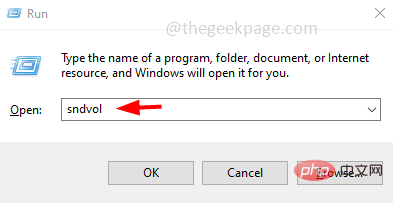
Method 2 – Run the Windows Audio Troubleshooter
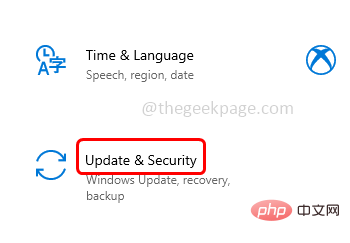
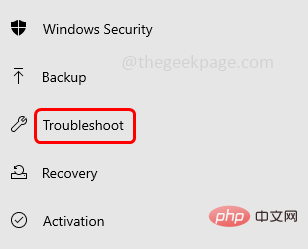
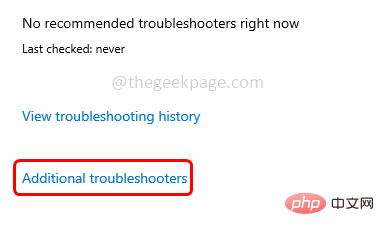 Select the
 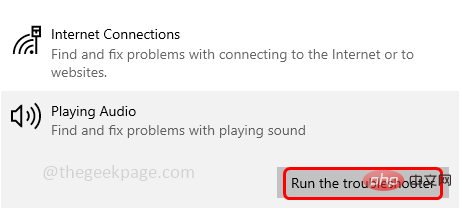 If there are any issues, it will detect and fix them. After the process is completed, check if the issue has been resolved.
Step 1 –Also use the
Windows R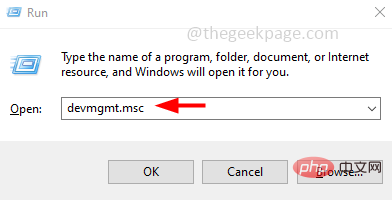 Scroll down and expand
 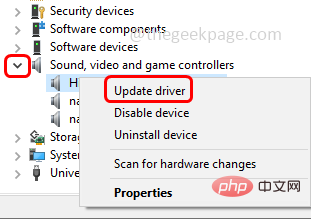 Click
Click 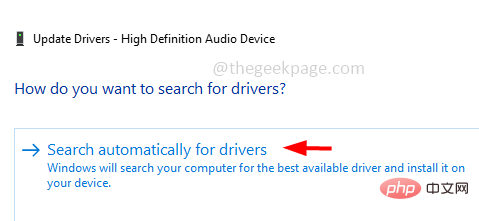 system and check if the issue is resolved.
Step 1 –Also use the
Windows R Scroll down and expand
 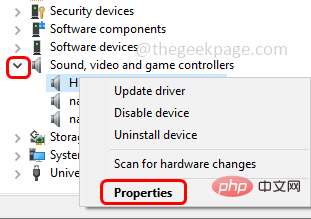 Go to
Go to 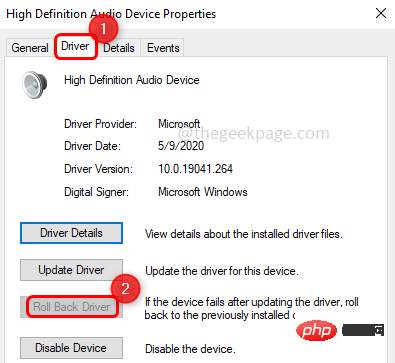
Method 5 – Uninstall Audio Driver

Method 6 – Restart the Windows Explorer process
Method 7 – Repair Corrupted System Files
sfc /scannow
The above is the detailed content of How to Fix Volume Mixer Not Saving Settings on Windows 10/11. For more information, please follow other related articles on the PHP Chinese website!

Hot AI Tools

Undresser.AI Undress
AI-powered app for creating realistic nude photos

AI Clothes Remover
Online AI tool for removing clothes from photos.

Undress AI Tool
Undress images for free

Clothoff.io
AI clothes remover

AI Hentai Generator
Generate AI Hentai for free.

Hot Article

Hot Tools

Notepad++7.3.1
Easy-to-use and free code editor

SublimeText3 Chinese version
Chinese version, very easy to use

Zend Studio 13.0.1
Powerful PHP integrated development environment

Dreamweaver CS6
Visual web development tools

SublimeText3 Mac version
God-level code editing software (SublimeText3)

Hot Topics
 This Apple ID is not yet in use in the iTunes Store: Fix
Jun 10, 2024 pm 05:42 PM
When logging into iTunesStore using AppleID, this error saying "This AppleID has not been used in iTunesStore" may be thrown on the screen. There are no error messages to worry about, you can fix them by following these solution sets. Fix 1 – Change Shipping Address The main reason why this prompt appears in iTunes Store is that you don’t have the correct address in your AppleID profile. Step 1 – First, open iPhone Settings on your iPhone. Step 2 – AppleID should be on top of all other settings. So, open it. Step 3 – Once there, open the “Payment & Shipping” option. Step 4 – Verify your access using Face ID. step
 How to fix red-eye on iPhone
Feb 23, 2024 pm 04:31 PM
So, you took some great photos at your last party, but unfortunately, most of the photos you took were of red eyes. The photo itself is great, but the red eyes in it kind of ruin the image. Not to mention, some of those party photos might be from your friends’ phones. Today we'll look at how to remove red eye from photos. What causes the red eyes in the photo? Red-eye often occurs when taking photos with flash. This is because the light from the flash shines directly into the back of the eye, causing the blood vessels under the eye to reflect the light, giving the effect of red eyes in the photo. Fortunately, with the continuous advancement of technology, some cameras are now equipped with red-eye correction functions that can effectively solve this problem. By using this feature, the camera takes pictures
 How to solve the problem of Win11 failing to verify credentials?
Jan 30, 2024 pm 02:03 PM
When a Win11 user uses credentials to log in, he or she receives an error message stating that your credentials cannot be verified. What is going on? After the editor investigated this problem, I found that there may be several different situations that directly or indirectly cause this problem. Let's take a look with the editor.
 An easy guide to fixing Windows 11 blue screen issues
Dec 27, 2023 pm 02:26 PM
Many friends always encounter blue screens when using computer operating systems. Even the latest win11 system cannot escape the fate of blue screens. Therefore, today I have brought you a tutorial on how to repair win11 blue screens. No matter whether you have encountered a blue screen or not, you can learn it first in case you need it. How to fix win11 blue screen method 1. If we encounter a blue screen, first restart the system and check whether it can start normally. 2. If it can start normally, right-click "Computer" on the desktop and select "Manage" 3. Then expand "System Tools" on the left side of the pop-up window and select "Event Viewer" 4. In the event viewer, we will You can see what specific problem caused the blue screen. 5. Then just follow the blue screen situation and events
 Comprehensive Guide to PHP 500 Errors: Causes, Diagnosis and Fixes
Mar 22, 2024 pm 12:45 PM
A Comprehensive Guide to PHP 500 Errors: Causes, Diagnosis, and Fixes During PHP development, we often encounter errors with HTTP status code 500. This error is usually called "500InternalServerError", which means that some unknown errors occurred while processing the request on the server side. In this article, we will explore the common causes of PHP500 errors, how to diagnose them, and how to fix them, and provide specific code examples for reference. Common causes of 1.500 errors 1.
 How to fix the volume cannot be adjusted in WIN10
Mar 27, 2024 pm 05:16 PM
1. Press win+r to open the run window, enter [regedit] and press Enter to open the registry editor. 2. In the opened registry editor, click to expand [HKEY_LOCAL_MACHINESOFTWAREMicrosoftWindowsCurrentVersionRun]. In the blank space on the right, right-click and select [New - String Value], and rename it to [systray.exe]. 3. Double-click to open systray.exe, modify its numerical data to [C:WindowsSystem32systray.exe], and click [OK] to save the settings.
 Fix aksfridge.sys blue screen error in Windows 11/10
Feb 11, 2024 am 11:30 AM
If you encounter aksfridge.sys blue screen error after upgrading to Windows 11 or Windows 10, this article will provide you with solutions. You can try the following methods to successfully resolve this issue. The genuine aksfridge.sys file is the software component of AladdinHASP from AladdinKnowledgeSystems. AladdinHASP (Hardware Anti-Software Piracy) is a suite of digital rights management (DRM) protection and licensing software. Aksfridge.sys is a filter driver necessary for HASP to function properly. This component adds support for specialized external devices. Hardware Anti-Software Piracy, also known as AladdinHAS
 How to fix the problem of being unable to access the Internet due to abnormal network card driver
Jan 06, 2024 pm 06:33 PM
Some friends find that their computers cannot access the Internet because of abnormal network card drivers. They want to know how to fix it. In fact, current systems have built-in driver repair functions, so we only need to manually update the driver. If it doesn’t work, then we can fix it. Driver software can be used. How to fix the problem that the network card driver is abnormal and cannot connect to the Internet: PS: If this problem occurs suddenly, you can try restarting the computer first. If it still doesn't work after restarting, continue with the following operations. Method 1: 1. First, right-click on the taskbar and select "Start Menu" 2. Open "Device Manager" in the right-click menu. 3. Click "Network Adapter", then select "Update Driver" and click "Automatically search for driver". After the update is completed, you can surf the Internet normally. 5. Some users are also affected by the problem.


