

How to enable touch drawing functionality in Microsoft Word

If you have a touch screen device, you will want to use the touch drawing feature in Microsoft Word. Using this feature, you can use your fingers to sketch directly on the screen without using a mouse. But this feature is not enabled by default. To use it, you must enable it manually from Word settings. In this article, let us see how to enable touch drawing functionality in Microsoft word.
Enable the "Draw with Touch" feature in Word
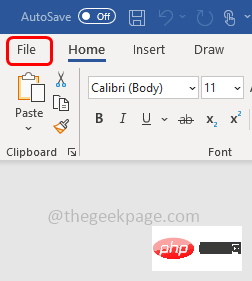
Step 1: Open the Microsoft Word document
Step 2: Click File in the upper left corner Tab
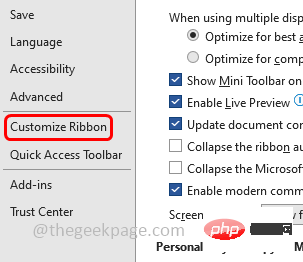
Step 3: Scroll down and click Options and the bottom left corner

Customize Ribbon from the window that opens
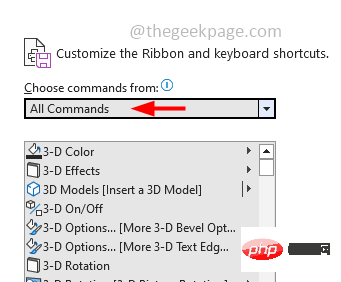
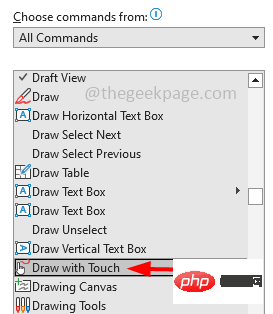
From the "Select a command from" drop-down list, select the"All commands" option
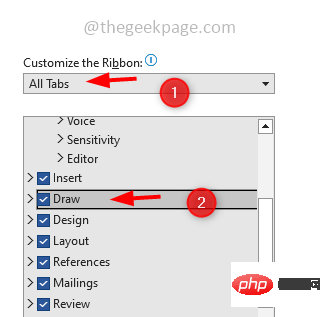
Customize the Ribbon# Under the ## column, select any all tags. Step 7: Select any option from the list. For example, here I will select
"Draw"
 Step 8: Go back to Select Command from Column again, scroll down and find
and click on it
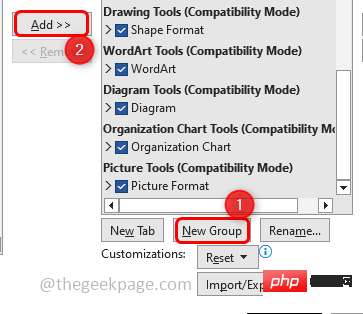
 Step 9: Then click on the New Group button and a
# will be created under the Draw tab ##Step 10: Now click "Add
" and you can see the "Touch Draw" option under the new group
Step 11: To save the changes, click 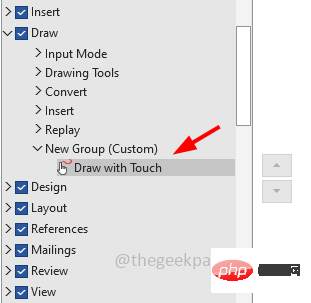 OK
OK
Step 12: Now, if you open the word document and click on the Drawing tab ( or the tab you selected in step 7), you can see at the top that the "Draw with Touch" option exists in the new group you created.
Step 13: Select the touch draw option and sketch with your finger. But please note that this feature only works on touch screen devices. 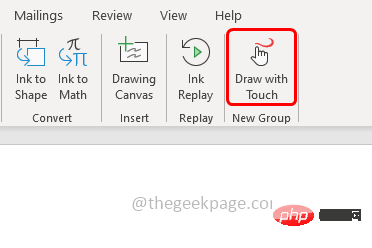
The above is the detailed content of How to enable touch drawing functionality in Microsoft Word. For more information, please follow other related articles on the PHP Chinese website!

Hot AI Tools

Undresser.AI Undress
AI-powered app for creating realistic nude photos

AI Clothes Remover
Online AI tool for removing clothes from photos.

Undress AI Tool
Undress images for free

Clothoff.io
AI clothes remover

AI Hentai Generator
Generate AI Hentai for free.

Hot Article
Hot Tools

Notepad++7.3.1
Easy-to-use and free code editor

SublimeText3 Chinese version
Chinese version, very easy to use

Zend Studio 13.0.1
Powerful PHP integrated development environment

Dreamweaver CS6
Visual web development tools

SublimeText3 Mac version
God-level code editing software (SublimeText3)
Hot Topics


 Fix: ERR_ADDRESS_UNREACHABLE error in Google Chrome
May 15, 2023 pm 06:22 PM
Fix: ERR_ADDRESS_UNREACHABLE error in Google Chrome
May 15, 2023 pm 06:22 PM
Several Windows users have complained that when they try to access some websites on Google Chrome browser on their systems, they are unable to access the web pages. It also displays a message on the browser saying "The site cannot be reached" with error code ERR_ADDRESS_UNREACHABLE. There could be many potential reasons behind this issue, it could be due to website server issues, proxy server settings, unstable internet connection, etc. If you encounter similar problems, don't panic. After deeply analyzing the problem in this article, we got a bunch of solutions. Before proceeding, try the following workarounds: Try checking if the user is trying to access the site from other devices and there are no issues, then this
 Logitech G Hub not working in Windows 11? Fix now
Apr 17, 2023 pm 08:16 PM
Logitech G Hub not working in Windows 11? Fix now
Apr 17, 2023 pm 08:16 PM
Logitech GHub is software that allows users to manage their Logitech peripherals. This software is compatible with Windows 11. However, some users reported that Logitech GHub does not work for them in Windows 11. Our readers have reported that when they try to launch the software, it gets stuck loading. Therefore, they cannot use the software when it does not open for them. Have you also tried fixing LogitechGHub not working in Windows 11? If so, the potential solutions below may launch LogitechGHub. What's the reason why Logitech GHub doesn't work in Windows 11? with many other
 Can't use MSI Afterburner in Windows 11? Try the following fixes.
May 09, 2023 am 09:16 AM
Can't use MSI Afterburner in Windows 11? Try the following fixes.
May 09, 2023 am 09:16 AM
MSIAfterburner is an overclocking tool suitable for most graphics cards. Apart from that, you can also use it to monitor the performance of your system. But some users reported that MSIAfterburner is not working in Windows 11. This may be due to several reasons, which we discuss in the following sections. However, when this happens, it prevents you from changing the performance or monitoring it while playing the game. As expected, this poses a significant challenge to gamers. That’s why we’ve dedicated this tutorial to help you understand the issue and walk you through the most effective fixes for MSIAfterburned not working in Windows 11 issue.
 How to fix preview pane not working in Windows 11
Apr 24, 2023 pm 06:46 PM
How to fix preview pane not working in Windows 11
Apr 24, 2023 pm 06:46 PM
One of the features that comes with Windows File Explorer is the preview pane, which displays a preview of the file you selected. This means you can view the contents of the file before opening it. The preview pane of File Explorer provides previews for different types of files such as Office-related documents, PDFs, text files, images, and videos. It usually works fine, but sometimes the file preview isn't available. Recently, many Windows 11 users have raised the issue that File Explorer’s preview pane is not working and they are unable to view file previews. Are you facing the issue of preview pane not working on your Windows computer? Then, continue reading this article. Here we have compiled a list of fixes that can help you fix
 Fix: VAN 1067 error when running Valorant on Windows 11
May 22, 2023 pm 02:41 PM
Fix: VAN 1067 error when running Valorant on Windows 11
May 22, 2023 pm 02:41 PM
The operating system looks much better than its predecessor and has gamer-oriented features like AutoHDR and DirectStorage, but Valorant players have had some trouble launching the game. This is not the first issue faced by gamers earlier, Valorant not opening on Windows 11 is another issue plaguing them but we have covered the ways to fix it. Now it seems that Valorant players who switched to Windows 11 are facing issues due to Secure Boot and TPM2.0 services, which causes the game menu to only show an exit option while running. Many users are getting the VAN1067 error, but it shouldn't be a cause for alarm
 To fix this, you need to use an interactive window station
Apr 24, 2023 pm 11:52 PM
To fix this, you need to use an interactive window station
Apr 24, 2023 pm 11:52 PM
This operation requires an interactive window station which is a rather strange bug. Software windows that allow users to interact with the app are not open, you need to enable them. This bug has been linked to the 2021 Printing Nightmare vulnerability. However, it continues to this day, affecting your computer and device drivers. Fortunately, it's easy to fix. Why does this error occur in the first place? Before describing how to fix this error, be sure to list the causes of this error. This way, you can take the necessary steps to ensure it doesn't happen again. Corrupted files are messing up your computer files – Corruption can be caused by a variety of reasons, from malware to power outages. It is recommended that you run an SFC scan. You have an overzealous antivirus app – antivirus software sometimes blocks
 DirectX function GetDeviceRemovedReason fails with error
May 17, 2023 pm 03:38 PM
DirectX function GetDeviceRemovedReason fails with error
May 17, 2023 pm 03:38 PM
Almost every high-end game we play relies on DirectX to run efficiently. However, some users reported encountering the DirectX function GetDeviceRemovedReasonfailedwith followed by the error reason. The above reasons are not self-evident to the average user and require some level of research to determine the root cause and the most effective solution. To make things easier, we've dedicated this tutorial to this problem. In the following sections, we will help you identify the potential causes and walk you through the troubleshooting steps to eliminate the DirectX function GetDeviceRemovedReasonfailedwitherror. what causes
 How to disable video autoplay in Opera browser?
Apr 22, 2023 pm 10:43 PM
How to disable video autoplay in Opera browser?
Apr 22, 2023 pm 10:43 PM
The latest version of the Opera browser includes a new automatic video popup feature. Using this feature, you will notice that the video will pop up automatically when you navigate to another tab in the browser. It has been noticed that this pop-up video can be resized and moved around the screen. When you navigate back to the Videos tab, it resumes and the floating window disappears. The video pop-up feature is useful for multitasking users who like to watch videos while working. However, not every Opera user will like this automatic video popup feature. If you are one of those Opera browser users who are annoyed by videos popping up every time you change tabs, then you have found the right post. Here we detail how to disable this popup in Opera