

Learn Python Celery and easily complete asynchronous tasks

Although modern web applications are faster and more convenient than ever, there are still many situations where heavy tasks need to be transferred to other parts of the system instead of working on the main thread.
Examples of these situations are as follows:
- Periodic tasks – jobs that are scheduled to run at specific intervals. For example, daily, monthly report generation.
- Third Party Tools - Applications should return responses to the user quickly, rather than waiting for other tasks to complete first. For example, send emails, notifications, communicate update progress to internal tools.
- Long-running jobs – jobs that perform complex or resource-expensive work and for which the user needs to wait for the job to complete. For example. DAG workflows, Map-Reduce based tasks, long-running Spark jobs, etc.
So, how to deal with these situations? At this time, Celery comes in handy.
What is Celery?
Celery is an open source task queue implementation, often combined with Python-based web frameworks such as Flask and Django, to execute tasks asynchronously outside of the typical request-response cycle.
So, Celery is essentially a task queue based on distributed messaging. Execution units or tasks are executed simultaneously on one or more workers using multiprocessing, gevent or eventlets. These tasks can be executed synchronously (i.e., wait until ready) or asynchronously (i.e., in the background).
How does Celery work?
Celery is a distributed task queue based on the producer-consumer model.
Task Queue is a mechanism for distributing work across threads and machines. It is essentially a message intermediary between producers (web applications) and consumers (Celery workers).
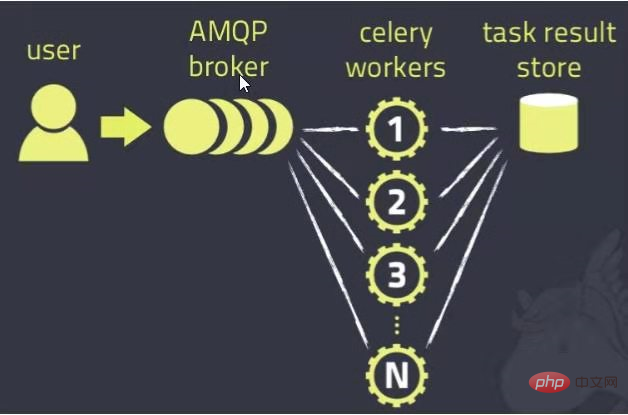
Celery interacts through messages, and the broker acts as an intermediary between clients (producers) and workers (consumers). To start a task, the client pushes a message to the queue, and the broker delivers the message to the worker.
The Celery system can be composed of multiple workers and brokers, which provides the possibility of high availability and horizontal expansion.
In short, the Celery client is the producer, which adds new tasks to the queue through the message broker. Then, Celery workers also obtain new tasks from the queue through the message broker. Once processed, the results are stored in the results backend.
Working Example
The following example will use RedisMQ as the message broker.
Set up Redis
On the linux/macOS system, run the Redis server locally by executing the following command:
$ wget http://download.redis.io/redis-stable.tar.gz
$ tar xvzf redis-stable.tar.gz
$ rm redis-stable.tar.gz
$ cd redis-stable
$ make
After setting up Redis, run the Redis server by executing the following command:
$ redis-server
The server runs on the default port 6379.
Set up the application
First, set up the Python project locally.
Celery can be installed through standard tools such as pip or easy_install. Install Celery and Redis through the following command:
pip install celery redis==4.3.4
Now you need a Celery instance to run the application. Any task implemented by Celery starts with an instance, such as creating and managing tasks.
Create a file tasks.py in the project:
From celery import Celery

broker_url = 'redi://localhost:6379/0'

app = Celery('tasks',broker = broker_url)

@app.task
def add(x, y):
return x+yA simple task add() is defined here to return the sum of two numbers.
Run Celery Worker
In the terminal, switch to the project location and run Celery worker with the following command:
$ celery -A tasks worker - loglevel=info
For more information about the Celery worker command line, you can use help:
$ celery worker - help
Calling tasks
In Celery, use the delay() method to call tasks.
Open another terminal window for the project and run the following command:
$ python
This will open the Python command line.
>> from tasks import add
>> add.delay(1,2)
This will return an AsyncResult instance, which can be used to check the status of the task, get its return value, wait for the task to complete, and also get exceptions and tracebacks on failure.
After running the add.delay() command, the task will be pushed to the queue and then acquired by the worker. This can be verified on the Celery worker terminal, where you can clearly see the task being received and then completed successfully.
The above is the detailed content of Learn Python Celery and easily complete asynchronous tasks. For more information, please follow other related articles on the PHP Chinese website!

Hot AI Tools

Undresser.AI Undress
AI-powered app for creating realistic nude photos

AI Clothes Remover
Online AI tool for removing clothes from photos.

Undress AI Tool
Undress images for free

Clothoff.io
AI clothes remover

Video Face Swap
Swap faces in any video effortlessly with our completely free AI face swap tool!

Hot Article
Hot Tools

Notepad++7.3.1
Easy-to-use and free code editor

SublimeText3 Chinese version
Chinese version, very easy to use

Zend Studio 13.0.1
Powerful PHP integrated development environment

Dreamweaver CS6
Visual web development tools

SublimeText3 Mac version
God-level code editing software (SublimeText3)
Hot Topics


 PHP and Python: Different Paradigms Explained
Apr 18, 2025 am 12:26 AM
PHP and Python: Different Paradigms Explained
Apr 18, 2025 am 12:26 AM
PHP is mainly procedural programming, but also supports object-oriented programming (OOP); Python supports a variety of paradigms, including OOP, functional and procedural programming. PHP is suitable for web development, and Python is suitable for a variety of applications such as data analysis and machine learning.
 Choosing Between PHP and Python: A Guide
Apr 18, 2025 am 12:24 AM
Choosing Between PHP and Python: A Guide
Apr 18, 2025 am 12:24 AM
PHP is suitable for web development and rapid prototyping, and Python is suitable for data science and machine learning. 1.PHP is used for dynamic web development, with simple syntax and suitable for rapid development. 2. Python has concise syntax, is suitable for multiple fields, and has a strong library ecosystem.
 Python vs. JavaScript: The Learning Curve and Ease of Use
Apr 16, 2025 am 12:12 AM
Python vs. JavaScript: The Learning Curve and Ease of Use
Apr 16, 2025 am 12:12 AM
Python is more suitable for beginners, with a smooth learning curve and concise syntax; JavaScript is suitable for front-end development, with a steep learning curve and flexible syntax. 1. Python syntax is intuitive and suitable for data science and back-end development. 2. JavaScript is flexible and widely used in front-end and server-side programming.
 Can vs code run in Windows 8
Apr 15, 2025 pm 07:24 PM
Can vs code run in Windows 8
Apr 15, 2025 pm 07:24 PM
VS Code can run on Windows 8, but the experience may not be great. First make sure the system has been updated to the latest patch, then download the VS Code installation package that matches the system architecture and install it as prompted. After installation, be aware that some extensions may be incompatible with Windows 8 and need to look for alternative extensions or use newer Windows systems in a virtual machine. Install the necessary extensions to check whether they work properly. Although VS Code is feasible on Windows 8, it is recommended to upgrade to a newer Windows system for a better development experience and security.
 Can visual studio code be used in python
Apr 15, 2025 pm 08:18 PM
Can visual studio code be used in python
Apr 15, 2025 pm 08:18 PM
VS Code can be used to write Python and provides many features that make it an ideal tool for developing Python applications. It allows users to: install Python extensions to get functions such as code completion, syntax highlighting, and debugging. Use the debugger to track code step by step, find and fix errors. Integrate Git for version control. Use code formatting tools to maintain code consistency. Use the Linting tool to spot potential problems ahead of time.
 PHP and Python: A Deep Dive into Their History
Apr 18, 2025 am 12:25 AM
PHP and Python: A Deep Dive into Their History
Apr 18, 2025 am 12:25 AM
PHP originated in 1994 and was developed by RasmusLerdorf. It was originally used to track website visitors and gradually evolved into a server-side scripting language and was widely used in web development. Python was developed by Guidovan Rossum in the late 1980s and was first released in 1991. It emphasizes code readability and simplicity, and is suitable for scientific computing, data analysis and other fields.
 How to run programs in terminal vscode
Apr 15, 2025 pm 06:42 PM
How to run programs in terminal vscode
Apr 15, 2025 pm 06:42 PM
In VS Code, you can run the program in the terminal through the following steps: Prepare the code and open the integrated terminal to ensure that the code directory is consistent with the terminal working directory. Select the run command according to the programming language (such as Python's python your_file_name.py) to check whether it runs successfully and resolve errors. Use the debugger to improve debugging efficiency.
 Is the vscode extension malicious?
Apr 15, 2025 pm 07:57 PM
Is the vscode extension malicious?
Apr 15, 2025 pm 07:57 PM
VS Code extensions pose malicious risks, such as hiding malicious code, exploiting vulnerabilities, and masturbating as legitimate extensions. Methods to identify malicious extensions include: checking publishers, reading comments, checking code, and installing with caution. Security measures also include: security awareness, good habits, regular updates and antivirus software.
