How to manually install Windows 10/11 updates using PowerShell
When any patch is released or any feature is introduced, it is important to update the system frequently. If we don't do this, then we miss out on critical bug fixes, weak security, software incompatibilities, and more. The system might just be acting strange, or the program might simply crash. Normally, we update the system by browsing settings and update and security and then check if there are any updates available. How else can you update if you can't access settings or update and security options? Probably few of us have this problem but the solution is simple and can also be done using PowerShell commands. In this article, let us learn how to update Windows 10 system manually using PowerShell commands.
Using PowerShell Commands to Update Windows 10
Windows gets updates from the Microsoft Update Server and checks our systems against it. To continue the installation and update process, we used a module called PSWindowsUpdate, which is a third-party module available in PowerShell.
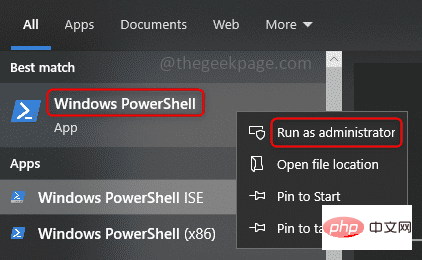
Step 1: Open PowerShell in administrator mode by typing PowerShell in the search bar and pressing Enter. Right-click PowerShell and click Run as administrator. A pop-up window will open asking for confirmation, click Yes.

Step 2: Copy the following command and paste it into the PowerShell window. Click to enter and wait a few seconds. It asks for confirmation of executing the policy, enter y for yes, then press enter. This command enables scripts that are allowed to run on your computer, basically it checks the trust policy.
设置执行策略远程签名

Step 3: The next step is to install the module or package. The following command installs the PSWindowsUpdate module required for Windows Update on your system. Copy and paste the command into PowerShell and press enter. It will take a few minutes for execution to begin, so please be patient. Once execution starts, it will ask for confirmation, enter y and press enter.
安装模块 PSWindowsUpdate

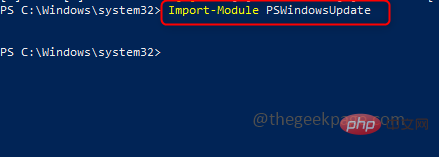
Step 4: The module is installed, now import the module into the current PowerShell session and use it to manage Windows Updates. Copy the following command, paste it into PowerShell, and press Enter.
导入模块 PSWindowsUpdate

Step 5: Now that the module is installed and imported, you can check the number of updates available on your computer before installing. The get command below checks for updates against the Microsoft update server and lists all updates that are available for your system. It also includes the KB (Knowledge Base) ID in the output, which may be needed later during the installation of updates. Copy the following command, paste it into PowerShell, and press Enter.
获取-WindowsUpdate

Note: You can also install only the specific updates you need and ignore the rest. This can be accomplished by executing the following command before step 6. It requires mentioning the KB (Knowledge Base) ID, so updates based on that specific ID will be ignored. Here, I only have 1 KB ID to update, so I'll go ahead with it and skip this command.
隐藏-WindowsUpdate- KBArticleID KB1234567
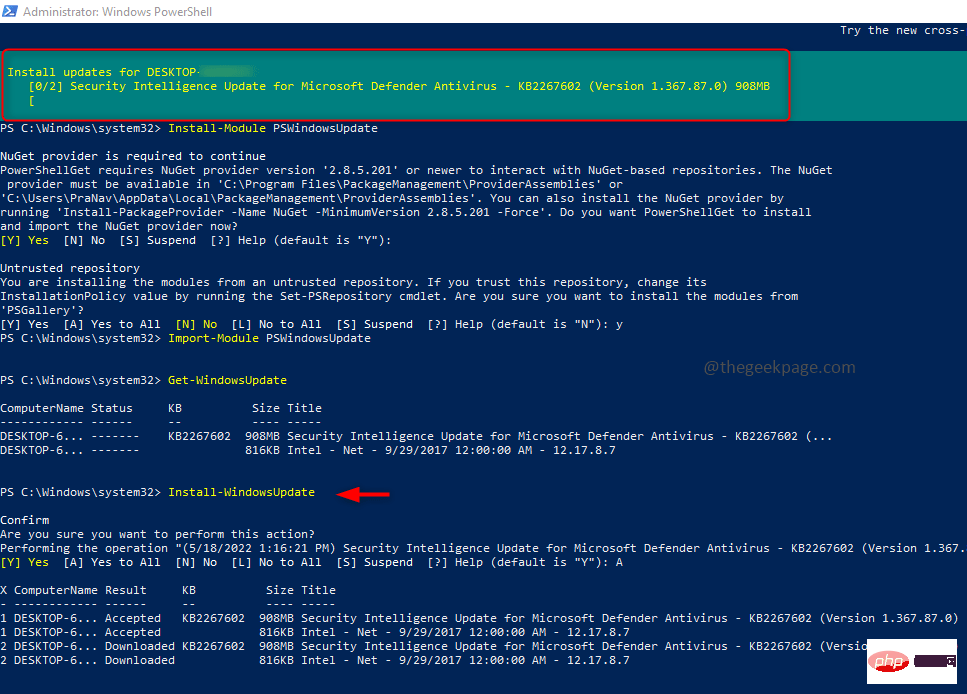
Step 6: To install all updates, please copypaste the following command into PowerShell, Then press Enter. It asks for confirmation, enter A for Yes to All, then press enter. This will install all updates listed above in the get command. You can also view the installation status at the top of the PowerShell window that appears in green.
安装-WindowsUpdate

 您还可以下载此 PC 修复工具以查找并修复任何 PC 问题:
第 1 步 -从此处下载 Restoro PC 修复工具
第 2 步- 单击开始扫描以自动查找并修复任何 PC 问题。
就是这样!是不是很简单,希望这篇文章对你有用,让你了解手动更新的过程。
The above is the detailed content of How to manually install Windows 10/11 updates using PowerShell. For more information, please follow other related articles on the PHP Chinese website!

Hot AI Tools

Undresser.AI Undress
AI-powered app for creating realistic nude photos

AI Clothes Remover
Online AI tool for removing clothes from photos.

Undress AI Tool
Undress images for free

Clothoff.io
AI clothes remover

Video Face Swap
Swap faces in any video effortlessly with our completely free AI face swap tool!

Hot Article

Hot Tools

Notepad++7.3.1
Easy-to-use and free code editor

SublimeText3 Chinese version
Chinese version, very easy to use

Zend Studio 13.0.1
Powerful PHP integrated development environment

Dreamweaver CS6
Visual web development tools

SublimeText3 Mac version
God-level code editing software (SublimeText3)

Hot Topics
 Windows 11 can't update the system reserved partition: 3 tips
Apr 26, 2023 pm 03:13 PM
While updating Windows 11 or upgrading from Windows 10 to Windows 11, you may encounter the error Wecouldnotupdatesystemreservedpartition. This may be accompanied by error code 0xc1900104, 0x800f0922 or 0xc1900201. What causes system reserved partition error? This may be caused by a full System Reserved Partition (SRP) that can no longer be written to. Additionally, some third-party security and antivirus applications write to the SRP and can fill it up quickly. Dual booting with Linux can also be the cause of this error. Additionally, if you
 Unable to delete ISO file opened in system: How to fix it
Apr 16, 2023 pm 02:25 PM
What is an ISO file? An ISO file is a file that contains an exact copy of an optical disc, such as a DVD or CD. This type of disc image can be installed on your computer and appear as if you have an optical drive connected to your computer and a CD or DVD containing data inserted into the drive. ISO files can also be used to burn new copies of the DVDs or CDs from which they were created, or simply to contain a large number of files in a single file that is easy to download. ISO files are often quite large; when you're done with them, you'll most likely want to
 How to resolve Microsoft Store error code 0x80073D02?
Apr 26, 2023 pm 06:31 PM
MicrosoftStore is a useful platform where you can download trusted games and apps for Windows. Sometimes when updating Windows or updating applications incorrectly, we encounter error code 0x80073D02 in Microsoft Store. This error prevents you from opening Microsoft Store or sometimes from updating apps. This is an annoying experience for users. Let's see how to get rid of this error. Method One: Resetting Windows Store Cache Corrupt entries in the cache can also add trouble and may lead to error code 0x80073D02. let's try
![How to dual-boot Windows 11 and macOS [Complete Guide]](https://img.php.cn/upload/article/000/000/164/168146628429366.jpg?x-oss-process=image/resize,m_fill,h_207,w_330) How to dual-boot Windows 11 and macOS [Complete Guide]
Apr 14, 2023 pm 05:58 PM
How to dual-boot Windows 11 and macOS [Complete Guide]
Apr 14, 2023 pm 05:58 PM
Windows 11 brought some major changes, many of which were widely accepted by users around the world. While you can dual-boot Windows 11 and Windows 10, what about other operating systems? Windows 11 can be used with different operating systems, and you can dual-boot Windows 11 and Linux if needed. Many people often ask, can I dual-boot Windows and macOS? The answer is yes. When it comes to macOS, the situation is no different. You can dual-boot macOS and Windows to use Windows software or play games on your Mac. Some people may use dual boot to try out macOS on their PC. Dual boot Win
 How to fix Windows 11 copy and paste function unresponsive issue?
Apr 26, 2023 pm 08:55 PM
Copying has always been a great way to save and share files. It allows you to create manual backups, perform simple transfers, and even make modifications that might damage the original file if not copied. However, this can sometimes be difficult if you have problems trying to use the clipboard on your Windows PC. Some Windows 11 users have recently been unable to use copy-paste on their systems. This issue can occur due to a number of reasons and if you are in the same boat, then you can fix it on your PC. How to Fix Copy-Paste on Windows 11 Since there are many issues that can cause copy-paste to malfunction on Windows, we have listed the most common solutions to fix this problem below. We recommend that you start with the first
 How to use Nishang, the PowerShell penetration testing tool
May 13, 2023 am 10:58 AM
Initial PowerShell, first let's understand the concept: PowerShell can be regarded as an upgraded version of cmd (bat scripting language), which is a scripting language on the Windows platform. It is object-oriented and closely related to .NetFrameWork. It can also be thought of as the bashshell on Windows. Windows PowerShell is a command line shell and scripting environment that enables command line users and script writers to take advantage of the power of the .NET Framework. It introduces a number of very useful new concepts, further extending what you get in the Windows Command Prompt and WindowsHost environments
 Fix: PowerShell cannot be opened or PowerShell has stopped working in Windows 11/10
Apr 24, 2023 pm 07:49 PM
Many users have reported issues with Windows PowerShell stopping working or not opening at all. One of the most common reasons for seeing the PowerShell has stopped working message is that there is a hidden virus on your computer. This in turn will slow down your system and other processes on the system will stop functioning. The error message does not provide any information about the cause of this problem, making it difficult to resolve. If you are annoyed with PowerShell not running or opening issues on your PC, then this article is for you. In this article, we have discussed some of the solutions you can use to fix this error. Fix 1 – Disable and re-enable Windows PowerShell 1. Use Ctr
 How to open PowerShell as administrator on Windows 11
May 10, 2023 pm 06:40 PM
How to Open PowerShell as Administrator on Windows 11 Running PowerShell with elevated or administrator-level permissions allows you to run commands that bypass Windows file protection, such as those used for Windows installation files. You can run PowerShell by opening PowerShell directly or by opening the new Windows Terminal application, which uses PowerShell to run commands by default. Open PowerShell as administrator on Windows 11: Open the start menu and type powershell or terminal. from the right


