

How to fix OneDrive shortcuts can't be moved error in Windows 11 or 10?

Sometimes you may want to share your OneDrive folder with other people, and for this you have to add a shortcut to the file, using the "Add shortcut to my files" option in the OneDrive app. The app will then create a shortcut in the root of the OneDrive of the person you want to share with. While moving folders from one directory to another is a fairly common and normal process, sometimes you may encounter an error message - "We are currently unable to move shortcuts and move shortcuts back to their original location."
Whenever you try to move files or folders to or within the OneDrive app, error messages appear as pop-ups. In fact, you may also encounter this error when opening a document. Some of the main reasons why you may see this error are when there is no shortcut in the folder, when you try to move a folder shortcut shared by another person, possible glitches in the root directory, file issues and folder permissions Etc
Whatever the reason, there are several methods that can help you fix OneDrive error "Cannot move shortcut" on Windows 11 PC.
Method 1: Check if the shortcut target is still available
Sometimes you may see an error because the target's shortcut must have been accidentally deleted, or you no longer have access to the shared file folder. In this case, launch a new tab on your browser and log in to your OneDrive account. Now, select the shortcut that created the question and click Delete.
Wait a moment and the shortcut should also be removed from File Explorer.
You can now create a new shortcut and should no longer encounter OneDrive errors.
Method 2: Unlink your PC
You can also unlink your PC to check if this helps you get rid of the "Cannot Mode Shortcut" error. Let's see how:
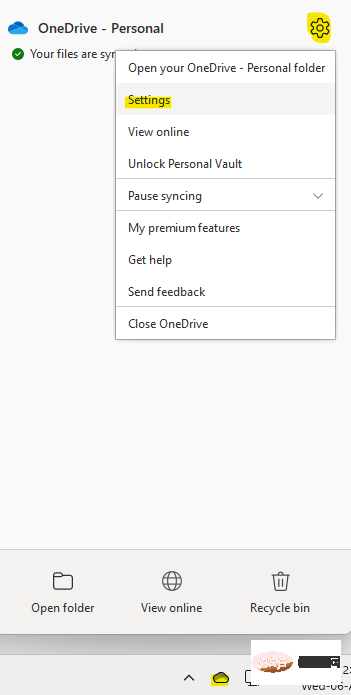
Step 1: Click to open the OneDrive app on the taskbar.
Next, click the gear-shaped Settings icon
Step 2: Click Settings in the menu.
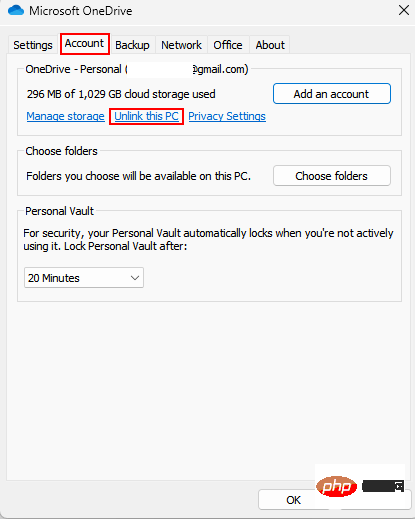
Step 3: In the Microsoft OneDrive Settings window, go to the "Account" option Card.
Here, click Unlink this PC link.
Wait a moment and then link your PC again.
You can now try moving the shared folder in the OneDrive app and you should not encounter the error again.
Method 3: Update OneDrive
If you are running an outdated version of the app, this may be the main reason why you are seeing the OneDrive shortcut error. Therefore, updating the app can help resolve the issue. That's it:
Step 1: Click to open the OneDrive app on the taskbar.
Next, click on the gear-shaped Settings icon. Now, click on Settings.
Step 2: In the Microsoft OneDrive Settings window, select the About tab.
Here, check the current OneDrive version under About Microsoft OneDrive application.

Step 3: Now, click on the following link to visit the OneDrive official website:
OneDrive web page
Here, look for the latest version available and if available, click on the Download OneDrive for Windows option to download and complete the update.
After updating the OneDrive app to the latest version, you should get rid of the shortcut error.
Method 4: Reset OneDrive
You can also try resetting OneDrive using Command Prompt and check if this helps resolve the error and allows you to move the shortcut:
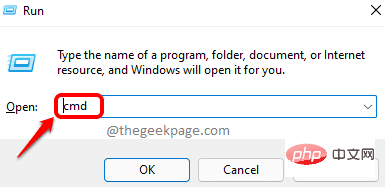
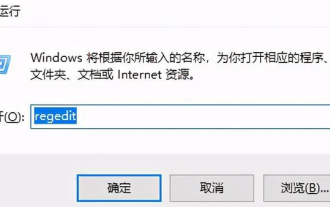
Step 1: Go to "Start", right-click it and select "Run" to open the "Run" commandwindow.
Step 2: In the Run Command window, type cmd in the search field and press Ctrl on your keyboard Shift Enter key to open an elevated command prompt.
Step 3: In the Command Prompt( admin) window, type the following command and press Enter:
%localappdata%\Microsoft\OneDrive\onedrive.exe /reset
After execution, close the command prompt window and restart the OneDrive app and the error should not reappear.
*Note – However, if the command returns the error message “Windows cannot find the path you mentioned”, run the following command:
C:\Program Files\Microsoft OneDrive\onedrive.exe /reset
Copy after loginC:\Program Files (x86)\Microsoft OneDrive\onedrive.exe /reset
Copy after loginNow, check if the issue is resolved.
Method 5: Re-establish sync
While restarting your PC can sometimes help resolve many issues, you can also try syncing the OneDrive app again. Just close the application and wait for some time.
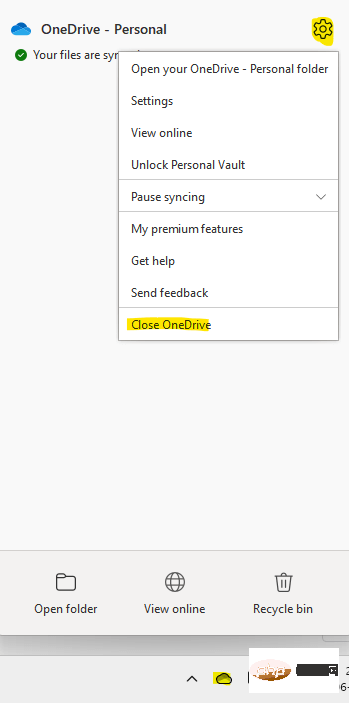
To close the OneDrive app, follow this process:
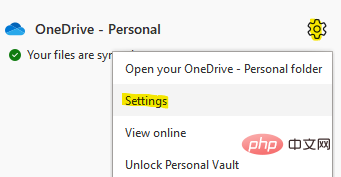
Step 1: Click to open on the taskbar OneDrive application.
Next, click on the gear-shaped Settings icon.
Step 2: Now, in the system tray, right-click on the cloud icon and click Close OneDrive.

After the application closes and a few minutes have elapsed, you can restart your PC and when the PC boots up, OneDrive should connect again and you should not see the error again.
Method 6: Move the shortcut back to the root folder
This error may also occur if you copied the shortcut from the root directory of OneDrive. Therefore, moving the shortcut back to the root directory may sometimes help solve the problem. Once you've done this, you can try moving the shortcut again to another location.
You can identify the name of the target shortcut mentioned in the error message or type the folder name in the search bar to bring up the problem shortcut.
Stop syncing folders and delete shortcuts
In this method, you have to stop syncing a folder and then delete its shortcuts. Let's see how to stop folder syncing:
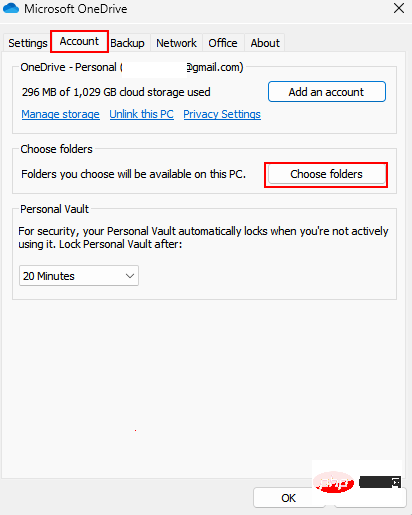
Step 1: Click to open the OneDrive app on the taskbar.
Step 2 – Next, click on the gear-shaped Settings icon. Now, click on Settings.
Step 3: In the Microsoft OneDrive settings dialog box, under the Account tab, go to the Select a folder section, Then click the "Select Folder" button.
Step 4: In the Select Folder window, uncheck the folder that contains the shortcut that created the question.
Press OK to apply the changes.
Step 5: Now, go to the folder and delete the shortcut.
Once done, create the shortcut again and try moving it without seeing the error again.
Delete a shortcut using OneDrive Web
If you can't delete a shortcut from the OneDrive app, you can try deleting the shortcut from the web version of OneDrive. Please follow the instructions below and see if this helps resolve the issue:
Step 1: Open a browser, visit the OneDrive website and use your Microsoft Login with user ID and password.
Step 2: Now, in the OneDrive web interface, look for the shortcut in question or use the search bar above to find it.
Step 3: After identifying the problematic shortcut, select it and click the Remove icon.
Step 4: Now, go to the left side of the interface and click on the Recycle Bin option.
Now you can easily move shared folders in OneDrive without getting the error again.
Remove shared folder shortcut from OneDrive
It is possible that the file or folder you want to move in the OneDrive app is a shared folder that no longer exists, or you no longer has access to the folder and hence you encounter “cannot move shortcut” error on your Windows 11 PC. Here's how to delete a shared folder shortcut:
Step 1: Go to your browser and open the web version of the OneDrive application.
Step 2: Next, navigate to the left side of the window and click "Sharing" to open a list of shared folders.
Step 3: Now, on the right side of the pane, select the file or folder in question.
Next, click on the Remove or Remove Shortcut option at the top.
This will delete the shortcut or remove the folder from the shared list.
If the shared folder is no longer available, it will be removed from your OneDrive app. However, if you want to access a shared folder again, you can ask the owner of the folder to share it again.
While this will remove the folder from the OneDrive app, you can still access it through the shared folder.
Turn off Office Upload
Sometimes, you may encounter errors when moving files in OneDrive due to a glitch in the automatic Office upload option. Let’s see how you can fix this issue and possibly get rid of the OneDrive error:
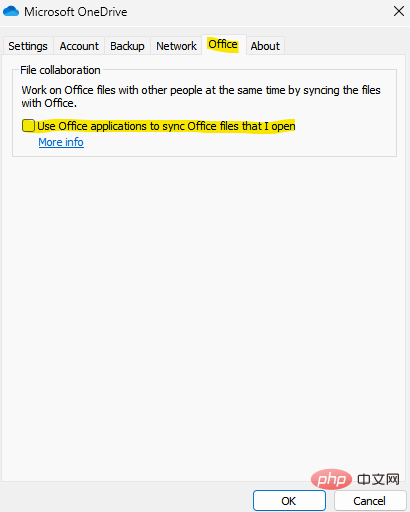
Step 1: Go to the right side of the taskbar and expand the system tray.
Now, right-click on the OneDrive application (cloud icon) in the system tray and select Settings from the menu.
Step 2: In the Microsoft OneDrive settings dialog box, select Office tab, and then under the File collaboration section, uncheck the box next to Use an Office app to syncmy open Office files.
Press OK to save changes and exit.
Now, open OneDrive again and check if the issue is resolved.
Select Folders to Sync
In this method, you will resync the folder you are having issues with. Let’s see how:
Step 1: Go to the bottom right of the taskbar and right-click on the cloud icon (OneDrive app).
Select Settings from the menu.
Step 2: In the "Settings" window, under the "Account" tab, click "Select Folder"button.
Step 3: In the Select Folder pop-up window, select several folders to synchronize.
Also, uncheck the box next to the folder that is causing the problem.
Press OK to save changes and allow OneDrive to sync.
Step 4: Now, repeat steps 1 and step 2, and then select the folder in the pop-up , also select the folder in question to sync it.
Press OK to save changes and let OneDrive sync again.
Now, check if the OneDrive error still exists.
Manage OneDrive Storage
Make sure to clean all junk files and folders in OneDrive regularly so that you have enough storage space in OneDrive. This is because less storage space can also cause problems, including error messages when moving files from one directory to another within the application.
Since cleaning junk is recommended, the best way to clean up and make space is through the OneDrive web version.
Step 1: Launch your browser and open the OneDrive web page.
Now, navigate to the bottom left of the window and you should see the available storage space in your total space. If you find that your storage space has reached its limit, then you should delete some files or folders. After deleting the files, the OneDrive shortcut error should be resolved.
*NOTE-You can download these files and folders (deleted) individually and save them on your PC, once the issue is resolved you can save them in in OneDrive.
Also, make sure your hard drive is free of junk files and has enough storage space.
Sometimes, simply closing the OneDrive app and restarting it can help fix shortcut errors.
However, if nothing helps, you can contact Microsoft Support for immediate assistance.
The above is the detailed content of How to fix OneDrive shortcuts can't be moved error in Windows 11 or 10?. For more information, please follow other related articles on the PHP Chinese website!

Hot AI Tools

Undresser.AI Undress
AI-powered app for creating realistic nude photos

AI Clothes Remover
Online AI tool for removing clothes from photos.

Undress AI Tool
Undress images for free

Clothoff.io
AI clothes remover

AI Hentai Generator
Generate AI Hentai for free.

Hot Article
Hot Tools

Notepad++7.3.1
Easy-to-use and free code editor

SublimeText3 Chinese version
Chinese version, very easy to use

Zend Studio 13.0.1
Powerful PHP integrated development environment

Dreamweaver CS6
Visual web development tools

SublimeText3 Mac version
God-level code editing software (SublimeText3)
Hot Topics


 How to cancel China Mobile card
Mar 14, 2024 pm 06:25 PM
How to cancel China Mobile card
Mar 14, 2024 pm 06:25 PM
How to cancel the China Mobile card? In China Mobile, you can directly cancel the phone card. Most users do not know how to cancel the mobile card. Next is the graphic tutorial on how to cancel the China Mobile card brought by the editor for users who are interested. Come and take a look! How to cancel the China Mobile card 1. First open the China Mobile APP, click the [My] area in the lower right corner of the main page and select the [Settings] button in the upper right corner; 2. Then jump to the settings function page, select the [Account and Security] option and click; 3. Then go to the account and security service page and find the [Logout Service] function; 4. Finally, on the page shown in the picture below, check the square box and click [Confirm Application] to log out.
 What software is crystaldiskmark? -How to use crystaldiskmark?
Mar 18, 2024 pm 02:58 PM
What software is crystaldiskmark? -How to use crystaldiskmark?
Mar 18, 2024 pm 02:58 PM
CrystalDiskMark is a small HDD benchmark tool for hard drives that quickly measures sequential and random read/write speeds. Next, let the editor introduce CrystalDiskMark to you and how to use crystaldiskmark~ 1. Introduction to CrystalDiskMark CrystalDiskMark is a widely used disk performance testing tool used to evaluate the read and write speed and performance of mechanical hard drives and solid-state drives (SSD). Random I/O performance. It is a free Windows application and provides a user-friendly interface and various test modes to evaluate different aspects of hard drive performance and is widely used in hardware reviews
 How to check China Mobile service password
Mar 14, 2024 pm 10:58 PM
How to check China Mobile service password
Mar 14, 2024 pm 10:58 PM
How to check the China Mobile service password? Each user who uses a China Mobile phone card has an exclusive service password, but most users do not know how to check the service password. The following is a diagram of the China Mobile service password query method brought by the editor for users. Text tutorial, interested users come and take a look! How to check the China Mobile service password 1. First open the China Mobile APP, select [Category] on the main page and select [Online Customer Service] in the special area; 2. Then jump to the page shown in the picture below, and click [Click Me] in the conversation; 3 , then enter the service password recharge interface, enter the information and click Next; 4. Then wait for the security check, click [Next] below; 5. Finally enter the service password and click [Submit].
 How to change China Mobile's cheaper plans
Mar 16, 2024 pm 07:43 PM
How to change China Mobile's cheaper plans
Mar 16, 2024 pm 07:43 PM
How does China Mobile change the cheaper package? You can change the cheaper package in the China Mobile APP. Most users don’t know how to change the cheap package. Next, the editor brings users a graphic tutorial on how to change the cheap package of China Mobile. Interested users come and take a look! How to change the cheaper package of China Mobile 1. First open the China Mobile APP, enter the main page and click [Category] at the bottom; 2. Then in the category area, click [Package] on the left and select [Package Change]; 3. Then Jump to the package discount page and select [Apply now] to change.
 CrystalDiskinfo usage tutorial-What software is CrystalDiskinfo?
Mar 18, 2024 pm 04:50 PM
CrystalDiskinfo usage tutorial-What software is CrystalDiskinfo?
Mar 18, 2024 pm 04:50 PM
CrystalDiskInfo is a software used to check computer hardware devices. In this software, we can check our own computer hardware, such as reading speed, transmission mode, interface, etc.! So in addition to these functions, how to use CrystalDiskInfo and what exactly is CrystalDiskInfo? Let me sort it out for you! 1. The Origin of CrystalDiskInfo As one of the three major components of a computer host, a solid-state drive is the storage medium of a computer and is responsible for computer data storage. A good solid-state drive can speed up file reading and affect consumer experience. When consumers receive new devices, they can use third-party software or other SSDs to
 Steps to solve the problem that WIN10 shared folder cannot be opened and prompts that the network path cannot be found
Mar 27, 2024 pm 03:31 PM
Steps to solve the problem that WIN10 shared folder cannot be opened and prompts that the network path cannot be found
Mar 27, 2024 pm 03:31 PM
1. Open the start menu, write [firewall] in the search bar, and select the legend option to enter. 2. Open the [Turn Windows Firewall on or off] option in the left menu. 3. Turn off all firewalls on home and public networks. 4. Expand the start menu and open Run, write [services.msc] in the run window and press Enter. 5. Finally, find the [TCP/iPnetBiosHelper] option in the service list and double-click it. Change the startup type to [Automatic] and start this service.
 Benchmark GPT-4! China Mobile's Jiutian large model passed dual registration
Apr 04, 2024 am 09:31 AM
Benchmark GPT-4! China Mobile's Jiutian large model passed dual registration
Apr 04, 2024 am 09:31 AM
According to news on April 4, the Cyberspace Administration of China recently released a list of registered large models, and China Mobile’s “Jiutian Natural Language Interaction Large Model” was included in it, marking that China Mobile’s Jiutian AI large model can officially provide generative artificial intelligence services to the outside world. . China Mobile stated that this is the first large-scale model developed by a central enterprise to have passed both the national "Generative Artificial Intelligence Service Registration" and the "Domestic Deep Synthetic Service Algorithm Registration" dual registrations. According to reports, Jiutian’s natural language interaction large model has the characteristics of enhanced industry capabilities, security and credibility, and supports full-stack localization. It has formed various parameter versions such as 9 billion, 13.9 billion, 57 billion, and 100 billion, and can be flexibly deployed in Cloud, edge and end are different situations
 How to resolve an incompatible software attempt to load with Edge?
Mar 15, 2024 pm 01:34 PM
How to resolve an incompatible software attempt to load with Edge?
Mar 15, 2024 pm 01:34 PM
When we use the Edge browser, sometimes incompatible software attempts to be loaded together, so what is going on? Let this site carefully introduce to users how to solve the problem of trying to load incompatible software with Edge. How to solve an incompatible software trying to load with Edge Solution 1: Search IE in the start menu and access it directly with IE. Solution 2: Note: Modifying the registry may cause system failure, so operate with caution. Modify registry parameters. 1. Enter regedit during operation. 2. Find the path\HKEY_LOCAL_MACHINE\SOFTWARE\Policies\Micros