

Take you to debug Nestjs project in VSCode (tutorial)


Friends who have used Vscode to write projects such as Node all know that if we want to troubleshoot problems, most of them are done through console.log Print to see where the problem is. If the problem involved is more complex, you will choose to debug and try to solve it through debug in Vscode. However, if it is a Nest project, in addition to configuring launch.json, you may be prompted ## during debugging. #Task "tsc: build - tsconfig.json" not found.
vscode tutorial, Programming teaching]
1 2 3 4 5 6 |
|
pnpm run dev:debug When commanding to run the project, add the `-debug` parameter for debugging, but at this time we just run the project. When the break point is set in VSCode, it will not be interrupted, and the Debug panel is not running.
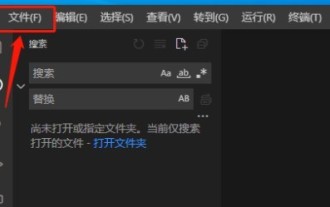
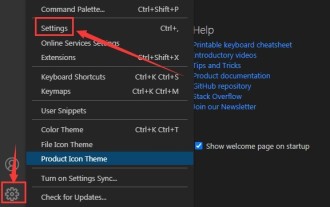
- Open the command panel (command shift p), search for
- Toggle Auto Attach
, select it and press Enter to enable

- Select Always: In this way, a ws debugging port will be started whenever a task is run through nodejs in the terminal

http://localhost:9229/json, you can see the wb (wbsocket) used for each debugging run by VSCode. VScode debugging is essentially Debugging through dual-end communication
1 |
|

attach To debug the debugging process just provided by VScode
1 2 3 4 5 6 7 8 9 |
|
through tsc before debugging. Through the tasks configuration file in VS Code, a set of tasks can be defined to be executed in the editor.The following explains the two tasks configured above
1
2
3
4
5
6
7
8
9
10
{"version":"2.0.0","tasks": [
{"type":"typescript","tsconfig":"tsconfig.json","problemMatcher": ["$tsc"
],"group":"build","label":"tsc: build","options": {"emit":"true","pretty":"true",
}
},
{"type":"npm","script":"dev:debug","problemMatcher": [],"label":"npm: dev:debug","detail":"pnpm run start:debug","dependsOn": ["tsc: build"
]
}
]
}复制代码Copy after login
- tsc: build
: TypeScript compilation task, which usestsconfig.jsonConfiguration in the file to compile TypeScript code. The type of the task istypescript, so it will use thetsccommand to perform compilation. During compilation, if there are any errors, the$tscproblem matcher is used to identify the error message. - npm: dev:debug
: Runs debugging tasks for NestJS applications. Its type isnpmand you can use NPM, Yarn or PNPM to run the script. This task executes thedev:debugscript, which is defined by the NestJS application developer and specified in thepackage.jsonfile. The dependency of this task istsc: build, which means that before running thenpm: dev:debugtask, thetsc: buildtask needs to be executed to compile TypeScript code.
npm: dev:debug task. This way, you can easily perform build and debug operations in VS Code and use a simple command to start the entire process.
vscode Basic Tutorial!
The above is the detailed content of Take you to debug Nestjs project in VSCode (tutorial). For more information, please follow other related articles on the PHP Chinese website!

Hot AI Tools

Undresser.AI Undress
AI-powered app for creating realistic nude photos

AI Clothes Remover
Online AI tool for removing clothes from photos.

Undress AI Tool
Undress images for free

Clothoff.io
AI clothes remover

AI Hentai Generator
Generate AI Hentai for free.
Hot Article
Hot Tools

Notepad++7.3.1
Easy-to-use and free code editor

SublimeText3 Chinese version
Chinese version, very easy to use

Zend Studio 13.0.1
Powerful PHP integrated development environment

Dreamweaver CS6
Visual web development tools

SublimeText3 Mac version
God-level code editing software (SublimeText3)
Hot Topics
 1359
1359
 52
52

 How to view word documents in vscode How to view word documents in vscode
May 09, 2024 am 09:37 AM
How to view word documents in vscode How to view word documents in vscode
May 09, 2024 am 09:37 AM
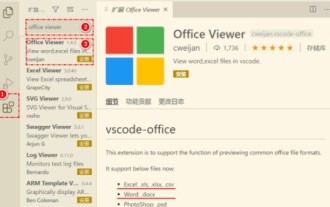
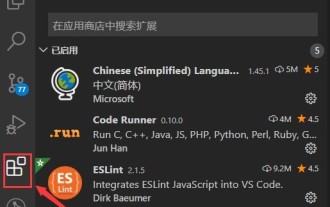
First, open the vscode software on the computer, click the [Extension] icon on the left, as shown in ① in the figure. Then, enter [officeviewer] in the search box of the extension interface, as shown in ② in the figure. Then, from the search Select [officeviewer] to install in the results, as shown in ③ in the figure. Finally, open the file, such as docx, pdf, etc., as shown below
 How to draw a flow chart with vscode_How to draw a flow chart with visual_studio code
Apr 23, 2024 pm 02:13 PM
How to draw a flow chart with vscode_How to draw a flow chart with visual_studio code
Apr 23, 2024 pm 02:13 PM
First, open visual studio code on the computer, click the four square buttons on the left, then enter draw.io in the search box to query the plug-in, click Install. After installation, create a new test.drawio file, then select the test.drawio file, enter the editing mode on the left There are various graphics on the side. You can draw the flow chart by selecting at will. After drawing, click File → Embed → svg and then select Embed. Copy the svg code. Paste the copied svg code into the html code. Open the html web page and you can see it. Click on the picture on the web page to jump to the flow chart. On this page, you can zoom in and out of the flow chart. Here, we choose to click on the pencil pattern in the lower right corner to jump to the web page.
 Caltech Chinese use AI to subvert mathematical proofs! Speed up 5 times shocked Tao Zhexuan, 80% of mathematical steps are fully automated
Apr 23, 2024 pm 03:01 PM
Caltech Chinese use AI to subvert mathematical proofs! Speed up 5 times shocked Tao Zhexuan, 80% of mathematical steps are fully automated
Apr 23, 2024 pm 03:01 PM
LeanCopilot, this formal mathematics tool that has been praised by many mathematicians such as Terence Tao, has evolved again? Just now, Caltech professor Anima Anandkumar announced that the team released an expanded version of the LeanCopilot paper and updated the code base. Image paper address: https://arxiv.org/pdf/2404.12534.pdf The latest experiments show that this Copilot tool can automate more than 80% of the mathematical proof steps! This record is 2.3 times better than the previous baseline aesop. And, as before, it's open source under the MIT license. In the picture, he is Song Peiyang, a Chinese boy. He is
 How to add files to vscode workspace How to add files to vscode workspace
May 09, 2024 am 09:43 AM
How to add files to vscode workspace How to add files to vscode workspace
May 09, 2024 am 09:43 AM
1. First, open the vscode software, click the explorer icon, and find the workspace window 2. Then, click the file menu in the upper left corner and find the add folder to workspace option 3. Finally, find the folder location in the local disk , click the add button
 How to enable background updates in vscode How to enable background updates in vscode
May 09, 2024 am 09:52 AM
How to enable background updates in vscode How to enable background updates in vscode
May 09, 2024 am 09:52 AM
1. First, after opening the interface, click the file menu in the upper left corner. 2. Then, click the settings button in the preferences column. 3. Then, in the settings page that jumps, find the update section. 4. Finally, click the mouse to check and enable it. Download and install the new VSCode version button in the background on Windows and restart the program.
 How to disable wsl configuration file in vscode How to disable wsl configuration file in vscode
May 09, 2024 am 10:30 AM
How to disable wsl configuration file in vscode How to disable wsl configuration file in vscode
May 09, 2024 am 10:30 AM
1. First, open the settings option in the settings menu. 2. Then, find the terminal column in the commonly used page. 3. Finally, uncheck the usewslprofiles button on the right side of the column.
 How to set animation smooth insertion in VScode VScode tutorial to set animation smooth insertion
May 09, 2024 am 09:49 AM
How to set animation smooth insertion in VScode VScode tutorial to set animation smooth insertion
May 09, 2024 am 09:49 AM
1. First, after opening the interface, click the workspace interface 2. Then, in the open editing panel, click the File menu 3. Then, click the Settings button under the Preferences column 4. Finally, click the mouse to check the CursorSmoothCaretAnimation button and save Just set it
 How to open workspace trust permissions in Vscode Vscode method to open workspace trust permissions
May 09, 2024 am 10:34 AM
How to open workspace trust permissions in Vscode Vscode method to open workspace trust permissions
May 09, 2024 am 10:34 AM
1. First, after opening the editing window, click the configuration icon in the lower left corner 2. Then, click the Manage Workspace Trust button in the submenu that opens 3. Then, find the page in the editing window 4. Finally, according to your office Just check the relevant instructions if required
