
Today’s specific content will be expanded from the following sections:
The above operations are relatively common and can also solve many office contents. Let’s start this section directly:
Python uses two libraries to operate PDF, namely: PyPDF2 and pdfplumber.
PyPDF2 can better read, write, split, and merge PDF files, while pdfplumber can better read the content of PDF files and extract tables in PDFs. The corresponding official websites of
are:
Since these two libraries are not Python’s standard libraries, they need to be installed separately before use.
win r and then enter cmd to open the command window, enter the following commands in order to install:
After the installation is completed, if success is displayed, it means the installation is successful.

Split a complete PDF into several small PDFs, because it mainly involves the overall operation of the PDF, so This section requires the use of the PyPDF2 library.
The general idea of splitting is as follows:
It should be noted that during the splitting process, Intervals can be set manually, for example: every 5 pages are saved as a small PDF file.
The split code is as follows:
import os
from PyPDF2 import PdfFileWriter, PdfFileReader
def split_pdf(filename, filepath, save_dirpath, step=5):
 """
 拆分PDF为多个小的PDF文件,
 @param filename:文件名
 @param filepath:文件路径
 @param save_dirpath:保存小的PDF的文件路径
 @param step: 每step间隔的页面生成一个文件,例如step=5,表示0-4页、5-9页...为一个文件
 @return:
 """
 if not os.path.exists(save_dirpath):
 os.mkdir(save_dirpath)
 pdf_reader = PdfFileReader(filepath)
 # 读取每一页的数据
 pages = pdf_reader.getNumPages()
 for page in range(0, pages, step):
 pdf_writer = PdfFileWriter()
 # 拆分pdf,每 step 页的拆分为一个文件
 for index in range(page, page+step):
 if index < pages:
 pdf_writer.addPage(pdf_reader.getPage(index))
 # 保存拆分后的小文件
 save_path = os.path.join(save_dirpath, filename+str(int(page/step)+1)+'.pdf')
 print(save_path)
 with open(save_path, "wb") as out:
 pdf_writer.write(out)
 print("文件已成功拆分,保存路径为:"+save_dirpath)
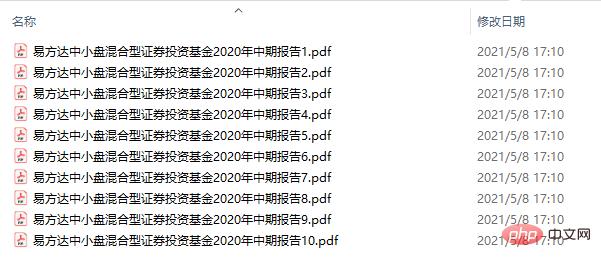
split_pdf(filename, filepath, save_dirpath, step=5)Take "E Fund's 2020 Interim Report of Small and Medium Cap Hybrid Securities Investment Fund" as an example. The entire PDF file has a total of 46 pages, with intervals of 5 pages. Finally, 10 small PDF files were generated.
Compared with splitting, the idea of merging is simpler:
The corresponding code is relatively simple:
import os
from PyPDF2 import PdfFileReader, PdfFileWriter
def concat_pdf(filename, read_dirpath, save_filepath):
 """
 合并多个PDF文件
 @param filename:文件名
 @param read_dirpath:要合并的PDF目录
 @param save_filepath:合并后的PDF文件路径
 @return:
 """
 pdf_writer = PdfFileWriter()
 # 对文件名进行排序
 list_filename = os.listdir(read_dirpath)
 list_filename.sort(key=lambda x: int(x[:-4].replace(filename, "")))
 for filename in list_filename:
 print(filename)
 filepath = os.path.join(read_dirpath, filename)
 # 读取文件并获取文件的页数
 pdf_reader = PdfFileReader(filepath)
 pages = pdf_reader.getNumPages()
 # 逐页添加
 for page in range(pages):
 pdf_writer.addPage(pdf_reader.getPage(page))
 # 保存合并后的文件
 with open(save_filepath, "wb") as out:
 pdf_writer.write(out)
 print("文件已成功合并,保存路径为:"+save_filepath)
concat_pdf(filename, read_dirpath, save_filepath)involves specific PDF content operations. This section requires the use of the pdfplumber library.
When extracting text, the extract_text function is mainly used.
The specific code is as follows:
import os
import pdfplumber
def extract_text_info(filepath):
 """
 提取PDF中的文字
 @param filepath:文件路径
 @return:
 """
 with pdfplumber.open(filepath) as pdf:
 # 获取第2页数据
 page = pdf.pages[1]
 print(page.extract_text())
# 提取文字内容
extract_text_info(filepath)
As you can see, you can locate the corresponding page number directly through the subscript, and then extract all the text of the page through the extract_text function.
And if you want to extract the text of all pages, you only need to change it to:
with pdfplumber.open(filepath) as pdf:
# 获取全部数据
for page in pdf.pages
print(page.extract_text())
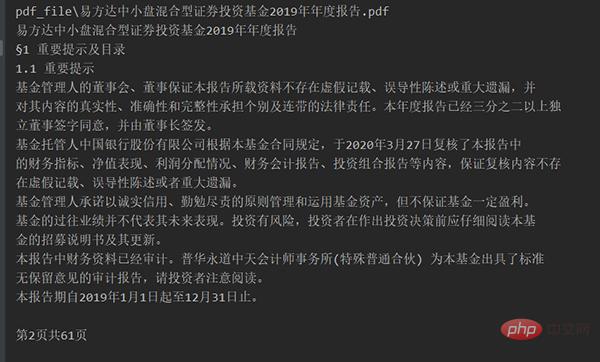
For example, extract the content of the first page of "E Fund Small and Medium Cap Hybrid Securities Investment Fund 2020 Interim Report" When running the code, the source file looks like this:
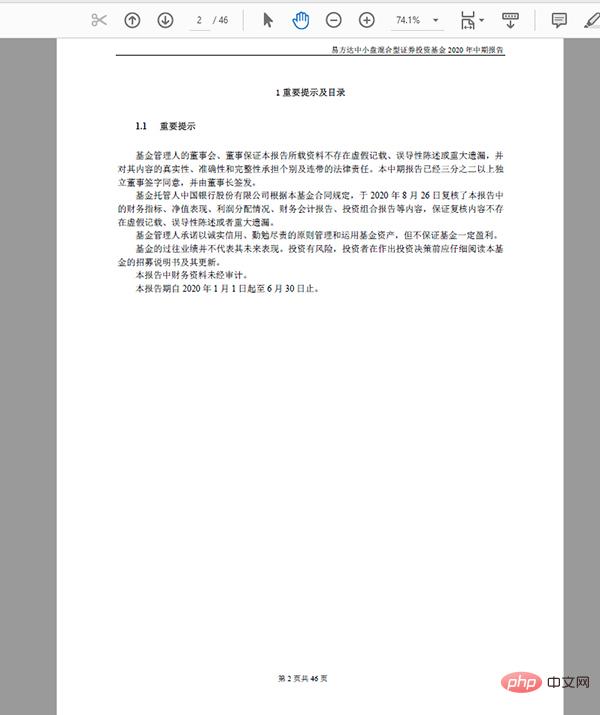
After running the code, it looks like this:
Similarly, this section is about the operation of specific content, so you also need to use the pdfplumber library.
Very similar to extracting text, extracting table content only replaces the extract_text function with the extract_table function.
The corresponding code is as follows:
import os
import pandas as pd
import pdfplumber
def extract_table_info(filepath):
 """
 提取PDF中的图表数据
 @param filepath:
 @return:
 """
 with pdfplumber.open(filepath) as pdf:
 # 获取第18页数据
 page = pdf.pages[17]
 # 如果一页有一个表格,设置表格的第一行为表头,其余为数据
 table_info = page.extract_table()
 df_table = pd.DataFrame(table_info[1:], columns=table_info[0])
 df_table.to_csv('dmeo.csv', index=False, encoding='gbk')
# 提取表格内容
extract_table_info(filepath)The above code can get the first table content on page 18 and save it as a csv file locally.
Because the read table will be stored as a two-dimensional array, and multiple two-dimensional arrays form a three-dimensional array.
Traverse this three-digit array to get each table data on the page. Correspondingly, change the extract_table function to extract_tables.
The specific code is as follows:
# 如果一页有多个表格,对应的数据是一个三维数组
tables_info = page.extract_tables()
for index in range(len(tables_info)):
 # 设置表格的第一行为表头,其余为数据
 df_table = pd.DataFrame(tables_info[index][1:], columns=tables_info[index][0])
 print(df_table)
# df_table.to_csv('dmeo.csv', index=False, encoding='gbk')Take the first table on page xx of "E Fund Small and Medium Cap Hybrid Securities Investment Fund 2020 Interim Report" as an example:
Source The table in the file looks like this:
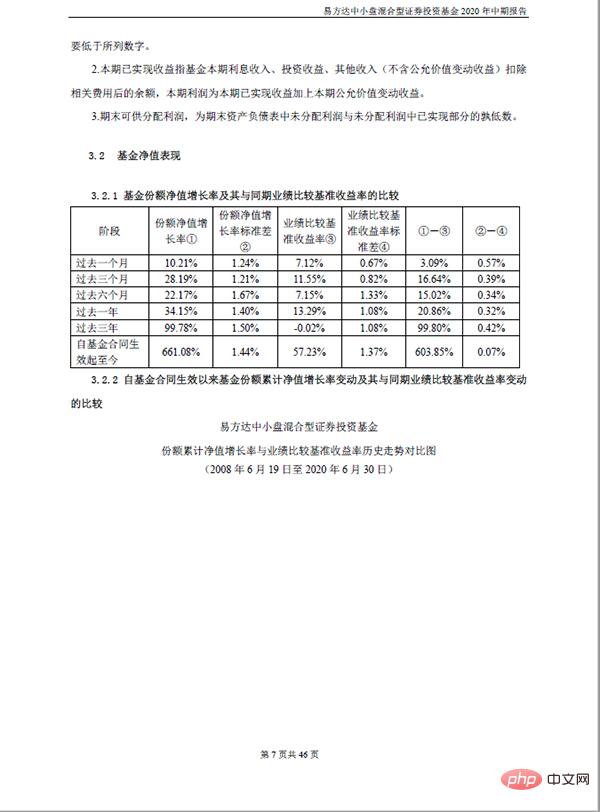
The table after extracting and saving it into excel looks like this:

提取 PDF 中的图片和将 PDF 转存为图片是不一样的(下一小节),需要区分开。
提取图片:顾名思义,就是将内容中的图片都提取出来;
转存为图片:则是将每一页的 PDF 内容存成一页一页的图片,下一小节会详细说明
转存为图片中,需要用到一个模块叫 fitz,fitz 的最新版 1.18.13,非最新版的在部分函数名称上存在差异,代码中会标记出来
使用 fitz 需要先安装 PyMuPDF 模块,安装方式如下:
提取图片的整体逻辑如下:
实现的具体代码如下:
import os
import re
import fitz
def extract_pic_info(filepath, pic_dirpath):
 """
 提取PDF中的图片
 @param filepath:pdf文件路径
 @param pic_dirpath:要保存的图片目录路径
 @return:
 """
 if not os.path.exists(pic_dirpath):
 os.makedirs(pic_dirpath)
 # 使用正则表达式来查找图片
 check_XObject = r"/Type(?= */XObject)"
 check_Image = r"/Subtype(?= */Image)"
 img_count = 0
 """1. 打开pdf,打印相关信息"""
 pdf_info = fitz.open(filepath)
 # 1.16.8版本用法 xref_len = doc._getXrefLength()
 # 最新版本
 xref_len = pdf_info.xref_length()
 # 打印PDF的信息
 print("文件名:{}, 页数: {}, 对象: {}".format(filepath, len(pdf_info), xref_len-1))
 """2. 遍历PDF中的对象,遇到是图像才进行下一步,不然就continue"""
 for index in range(1, xref_len):
 # 1.16.8版本用法 text = doc._getXrefString(index)
 # 最新版本
 text = pdf_info.xref_object(index)
 is_XObject = re.search(check_XObject, text)
 is_Image = re.search(check_Image, text)
 # 如果不是对象也不是图片,则不操作
 if is_XObject or is_Image:
 img_count += 1
 # 根据索引生成图像
 pix = fitz.Pixmap(pdf_info, index)
 pic_filepath = os.path.join(pic_dirpath, 'img_' + str(img_count) + '.png')
 """pix.size 可以反映像素多少,简单的色素块该值较低,可以通过设置一个阈值过滤。以阈值 10000 为例过滤"""
 # if pix.size < 10000:
 # continue
 """三、 将图像存为png格式"""
 if pix.n >= 5:
 # 先转换CMYK
 pix = fitz.Pixmap(fitz.csRGB, pix)
 # 存为PNG
 pix.writePNG(pic_filepath)
# 提取图片内容
extract_pic_info(filepath, pic_dirpath)以本节示例的“易方达中小盘混合型证券投资基金2020年中期报告” 中的图片为例,代码运行后提取的图片如下:
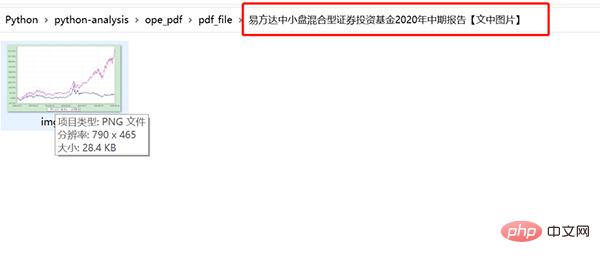
这个结果和文档中的共 1 张图片的结果符合。
转换为照片比较简单,就是将一页页的 PDF 转换为一张张的图片。大致过程如下:
首先需要安装对应的库,最新的 pdf2image 库版本应该是 1.14.0。
它的 github地址 为:https://github.com/Belval/pdf2image ,感兴趣的可以自行了解。
安装方式如下:
对于不同的平台,需要安装相应的组件,这里以 windows 平台和 mac 平台为例:
Windows 平台
对于 windows 用户需要安装 poppler for Windows,安装链接是:http://blog.alivate.com.au/poppler-windows/
另外,还需要添加环境变量, 将 bin 文件夹的路径添加到环境变量 PATH 中。
Mac
对于 mac 用户,需要安装 poppler for Mac,具体可以参考这个链接:http://macappstore.org/poppler/
详细代码如下:
import os
from pdf2image import convert_from_path, convert_from_bytes
def convert_to_pic(filepath, pic_dirpath):
 """
 每一页的PDF转换成图片
 @param filepath:pdf文件路径
 @param pic_dirpath:图片目录路径
 @return:
 """
 print(filepath)
 if not os.path.exists(pic_dirpath):
 os.makedirs(pic_dirpath)
 images = convert_from_bytes(open(filepath, 'rb').read())
 # images = convert_from_path(filepath, dpi=200)
 for image in images:
 # 保存图片
 pic_filepath = os.path.join(pic_dirpath, 'img_'+str(images.index(image))+'.png')
 image.save(pic_filepath, 'PNG')
# PDF转换为图片
convert_to_pic(filepath, pic_dirpath)
以本节示例的“易方达中小盘混合型证券投资基金2020年中期报告” 中的图片为例,该文档共 46 页,保存后的 PDF 照片如下:
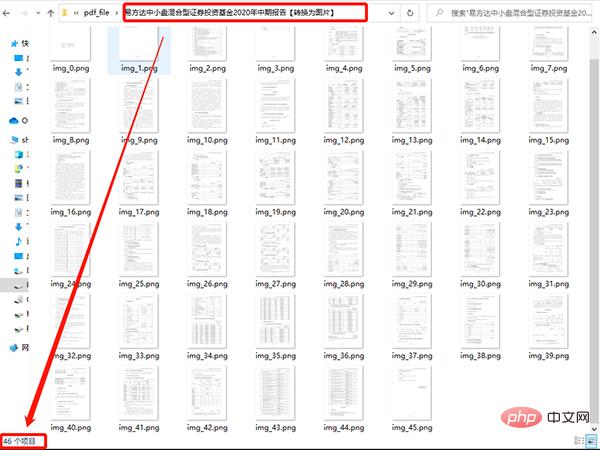
一共 46 张图片
添加水印后的效果如下:
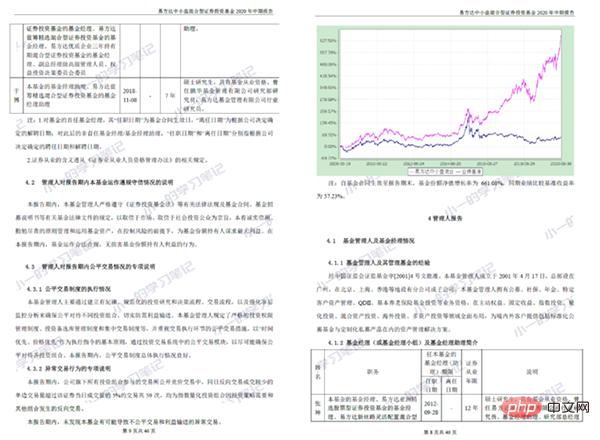
在制作水印的时候,可以自定义水印内容、透明度、斜度、字间宽度等等,可操作性比较好。
前面专门写过一篇文章,讲的特别详细:Python快速给PDF文件添加自定义水印。
你可能在打开部分 PDF 文件的时候,会弹出下面这个界面:
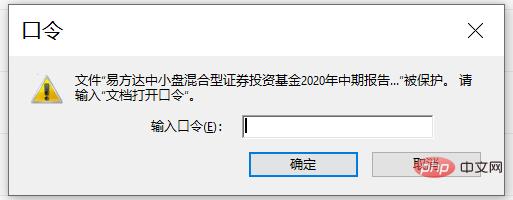
这种就是 PDF 文件被加密了,在打开的时候需要相应的密码才行。
本节所提到的也只是基于 PDF 文档的加密解密,而不是所谓的 PDF 密码破解。
在对 PDF 文件加密需要使用 encrypt 函数,对应的加密代码也比较简单:
import os
from PyPDF2 import PdfFileReader, PdfFileWriter
def encrypt_pdf(filepath, save_filepath, passwd='xiaoyi'):
 """
 PDF文档加密
 @param filepath:PDF文件路径
 @param save_filepath:加密后的文件保存路径
 @param passwd:密码
 @return:
 """
 pdf_reader = PdfFileReader(filepath)
 pdf_writer = PdfFileWriter()
 for page_index in range(pdf_reader.getNumPages()):
 pdf_writer.addPage(pdf_reader.getPage(page_index))
 # 添加密码
 pdf_writer.encrypt(passwd)
 with open(save_filepath, "wb") as out:
 pdf_writer.write(out)
# 文档加密
encrypt_pdf(filepath, save_filepath, passwd='xiaoyi')
代码执行成功后再次打开 PDF 文件则需要输入密码才行。
根据这个思路,破解 PDF 也可以通过暴力求解实现,例如:通过本地密码本一个个去尝试,或者根据数字+字母的密码形式循环尝试,最终成功打开的密码就是破解密码。
另外,针对已经加密的 PDF 文件,也可以使用 decrypt 函数进行解密操作。
解密代码如下:
def decrypt_pdf(filepath, save_filepath, passwd='xiaoyi'):
 """
 解密 PDF 文档并且保存为未加密的 PDF
 @param filepath:PDF文件路径
 @param save_filepath:解密后的文件保存路径
 @param passwd:密码
 @return:
 """
 pdf_reader = PdfFileReader(filepath)
 # PDF文档解密
 pdf_reader.decrypt('xiaoyi')
 pdf_writer = PdfFileWriter()
 for page_index in range(pdf_reader.getNumPages()):
 pdf_writer.addPage(pdf_reader.getPage(page_index))
 with open(save_filepath, "wb") as out:
 pdf_writer.write(out)
# 文档解密
decrypt_pdf(filepath, save_filepath, passwd='xiaoyi')解密完成后的 PDF 文档打开后不再需要输入密码,如需加密可再次执行加密代码。
以上就是 Python 操作 PDF 的全部内容,文中贴出的代码都已经测试过,可正常运行。
The above is the detailed content of Detailed operations of PDF in Python office automation. For more information, please follow other related articles on the PHP Chinese website!


