Ndis.sys BSoD: How to fix it in Windows 11 and 10
If you encounter a Blue Screen of Death with the stop code ndis.sys, this guide can help! After explaining what ndis.sys is and discussing the causes of this error, we will cover all the troubleshooting methods to fix this annoying BSoD error.
What is ndis.sys?
NDIS (Network Driver Interface Specification) is the legal system driver for network interface controllers. It handles communication and connections between all connected devices and components on a computer network.
The ndis.sys file is a basic system file developed by Microsoft. It is related to NDIS and serves as a collection of system driver configurations that Windows uses to establish communication with hardware and connected devices. This file is usually located in the C:\Windows\System32\drivers folder.
What causes ndis.sys BSoD error on Windows 11 and 10?
This Blue Screen of Death error can have multiple causes; some common ones are mentioned here:
- Corrupted Device Driver - If your network driver Corruption or damage may cause this BSoD error. You must update, reinstall, or roll back the driver to resolve this issue.
- Malware Infection – Viruses on your computer can corrupt essential system files, which can cause all kinds of trouble, including this one. To fix this issue, run a malware scan.
- Corrupted System Files – If a system file is corrupted, it may cause problems when performing normal functions on the computer, including this error. To fix it, you need to repair system files.
- Hard Drive Issues – You may encounter this error if any hardware is not installed properly on the motherboard or is damaged. Check that the components are all placed perfectly.
Now that we know why this happens, let’s move on to actual solutions to fix BSoD errors on Windows 11 and 10.
What can I do to fix ndis.sys BSoD error on Windows 11?
Before performing advanced troubleshooting steps, you should consider performing the following checks:
- Check for window updates.
- Check that your BIOS and firmware are up to date.
- Temporarily disable anti-virus software.
If these quick fixes don’t work for you, let’s move on to the solutions below.
1. Run the Windows Memory Diagnostic Tool
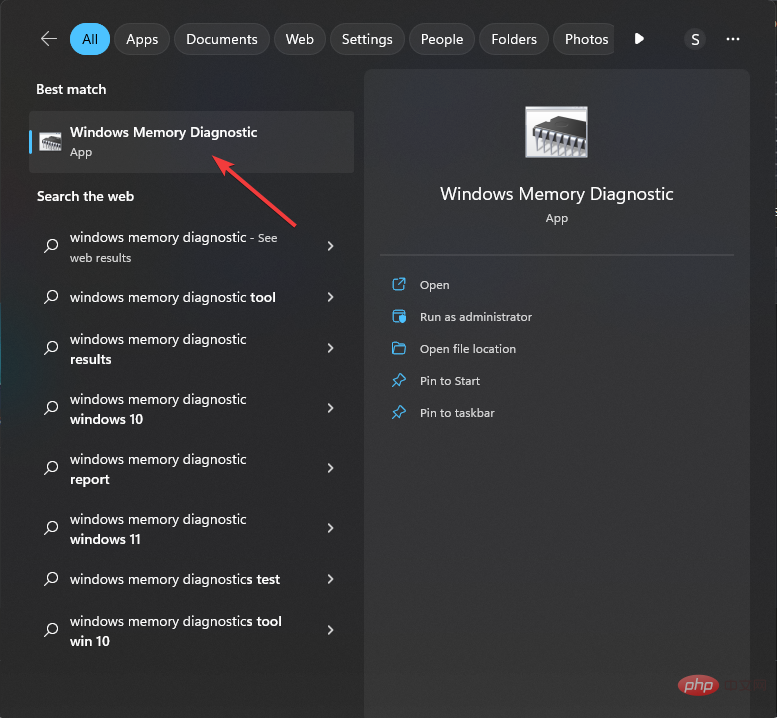
- key, type Windows Memory Diagnostic program, and then click "Open". Windows

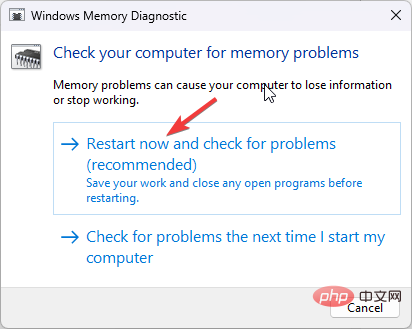
- In the Windows Memory Diagnostic tool window, click Restart now and check for problems (recommended).

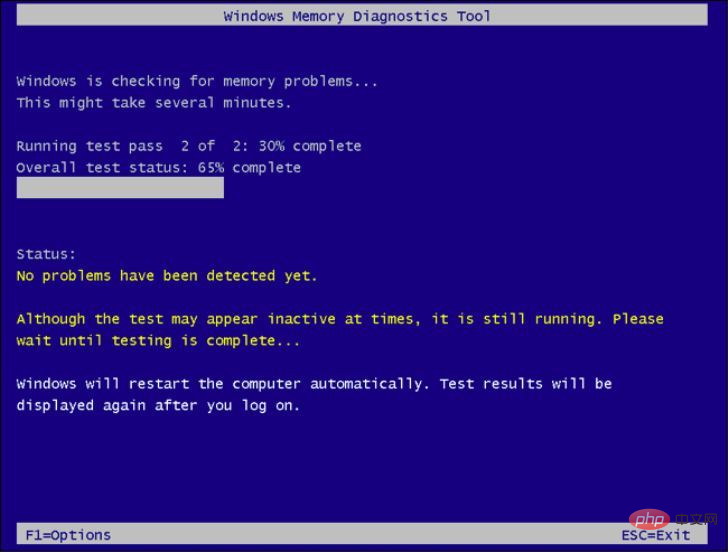
- The Windows Memory Diagnostic Tool scans your memory for any problems. Your computer will restart and the tool will verify and test the RAM.

Once completed, your PC will restart again. You can view the results in the Windows Memory Diagnostics notification. If a memory module failure is detected, perform the test again. Check whether the memory module is connected correctly. If so, you may need to replace it.
2. Scan your computer for malware and viruses
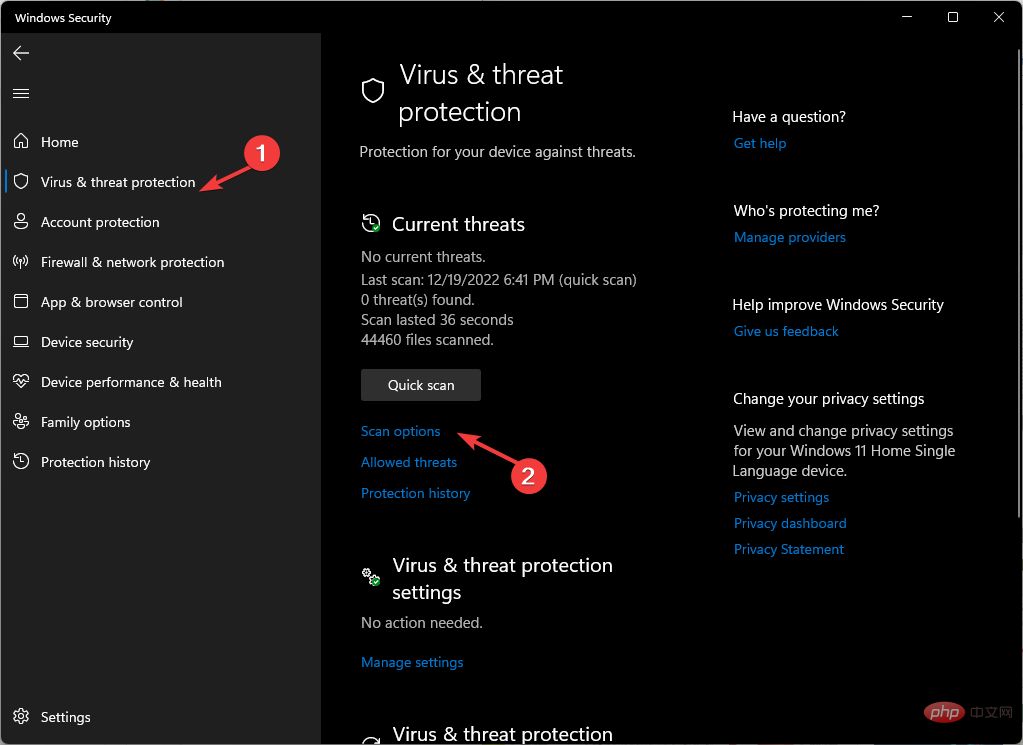
- Press the Windows Security key, and then click Open. Windows
- Go to Virus & Threat Protection and click Scan Options.

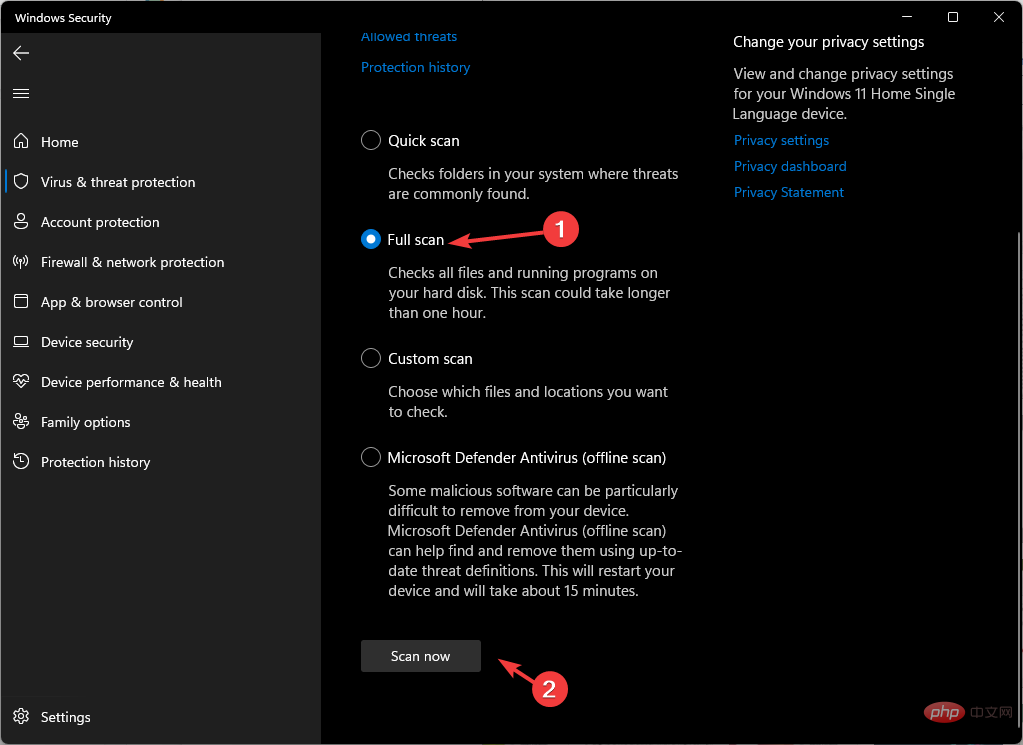
- Now select Full Scan and click Scan Now.

- The tool will scan your computer for infections. Once the scan is completed, it will display the malicious files. Delete it when prompted to fix the problem.
Microsoft Defender is the built-in antivirus software in Windows 10 and 11, but it is not foolproof. If you have the option, you can also scan your PC using third-party antivirus software.
3. Run Disk Cleanup
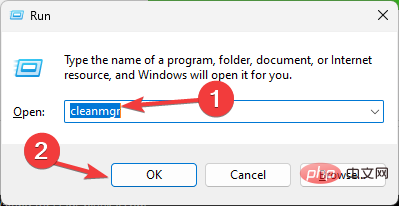
- Press to open the "Run" dialog box. WindowsR

- Type cleanmgr and click OK to open Disk Cleanup.
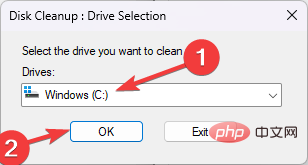
- In the "Disk Cleanup: Drive Selection" window, select "C Drive" and click "OK".

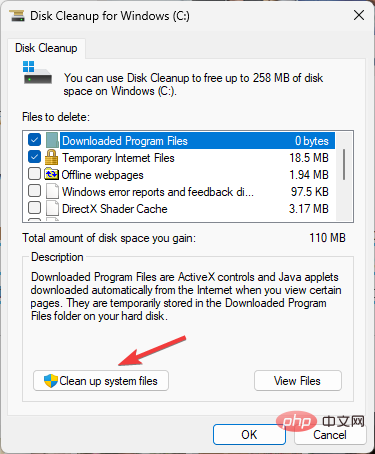
- Now click on Clean System Files.

- In the Disk Cleanup: Drive Selection window again, select the C drive and click OK.
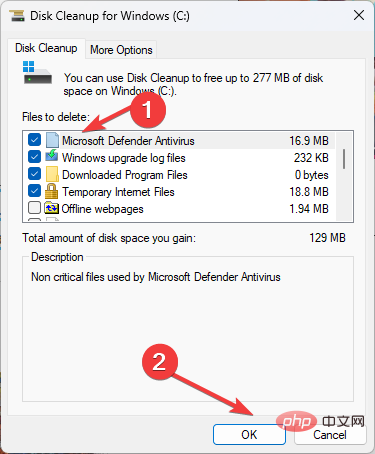
- Under the Files to Remove section, select all entries and click OK.

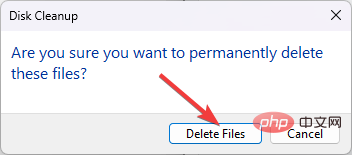
- Next, click Delete File.

4. Troubleshoot network driver issues
4.1 Roll back the driver
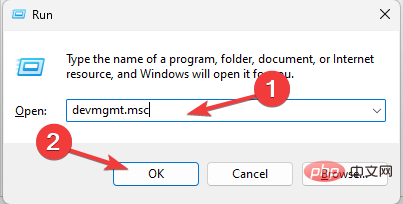
- Press to open "Run" command box. WindowsR

- Type devmgmt.msc and click OK to open Device Manager.
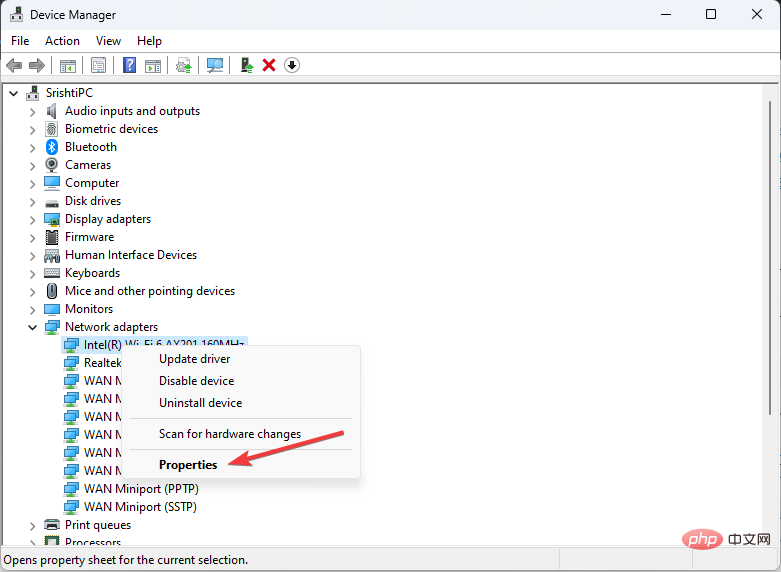
- Go to Network Adapters and expand it.
- Right-click on the listed driver and select "Properties" from the context menu.

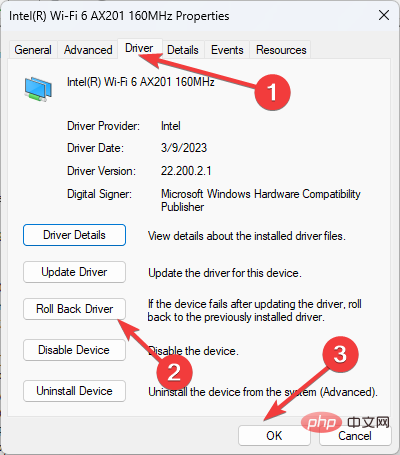
- Go to the Driver tab on the Properties window and click Rollback Driver.

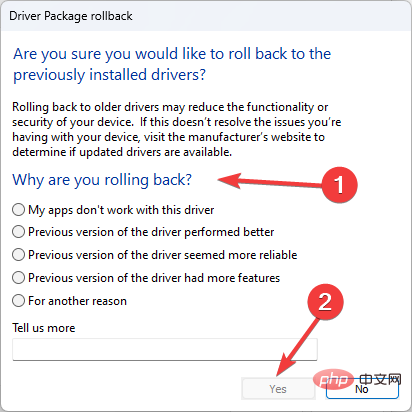
- Select the reason for the rollback in the next window and click "Yes".

Network drives will be rolled back to the previous version. If the "Roll Back Driver" option is grayed out, it means you don't have an old driver to restore and you should move on to the next solution below.
4.2 Reinstall the network driver
- Open Device Manager using the above steps.
- Go to Network Adapters and expand it.
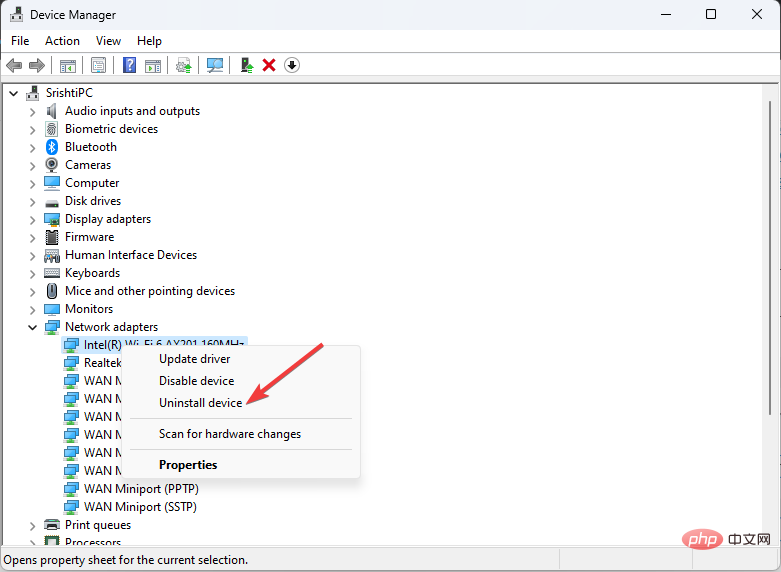
- Right-click on the listed driver and select Uninstall Driver from the context menu.

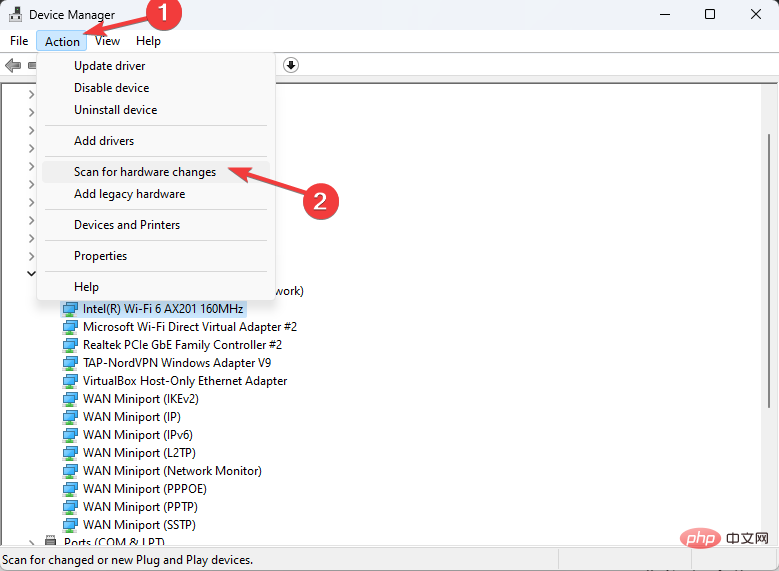
- Click Actions and select Scan for hardware changes to reinstall the driver.

5. Perform a clean boot
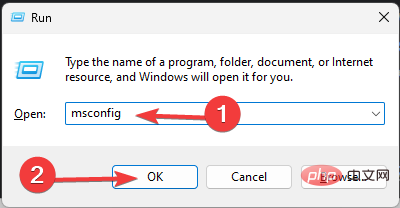
- Press to open the Run console. WindowsR

- Type msconfig and click OK to open the System Configuration window.
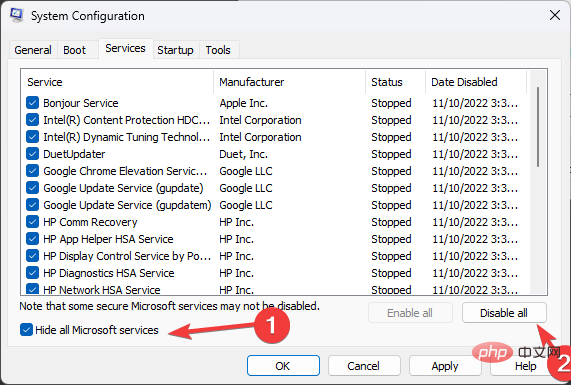
- Go to the Services tab, place a checkmark next to Hide all Microsoft services, and click Disable All.

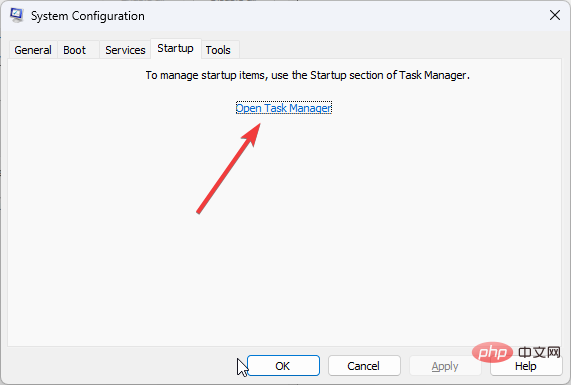
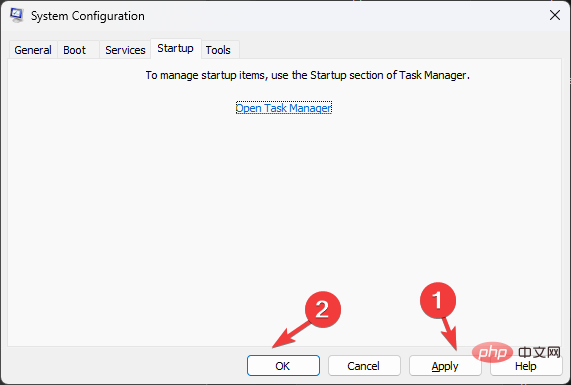
- Switch to the "Startup" tab and click "Open Task Manager".

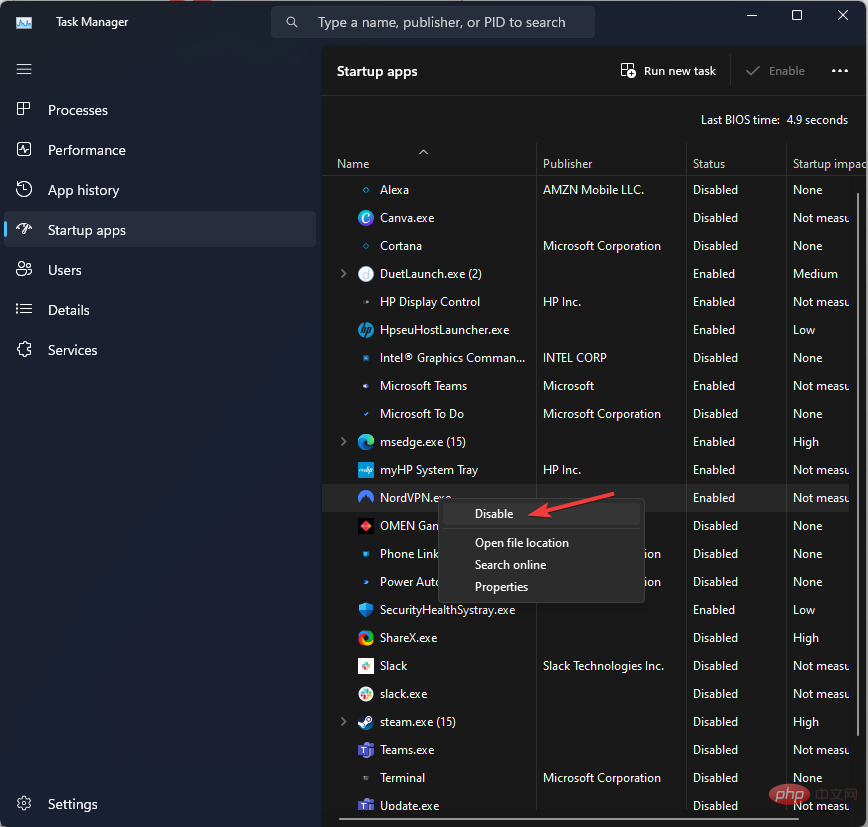
- Right-click all enabled items one by one and select Disable. Close the task manager.

- Next, in the System Configuration window, click Apply and OK.

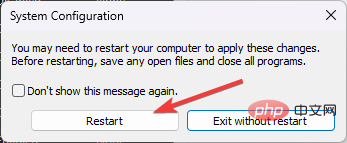
- Click Restart.

Your computer will now restart with minimal drivers and startup programs. If the problem doesn't occur, it's caused by a background or third-party app. Please delete it.
6. To perform an SFC and DISM scan, press the
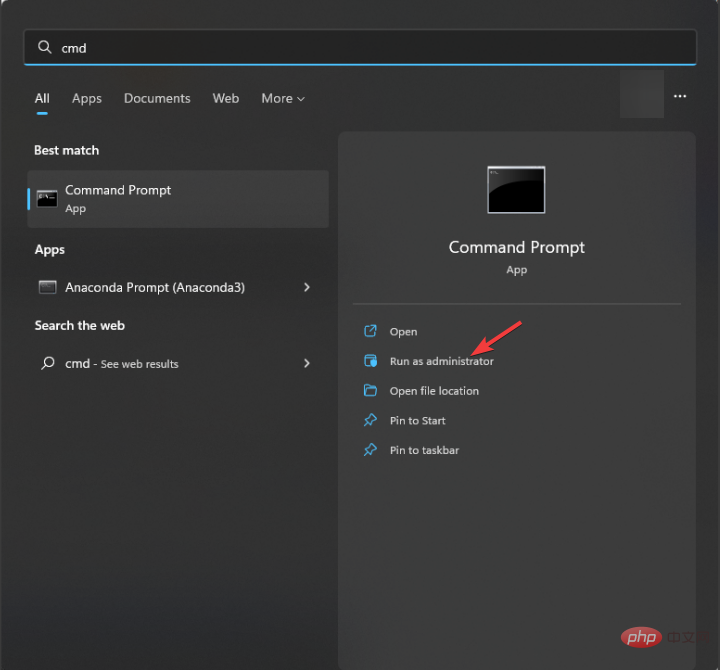
- key, type cmd, and then click Run as administrator. Windows

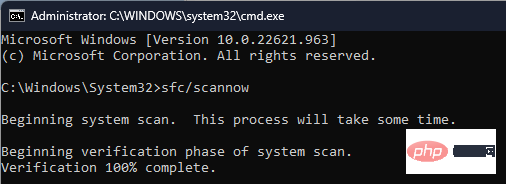
- Type the following command to repair system files and click: Enter
<strong>sfc/scannow</strong>
- Copy and paste the following command to repair the Windows operating system image and press: Enter
<strong>DISM /Online /Cleanup-Image /RestoreHealth</strong>
- Restart your computer for the changes to take effect.
Expert Tip:
Certain PC problems are difficult to solve, especially when Windows’ system files and repositories are missing or corrupted.
Be sure to use a specialized tool, such as Fortect, which will scan for corrupted files and replace them with new versions from their repository.
Apart from these steps, you can also choose automatic tools that can detect corrupt files, Windows errors and BSoD errors in a short time.
More precisely, you can launch the software to start a complete scan, identify system issues and fix them with a single click.
⇒ Obtain Fortress
7. Check the disk for errors
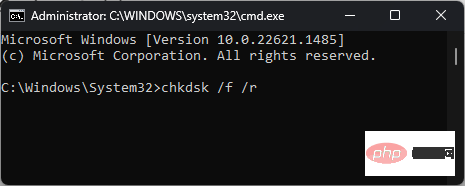
- Press the cmd, and click Run as administrator. Windows
- Type the following command to check the hard drive for bad sectors and try to repair them to make them readable in the file system and hit: Enter
<strong>chkdsk /f /r</strong>
- Restart the computer.
8. Perform system restore
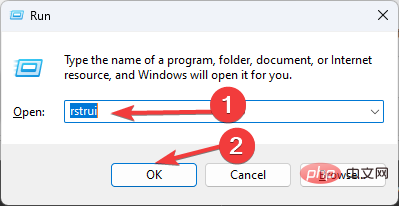
- Press to open the Run console. WindowsR

- Type rstrui and click OK to open the System Restore wizard.
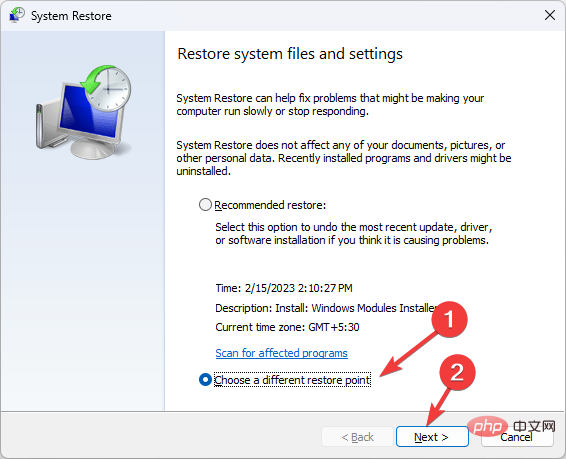
- Select "Choose a different restore point" in the "System Restore" window, and then click "Next."

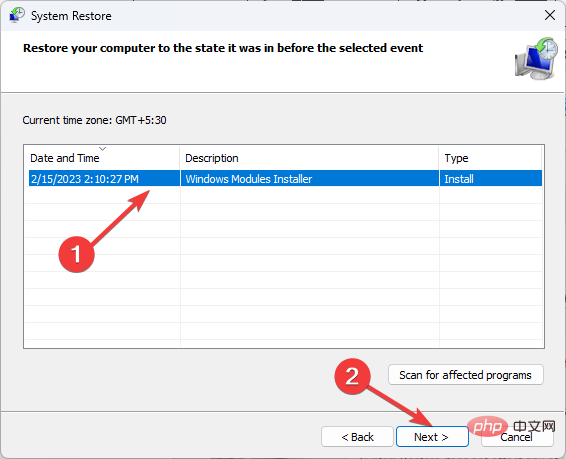
- Select a restore point and click Next.

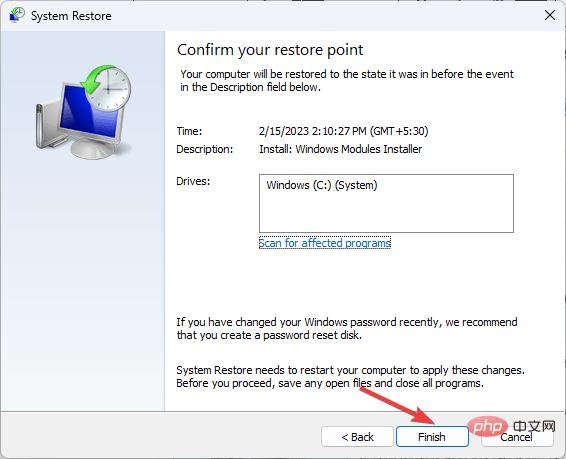
- Click "Finish" to start the restore process.

If the process is unsuccessful, you can read our guide on what to do if system restore doesn’t work on Windows 11.
What can I do to fix ndis.sys BSoD error on Windows 10?
To fix the Blue Screen of Death error on Windows 10, you can follow the above-mentioned methods for Windows 11.
If these methods don't work for you, you can use this guide to reset your PC to resolve this issue on your Windows computer.
So, these are the methods you can use to fix ndis.sys BSoD error on Windows 10 and 11. If nothing works, you'll need to perform a clean installation of Windows.
The above is the detailed content of Ndis.sys BSoD: How to fix it in Windows 11 and 10. For more information, please follow other related articles on the PHP Chinese website!

Hot AI Tools

Undresser.AI Undress
AI-powered app for creating realistic nude photos

AI Clothes Remover
Online AI tool for removing clothes from photos.

Undress AI Tool
Undress images for free

Clothoff.io
AI clothes remover

AI Hentai Generator
Generate AI Hentai for free.

Hot Article

Hot Tools

Notepad++7.3.1
Easy-to-use and free code editor

SublimeText3 Chinese version
Chinese version, very easy to use

Zend Studio 13.0.1
Powerful PHP integrated development environment

Dreamweaver CS6
Visual web development tools

SublimeText3 Mac version
God-level code editing software (SublimeText3)

Hot Topics
 How to fine-tune deepseek locally
Feb 19, 2025 pm 05:21 PM
Local fine-tuning of DeepSeek class models faces the challenge of insufficient computing resources and expertise. To address these challenges, the following strategies can be adopted: Model quantization: convert model parameters into low-precision integers, reducing memory footprint. Use smaller models: Select a pretrained model with smaller parameters for easier local fine-tuning. Data selection and preprocessing: Select high-quality data and perform appropriate preprocessing to avoid poor data quality affecting model effectiveness. Batch training: For large data sets, load data in batches for training to avoid memory overflow. Acceleration with GPU: Use independent graphics cards to accelerate the training process and shorten the training time.
 deepseek image generation tutorial
Feb 19, 2025 pm 04:15 PM
DeepSeek: A powerful AI image generation tool! DeepSeek itself is not an image generation tool, but its powerful core technology provides underlying support for many AI painting tools. Want to know how to use DeepSeek to generate images indirectly? Please continue reading! Generate images with DeepSeek-based AI tools: The following steps will guide you to use these tools: Launch the AI Painting Tool: Search and open a DeepSeek-based AI Painting Tool (for example, search "Simple AI"). Select the drawing mode: select "AI Drawing" or similar function, and select the image type according to your needs, such as "Anime Avatar", "Landscape"
 Pi Node Teaching: What is a Pi Node? How to install and set up Pi Node?
Mar 05, 2025 pm 05:57 PM
Detailed explanation and installation guide for PiNetwork nodes This article will introduce the PiNetwork ecosystem in detail - Pi nodes, a key role in the PiNetwork ecosystem, and provide complete steps for installation and configuration. After the launch of the PiNetwork blockchain test network, Pi nodes have become an important part of many pioneers actively participating in the testing, preparing for the upcoming main network release. If you don’t know PiNetwork yet, please refer to what is Picoin? What is the price for listing? Pi usage, mining and security analysis. What is PiNetwork? The PiNetwork project started in 2019 and owns its exclusive cryptocurrency Pi Coin. The project aims to create a one that everyone can participate
 binance official website URL Binance official website entrance latest genuine entrance
Dec 16, 2024 pm 06:15 PM
This article focuses on the latest genuine entrances to Binance’s official website, including Binance Global’s official website, the US official website and the Academy’s official website. In addition, the article also provides detailed access steps, including using a trusted device, entering the correct URL, double-checking the website interface, verifying the website certificate, contacting customer support, etc., to ensure safe and reliable access to the Binance platform.
 How to ask deepseek
Feb 19, 2025 pm 04:39 PM
The search accuracy of DeepSeek depends on the way of asking questions. To achieve ideal results, the question should contain the following key elements: Clear topic: Specific specified information objectives. Specific angles: Cut into the topic from a specific perspective. Expected output form: define the desired result type (summary, analysis, list, etc.).
 How to download deepseek
Feb 19, 2025 pm 05:45 PM
Make sure to access official website downloads and carefully check the domain name and website design. After downloading, scan the file. Read the protocol during installation and avoid the system disk when installing. Test the function and contact customer service to solve the problem. Update the version regularly to ensure the security and stability of the software.
 How to use deepseek
Feb 19, 2025 pm 04:45 PM
DeepSeek is an efficient data search and analysis tool with an indexing mechanism at its core. Factors that affect their efficiency include: data type, data size, search strategy, and DeepSeek performance. High-quality data, refined search queries and sufficient computing resources are essential to optimize search results.
 Samsung Galaxy Z Flip6 review: Simple design and practical experience, is the answer to the discounted version? !
Jul 30, 2024 pm 12:54 PM
In the field of folding screens, small folding screens are also loved by many young users due to their lightweight, portable, exquisite and compact fashion attributes. In the previous review of the Samsung Galaxy Z Fold6 large folding screen, I gave it a "more square and more AI" evaluation. The small folding screen released at the same time, Samsung Galaxy Z Flip 6, has also attracted much attention. So what will it be like? Today, let’s unlock this new fashion product together. "Light" design: The fashionable appearance on the fingertips is the same as Galaxy Z Fold 6. The Galaxy Z Flip 6 body adopts a square design. In the unfolded state, the fuselage is slender than the average candy bar machine. The front and rear are connected by a straight-sided middle frame, and the four R corners retain a rounded shape.


