23 pro-like tips on how to get the most out of your iPhone 14 Pro camera
The iPhone 14 Pro brings the biggest update to an iPhone camera in a long time, including its massive 48MP sensor. So if you've recently upgraded to Apple's latest flagship, here are some advanced tips and tricks to help you get the most out of your new iPhone 14 Pro camera.
In addition to the camera, the iPhone 14 Pro also bundles exclusive features such as Always-on Display and the new Dynamic Island. Always-on Display lets you see your Lock screen at a glance without having to interact with your iPhone.
This lets you check the time, track incoming notifications, and view lock screen widgets without unlocking your iPhone. Dynamic Islands, on the other hand, are a new way to track and interact with background activity without opening Control Center or Notification Center. All these features make the iPhone 14 Pro a great device, and it only gets better when you factor in the new 48MP camera.
1. Use a wide-angle lens to do magic
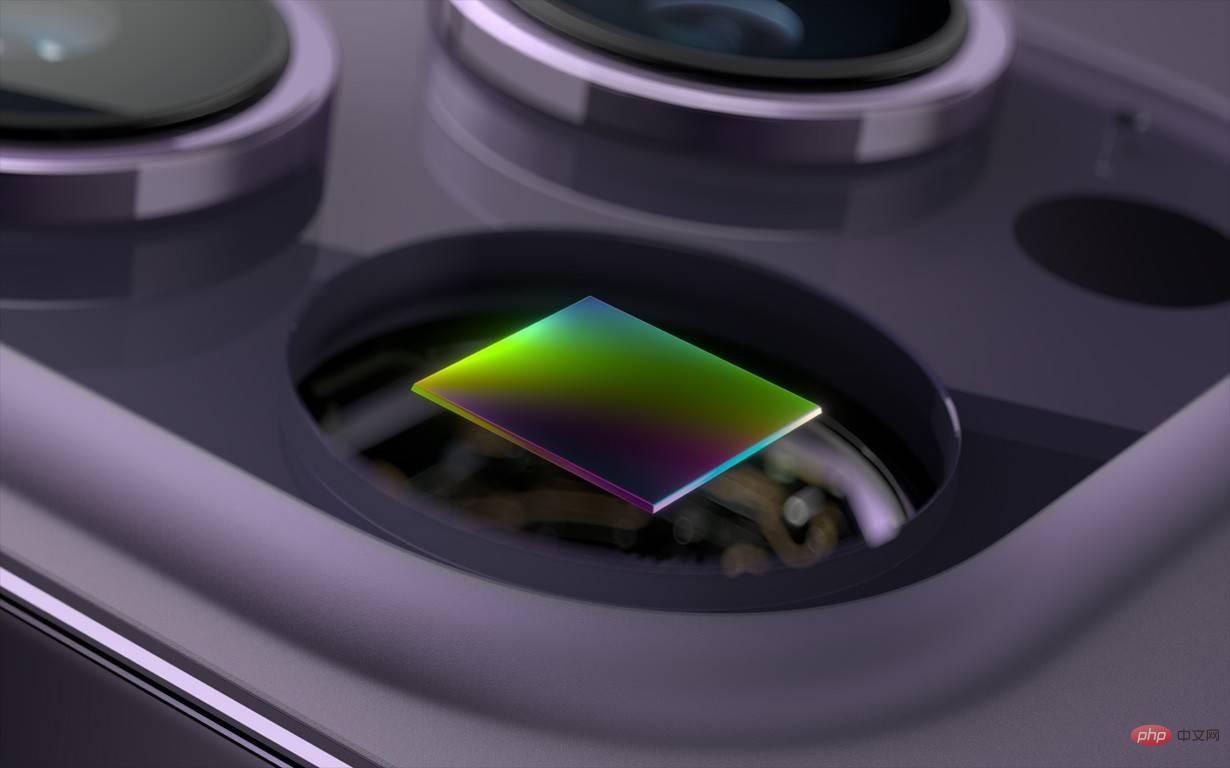
Smartphone cameras have long been the primary cameras for many users. Smartphone cameras, while great additions to your arsenal, have lenses with limited focal lengths that end up producing images that look similar to each other regardless of your smartphone.
You can now overcome this limitation by using the wide-angle lens on iPhone 14 Pro. A wide-angle lens offers a different perspective, allowing you to fit more subjects and elements into your frame, and take advantage of the 13mm focal length to give most of your images a different look.
iPhone 14 pro comes with a 13mm wide-angle lens with an aperture of f/2.2. Plus, this lens offers a 120° field of view, helping you capture more than a standard 24mm lens. If you want to make your images unique and fit more and more information into your frame, we highly recommend using the wide-angle lens on iPhone 14 Pro.
2. Use portrait mode whenever possible to add depth
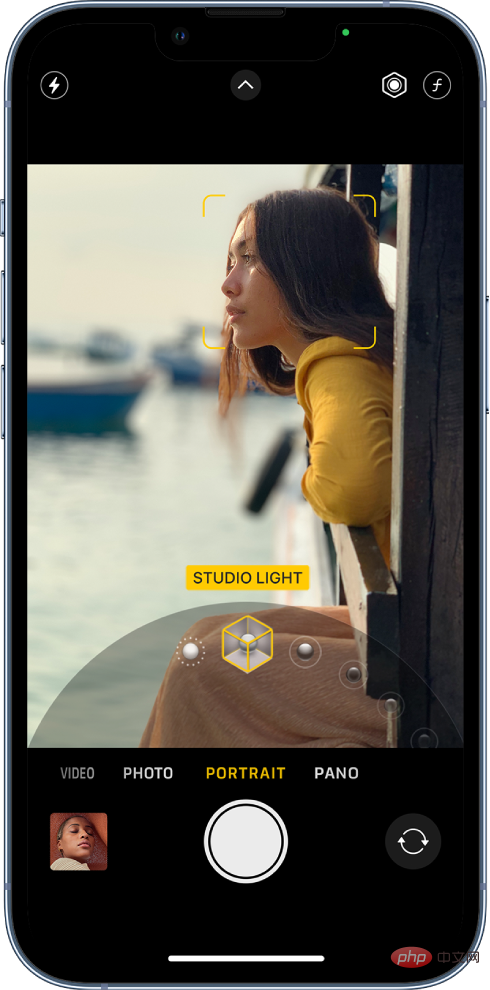
Depth is what makes an image stand out from most photos. They help your subject stand out while distinguishing itself from the background. Depth also allows viewers to better understand a scene, allowing size and perspective to help them intuitively. Therefore, we recommend using portrait mode when you are unsure of the current frame. Portrait mode can help enhance your subjects and add depth to photos where depth and dimension are difficult to convey.
This may include shots of the sky, where it becomes difficult to convey distance if there are only a few subjects in the foreground, such as a tree or a few birds. Portrait mode can also help enhance natural-looking photos, where the background may be too cluttered to properly focus on the subject in the foreground.
So if you are confused about photo mode because of the cluttered background, be sure to try portrait mode for a quick and easy solution. If you want to eliminate the background completely, we recommend trying the following lighting modes in portrait mode.
- Stage Light Mono
- High Dim Mono
- Stage Light
If your subject is in the foreground Easily discernible, these patterns will emerge completely from the background. Hence, these modes can help you capture images with cluttered background by removing it completely.
3. Apply Photography Styles to avoid over-editing
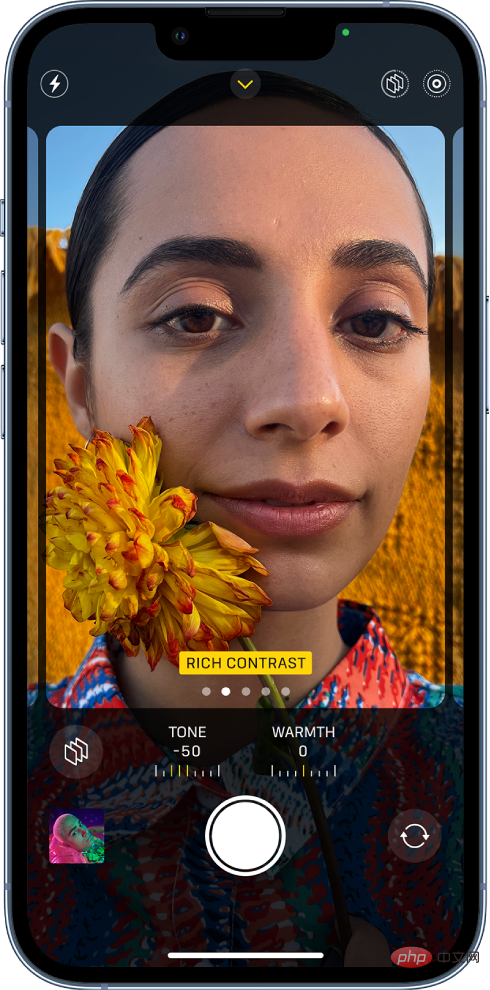
Based on your selections in the Settings app, Photography Styles are automatically applied to your Shoot. These styles help you easily adjust and change the look of your capture. Photography Styles real-time app changes the tone and warmth of your photos. Adjusting these values can help you get the right image look in real time without having to rely on editing the image in post-production.
However, this can ruin your images if you don't adjust your photography style to the current lighting conditions beforehand. This is especially true when shooting images in poor lighting conditions, where warm and cool photography styles can make or break the final look of your image.
So when shooting images with iPhone 14 Pro, we recommend that you adjust and fine-tune your photography style to get the perfect color and white balance in your images.
4. Use a timer for long exposures
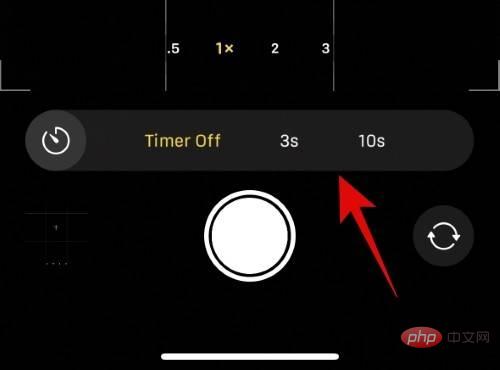
Long exposure shooting allows you to manually adjust the shutter speed to capture more in low-light conditions. Lots of light. In areas with low light pollution, you can use it for night photography to capture stars and more. The problem with long exposure shots is that any slight movement will blur your photo and introduce light streaks, which can completely ruin your image.
So when taking long-exposure photos with an iPhone, it can be a challenge to stay steady, especially when pressing the shutter button. Therefore, the timer option in the camera app can be of huge help in such situations. The iPhone camera app allows you to set the timer to three or ten seconds. This will allow you to press the shutter button beforehand, thereby introducing a delay into the shot, which should give you enough time for your iPhone to stabilize for long exposure shots. So, if you enjoy astrophotography or taking images in low-light conditions, using a timer can help you greatly improve the quality of your images.
5. Capture HDR as much as possible
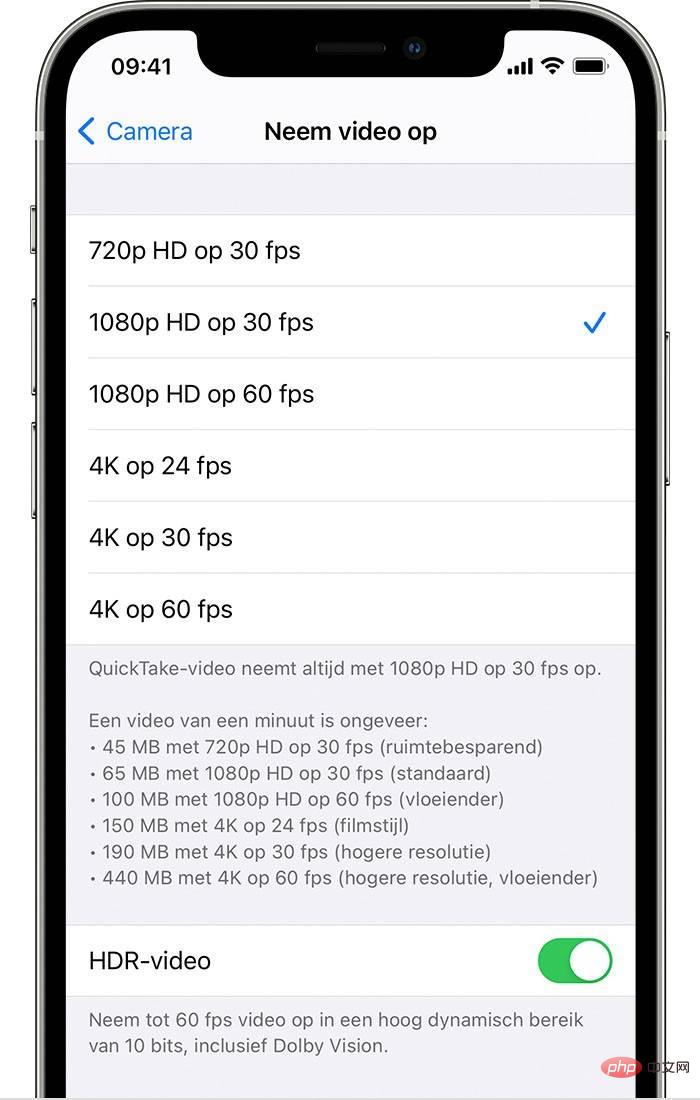
HDR or High Dynamic Range has long been a feature on iPhone Pro models that allows you to Capture images and video with Dolby Vision's 10-bit color depth. This results in greater dynamic range in the image, resulting in better contrast and easily discernible highlights and shadows in the image. Highlights and shadows make or break 90% of images taken through a camera.
They can help you capture stunning reflections and hidden details or ruin a shot by introducing overexposed or underexposed parts of the frame. HDR can help you add more detail to high-contrast photos and leave more room when changing exposure and other settings in post-production. Therefore, we strongly recommend shooting HDR images whenever possible.
One thing you should keep in mind is that the iPhone creates HDR images by combining three images taken at different exposures. This can ultimately cause problems when shooting images where the subject is in motion and introduces motion blur. Therefore, if you are capturing a subject in motion, you may want to avoid HDR depending on your preference.
6. Use a light meter to prevent overexposure
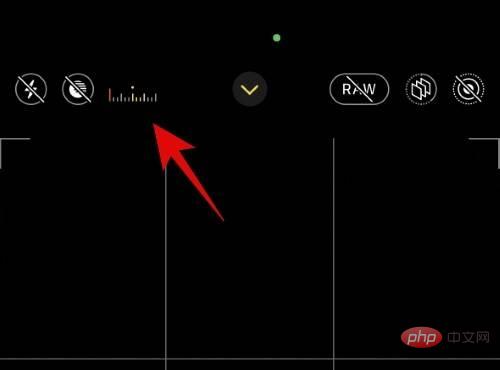
Overexposed images will cause you to lose important details in the image, which is not ideal. Therefore, to prevent your image from being overexposed when manually adjusting exposure, keep an eye on the light meter in the upper left corner of the screen. If the light meter moves to the left, your current image is underexposed, if it moves to the right, your image is overexposed.
We recommend that you pay close attention to your light meter to ensure your images are exposed correctly. The light meter is only available if you adjust the exposure manually. If you take an image using autoexposure in the Camera app, the light meter will be hidden on your iPhone.
7. Change the aspect ratio beforehand to suit your needs
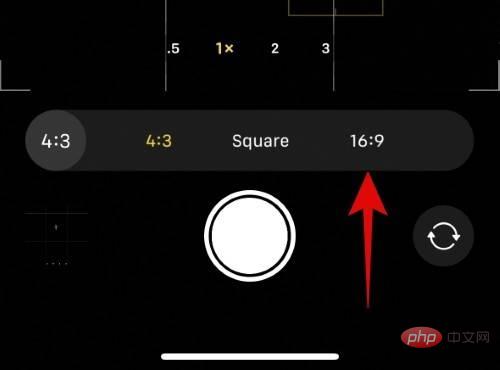
Aspect ratio is useful if you wish to post images or videos to social media platforms help. For example, images on Instagram require a 1:1 or square aspect ratio, while videos require a 9:16 aspect ratio. Capturing images and videos with the wrong aspect ratio will force you to crop the images when posting them to social media platforms.
In turn, this can cause you to lose important details in your images, which may make them redundant in some cases. To avoid this happening, we recommend dialing in the correct aspect ratio in the Settings app beforehand. Simply swipe up and tap the aspect ratio icon to change the current aspect ratio.
8. Symmetry and pattern are the keys to good images
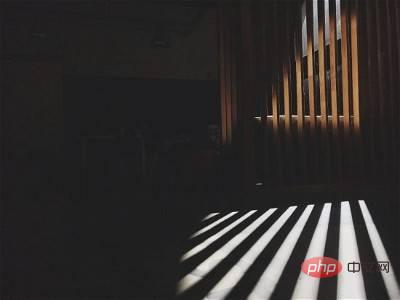
This is a general rule of thumb when it comes to photography, no matter what camera you use. Symmetry between background objects helps enhance an image and introduce order into a chaotic background that is often difficult to spot when capturing an image. Patterns can also create this effect by allowing the viewer to discover new patterns within an otherwise chaotic background. You can introduce symmetry and pattern into your images by changing your perspective, finding different angles, and using different lenses.
 Source: Unsplash.com
 " data-medium-file="https://cdn.nerdschalk.com/wp-content/uploads/2022/11/rule-of-thirds-patterns-and-symmetry-8.jpg" data-large-file="https://cdn.nerdschalk.com/wp-content/uploads/2022/11/rule-of-thirds-patterns-and-symmetry-8-550x296.jpg" data-origin-src="https://cdn.nerdschalk.com/wp-content/uploads/2022/11/rule-of-thirds-patterns-and-symmetry-8-550x296.jpg" data-mce-src="https://cdn.nerdschalk.com/wp-content/uploads/2022/11/rule-of-thirds-patterns-and-symmetry-8-550x296.jpg?width=300" data-mce- style="max-width:90%">
资料来源:Unsplash.com  Source: Unsplash.com
 " data-medium-file="https://cdn.nerdschalk.com/wp-content/uploads/2022/11/rule-of-thirds-patterns-and-symmetry-7.jpg" data-large-file="https://cdn.nerdschalk.com/wp-content/uploads/2022/11/rule-of-thirds-patterns-and-symmetry-7-550x367.jpg" data-origin-src="https://cdn.nerdschalk.com/wp-content/uploads/2022/11/rule-of-thirds-patterns-and-symmetry-7-550x367.jpg" data-mce-src="https://cdn.nerdschalk.com/wp-content/uploads/2022/11/rule-of-thirds-patterns-and-symmetry-7-550x367.jpg?width=300" data-mce- style="max-width:90%">
资料来源:Unsplash.com  Source: Unsplash.com
 " data-medium-file="https://cdn.nerdschalk.com/wp-content/uploads/2022/11/rule-of-thirds-patterns-and-symmetry-6.jpg" data-large-file="https://cdn.nerdschalk.com/wp-content/uploads/2022/11/rule-of-thirds-patterns-and-symmetry-6-550x310.jpg" data-origin-src="https://cdn.nerdschalk.com/wp-content/uploads/2022/11/rule-of-thirds-patterns-and-symmetry-6-550x310.jpg" data-mce-src="https://cdn.nerdschalk.com/wp-content/uploads/2022/11/rule-of-thirds-patterns-and-symmetry-6-550x310.jpg?width=300" data-mce- style="max-width:90%">
资料来源:Unsplash.com  Source: Unsplash.com
 " data-medium-file="https://cdn.nerdschalk.com/wp-content/uploads/2022/11/rule-of-thirds-patterns-and-symmetry-5.jpg" data-large-file="https://cdn.nerdschalk.com/wp-content/uploads/2022/11/rule-of-thirds-patterns-and-symmetry-5-550x367.jpg" data-origin-src="https://cdn.nerdschalk.com/wp-content/uploads/2022/11/rule-of-thirds-patterns-and-symmetry-5-550x367.jpg" data-mce-src="https://cdn.nerdschalk.com/wp-content/uploads/2022/11/rule-of-thirds-patterns-and-symmetry-5-550x367.jpg?width=300" data-mce- style="max-width:90%">
资料来源:Unsplash.com
在灯光、路灯、小路、电线杆、房屋等物体中很容易发现对称性和图案。密切关注画面中的这些元素,然后将它们对齐可以帮助您为其他平凡的镜头添加图案和对称性。因此,如果您觉得您的框架似乎缺少某些东西,请务必在现实世界元素中寻找图案和对称性,以便为您捕获的图像添加一些额外的活力。
9. 引导线和三分法
引导线是每张照片的另一个主要部分。它们有助于将观看者的眼睛引导到您尝试捕捉的帧中所需的焦点。三分法则也建立在相同的基础上,它允许您将主题定位在可以直观地在每一帧中吸引观众眼球的一般点上。牢记这些因素将帮助您在当前帧中智能地定位您的主体,通过确保观众的眼睛自动吸引到您的主体来帮助增强您的整体形象。
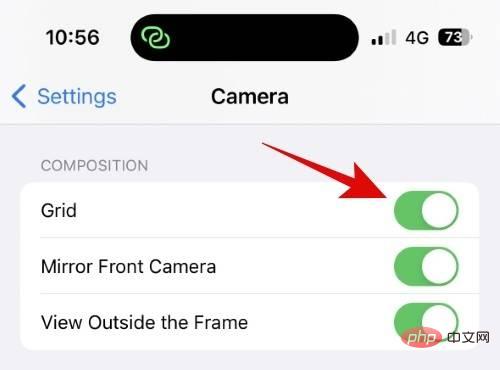
When it comes to the rule of thirds, you can turn on the grid toggle in the camera app settings to help you compose your shots the same way. With the grid turned on, place your subject at any intersection to follow the rule of thirds. Another thing to remember when following the rule of thirds is to pay attention to the negative space in the current frame. Too much negative space can sometimes overwhelm the rule of thirds, making your subject look a little weird regardless of its current background. In this case, you may want to compose your shot intuitively and pay more attention to the leading lines in the current frame.
Guiding lines can be formed from many things in the current frame. Streetlights, roads, sidewalks, buildings, wires, etc. can all guide your subject if you compose your shot correctly. They help you unconsciously point to your subject while ensuring that whatever catches your viewer's attention will always end up at your chosen focus point in the current frame. Here are a few great examples of leading lines and the rule of thirds that will help you better understand these concepts and get the most out of the iPhone 14 Pro’s 48MP camera.

Source: Unsplash.com 
Source: Unsplash. com 
Source: Unsplash.com
10. Don’t forget macros
Macro mode lets you capture the details of tiny objects using the ultra-wide-angle lens on iPhone 14 Pro. You can use macro mode to capture details such as insects, snowflakes, small stones, tiny objects, and more. Your iPhone 14 Pro and Pro Max will automatically switch to Macro mode when you get close to a small object and the focal length is reduced to a few centimeters.
You can capture images, live photos, slow motion and time-lapse videos in Macro mode, which opens up a ton of creative possibilities when capturing tiny objects and subjects from iPhone. Macro mode automatically turns on when you get close to your subject, indicated by this icon in the lower left corner of the Camera app. 
 Source: Unsplash.com
 Source: Unsplash. com
 Source: Unsplash.com
icon. If you plan to take a lot of macro photos, you can choose to preserve your macro mode settings using Preserve Settings in the Settings app. This will ensure that the camera app does not revert to its default settings after closing. 

Source: Unsplash.com  ##Source: Unsplash.com
 Source: Unsplash.com
Settings > Camera > View Outside Frame to turn this feature off and see the actual frame based on your current aspect ratio setting.
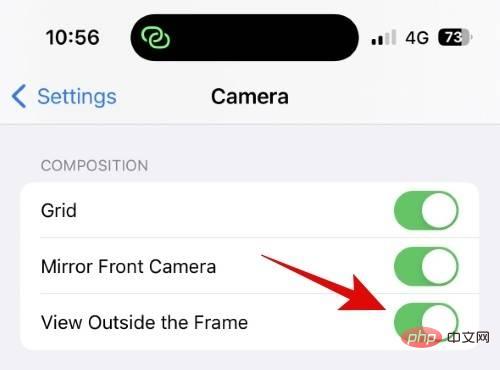
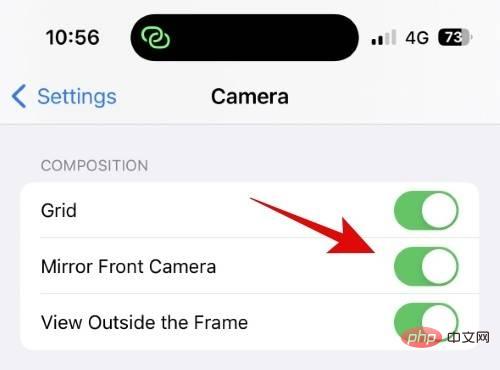
Settings > Camera > Mirror Front Camera to mirror the image captured from the front camera. This will help your selfies look more natural and look like the way you see yourself in the mirror.
14. Don’t forget to lock focus and adjust exposure If you’ve ever heard professional photographers talk about camera settings, you’ve probably noticed that most of them don’t Rely on manual control. That's why Fujifilm has focused its XT camera line on manual controls, with dials that provide satisfying tactical feedback when using camera controls. Manually controlling focus and exposure can help you achieve looks you might not be able to achieve when using autoexposure and autofocus on your iPhone. You can manually control exposure in the camera app using the dedicated controls provided when swiping up or by swiping up while focusing on the current frame.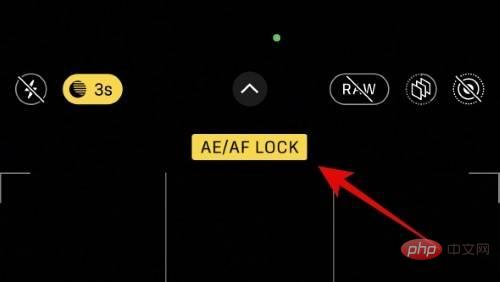
AE/AF LOCK appears at the top of the viewfinder preview. This means your current exposure and focus are locked and you can now manually capture your subject as expected. This will allow for more creative control when capturing images and video from iPhone 14 Pro and Pro Max.
15. Avoid zooming if you can get closer to your subject
Zooming in is a great way to reach out and capture subjects that are far away from you. While the iPhone 14 Pro and Pro Max allow 6x optical zoom, it introduces artifacts and noise when zooming in. This is a natural drawback of magnification, especially when using digital zoom, as it crops to the original frame to zoom in on the subject. Therefore, if you want to preserve detail and capture sharp images, you should avoid zooming in as much as possible. Instead, stay close to your subject and only zoom in when your subject is too far away.
Also, try not to magnify more than 3x as it uses your camera lens for optical magnification rather than digital magnification to maintain detail in the image without introducing artifacts. Also, when zooming in to shoot video, it's a good idea to use Action Mode to stabilize your photos, as even the slightest movement can introduce serious shake in the video. If you have a tripod, you can use it with Action Mode to create professional-looking videos as you zoom in on your subject.
16. Remember, you can adjust the focus after taking a picture in portrait mode
This is a little known feature in the iPhone, but if you want to adjust the focus after taking an image in portrait mode Change the appearance of the image, this will be helpful. Portrait mode uses a combination of intelligent image processing and the different focal lengths available on iPhone to produce natural-looking depth of field in images. This depth of field can be adjusted after you capture the image, unlike traditional cameras, which allow for more creative control after you capture the image.
So if you feel you need more background blur or want to make your background sharper, you can always change the focus of your portrait image using the Photos app. Not only can you adjust the focus of your image, but you can also change the Portrait Mode lighting applied to your photo. To change the focus and lighting effects applied to a portrait photo, open the image in the Photos app and tap Edit.
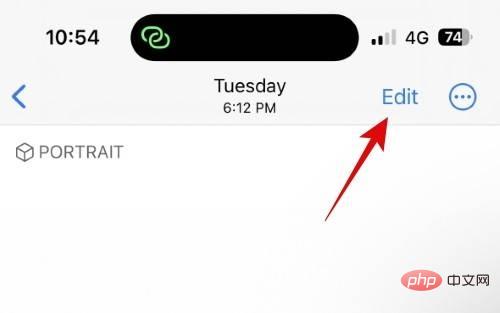
#You can now click the  icon in the upper left corner to adjust the focus of the image.

Use the slider to increase or decrease the focal length.
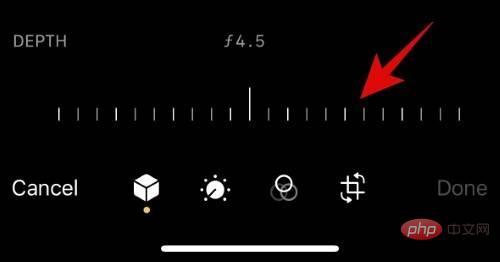
Similarly, when finished slide and change the lighting effect applied to the image.
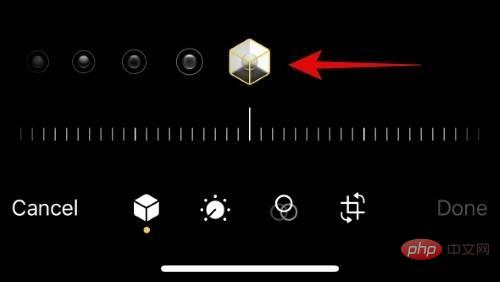
This is how you can adjust the focus and lighting effects applied to portrait images on iPhone 14 Pro and Pro Max.
17. Vertical Panoramas Can Help You Capture Tall Structures
Panoramas are designed to be shot horizontally to accommodate subjects and objects that would otherwise be outside of your frame. But it’s not a hard and fast rule, you can always try new things when shooting panoramas on iPhone 14 Pro. You can switch to a wide-angle lens and then capture vertical panoramas while low to the ground to capture extremely tall structures such as skyscrapers, towers, windmills, and more.
You can also use panoramas to create abstract images by moving objects and subjects in and out of the frame as you capture the panorama. This creates a unique look and allows for more creative control when creating abstract images. So if you want to try something new when capturing images on your iPhone 14 Pro, you might want to try Panorama mode in the Camera app.
18. Tripod for slow motion, time-lapse and long exposure photography
If you like taking photos on your iPhone, then we highly recommend using a tripod. A tripod can help you stabilize your iPhone like never before and allow you to capture perfect images, especially under magnification and in low-light conditions. Low-light conditions require a higher shutter speed, which means the shutter will be open longer to let more light into the camera's sensor. Therefore, when capturing images at higher shutter speeds, any slight movement can introduce blur, noise, and light streaks in the image. This ruins most images; therefore, a tripod can help you stabilize and capture low-light images with perfect clarity.
Additionally, a tripod helps you capture time lapses easily as you can stabilize your iPhone, set your frame and simply step away from your iPhone to capture your subject for the desired amount of time. This is especially useful if you wish to create a time lapse of a travel journey, night sky, etc. So, if you regularly shoot images and videos from your iPhone and want to create a more professional look, you should definitely get a tripod for your iPhone.
19. Third-party apps for manual controls
While the iPhone camera app is very comprehensive, it lacks some basic features if you want to create professional images and videos. The lack of manual control over ISO and other settings can seriously hinder your shooting and prevent you from creating unique looks that aren't possible when using the default camera app.
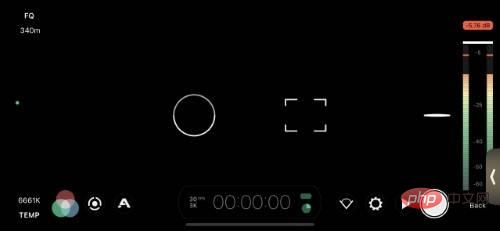
# Therefore, I recommend you check out some third-party apps to manually control your iPhone 14 Pro’s camera. Here are some suggestions to help you find your favorite apps. Most of these options are paid but offer excellent camera controls, which may make them worth the money, depending on your current needs and requirements.
- FILM PROFESSIONAL| Download link
- Halide Marker II|Download link
- Ghost Camera | Download link
20. Burst mode and action mode for all action shots
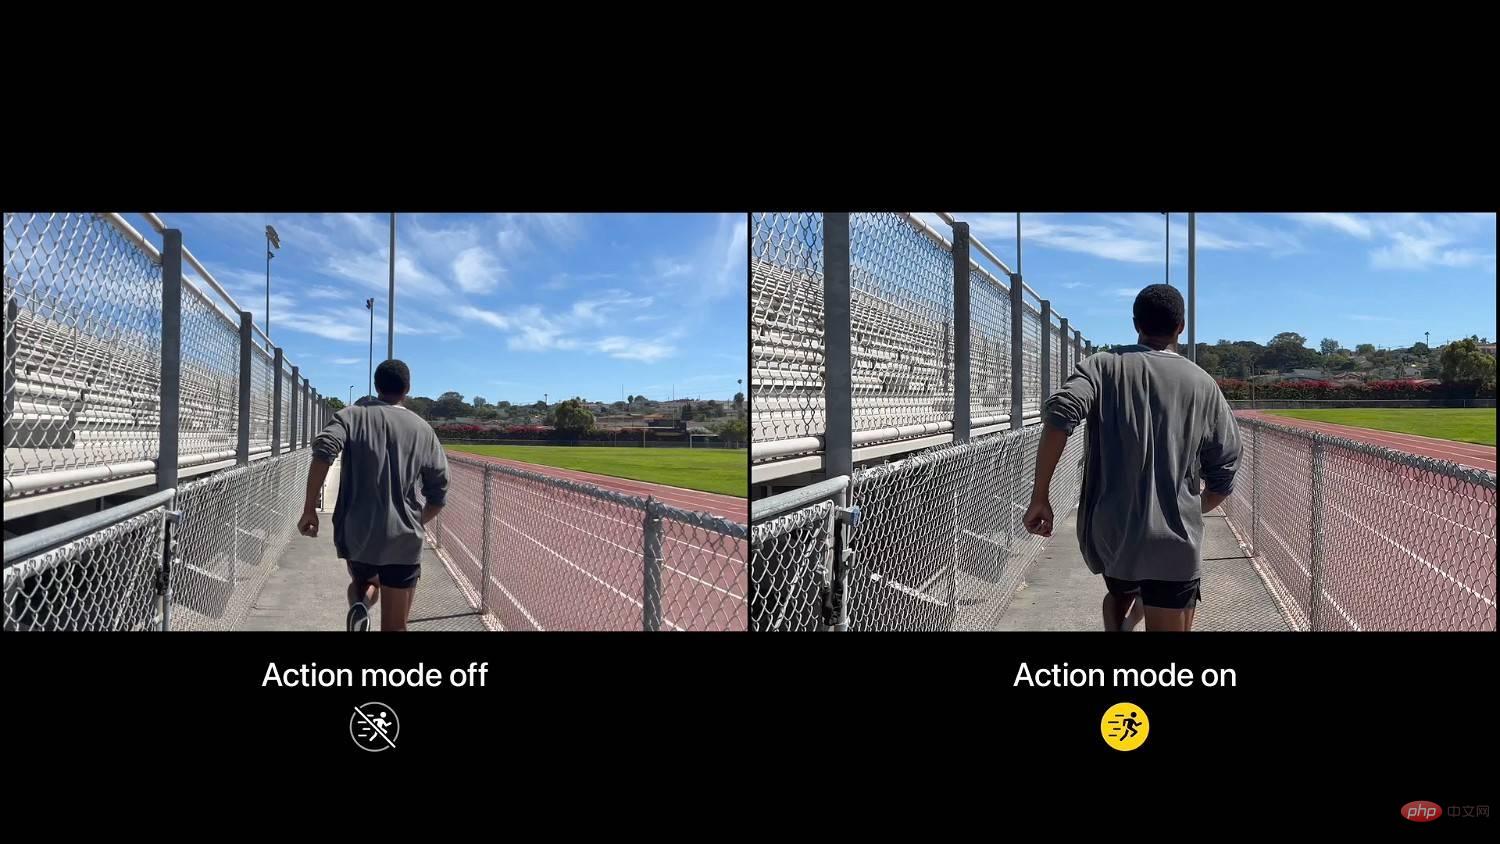
Use Auto in the default camera app Capturing fast-moving subjects can be challenging when it comes to exposure and other settings. This can become more difficult if you're also in motion while trying to capture images and videos. So burst mode and action mode can be of huge help in this situation. Action Mode is a stabilization feature for capturing videos that helps eliminate shakes in videos. This feature works by slightly upscaling the original frame and then using smart background processing to stabilize your video.
Similarly, burst mode quickly captures images at your current settings until you release the shutter button. This helps you easily capture a subject in motion and then select the best image from all the bursts of photos. You can use burst mode by holding down the shutter button and then swiping to the left.
You can also go to Settings > Camera and turn on the toggle switch for Use Volume Up for Burst. This will allow you to capture images in burst mode on your iPhone using the volume up button.
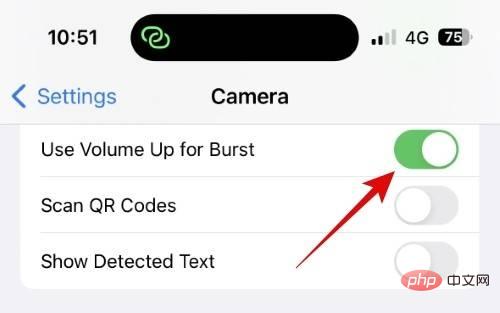
To use Action Mode while shooting video, just click and turn on the  Action Mode option ( ) that should appear at the top.
  If the option is not available at the top, you can also swipe up and turn on action mode ( ).
21. Keep an eye on the sun
The sun can be your friend or foe, depending on your position relative to it when you capture the image. This is especially true when taking images in poor lighting conditions, usually in the afternoon.
So paying attention to the sun when taking an image can help you properly light your subject and ensure that your image doesn't have any harsh shadows or overexposed highlights. If you want to experiment, you can also use the sun and position it behind your subject to create an interesting and unique look.
22. Turn off Low Power Mode whenever possible
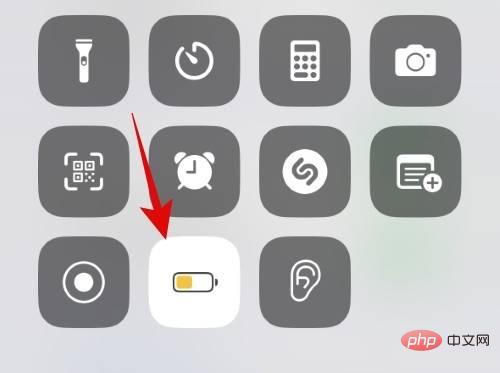
Low Power Mode helps save iPhone battery life by limiting background activity and reducing the frequency of your iPhone’s processor. battery power. While a great way to extend your iPhone's battery life, it can slow down your device's performance.
This, in turn, delays image processing and causes problems when capturing large numbers of images and videos. It also increases processing time when using exclusive features like Movie Mode, Action Mode, Portrait Mode, and more. Therefore, whenever you take an image, we recommend that you turn off Low Power Mode to get the most out of your iPhone 14 Pro’s camera.
23. Understand ProRAW and ProRes and when to use them
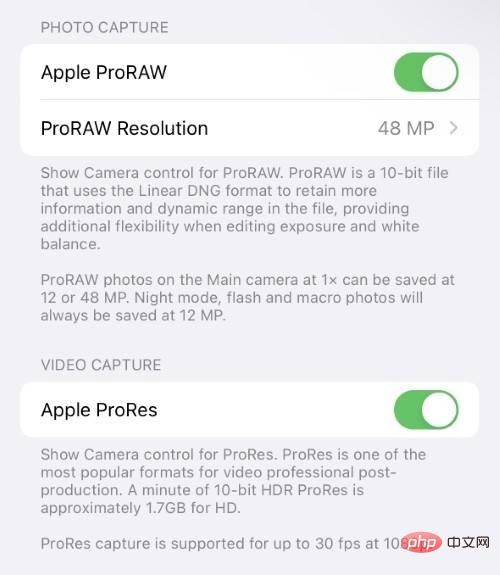
ProRAW and ProRes are RAW image and video formats provided by Apple that help with image and Capture as much data as possible in the video. This data can greatly aid you in post-processing when editing captured images and videos to adjust colors and other settings for a custom look. These formats also allow you to apply LUTs and other exclusive effects to help create a unique look for your images and videos.
However, these formats are large in size and take up a lot of space on your iPhone. If you don't plan on professionally editing your images in the future, it's probably best not to shoot with ProRAW and ProRes on your iPhone. This will help you save space while producing images and videos that are nearly identical to those shot in ProRAW and ProRes. Therefore, we recommend using ProRAW and ProRes intelligently when needed to save space and editing time.
The above is the detailed content of 23 pro-like tips on how to get the most out of your iPhone 14 Pro camera. For more information, please follow other related articles on the PHP Chinese website!

Hot AI Tools

Undresser.AI Undress
AI-powered app for creating realistic nude photos

AI Clothes Remover
Online AI tool for removing clothes from photos.

Undress AI Tool
Undress images for free

Clothoff.io
AI clothes remover

Video Face Swap
Swap faces in any video effortlessly with our completely free AI face swap tool!

Hot Article

Hot Tools

Notepad++7.3.1
Easy-to-use and free code editor

SublimeText3 Chinese version
Chinese version, very easy to use

Zend Studio 13.0.1
Powerful PHP integrated development environment

Dreamweaver CS6
Visual web development tools

SublimeText3 Mac version
God-level code editing software (SublimeText3)

Hot Topics
 1393
1393
 52
52
 37
37
 110
110
 iPhone 16 Pro and iPhone 16 Pro Max official with new cameras, A18 Pro SoC and larger screens
Sep 10, 2024 am 06:50 AM
Apple has finally lifted the covers off its new high-end iPhone models. The iPhone 16 Pro and iPhone 16 Pro Max now come with larger screens compared to their last-gen counterparts (6.3-in on the Pro, 6.9-in on Pro Max). They get an enhanced Apple A1
 iPhone parts Activation Lock spotted in iOS 18 RC — may be Apple\'s latest blow to right to repair sold under the guise of user protection
Sep 14, 2024 am 06:29 AM
Earlier this year, Apple announced that it would be expanding its Activation Lock feature to iPhone components. This effectively links individual iPhone components, like the battery, display, FaceID assembly, and camera hardware to an iCloud account,
 iPhone parts Activation Lock may be Apple\'s latest blow to right to repair sold under the guise of user protection
Sep 13, 2024 pm 06:17 PM
Earlier this year, Apple announced that it would be expanding its Activation Lock feature to iPhone components. This effectively links individual iPhone components, like the battery, display, FaceID assembly, and camera hardware to an iCloud account,
 Gate.io trading platform official app download and installation address
Feb 13, 2025 pm 07:33 PM
This article details the steps to register and download the latest app on the official website of Gate.io. First, the registration process is introduced, including filling in the registration information, verifying the email/mobile phone number, and completing the registration. Secondly, it explains how to download the Gate.io App on iOS devices and Android devices. Finally, security tips are emphasized, such as verifying the authenticity of the official website, enabling two-step verification, and being alert to phishing risks to ensure the safety of user accounts and assets.
 Multiple iPhone 16 Pro users report touchscreen freezing issues, possibly linked to palm rejection sensitivity
Sep 23, 2024 pm 06:18 PM
If you've already gotten your hands on a device from the Apple's iPhone 16 lineup — more specifically, the 16 Pro/Pro Max — chances are you've recently faced some kind of issue with the touchscreen. The silver lining is that you're not alone—reports
 Anbi app official download v2.96.2 latest version installation Anbi official Android version
Mar 04, 2025 pm 01:06 PM
Binance App official installation steps: Android needs to visit the official website to find the download link, choose the Android version to download and install; iOS search for "Binance" on the App Store. All should pay attention to the agreement through official channels.
 Beats adds phone cases to its lineup: unveils a MagSafe case for the iPhone 16 series
Sep 11, 2024 pm 03:33 PM
Beats is known for launching audio products such as Bluetooth speakers and headphones, but in what can best be described as a surprise, the Apple-owned company has branched into making phone cases, starting with the iPhone 16 series. The Beats iPhone
 How to solve the problem of 'Undefined array key 'sign'' error when calling Alipay EasySDK using PHP?
Mar 31, 2025 pm 11:51 PM
Problem Description When calling Alipay EasySDK using PHP, after filling in the parameters according to the official code, an error message was reported during operation: "Undefined...


 Source: Unsplash.com
  Source: Unsplash.com
  Source: Unsplash.com
  Source: Unsplash.com



 Source: Unsplash.com
 Source: Unsplash. com
 Source: Unsplash.com
 ##Source: Unsplash.com
 Source: Unsplash.com