
1. Install progress library
Progress is a third-party Python library. Execute the pip command in the terminal to install it.
pip install progress
2. Progress progress bar effect display
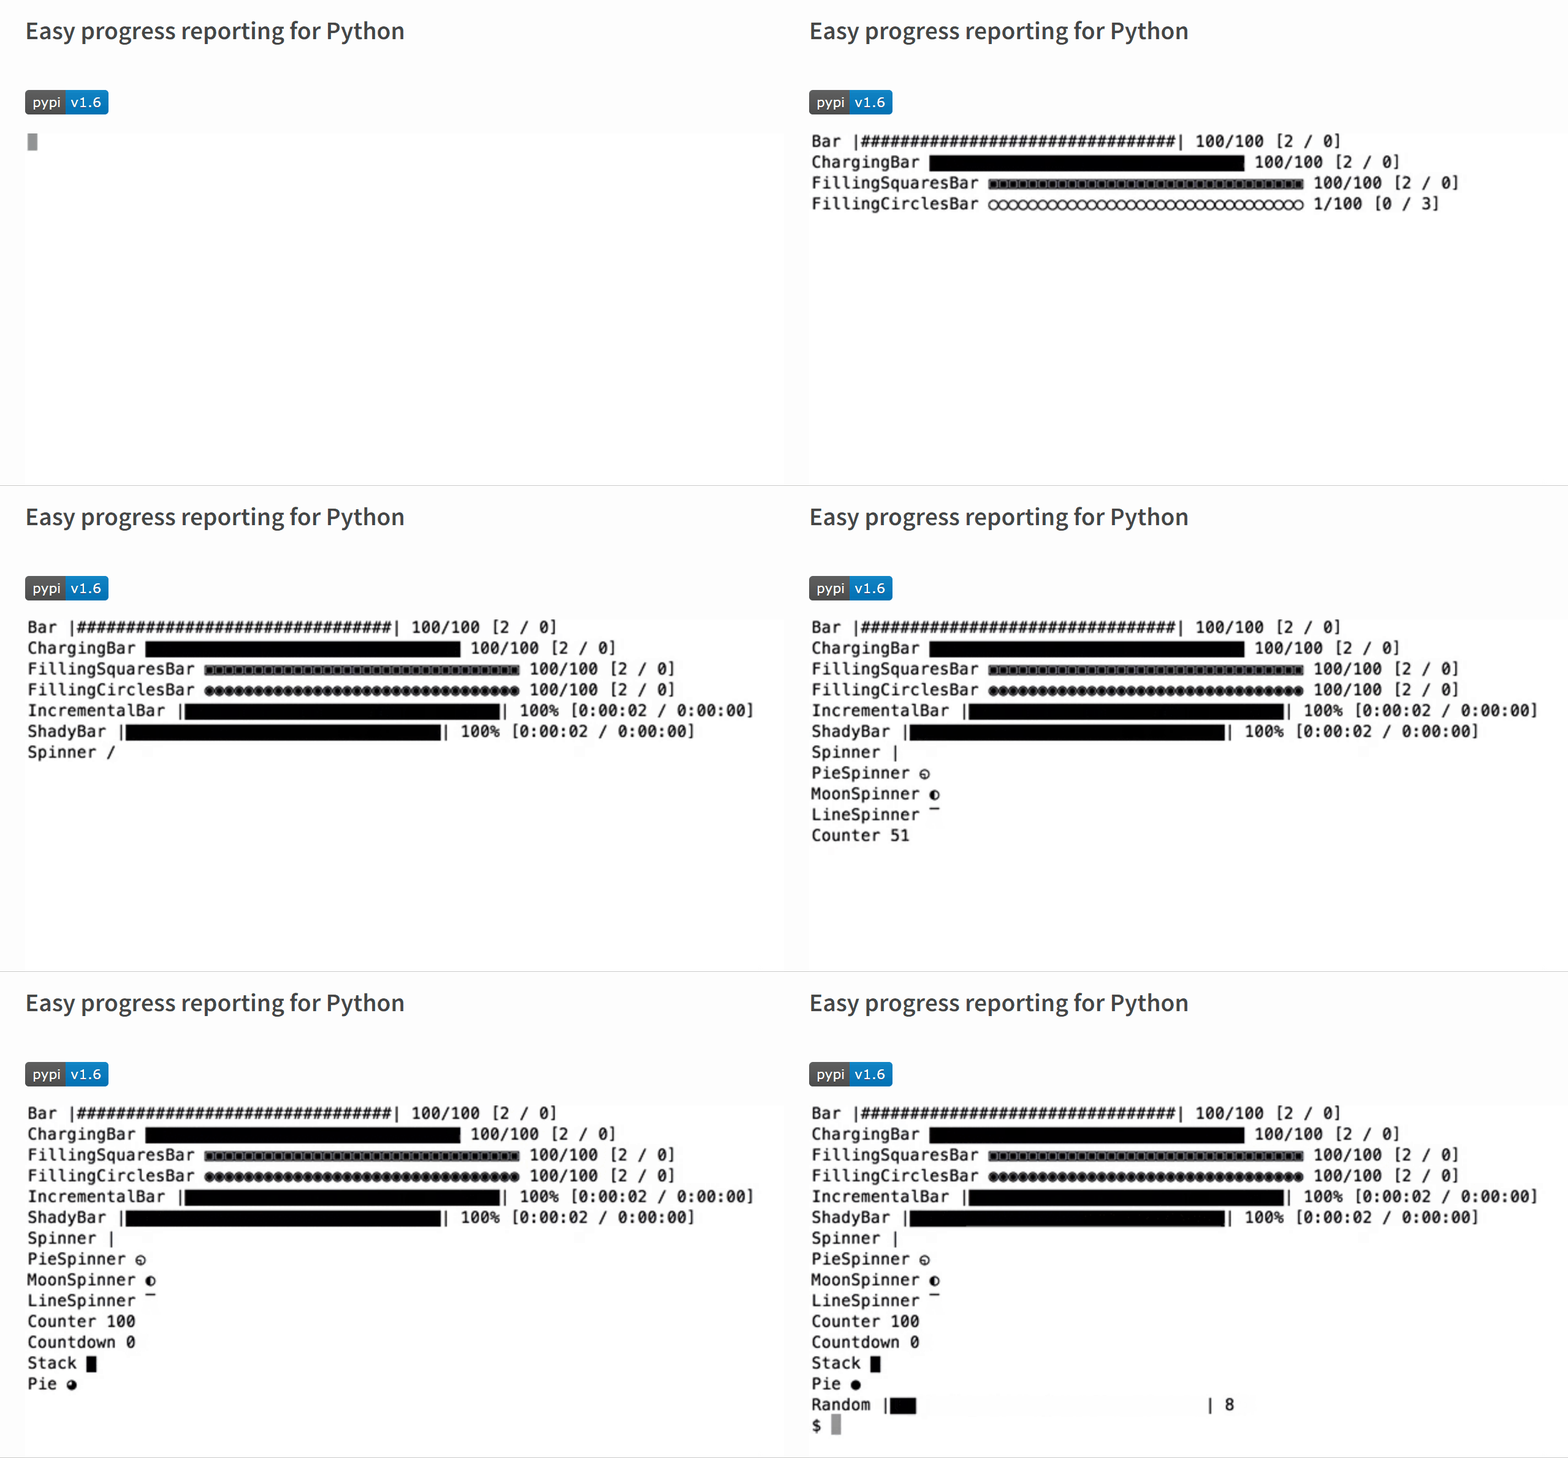
On the official website, you can see the various progress bar effects that progress can achieve, as shown in the following animation.
# coding=utf-8
from progress.bar import Bar
import time

# 创建Bar类的实例
bar = Bar('MyProcess:', max=100)
# 循环处理某业务,调用bar对象的next()方法,循环次数等于max
for _ in range(100):
	# Do some work
    time.sleep(0.05)
    bar.next()
# 循环完成后调用finish()方法
bar.finish()Running effect:

Use the progress library to implement the progress bar It's very simple. Import the Bar class from bar.py in the progress library, instantiate an object, and then process the business in a loop and call the next() method. After the processing is completed, call the finish() method to end the progress bar.
The main parameters of the Bar class are:
message: the message displayed by the progress bar. This parameter can be passed to Bar using positional parameters by default.
width: Modify the width of the progress bar, the default is 32.
max: The progress bar is divided into several equal parts, such as 100.
suffix: The format for displaying progress percentage, the default is ‘%(index)d/%(max)d’.
fill: What to use to fill the progress bar, the default is ’#’.
empty_fill: What to use to fill the unloaded progress bar, the default space is ’ ’.
bar_prefix: progress bar prefix, default’ |’.
bar_suffix: progress bar suffix, default’| ’.
color: The color of the progress bar, default None.
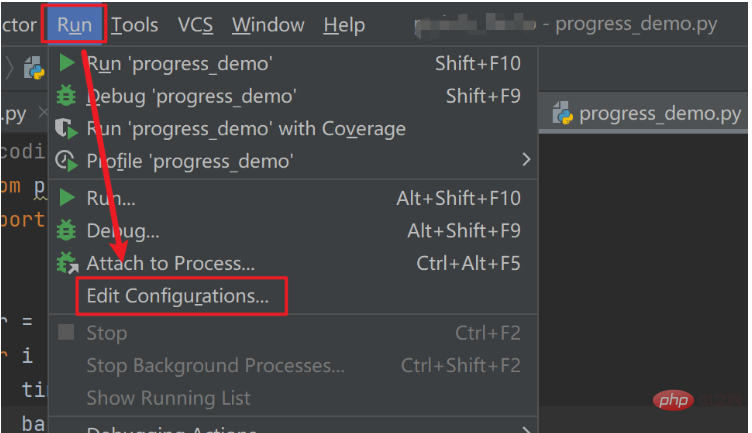
Most Python programmers use PyCharm. If the progress bar effect is not displayed after running the progress bar code in PyCharm, you can follow Follow the steps below to set up and then run the code again.
Step1. Click the Run button above PyCharm, and then click Edit Configurations to enter the run configuration page.
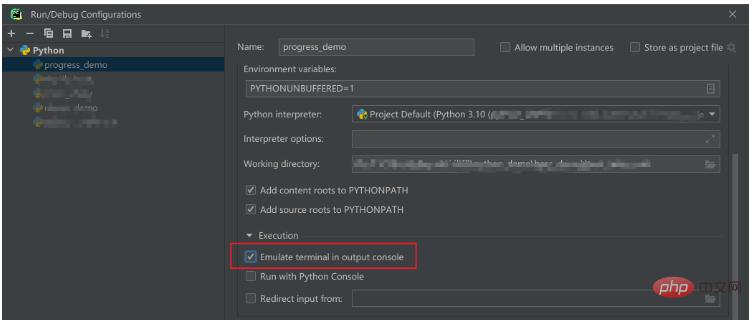
Step2. Check the Emulate terminal in output console option and rerun the code.
Careful friends should have discovered that after the above progress bar code is completed in PyCharm, there is a string of strange characters under the progress bar: ‘?[?25h&rsquo ; , use the script mode python progress_demo.py to run the same code in the terminal, and there will be no such string of symbols.
This string of characters represents the cursor. After running in PyCharm, the cursor is output on the console. The solution is: hold down the Ctrl key, click on the imported Bar class name, jump to the source code bar.py, then hold down the Ctrl key and click on the Progress class inherited by the Bar class, enter the __init__.py file of the progress library, and change The SHOW_CURSOR variable in this file is changed to an empty string.
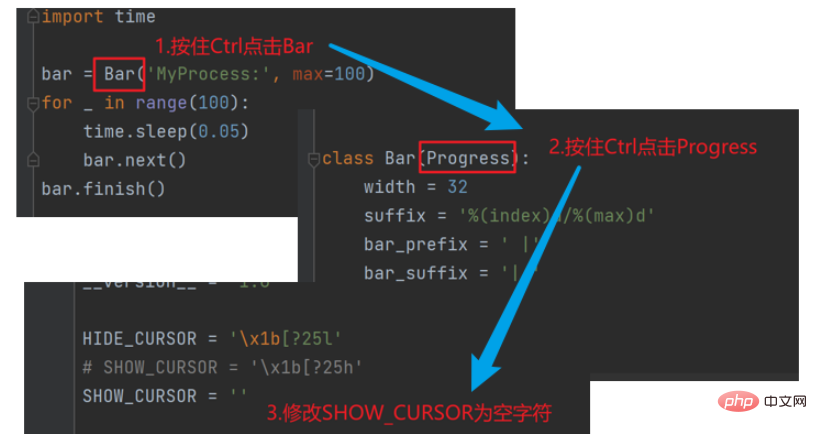
#After modifying the source code and re-running the code, the cursor will no longer be displayed, and the string of characters will not be displayed.

When running the progress bar in PyChram, you may also encounter other display problems. It is recommended to run it in a script when problems occur. The result of running the script shall prevail. Running in PyChram is only used to debug code.
1. Context manager: Use with … as … context manager to write the progress bar, progress bar There is no need to call the finish() method when finished.
with Bar('Processing', max=20) as bar:
    for i in range(20):
        time.sleep(0.05)
bar.next()2. Use the iter() method: Using the iter() method can simplify the work of the iterator without calling the next() method.
for i in Bar('Processing').iter(range(100)):
time.sleep(0.05)The execution results of these two implementation methods are the same as the original implementation method.
1. Bar series
In the previous article, you clicked on the source code of progress and you can see the Bar class inheritance From the Progress class, the Progress class inherits from the Infinite class. The Progress class and the Infinite class implement the basic functions of the progress bar.
In bar.py, in addition to the Bar class, there are 6 classes, ChargingBar, FillingSquaresBar, FillingCirclesBar, IncrementalBar, PixelBar, and ShadyBar. They are subclasses or grandsons of the Bar class and inherit the progress bar. The function only modifies the values of variables suffix, fill, empty_fill, bar_prefix, bar_suffix in each class, and modifies the style of the progress bar.
It is very simple to use. You only need to import these classes and replace Bar in the above code with these classes, such as FillingSquaresBar.
from progress.bar import Bar, ChargingBar, FillingSquaresBar, FillingCirclesBar, IncrementalBar, PixelBar, ShadyBar
import time

bar = FillingSquaresBar('MyProcess:', max=100)
for i in range(100):
    time.sleep(0.05)
    bar.next()
bar.finish()Operation effect:

还可以自己修改上面的参数,设置个性化的进度条,本文暂不扩展,以后有空可以专门写文章介绍。
2. Spinner 系列
progress 库的 spinner.py 中实现了 5 个类,Spinner, PieSpinner, MoonSpinner, LineSpinner, PixelSpinner。
from progress.spinner import Spinner, PieSpinner, MoonSpinner, LineSpinner, PixelSpinner

for i in Spinner('MySpinner:').iter(range(100)):
time.sleep(0.01)运行效果:

3.Counter 系列
progress 库的 counter.py 中实现了 4 个类,Counter, Countdown, Stack, Pie。
from progress.counter import Counter, Countdown, Stack, Pie
import time

for i in Counter('Loading:').iter(range(100)):
time.sleep(0.01)运行效果:

接下来将上面介绍的所有种类的进度条全部放到一起,代码如下:
from progress.bar import Bar, ChargingBar, FillingSquaresBar, \
    FillingCirclesBar, IncrementalBar, PixelBar, ShadyBar
from progress.spinner import Spinner, PieSpinner, MoonSpinner, LineSpinner, PixelSpinner
from progress.counter import Counter, Countdown, Stack, Pie
import time
import random

progess_list = [Bar, ChargingBar, FillingSquaresBar, FillingCirclesBar, IncrementalBar,
                PixelBar, ShadyBar, Spinner, PieSpinner, MoonSpinner, LineSpinner,
                PixelSpinner, Counter, Countdown, Stack, Pie]
for P in progess_list:
    for i in P(P.__name__ + ':').iter(range(100)):
        time.sleep(0.01)

bar = IncrementalBar('Random:', suffix='%(index)d%%')
for i in range(100):
    bar.goto(random.randint(0, 100))
    time.sleep(0.01)
bar.finish()运行效果:
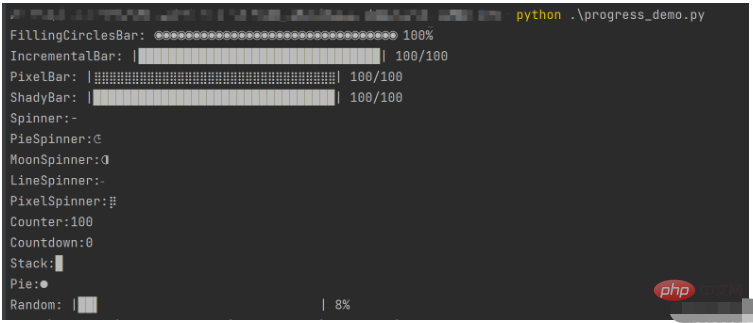
运行代码后可以得出所有种类的进度条,与文章开头从官网截的图效果相同。
The above is the detailed content of How to implement a progress bar using the progress library in Python. For more information, please follow other related articles on the PHP Chinese website!


