'Methods to resolve 0x80073701 update error in Windows 11'
Windows updates are critical and the latest versions are still in their early stages, it is recommended that you always install the latest version. However, some users are receiving the 0x80073701 error when trying to install updates in Windows 11.
With every update, Microsoft releases a series of new features, some of which are designed to improve system performance. In addition to this, there are patches for previously reported bugs. Therefore, you will get better performance and fewer errors after installing the latest version.
However, there are various errors that prevent you from installing the update. Questions here can range from simple to extremely complex. And, that’s why we decided to use this article to help you fix 0x80073701 update error in Windows 11.
What causes the 0x80073701 update error in Windows 11?
When it comes to update errors, there are some common root causes. Typically, this is a glitch that prevents you from installing updates.
In addition to this, you may find yourself encountering error code 0x80073701 in Windows 11 if critical system files are corrupted or missing. Then there are the Windows Update components, issues that can wreak havoc when installing updates.
In addition, critical services responsible for identifying, downloading, and installing updates may not be running.
Now that you have a basic understanding of the root cause, let us introduce you to the most effective fixes for 0x80073701 error in Windows 11.
How to fix 0x80073701 error windows 11?
1. Use a dedicated third-party tool
The easiest way to fix any Windows update error or even other errors is to use a reliable and dedicated third-party tool. There are many available, but not all are as effective as Restoro.
It not only eliminates corrupted system files, but also finds other problems with the system and repairs them. The tool will optimize the registry, scan and remove any malware found, and it will also replace missing DLL files.
On top of that, it will also repair any damage left by malware or viruses to ensure your PC’s health and performance are not affected.
With Restoro, you can think freely and work effortlessly while solving problems in the background.
⇒Get Recovery
2. Run the Windows Update Troubleshooter
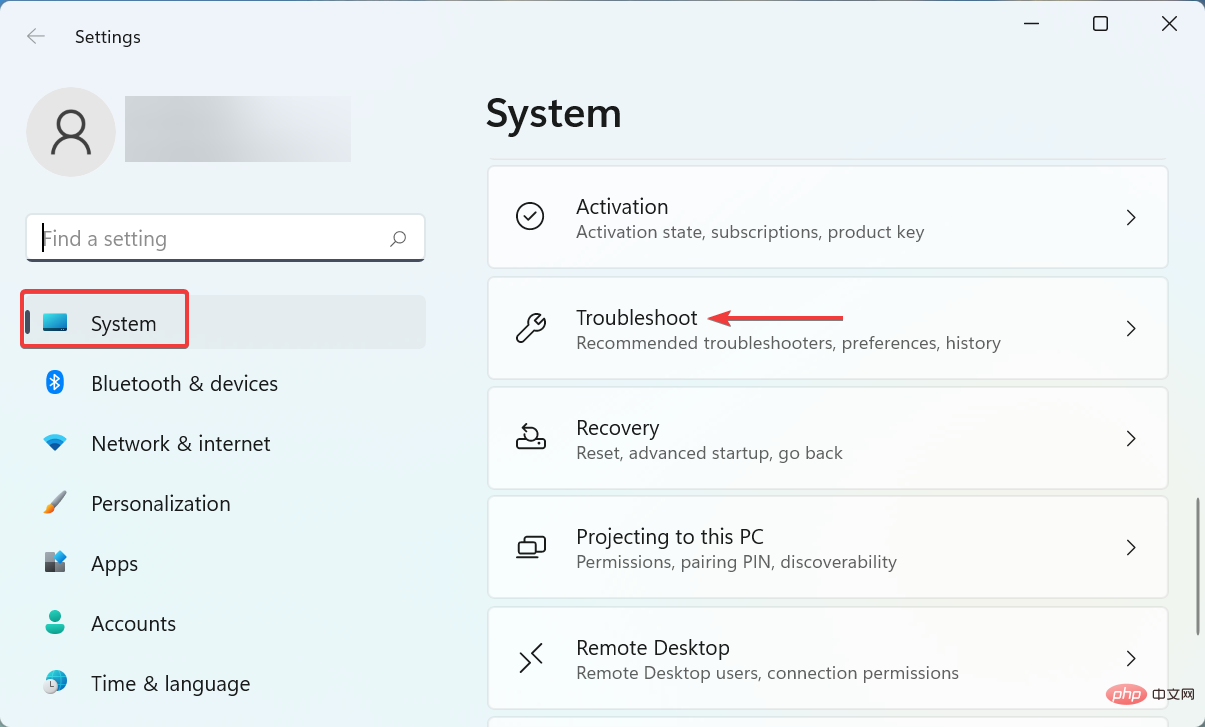
- Press Windows I to launch the Settings app and click on the right side of the System tab "Troubleshooting".

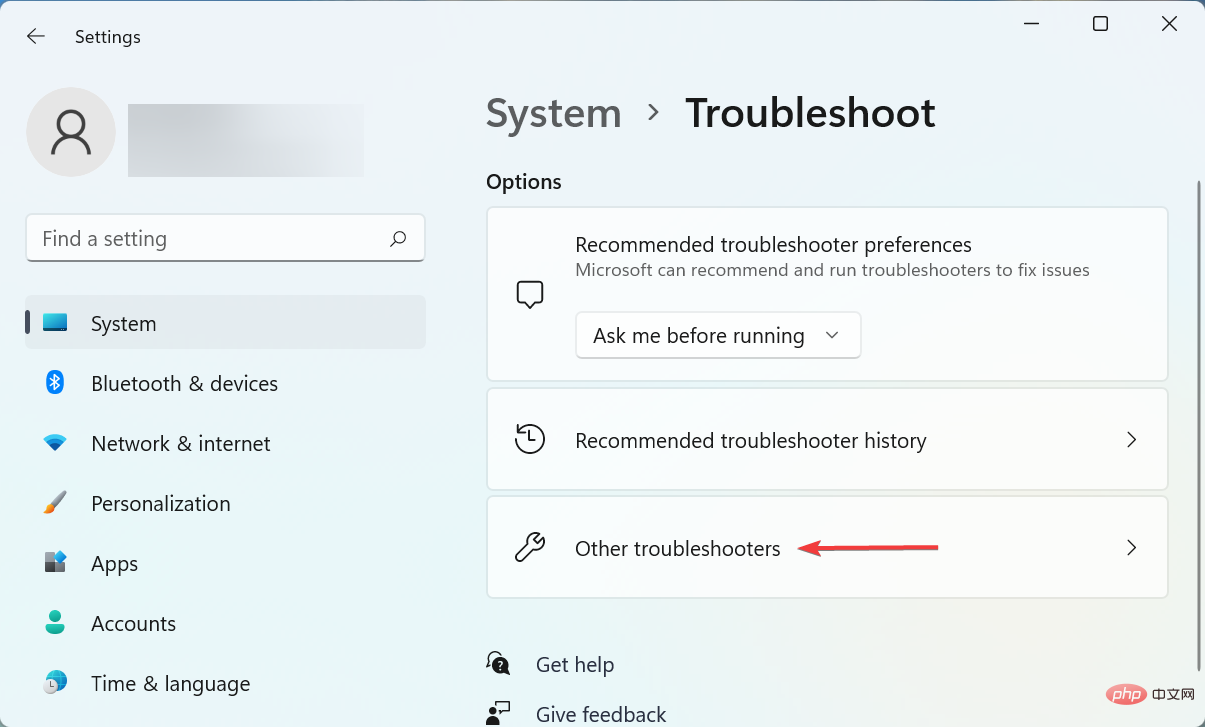
- Click Additional Troubleshooting.

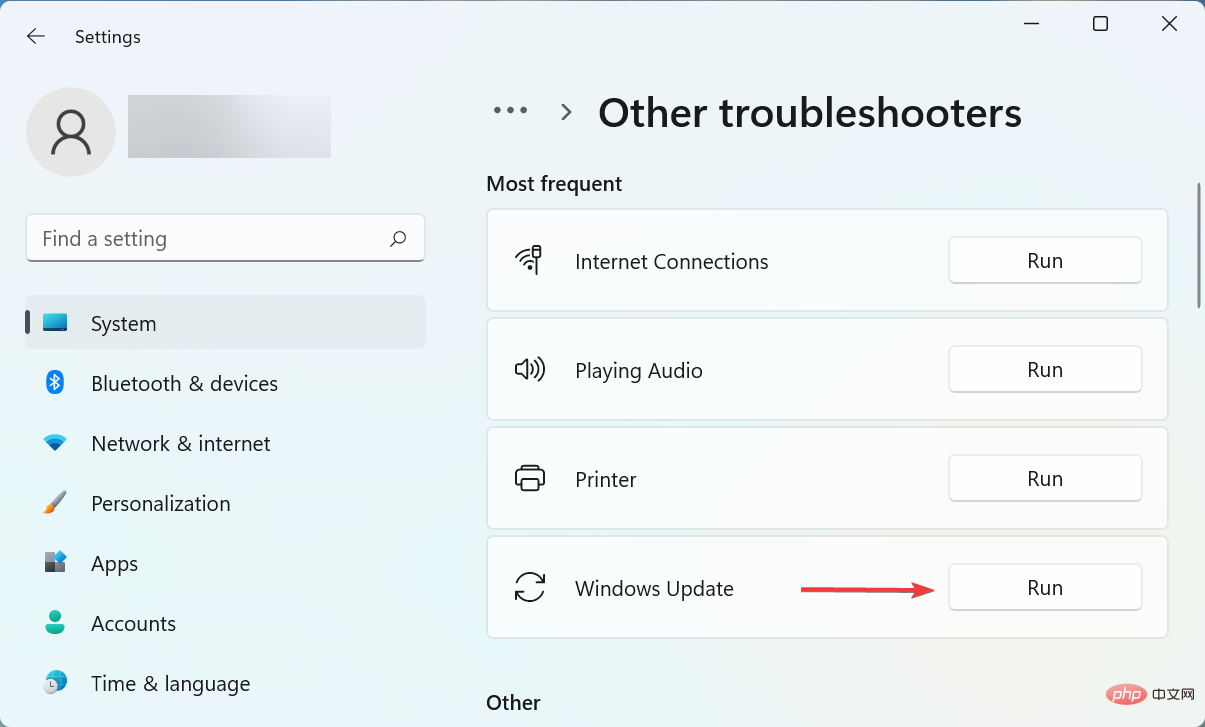
- Find the Windows Updatetroubleshooter and click the Run button next to it.

- Follow the on-screen instructions and select the necessary responses when prompted to fix the error.
3. Run the DISM tool and SFC scan
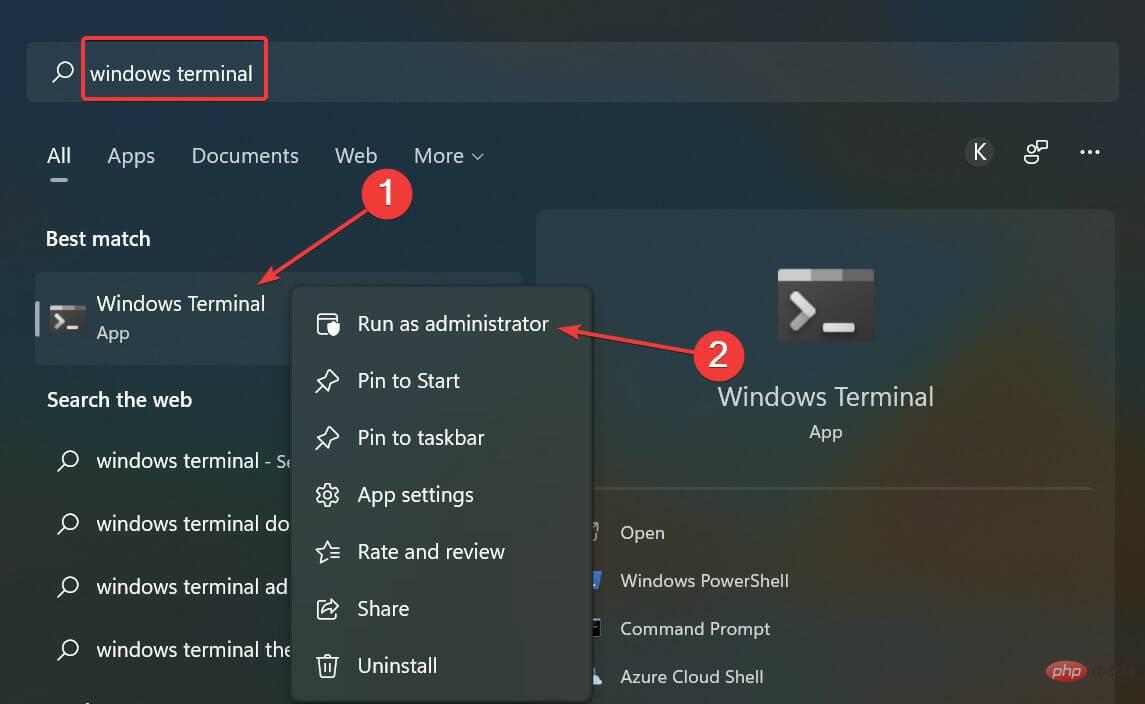
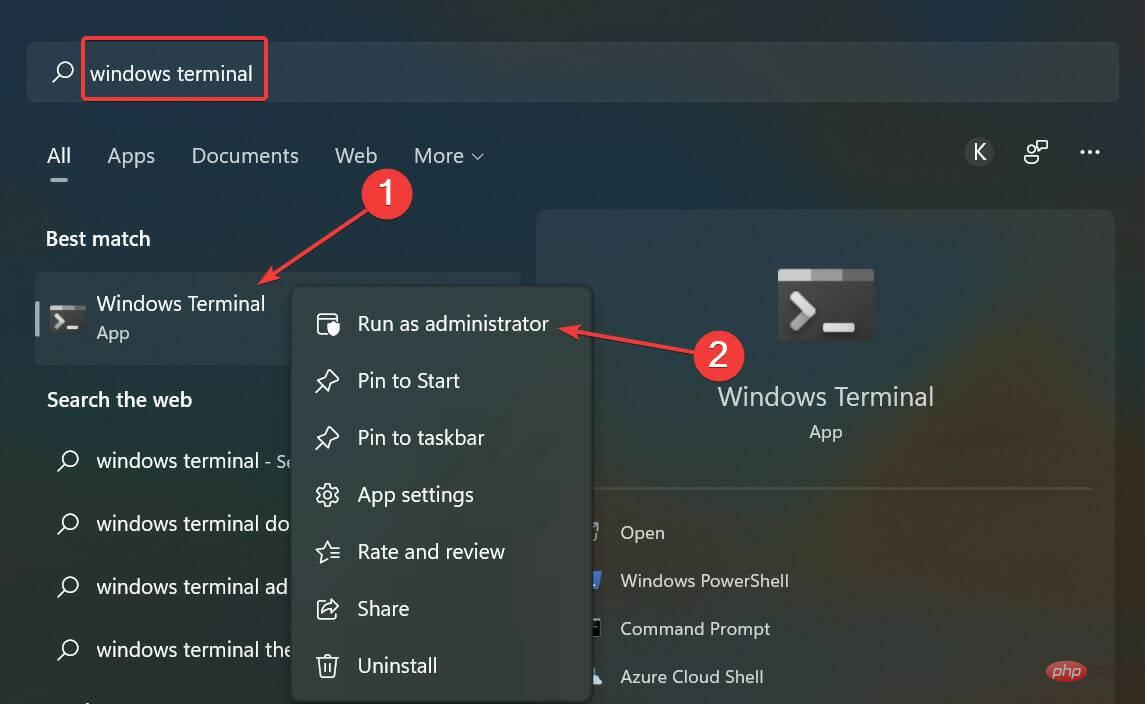
- Press Windows S to launch the search menu in the top text field Enter Windows Terminal, right-click the relevant search result, and select Run as administrator from the context menu.

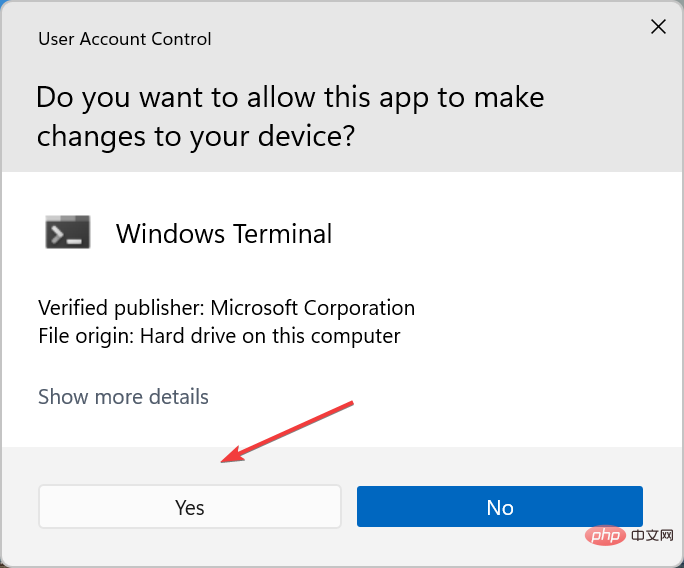
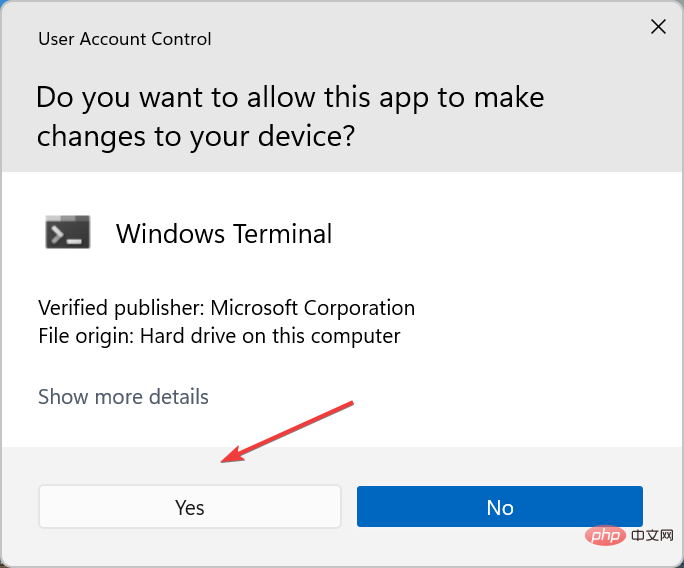
- Click Yes on the pop-up UAC (User Account Control) prompt.

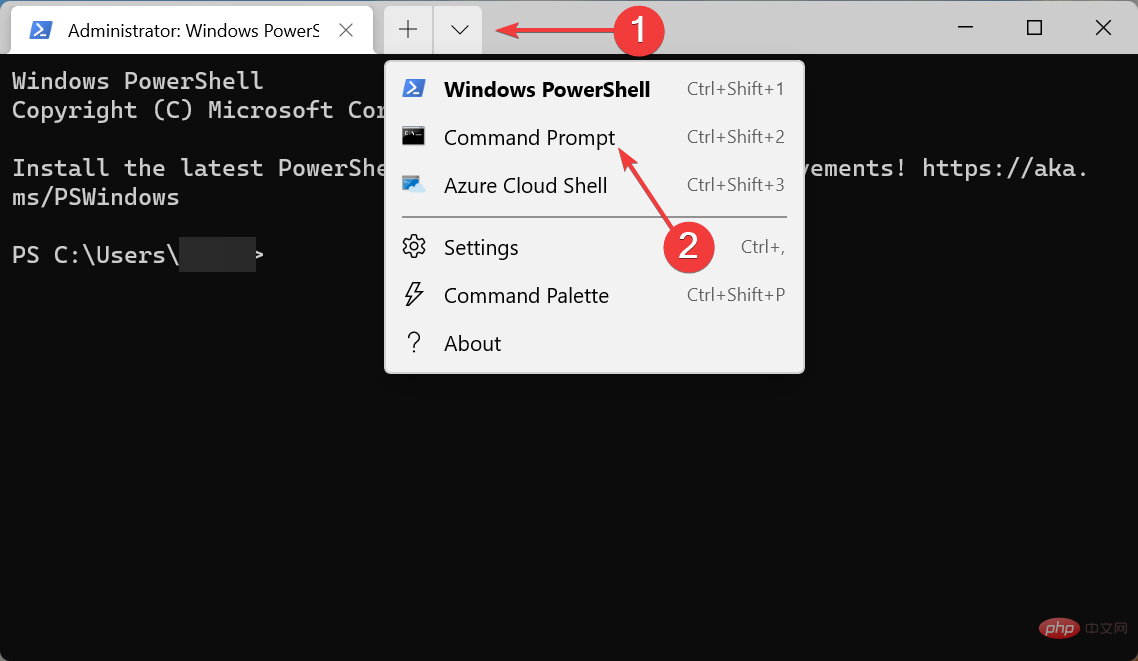
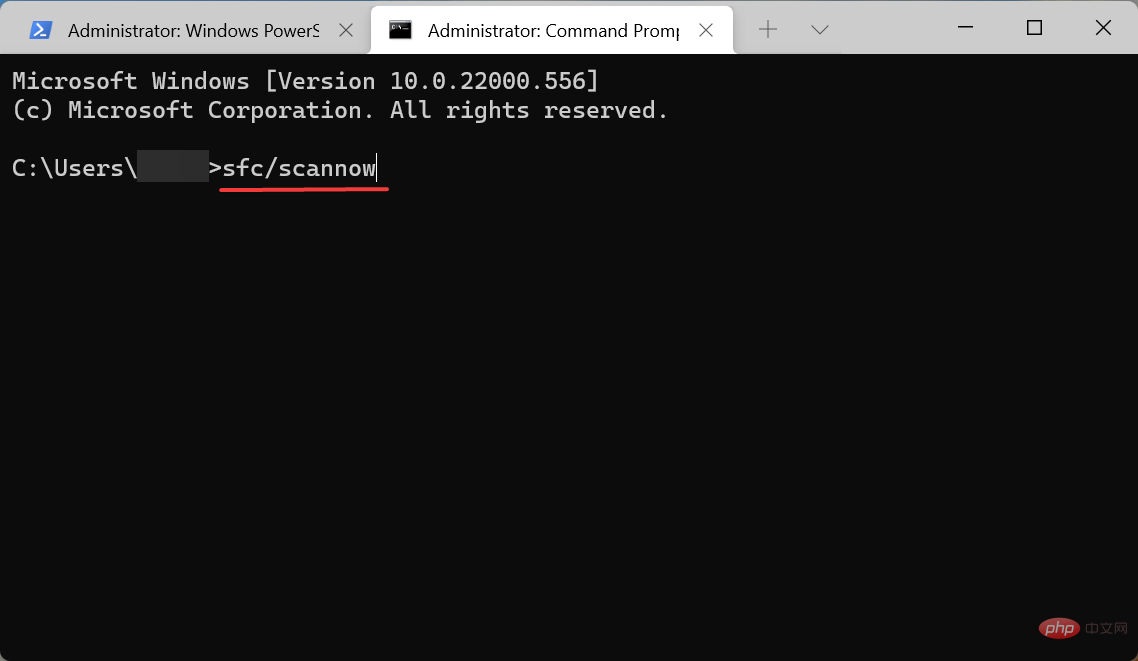
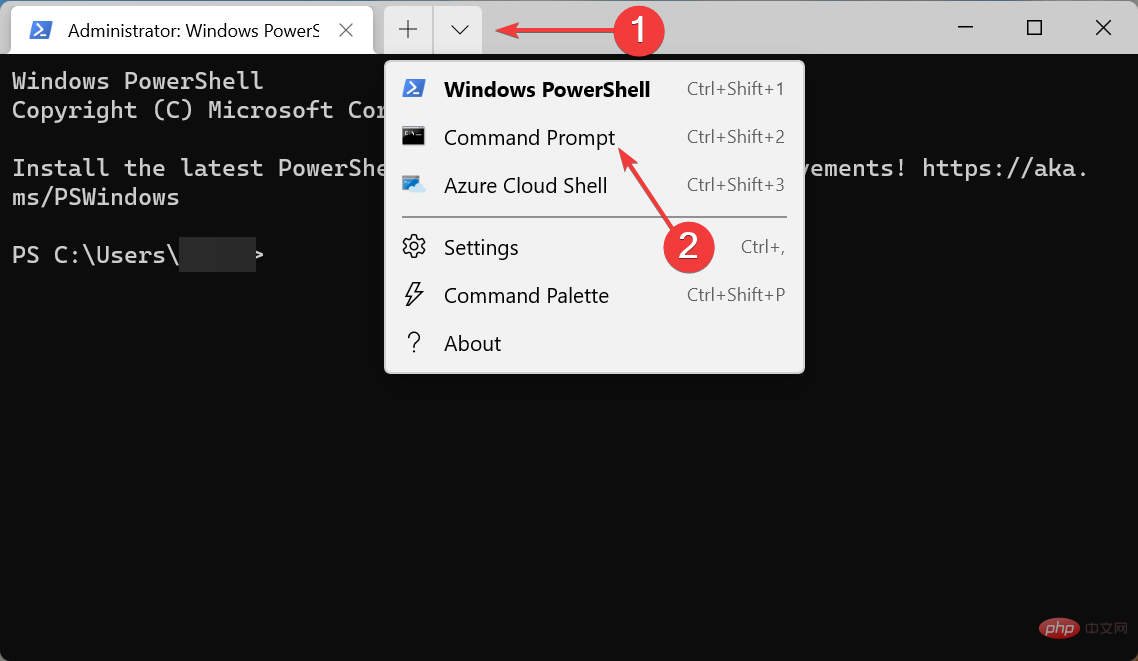
- Now, click on the down arrow and select Command Prompt from the list of options. Alternatively, you can click Ctrl in a new tab Shift2 to launch the Command Prompt.

- Now, paste the following three commands at a time and click Enter on each command to run the DISM tool.
<strong>DISM.exe /online /cleanup-image /scanhealth</strong>##DISM.exe /online /cleanup-image /restorehealth<strong></strong>After completion, execute the following command to run the - SFC scan.
sfc /scannow<strong></strong>
4. Run Windows Update Service
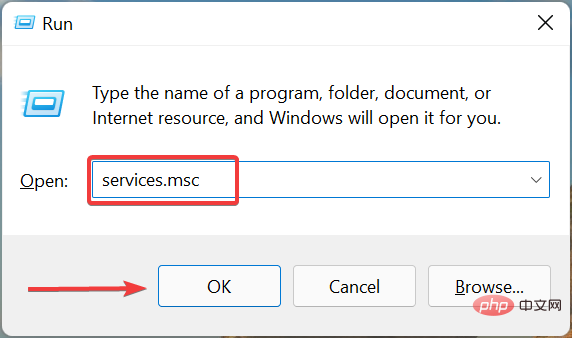
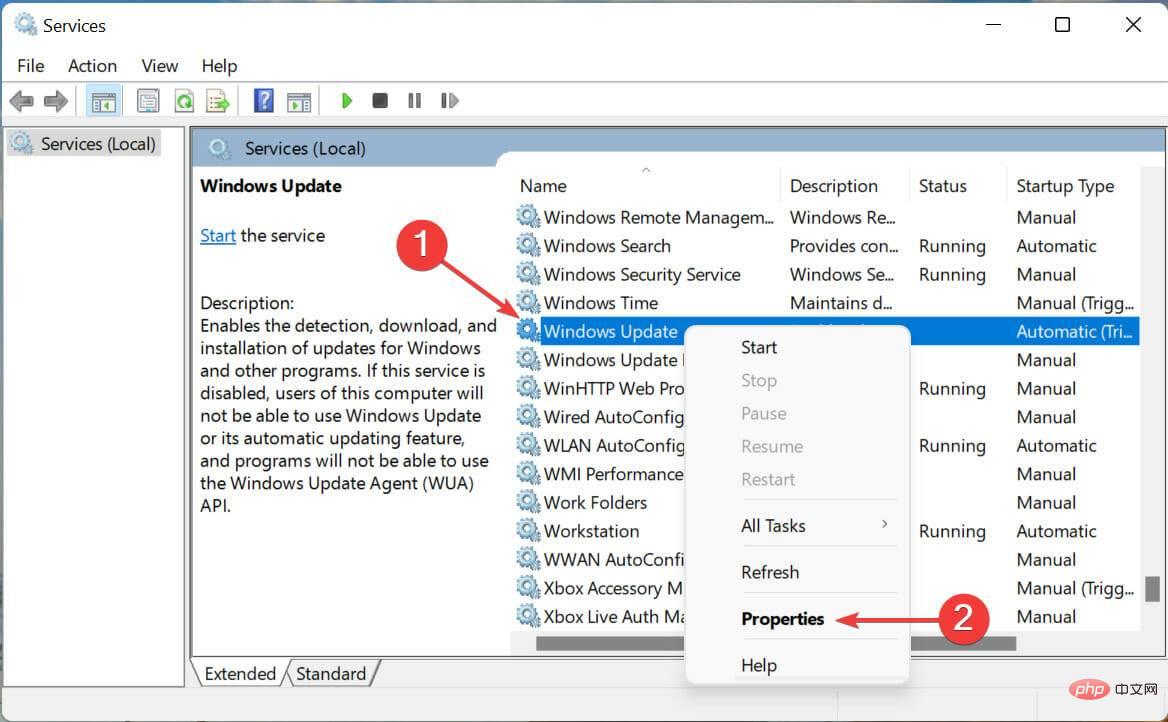
- Press Windows R to start the run command and enter services.msc## in the text field #, then click OK or hit Enter to start the Service application.
 Locate the
 - Windows Update service, right-click it and select Properties from the context menu.
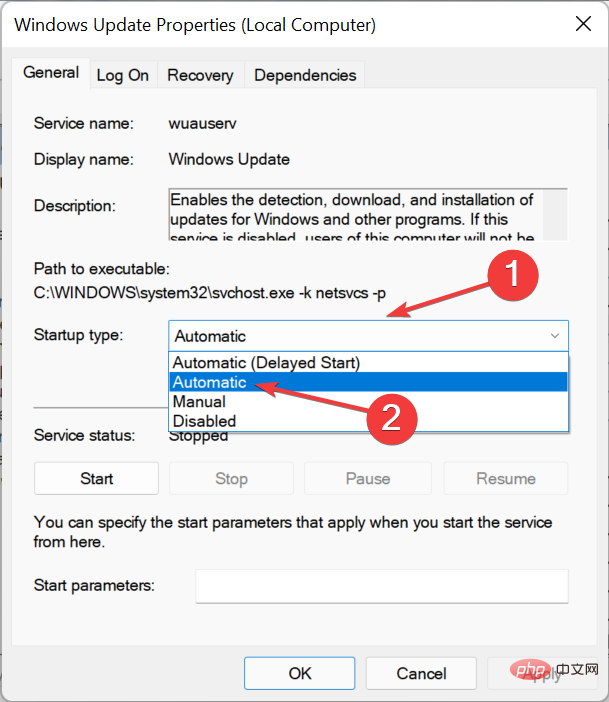
 Click the
 - Startup type drop-down menu and select Automatic from the list of options.
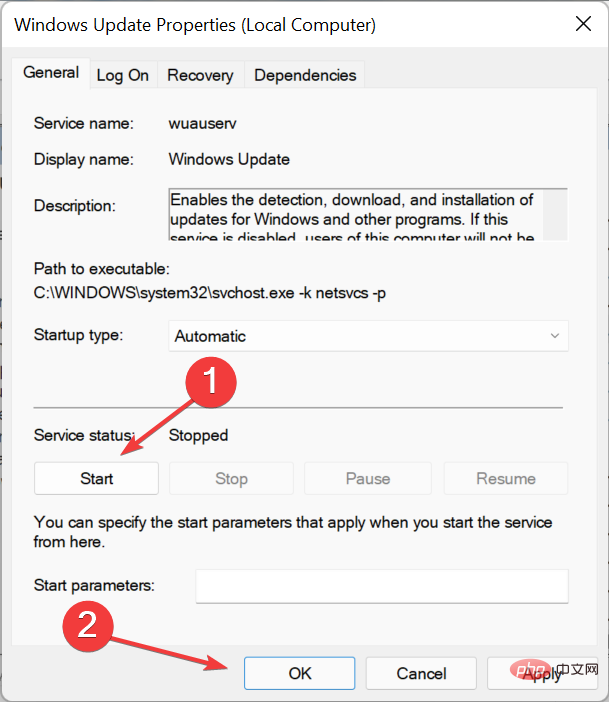
 Now, if the service is not running, click the "
 - Start" button and then click "OK" at the bottom to save the changes.

- Press
- Windows S to launch the search menu. Enter Windows Terminal in the text field, right-click the relevant search result, and select Run as administrator from the context menu.
 Click
Click - Yes in the pop-up UAC prompt.
 Click the down arrow at the top and select
 - Command Prompt.
 Now, type/paste the following commands and
 - Enterclick after each command to stop a bunch of Windows Update related services.
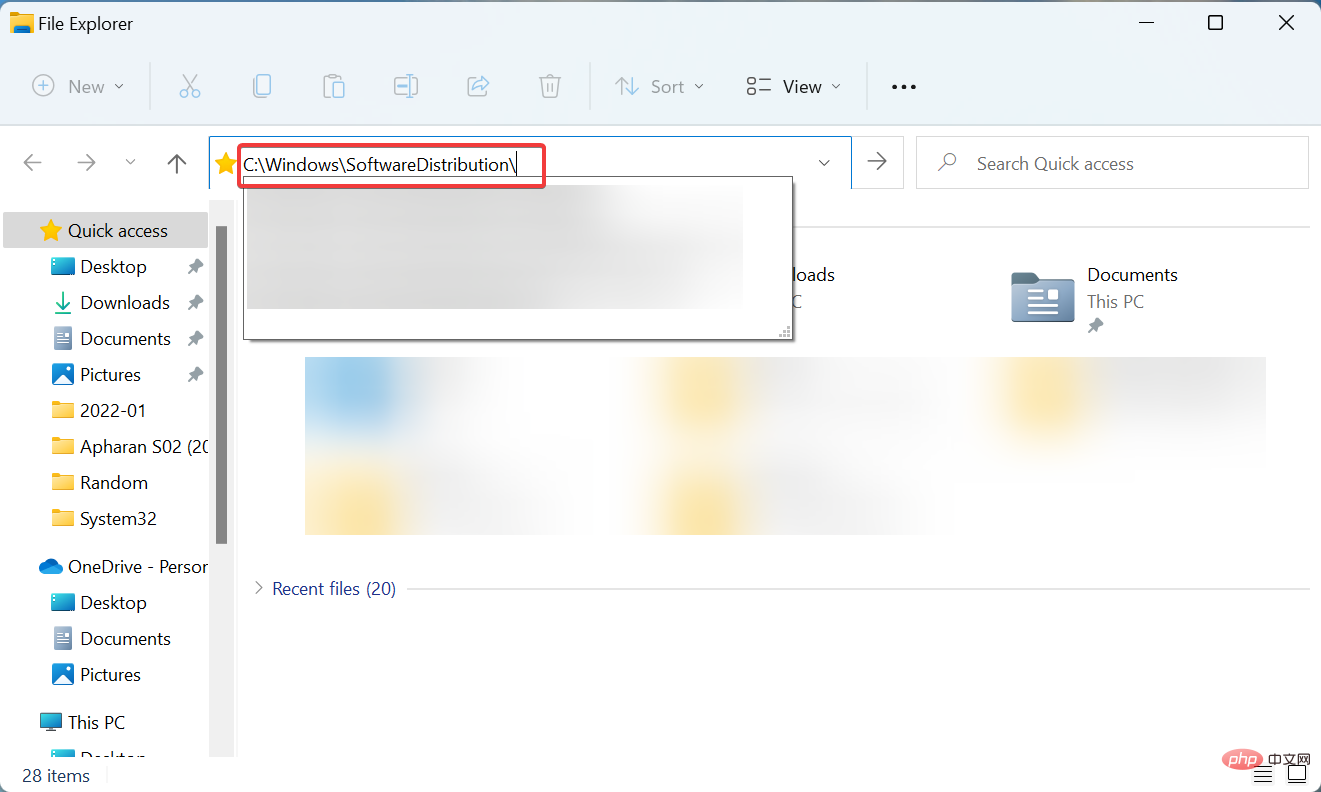
net stop wuauserv<strong></strong>net stop cryptsvc<strong></strong>net stop bits<strong></strong>net stop msiserver<strong></strong>After completion, press - Windows E to start File Explorer and paste the following path into in the address bar and click Enter.
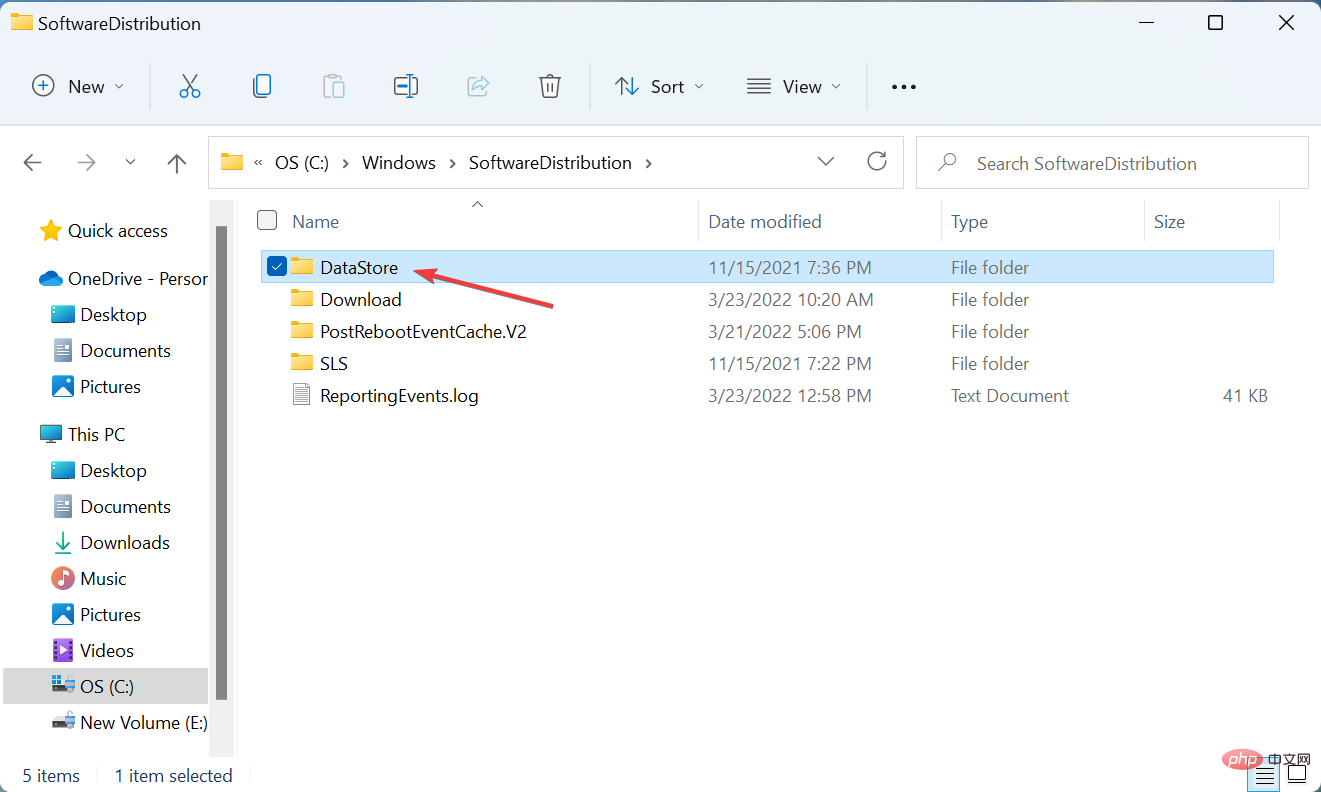
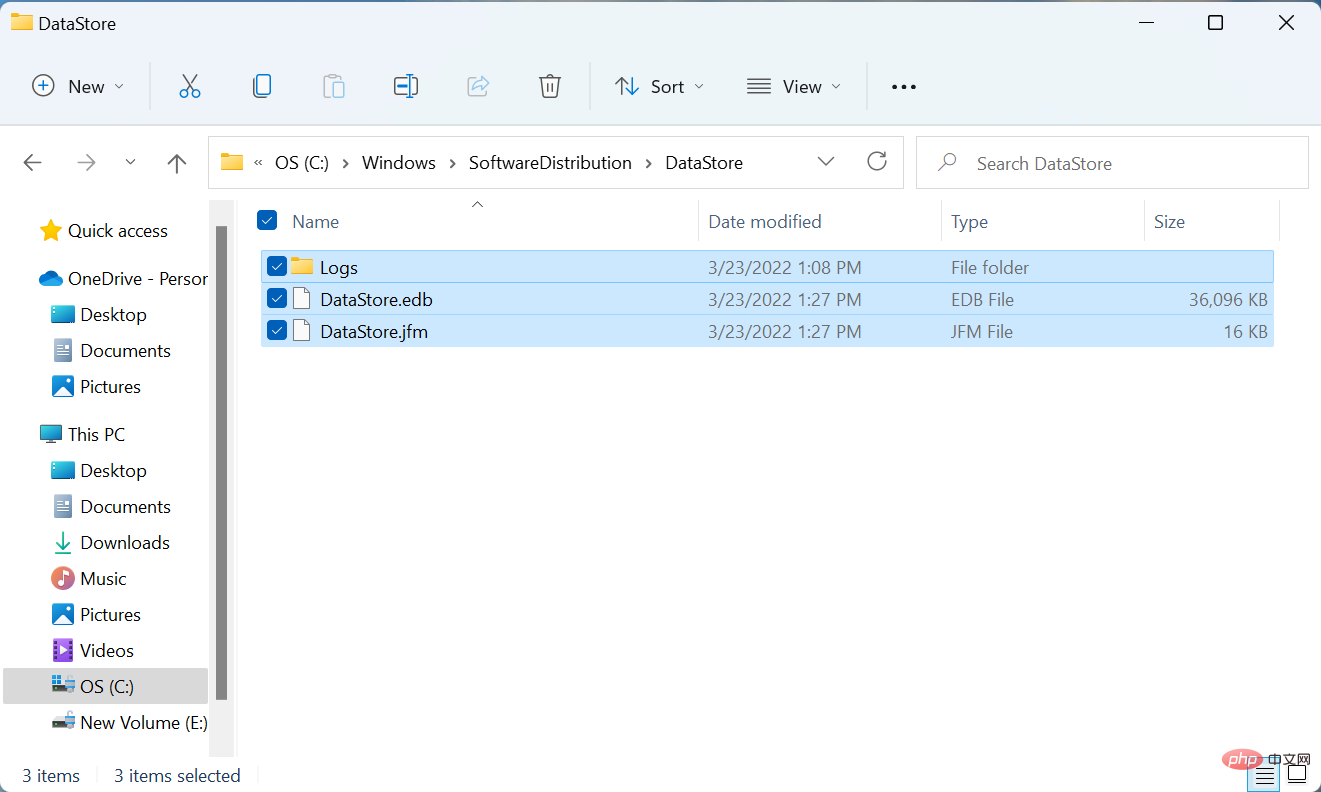
C:\Windows\SoftwareDistribution\<strong></strong> Double-click the
 - DataStore folder here to view its contents.
 Next, press
 - Ctrl A to select all the files here and then press the Del key to delete them.
 Choose an appropriate response in case a confirmation prompt pops up.
 - Now, go back to the
- Command Prompt tab in Windows Terminal and execute the following command to run the service you stopped earlier.
net start wuauserv<strong></strong>net start cryptsvc<strong></strong>net start bits<strong></strong>net start msiserver<strong></strong>
6. Reset Windows Update Components
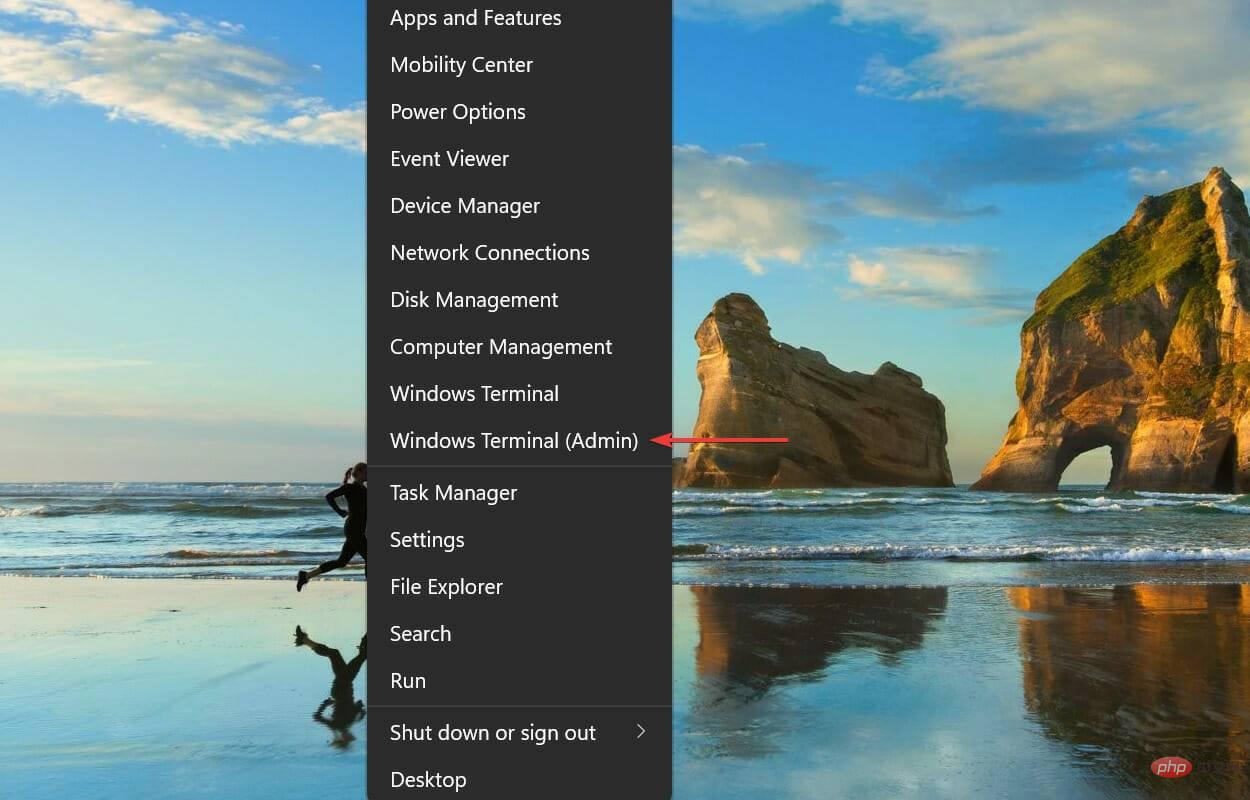
- Press Windows X or right-click the Start icon to launch the power user menu , and then select Windows Terminal (Administrator) from the list of options.

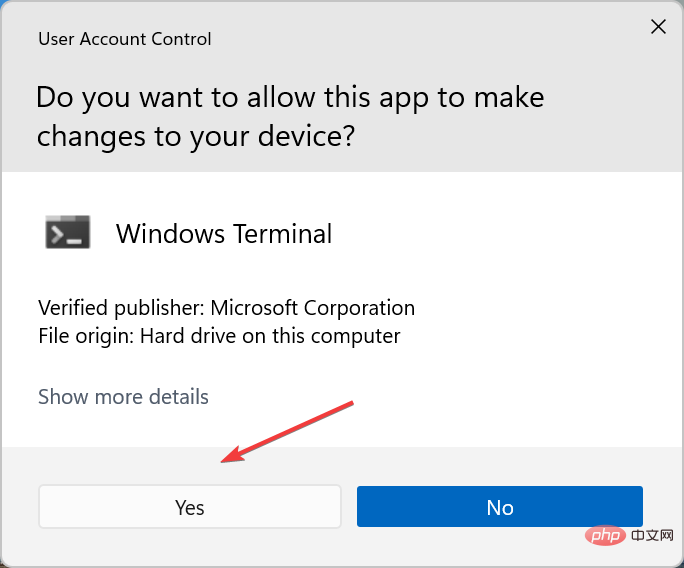
- Click Yes on the UAC (User Account Control) prompt that appears.

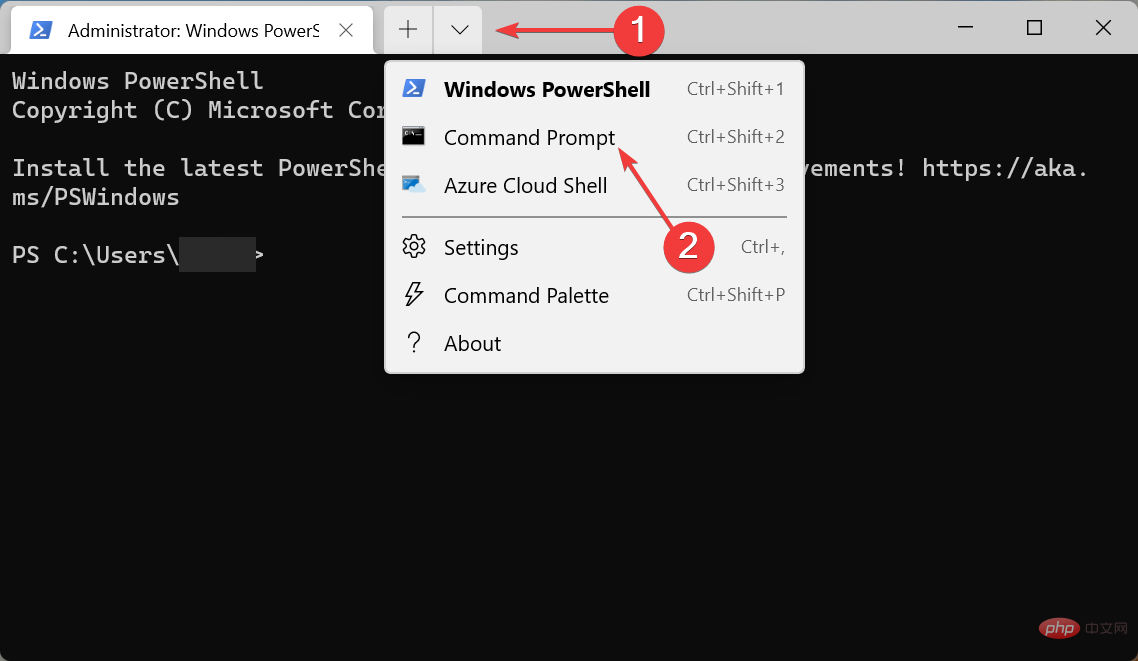
- Next, click the down arrow near the top and select Command Prompt.

- First, execute the following two commands to stop the Windows Update service and BITS.
<strong>net stop wuauserv</strong><strong>net stop bits</strong> - Next, paste the following command and hit EnterDelete qmgr*.dat files.
<strong>Del “%ALLUSERSPROFILE%Application DataMicrosoftNetworkDownloaderqmgr*.dat”</strong> - Now execute the following three commands to rename some key folders. However, if this is your first time resetting Windows Update components, you can skip this step. If it doesn't work the first time, do these the next time you try.
<strong>Ren %Systemroot%\SoftwareDistribution\DataStore DataStore.bak</strong><strong>Ren %Systemroot%\SoftwareDistribution\Download Download.bak</strong><strong>Ren %Systemroot%\System32\catroot2 catroot2.bak</strong> - Execute these commands individually to reset the BITS and Windows Update services.
<strong>sc.exe sdset bits D:(A;;CCLCSWRPWPDTLOCRRC;;;SY)(A;;CCDCLCSWRPWPDTLOCRSDRCWDWO;;;BA)(A;;CCLCSWLOCRRC;;;AU)(A;;CCLCSWRPWPDTLOCRRC;; ;PU)</strong>##sc.exe sdset wuauserv D:(A;;CCLCSWRPWPDTLOCRRC;;;SY)(A;;CCDCLCSWRPWPDTLOCRSDRCWDWO;;;BA)(A;;CCLCSWLOCRRC;;; AU)(A;;CCLCSWRPWPDTLOCRRC;;;PU)<strong></strong>Next, paste the following command and hit - Enter.
cd /d % windir%\system32<strong></strong>The next step is to paste each of these commands individually and then hit - Enter after each command to re-register some key files.
regsvr32.exe atl.dll<strong>regsvr32.exe urlmon.dll<br>regsvr32.exe mshtml.dll<br>regsvr32.exe shdocvw.dll<br>regsvr32.exe browseui.dll<br>regsvr32.exe jscript.dll<br>regsvr32.exe vbscript.dll<br>regsvr32.exe scrrun.dll<br>regsvr32.exe msxml.dll<br>regsvr32.exe msxml3 .dll<br>regsvr32.exe msxml6.dll<br>regsvr32.exe actxprxy.dll<br>regsvr32.exe softpub.dll<br>regsvr32.exe wintrust.dll<br>regsvr32.exe dssenh.dll<br> regsvr32.exe rsaenh.dll<br>regsvr32.exe gpkcsp.dll<br>regsvr32.exe sccbase.dll<br>regsvr32.exe slbcsp.dll<br>regsvr32.exe cryptdlg.dll<br>regsvr32.exe oleaut32. dll<br>regsvr32.exe ole32.dll<br>regsvr32.exe shell32.dll<br>regsvr32.exe initpki.dll<br>regsvr32.exe wuapi.dll<br>regsvr32.exe wuaueng.dll<br>regsvr32 .exe wuaueng1.dll<br>regsvr32.exe wucltui.dll<br>regsvr32.exe wups.dll<br>regsvr32.exe wups2.dll<br>regsvr32.exe wuweb.dll<br>regsvr32.exe qmgr.dll <br>regsvr32.exe qmgrprxy.dll<br>regsvr32.exe wucltux.dll<br>regsvr32.exe muweb.dll<br>regsvr32.exe wuwebv.dll<br></strong>
Winsock. netsh winsock reset<strong></strong>
BITS and Windows Update services. Just execute these two commands. net start bits<strong></strong>net start wuauserv<strong></strong>
7. Manually install updates
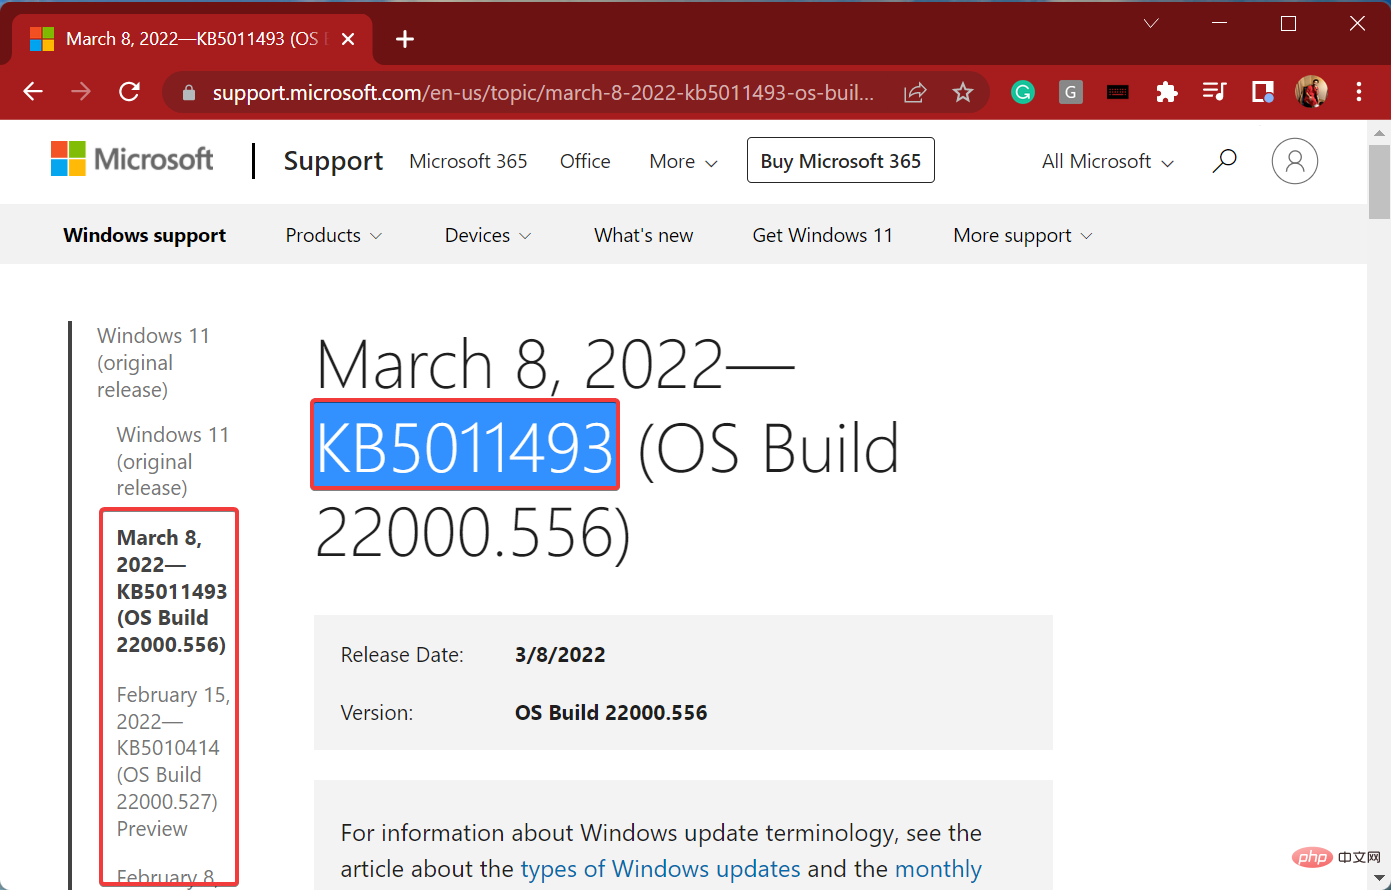
- Go to Windows 11 Update History, find the update you are having trouble installing, and copy its KB (Knowledge Base) number .

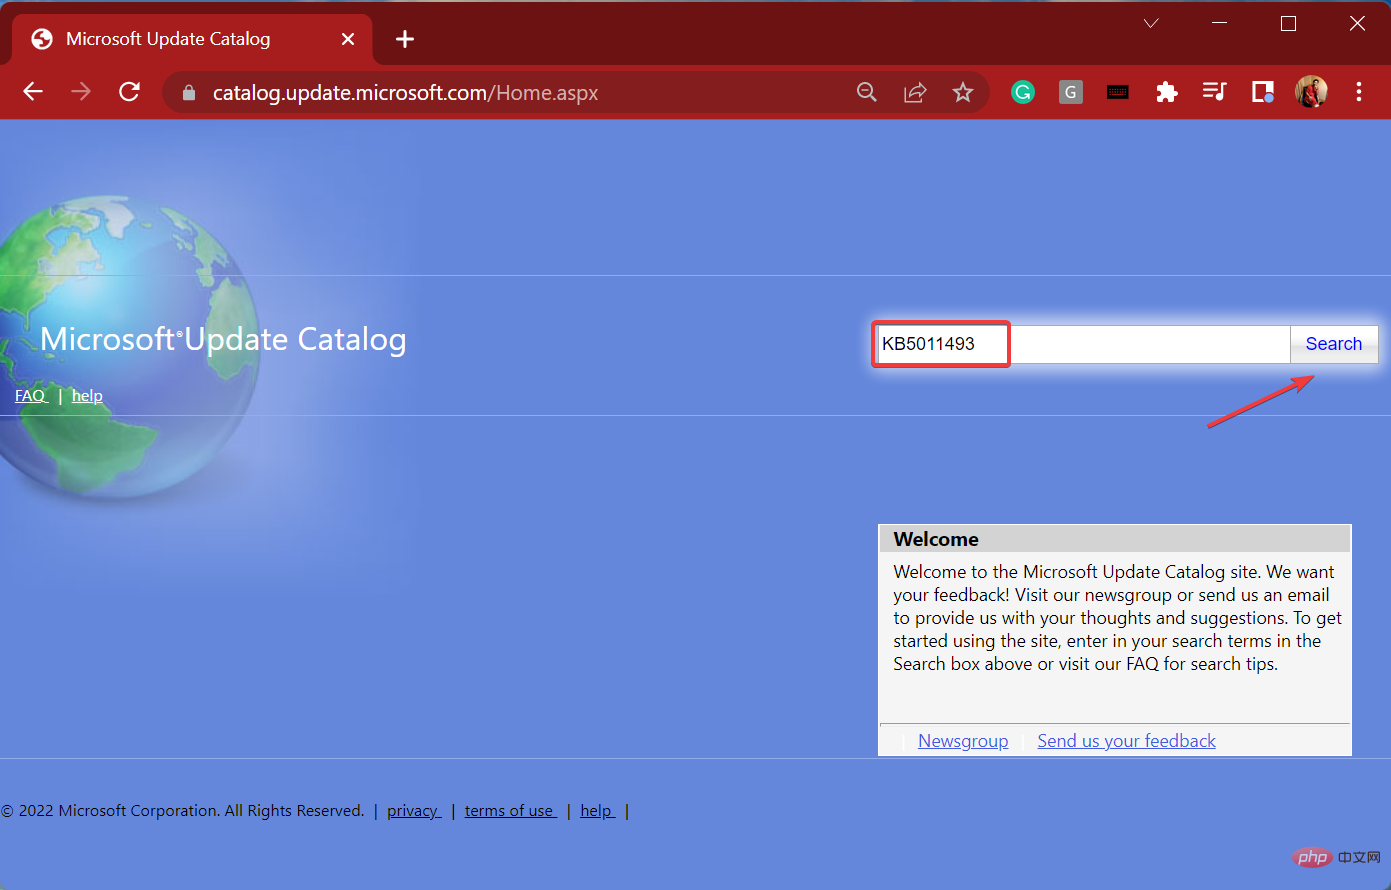
- Netx, go to the Microsoft Update Catalog where all versions are available for download, paste the KB number into the text field near the upper right corner, and click Search.

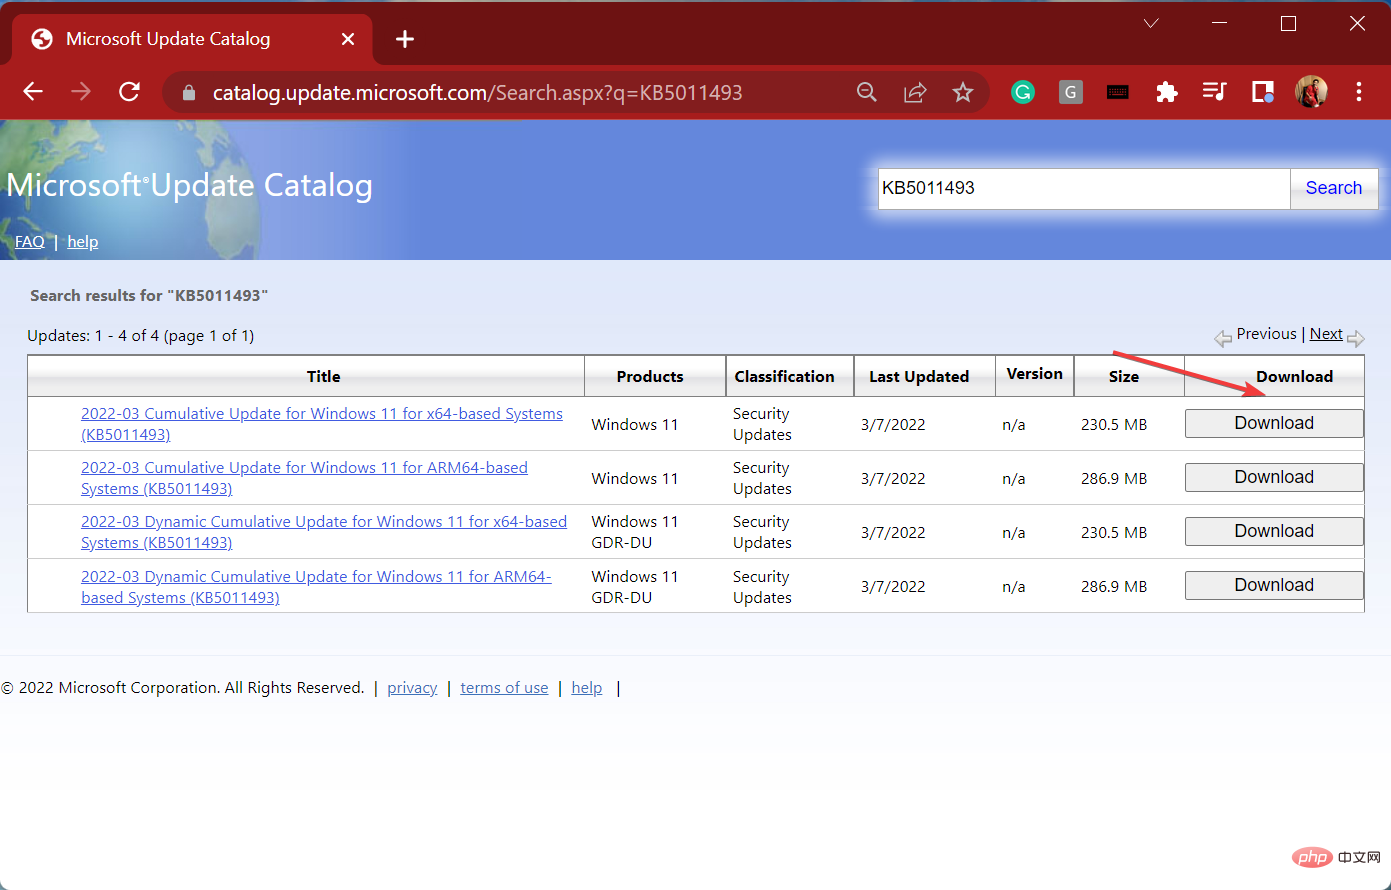
- Click the "Download" button for the relevant option in your case.

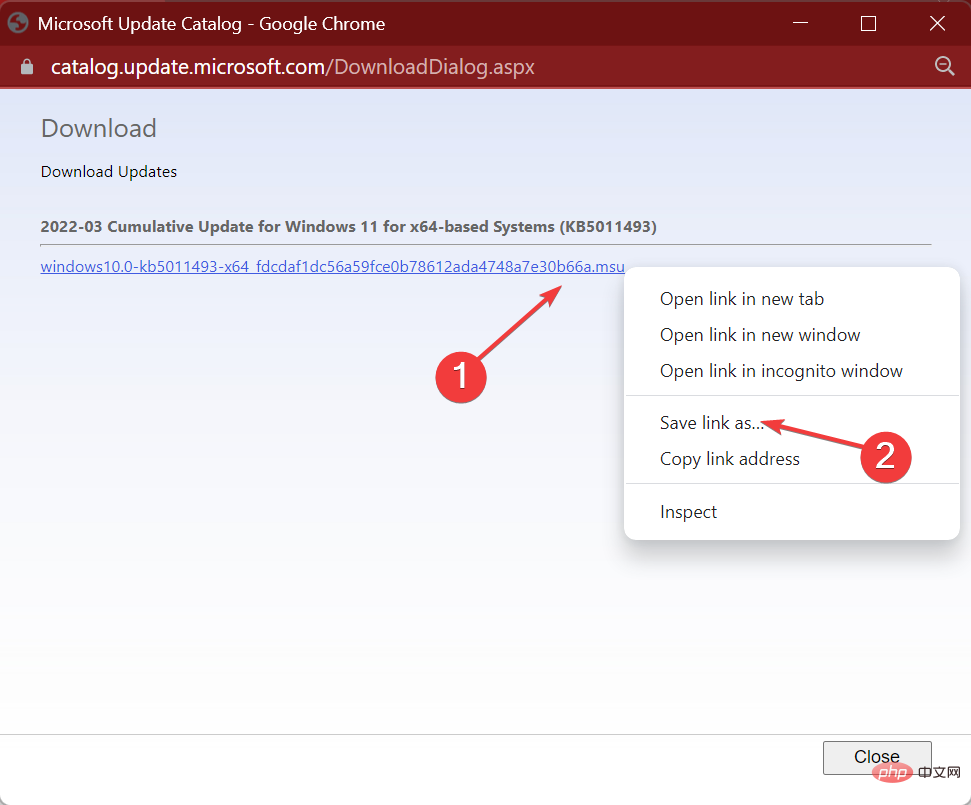
- Now, right-click on the link shown here and select Save link as from the context menu.

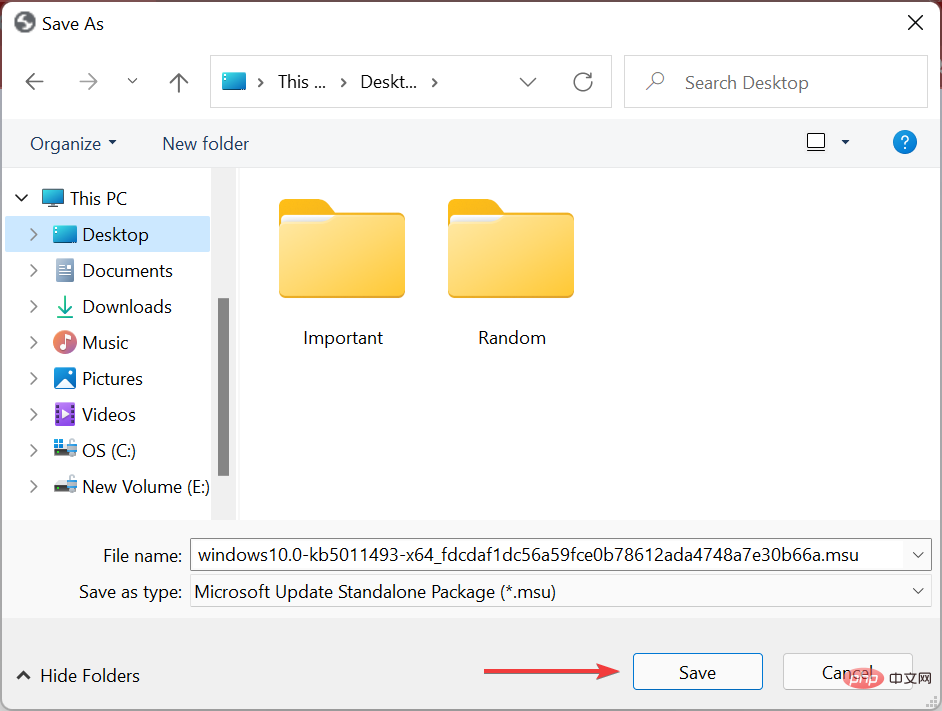
- Select the location where you want to download the file and click Save.

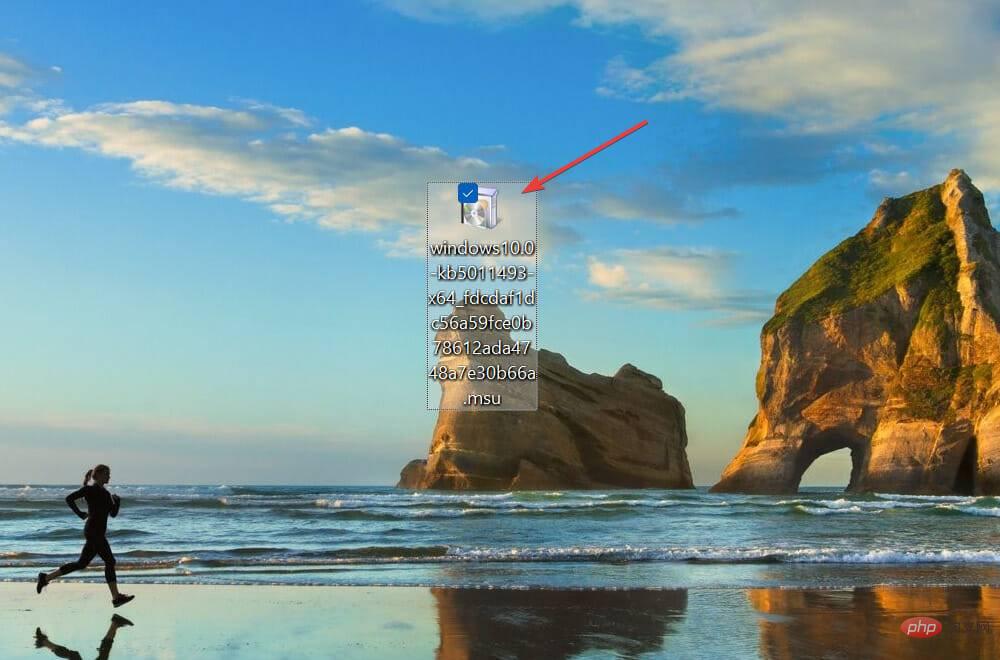
- After downloading the file, double-click it to launch the setup and follow the on-screen instructions to complete the process.

Once completed, restart your computer and you will now install the version of Windows 11 that you were experiencing error code 0x80073701 on.
If there is an issue with the update itself, downloading it manually may work, and you shouldn't face errors with subsequent updates. If you still do this, resetting Windows 11 to its factory settings might help.
Also, the built-in troubleshooter is not only capable of handling such issues, but some users have reported that the Windows Update Troubleshooter is not working properly, so you must resolve the issue and use the latest Windows version.
The above is the detailed content of 'Methods to resolve 0x80073701 update error in Windows 11'. For more information, please follow other related articles on the PHP Chinese website!

Hot AI Tools

Undresser.AI Undress
AI-powered app for creating realistic nude photos

AI Clothes Remover
Online AI tool for removing clothes from photos.

Undress AI Tool
Undress images for free

Clothoff.io
AI clothes remover

AI Hentai Generator
Generate AI Hentai for free.

Hot Article

Hot Tools

Notepad++7.3.1
Easy-to-use and free code editor

SublimeText3 Chinese version
Chinese version, very easy to use

Zend Studio 13.0.1
Powerful PHP integrated development environment

Dreamweaver CS6
Visual web development tools

SublimeText3 Mac version
God-level code editing software (SublimeText3)

Hot Topics
 What software is crystaldiskmark? -How to use crystaldiskmark?
Mar 18, 2024 pm 02:58 PM
CrystalDiskMark is a small HDD benchmark tool for hard drives that quickly measures sequential and random read/write speeds. Next, let the editor introduce CrystalDiskMark to you and how to use crystaldiskmark~ 1. Introduction to CrystalDiskMark CrystalDiskMark is a widely used disk performance testing tool used to evaluate the read and write speed and performance of mechanical hard drives and solid-state drives (SSD). Random I/O performance. It is a free Windows application and provides a user-friendly interface and various test modes to evaluate different aspects of hard drive performance and is widely used in hardware reviews
 CUDA's universal matrix multiplication: from entry to proficiency!
Mar 25, 2024 pm 12:30 PM
General Matrix Multiplication (GEMM) is a vital part of many applications and algorithms, and is also one of the important indicators for evaluating computer hardware performance. In-depth research and optimization of the implementation of GEMM can help us better understand high-performance computing and the relationship between software and hardware systems. In computer science, effective optimization of GEMM can increase computing speed and save resources, which is crucial to improving the overall performance of a computer system. An in-depth understanding of the working principle and optimization method of GEMM will help us better utilize the potential of modern computing hardware and provide more efficient solutions for various complex computing tasks. By optimizing the performance of GEMM
 Huawei's Qiankun ADS3.0 intelligent driving system will be launched in August and will be launched on Xiangjie S9 for the first time
Jul 30, 2024 pm 02:17 PM
On July 29, at the roll-off ceremony of AITO Wenjie's 400,000th new car, Yu Chengdong, Huawei's Managing Director, Chairman of Terminal BG, and Chairman of Smart Car Solutions BU, attended and delivered a speech and announced that Wenjie series models will be launched this year In August, Huawei Qiankun ADS 3.0 version was launched, and it is planned to successively push upgrades from August to September. The Xiangjie S9, which will be released on August 6, will debut Huawei’s ADS3.0 intelligent driving system. With the assistance of lidar, Huawei Qiankun ADS3.0 version will greatly improve its intelligent driving capabilities, have end-to-end integrated capabilities, and adopt a new end-to-end architecture of GOD (general obstacle identification)/PDP (predictive decision-making and control) , providing the NCA function of smart driving from parking space to parking space, and upgrading CAS3.0
 CrystalDiskinfo usage tutorial-What software is CrystalDiskinfo?
Mar 18, 2024 pm 04:50 PM
CrystalDiskInfo is a software used to check computer hardware devices. In this software, we can check our own computer hardware, such as reading speed, transmission mode, interface, etc.! So in addition to these functions, how to use CrystalDiskInfo and what exactly is CrystalDiskInfo? Let me sort it out for you! 1. The Origin of CrystalDiskInfo As one of the three major components of a computer host, a solid-state drive is the storage medium of a computer and is responsible for computer data storage. A good solid-state drive can speed up file reading and affect consumer experience. When consumers receive new devices, they can use third-party software or other SSDs to
 How to set the keyboard increment in Adobe Illustrator CS6 - How to set the keyboard increment in Adobe Illustrator CS6
Mar 04, 2024 pm 06:04 PM
Many users are using the Adobe Illustrator CS6 software in their offices, so do you know how to set the keyboard increment in Adobe Illustrator CS6? Then, the editor will bring you the method of setting the keyboard increment in Adobe Illustrator CS6. Interested users can take a look below. Step 1: Start Adobe Illustrator CS6 software, as shown in the figure below. Step 2: In the menu bar, click the [Edit] → [Preferences] → [General] command in sequence. Step 3: The [Keyboard Increment] dialog box pops up, enter the required number in the [Keyboard Increment] text box, and finally click the [OK] button. Step 4: Use the shortcut key [Ctrl]
 Which version of Apple 16 system is the best?
Mar 08, 2024 pm 05:16 PM
The best version of the Apple 16 system is iOS16.1.4. The best version of the iOS16 system may vary from person to person. The additions and improvements in daily use experience have also been praised by many users. Which version of the Apple 16 system is the best? Answer: iOS16.1.4 The best version of the iOS 16 system may vary from person to person. According to public information, iOS16, launched in 2022, is considered a very stable and performant version, and users are quite satisfied with its overall experience. In addition, the addition of new features and improvements in daily use experience in iOS16 have also been well received by many users. Especially in terms of updated battery life, signal performance and heating control, user feedback has been relatively positive. However, considering iPhone14
 How to resolve an incompatible software attempt to load with Edge?
Mar 15, 2024 pm 01:34 PM
When we use the Edge browser, sometimes incompatible software attempts to be loaded together, so what is going on? Let this site carefully introduce to users how to solve the problem of trying to load incompatible software with Edge. How to solve an incompatible software trying to load with Edge Solution 1: Search IE in the start menu and access it directly with IE. Solution 2: Note: Modifying the registry may cause system failure, so operate with caution. Modify registry parameters. 1. Enter regedit during operation. 2. Find the path\HKEY_LOCAL_MACHINE\SOFTWARE\Policies\Micros
 What software is photoshopcs5? -photoshopcs5 usage tutorial
Mar 19, 2024 am 09:04 AM
PhotoshopCS is the abbreviation of Photoshop Creative Suite. It is a software produced by Adobe and is widely used in graphic design and image processing. As a novice learning PS, let me explain to you today what software photoshopcs5 is and how to use photoshopcs5. 1. What software is photoshop cs5? Adobe Photoshop CS5 Extended is ideal for professionals in film, video and multimedia fields, graphic and web designers who use 3D and animation, and professionals in engineering and scientific fields. Render a 3D image and merge it into a 2D composite image. Edit videos easily


