How to fix Steam client error codes 7 and 130 on Windows PC?
Apr 25, 2023 pm 11:07 PMMany Steam client users have noticed that they are unable to view any web pages on the Steam client application on their systems. When a user tries to load a webpage by searching for the game on Steam, it simply throws an error message saying that loading the webpage failed (unknown error).
This may be caused by corrupted cache files in Steam, unstable internet connection, etc. It's also possible that there's some issue or the Steam client application itself is stuck.
If you are facing the same issue while using the Steam app, don’t worry. This can be resolved using the three fixes discussed below in this article.
Fix 1 – Restart the Steam Client Application
Sometimes, the problem may lie with the Steam Client application itself. It may be frozen for many unknown reasons. So we recommend our users to try restarting the Steam client application.
Step 1: If the Steam application is open, go to the Steam option on the top menu bar and select Exit from the drop-down list ,As follows.

Step 2: This will close the Steam client application on your system.
Step 3: But we need to make sure that no other processes of the Steam client application are running in the background of the system.
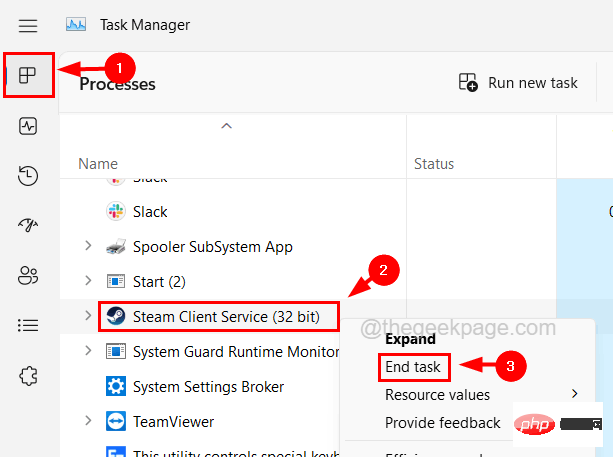
Step 4: To do this, press Ctrl Shift Esc keys simultaneously to open Task Manager.
Step 5: Once the Task Manager window appears on the screen, go to the "Processes" tab by clicking on the "Processes" tab on the left panel.
Step 6: Then scroll down the process list under Background Processes and search for any Steam client process.
Step 7: Right-click the Steam Client Process and select the End Task option from the context menu, as shown in the screenshot below.

#Step 8: Repeat the same process and make sure there are no Steam client processes running on the current system.
Step 9: Once completed, close Task Manager and try opening the Steam client to see if that works.
Fix 2 – Check your internet connection
You might think that there must be some internal issue with the Steam application that is causing this issue. However, there may be some external factors such as unstable internet connection.
If you notice a weak Internet connection on your system, disconnect your system from the Internet, restart your router if you are using Wi-Fi, or unplug your router if you are using an Ethernet connection. Remove the cable.
Please wait a few minutes and then reconnect the Internet connection on the system to the router signal or plug the Ethernet cable back into the system. Check if the internet connection on the system is restored again.
Otherwise, call your internet service provider and get a stable, fast internet connection.
Fix 3 – Clear the Steam client’s DNS cache
In order to refresh the IP addresses or DNS records in the cache, you need to clear the DNS cache on your system. Otherwise, it may create such problems. So let’s see how to flush the DNS cache on your system.
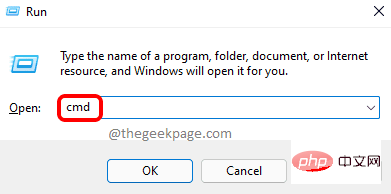
Step 1: Press the Windows and R keys simultaneously on your keyboard to open the Run console.
Step 2: Then enter cmd in the run text box and press the Ctrl Shift Enter key.

Step 3: Click Yes to accept the on-screen UAC prompt.
Step 4: This will open a command prompt window as administrator.
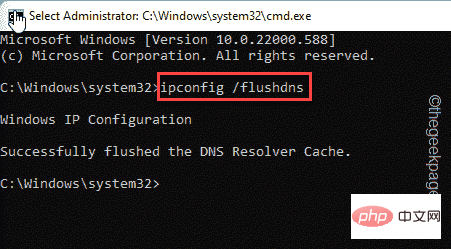
Step 5: Now type ipconfig /flushdns in the command prompt and press Enter key.

Step 6: Once the command is executed, it will flush the local DNS cache on the system.
Step 7: After that close the command prompt and restart the system.
The above is the detailed content of How to fix Steam client error codes 7 and 130 on Windows PC?. For more information, please follow other related articles on the PHP Chinese website!

Hot Article

Hot tools Tags

Hot Article

Hot Article Tags

Notepad++7.3.1
Easy-to-use and free code editor

SublimeText3 Chinese version
Chinese version, very easy to use

Zend Studio 13.0.1
Powerful PHP integrated development environment

Dreamweaver CS6
Visual web development tools

SublimeText3 Mac version
God-level code editing software (SublimeText3)

Hot Topics
 Where are video files stored in browser cache?
Feb 19, 2024 pm 05:09 PM
Where are video files stored in browser cache?
![GeForce Now error code 0x0000012E [FIXED]](https://img.php.cn/upload/article/000/000/164/170834836989999.jpg?x-oss-process=image/resize,m_fill,h_207,w_330) GeForce Now error code 0x0000012E [FIXED]
Feb 19, 2024 pm 09:12 PM
GeForce Now error code 0x0000012E [FIXED]
Feb 19, 2024 pm 09:12 PM
GeForce Now error code 0x0000012E [FIXED]
![HRESULT 0x800A03EC Exception error occurred in Excel [Fixed]](https://img.php.cn/upload/article/000/887/227/170834257118628.jpg?x-oss-process=image/resize,m_fill,h_207,w_330) HRESULT 0x800A03EC Exception error occurred in Excel [Fixed]
Feb 19, 2024 pm 07:36 PM
HRESULT 0x800A03EC Exception error occurred in Excel [Fixed]
Feb 19, 2024 pm 07:36 PM
HRESULT 0x800A03EC Exception error occurred in Excel [Fixed]
 What to do if the 0x80004005 error code appears. The editor will teach you how to solve the 0x80004005 error code.
Mar 21, 2024 pm 09:17 PM
What to do if the 0x80004005 error code appears. The editor will teach you how to solve the 0x80004005 error code.
 What to do if the blue screen error code 0x00000124 appears in Win7 system? The editor will teach you how to solve it
Mar 21, 2024 pm 10:10 PM
What to do if the blue screen error code 0x00000124 appears in Win7 system? The editor will teach you how to solve it
 Tips to solve error code 0xc004f034 during WIN10 system activation
Mar 27, 2024 pm 04:30 PM
Tips to solve error code 0xc004f034 during WIN10 system activation


