How to turn off Windows Defender Smart Screen in Windows 11, 10?
Many Windows users have recently reported that they were annoyed when Windows Defender SmartScreen warned users not to launch applications that were not recognized by Microsoft Windows and they had to click on the "Run anyway" option every time. Windows users are unsure what they can currently do to avoid or disable it.
After researching this issue, we discovered that Windows Defender functionality on the system can be disabled through the Settings application or Local Group Policy Editor or by adjusting the registry file. By doing this, users will no longer have to face the defender SmartScreen.
If your system is also facing the same problem, in this article, you will find the method to disable Windows Defender, which will help solve this problem.
How to disable Windows Defender SmartScreen through Windows Security
The Windows Defender SmartScreen feature has an option that will only warn users and allow them to run unrecognized apps on their devices at their own risk. This can only be done through an administrative account on the system.
Here are the steps to guide you on how to do it.
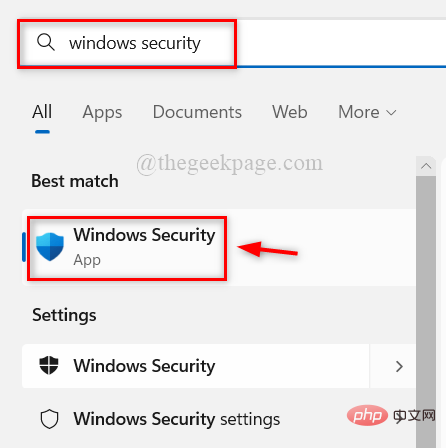
Step 1: Open the Windows Security application on your system by pressing the Windows key and typing windows security.
Step 2: Select Windows Security App from the search results as shown in the image below.
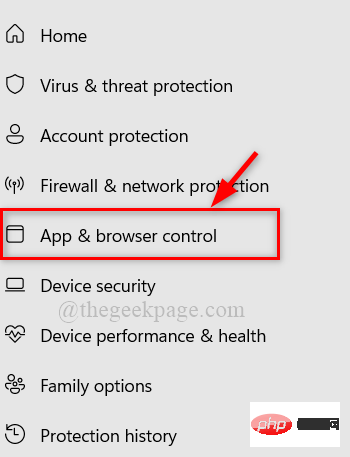
Step 3: Then, click on Apps and Browser Controls in the left menu as shown below.
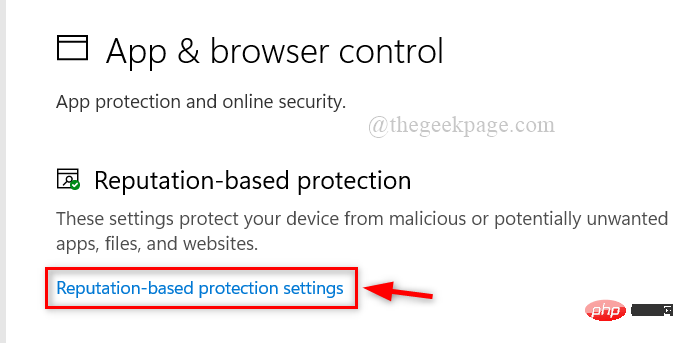
Step 4: On the right, click Reputation-based protection settings under the Reputation-based protection option.
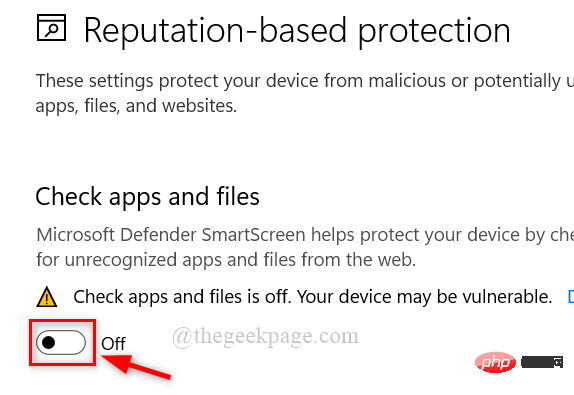
Step 5: Click the toggle button of the Check Apps and Files optionturn it off, as shown in the screenshot below.
Note: Click Yes on the UAC prompt to continue.
Step 6: That’s it. Close the Windows security window.
This is how any user can disable Windows Defender SmartScreen on their system using the Windows Security app.
How to disable Windows Defender SmartScreen through the Local Group Policy Editor
For users who have Windows 11 Pro, you can use the Local Group Policy Editor to disable Windows Defender SmartScreen on your system. We've listed some simple steps on how to do this.
Step 1: Press the Windows R keys simultaneously on your keyboard to open the Run command box.
Step 2: Then, type gpedit.msc in the Run command box and press the Enter key.

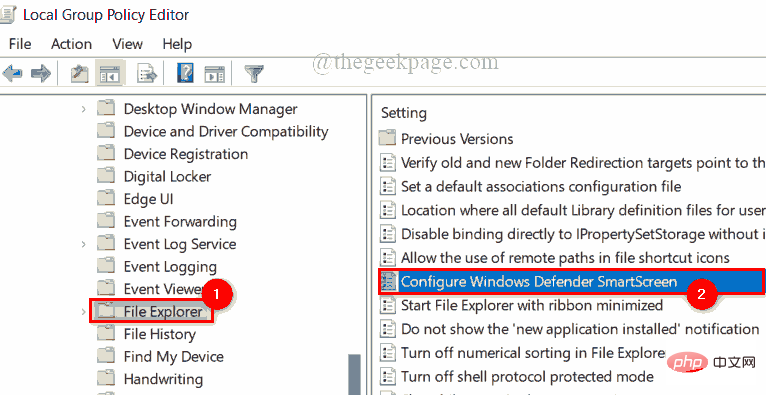
Step 3: In the Local Group Policy Editor window, navigate to File Explorer using the path given below.
计算机配置 > 管理模板 > Windows 组件 > 文件资源管理器
Step 4: On the right side, double-click the Configure Windows Defender SmartScreen option as shown in the image below.
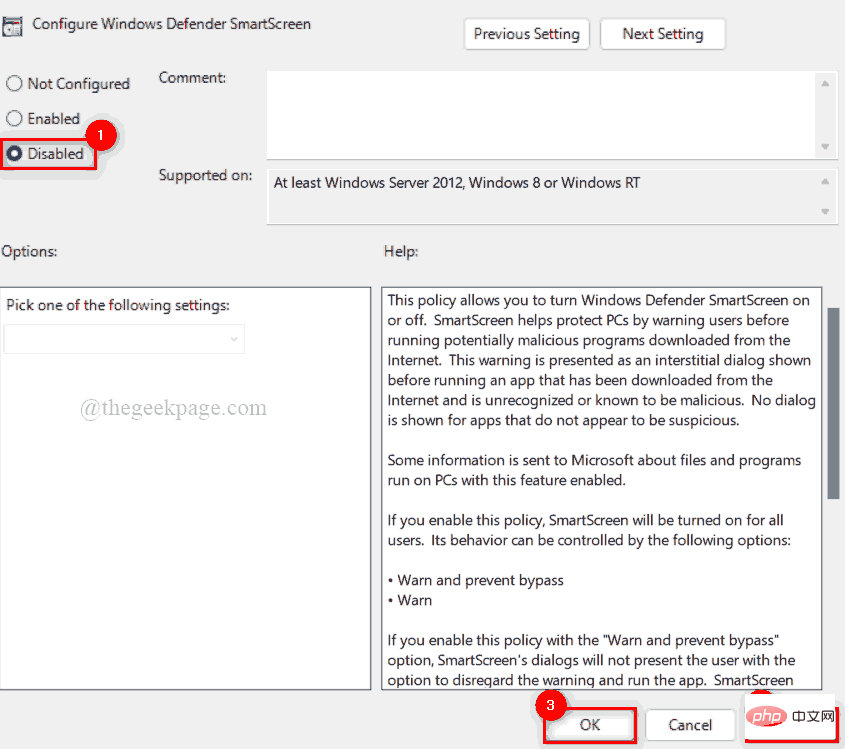
Step 5: In the Configure Windows Defender SmartScreen window, click the Disabled radio button, and then click Apply and OK to disable it as shown below.
Step 6: Close the Local Group Policy Editor window.
Step 7: Restart the system for the effect to take place.
After the system starts, check whether SmartScreen is disabled.
How to disable Windows Defender SmartScreen via Registry Editor
Note: Before proceeding with this method, make sure the registry file has been exported to the system. Because if something goes wrong while editing, you can always revert it. Even small changes that cause errors can damage your system.
Step 1: Press the Windows R keys simultaneously on your keyboard to open the "Run" command box.
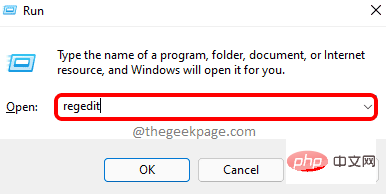
Step 2: Type regedit in it and press the Enter key to launch the Registry Editor.
Note: Accept the UAC prompt by clicking Yes to continue.
第 3 步:在注册表编辑器窗口中,将下面给出的路径复制并粘贴到空地址栏中,然后按Enter键到达System注册表项,如下所示。
HKEY_LOCAL_MACHINE\SOFTWARE\Policies\Microsoft\Windows\System
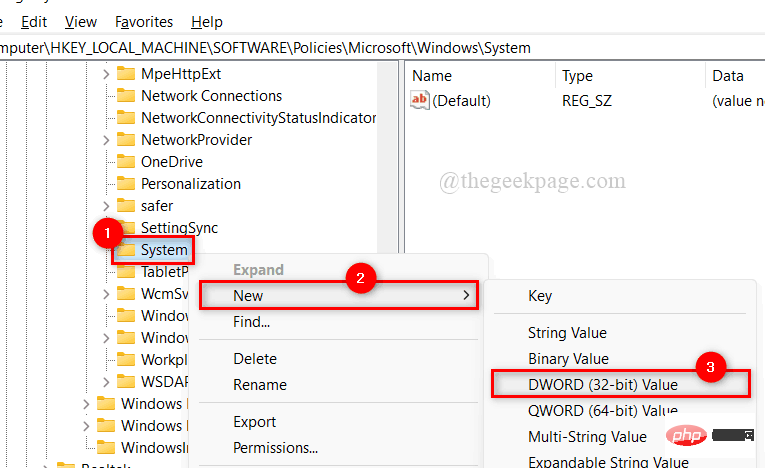
第 4 步:如果在注册表编辑器窗口右侧没有找到任何 EnableSmartScreen DWORD 值,则通过右键单击系统注册表项来创建一个 DWORD 值。
第 5 步:从上下文菜单中选择新建 > DWORD(32 位)值,如下所示。
第 6 步:将其重命名为EnableSmartScreen并双击打开它。
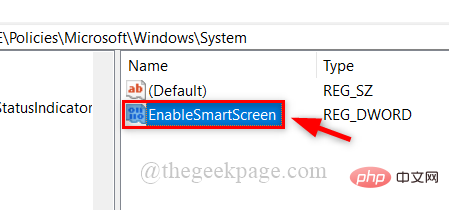
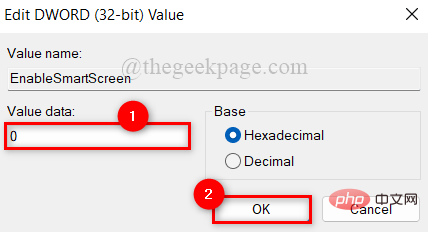
第 7 步:要禁用 SmartScreen,请在数值数据字段中输入0 ,然后单击确定 进行更改。
步骤 8:完成后,关闭注册表编辑器窗口。
步骤9:然后,重新启动系统一次,启动后检查它是否被禁用。
The above is the detailed content of How to turn off Windows Defender Smart Screen in Windows 11, 10?. For more information, please follow other related articles on the PHP Chinese website!

Hot AI Tools

Undresser.AI Undress
AI-powered app for creating realistic nude photos

AI Clothes Remover
Online AI tool for removing clothes from photos.

Undress AI Tool
Undress images for free

Clothoff.io
AI clothes remover

AI Hentai Generator
Generate AI Hentai for free.

Hot Article

Hot Tools

Notepad++7.3.1
Easy-to-use and free code editor

SublimeText3 Chinese version
Chinese version, very easy to use

Zend Studio 13.0.1
Powerful PHP integrated development environment

Dreamweaver CS6
Visual web development tools

SublimeText3 Mac version
God-level code editing software (SublimeText3)

Hot Topics
 How to disable display scaling for high DPI settings in Windows 11 or 10
May 22, 2023 pm 10:11 PM
The default display scaling feature on Windows 10 or later is a core component of the Windows operating system. But sometimes, this feature of certain apps can cause compatibility issues, unreadable text, blurry logos, and ultimately, app crashes. This can be a huge headache if you're dealing with 2160p or higher resolutions. There are many ways to disable the default display scaling feature on high DPI settings. We've selected the best ones and detailed step-by-step instructions for each process. How to Disable Display Scaling on High DPI Settings There is a way, all you have to do is disable high DPI scaling for a single application, and there is a way to do it for the entire Window
 Tiny10 makes Windows 10 durable on (very old) PCs
May 22, 2023 pm 04:02 PM
Tiny10 is one developer's attempt to make Microsoft's Windows 10 operating system usable on both older PC systems and modern systems. When Microsoft released Windows 10 in 2015, it ensured that the operating system had the same system requirements as previous versions of Windows. That changes with the release of Windows 11 in 2021. Still, Windows 10 felt noticeably heavier than previous Windows versions, and users began looking for ways to improve the usability of the operating system. Faster hard drive, more memory, faster and more powerful CP
![Event ID 157: Disk has been removed unexpectedly [Fixed]](https://img.php.cn/upload/article/000/887/227/168576249277516.jpg?x-oss-process=image/resize,m_fill,h_207,w_330) Event ID 157: Disk has been removed unexpectedly [Fixed]
Jun 03, 2023 am 11:21 AM
Event ID 157: Disk has been removed unexpectedly [Fixed]
Jun 03, 2023 am 11:21 AM
Disk has been accidentally deleted is an error in the system event log on Windows devices. This is an unusual issue on the virtual disk that all XBOX Live PC and Microsoft PC installations rely on. Typically, this problem occurs when something disrupts the system's communication with the disk. Event ID157 in Event Viewer The disk has been accidentally deleted, preventing the user from installing the game using the specified virtual drive. This virtual drive will not be visible in File Explorer like other drives. You may also encounter VMWare issues where the disk has been accidentally deleted. The solution below will fix the problem, but you must make changes directly in VMWare's emulated operating system. Depend on
 How to Fix Error Code 1132 in Zoom on Windows PC
May 30, 2023 am 11:08 AM
Zoom's video conferencing capabilities have made it popular among users while working from home. Many Zoom desktop client users have reported seeing error code 1132 along with an “Unknown error has occurred” message on their Windows PCs. Usually, this error code pops up when users try to log into their account and join any meeting in Zoom. In the error window, the user has the option to open a browser and join the meeting. However, some users reported that they were unable to open the meeting even on the browser. Windows firewall settings, outdated Zoom installation, or Zoom blacklisting your account could be some of the possible reasons for this error. Are you encountering an error code while using the Zoom app
 Fix: Windows Driver Foundation missing error
Jun 02, 2023 pm 09:15 PM
It's really frustrating when your Windows PC lags or runs slowly while playing games or performing resource-intensive tasks. Your PC may have all the processing power to handle these tasks, but if certain drivers fail to load, then your PC will experience multiple issues. One such error is WindowsDriverFoundation missing issue. When this error pops up, you should know that some important system-related drivers fail to load on your Windows PC. Since drivers are one of the most important components that allow the hardware to communicate with your PC, any issues with the drivers can cause the hardware process to malfunction. Several users reported that Window
 Unable to open the Group Policy object on this computer
Feb 07, 2024 pm 02:00 PM
Occasionally, the operating system may malfunction when using a computer. The problem I encountered today was that when accessing gpedit.msc, the system prompted that the Group Policy object could not be opened because the correct permissions may be lacking. The Group Policy object on this computer could not be opened. Solution: 1. When accessing gpedit.msc, the system prompts that the Group Policy object on this computer cannot be opened because of lack of permissions. Details: The system cannot locate the path specified. 2. After the user clicks the close button, the following error window pops up. 3. Check the log records immediately and combine the recorded information to find that the problem lies in the C:\Windows\System32\GroupPolicy\Machine\registry.pol file
 Essential software for C language programming: five good helpers recommended for beginners
Feb 20, 2024 pm 08:18 PM
C language is a basic and important programming language. For beginners, it is very important to choose appropriate programming software. There are many different C programming software options on the market, but for beginners, it can be a bit confusing to choose which one is right for you. This article will recommend five C language programming software to beginners to help them get started quickly and improve their programming skills. Dev-C++Dev-C++ is a free and open source integrated development environment (IDE), especially suitable for beginners. It is simple and easy to use, integrating editor,
 Detailed guide to 15 Python editors/IDEs, there is always one that suits you!
Aug 09, 2023 pm 05:44 PM
There is no better way to write Python code than using an integrated development environment (IDE). Not only can they make your work simpler and more logical, they can also improve programming experience and efficiency. Everyone knows this. The question is, how to choose the best Python development environment among the many options.


