Enter A1B2C3 to enter the Windows 11 hotfix login screen
Many users noticed a prompt asking to enter A1B2C3 as the pin when restarting their Windows 11/2 system. This prompt keeps popping up asking for A1B2C3 even if it is entered correctly or even if the Windows PIN is not entered at all. This can be a frustrating issue for users, who are unable to use the system to perform their important tasks even without trying to enter their PIN. Basically, the error message indicates that the user has made multiple incorrect PIN entry attempts.
If you encounter this issue on Windows 11/10 PC, please continue reading this article. Here, we have discussed the solutions that can help you resolve this issue on your computer.
Fix – Delete NGC Folder and Set Windows PIN
Step 1 – Delete NGC Folder from PC
Step 1. On the screen where you see this prompt, enter A1B2C3 to go to the next screen.
Step 2. Now you will see "Signature Options" on the next screen.
Click "LoginOptions" and select the Key option.
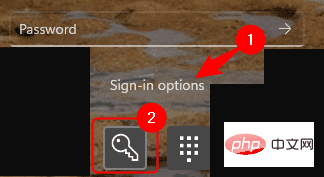
Step 3. Now, enter your password and log in to your computer.
Step 4. Press Windows E to open File Explorer.
Step 5. Navigate to the location below or copy and paste it into the navigation bar.
C:\Windows\ServiceProfiles\LocalService\AppData\Local\Microsoft
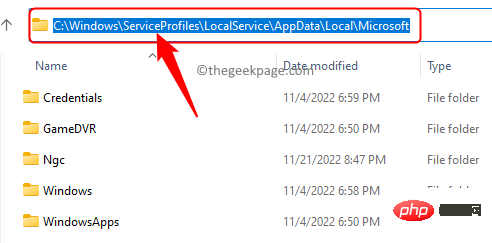
Note: If you find that you do not have access to some folders in your path, click "#" in the dialog box that appears. ##continue".
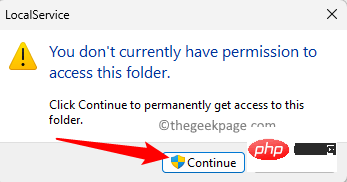
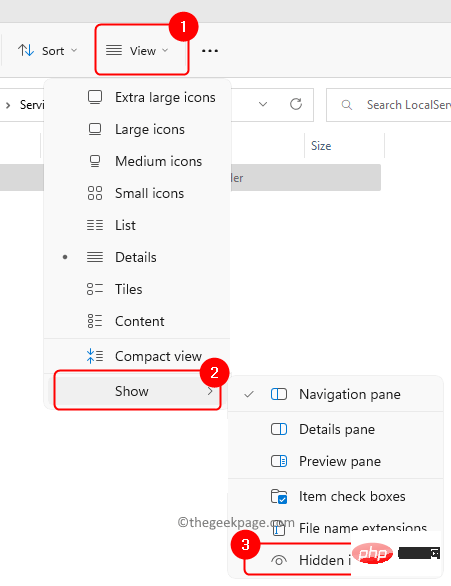
AppData folder, click "View" at the top of File Explorer .
Then, selectShow –> Hide Items.
Microsoft folder, right-click the Ngc folder and select Properties.
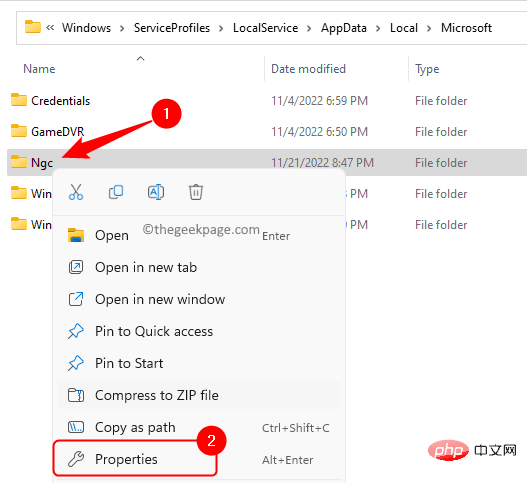
Security tab in the Ngc Properties window.
Step 8. Then, click theAdvanced button at the bottom.
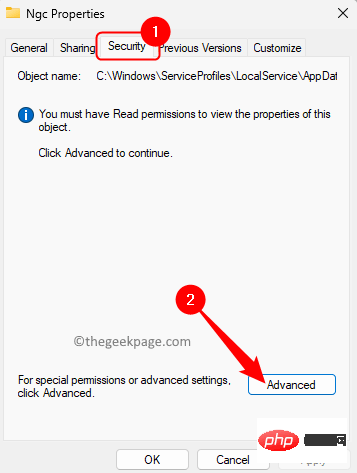
Change link associated with the Owner in the Advanced Security Settings page of the Ngc folder.

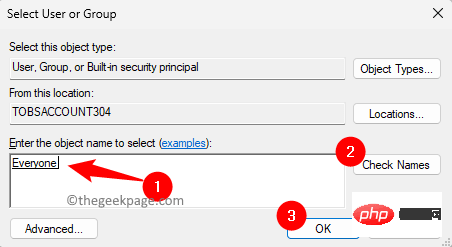
User or Group" window, enter "Everyone " in the text box below, and enter the name of the object to be selected .
Then, clickto check the name.
Finally, clickOK.
"Advanced Security Settings" window and click "Apply".
Then, click OK in theWindows Security dialog box, and then click OK again.
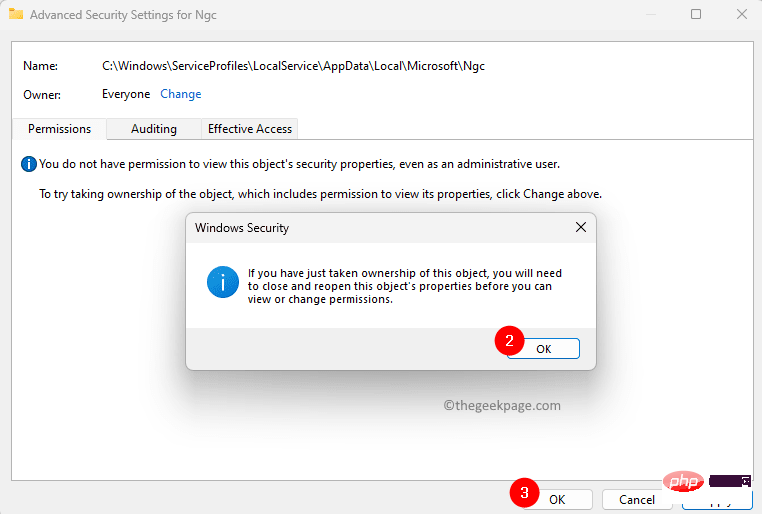
Ngc Properties window by clicking OK.
Step 13. Right-click on the Ngc folder and click on theRemove icon to delete Ngc folder from your PC.
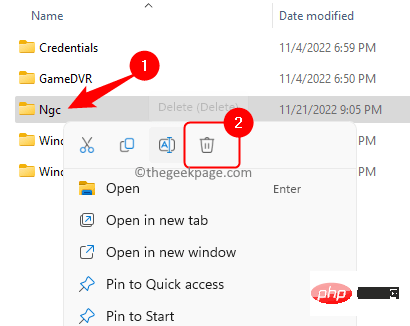
Note: If the folder cannot be deleted, please open the "Properties of the Ngc folder ” window and go to the Security tab.
Click the"Advanced" button again.
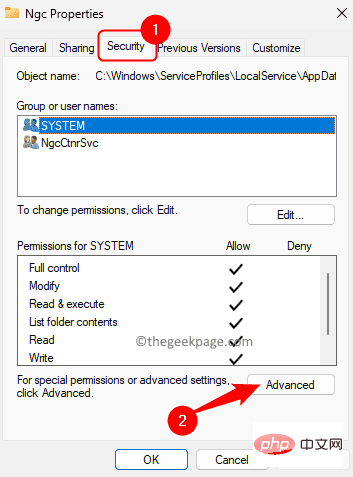
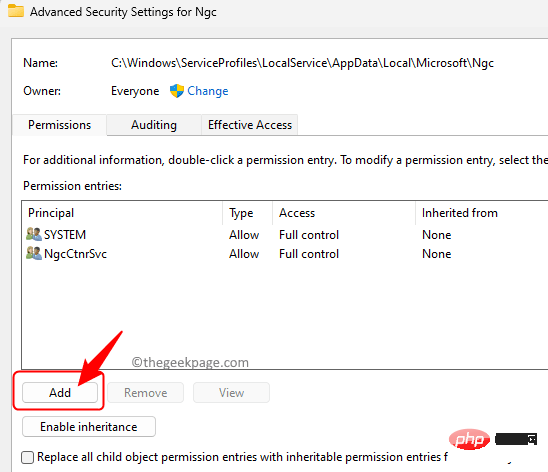
在“高级安全设置”窗口中,单击“添加”。
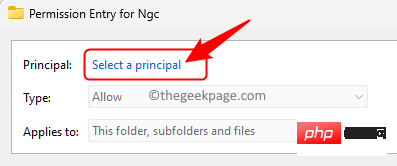
在“权限条目”窗口中,单击“选择主体”链接。
在下面键入每个人 输入要选择的对象名称。
单击检查名称,然后单击确定。

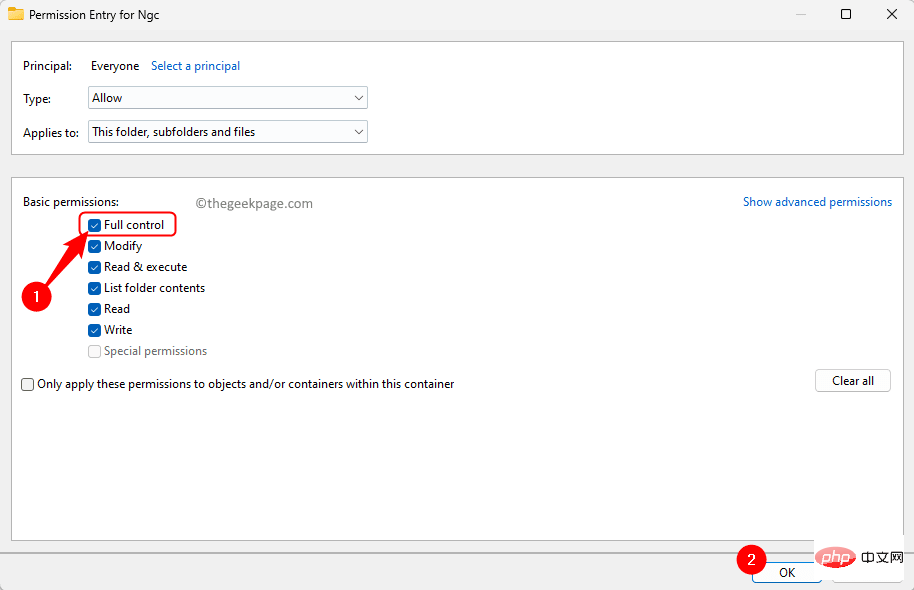
然后,选中旁边的框 完全控制 并单击确定。
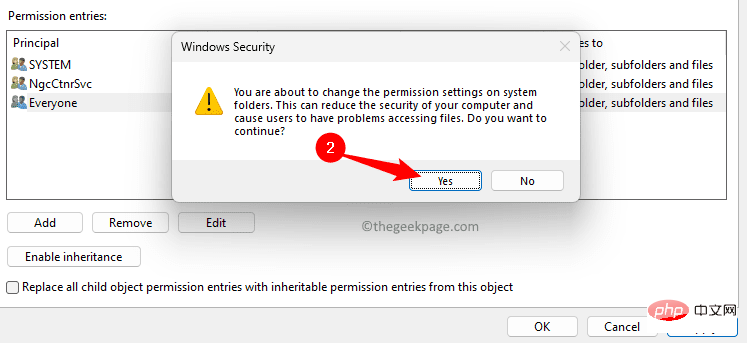
最后,单击“应用”,然后单击“是”在“Windows 安全”对话框中。
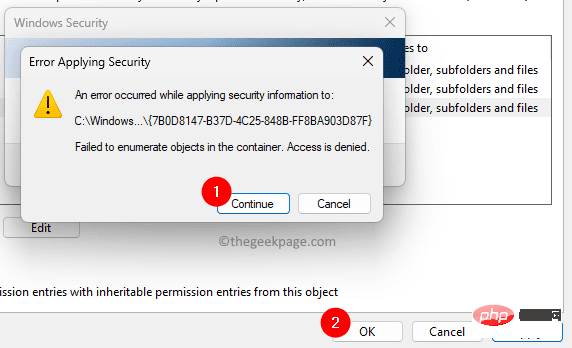
然后,单击继续,然后单击确定。
现在,尝试删除PC上的Nuc文件夹。
如果您仍然无法删除 Ngc 文件夹,请按照以下步骤操作。
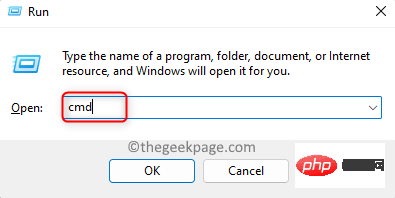
1. 按 Windows + R 打开运行。
2.键入cmd并按 按Ctrl + 转移 + 输入 以管理员身份打开命令提示符。
3. 当 UAC 提示输入权限时,单击是。
4.在命令提示符下,一个接一个地复制并粘贴下面的命令,然后按 输入 在每个命令之后执行它们。
takeown /f C:\Windows\ServiceProfiles\LocalService\AppData\Local\Microsoft\NGCicacls C:\Windows\ServiceProfiles\LocalService\AppData\Local\Microsoft\NGC /grant administrators:f
 从PC中删除Ngc文件夹后重新启动计算机。
步骤 2 – 设置 Windows Hello PIN
第 1 步。删除 NGC 文件夹并重新启动系统后,使用密码登录。
第 2 步。使用 Windows + I 组合键打开“设置”应用。
第 3 步。选择左窗格中的“帐户”选项卡。
第 4 步。单击右侧标有“登录选项”的框。
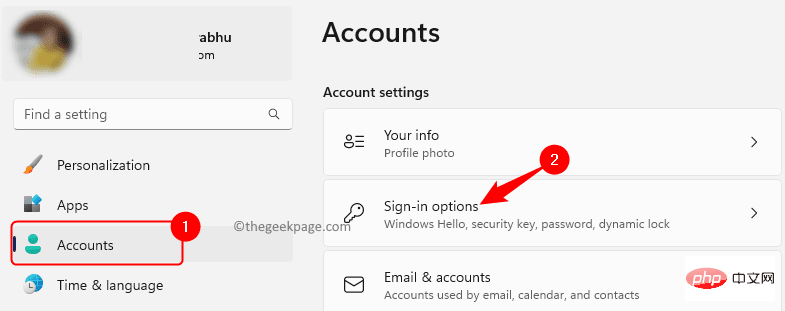
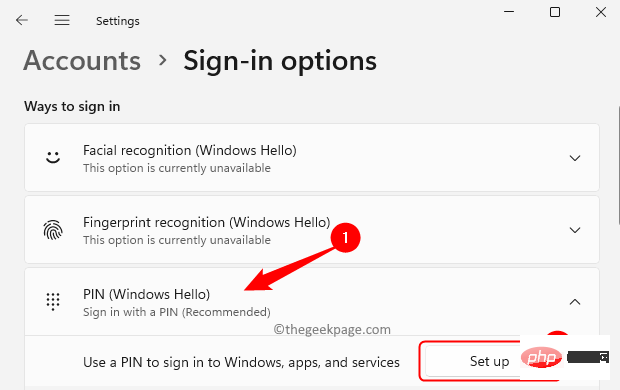
第5步。现在,单击PIN(Windows Hello)将其展开。
然后,单击“使用 PIN 登录 Windows、应用和服务”旁边的“设置”按钮。
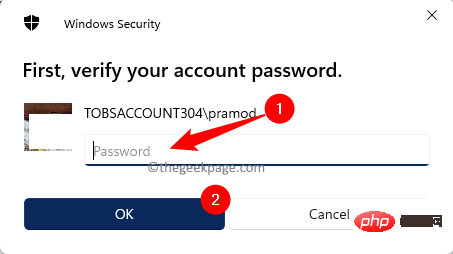
第 6 步。在出现的对话框中输入您的帐户密码。
然后,单击确定。
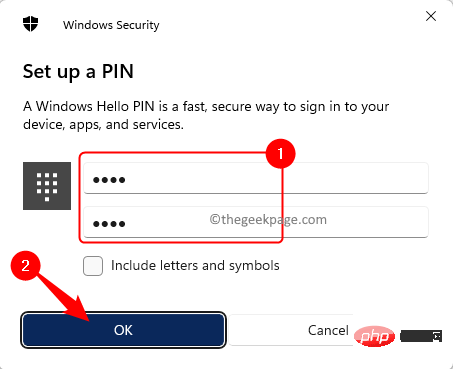
步骤 7.现在,系统将提示您创建新的 PIN。
输入新的 PIN 码,然后单击确定。
第8步。重新启动电脑。
系统启动后,使用您的 Windows Hello PIN 登录,您将不会看到输入 A1B2C3 的提示。
The above is the detailed content of Enter A1B2C3 to enter the Windows 11 hotfix login screen. For more information, please follow other related articles on the PHP Chinese website!

Hot AI Tools

Undresser.AI Undress
AI-powered app for creating realistic nude photos

AI Clothes Remover
Online AI tool for removing clothes from photos.

Undress AI Tool
Undress images for free

Clothoff.io
AI clothes remover

AI Hentai Generator
Generate AI Hentai for free.

Hot Article

Hot Tools

Notepad++7.3.1
Easy-to-use and free code editor

SublimeText3 Chinese version
Chinese version, very easy to use

Zend Studio 13.0.1
Powerful PHP integrated development environment

Dreamweaver CS6
Visual web development tools

SublimeText3 Mac version
God-level code editing software (SublimeText3)

Hot Topics
 How to fine-tune deepseek locally
Feb 19, 2025 pm 05:21 PM
Local fine-tuning of DeepSeek class models faces the challenge of insufficient computing resources and expertise. To address these challenges, the following strategies can be adopted: Model quantization: convert model parameters into low-precision integers, reducing memory footprint. Use smaller models: Select a pretrained model with smaller parameters for easier local fine-tuning. Data selection and preprocessing: Select high-quality data and perform appropriate preprocessing to avoid poor data quality affecting model effectiveness. Batch training: For large data sets, load data in batches for training to avoid memory overflow. Acceleration with GPU: Use independent graphics cards to accelerate the training process and shorten the training time.
 deepseek image generation tutorial
Feb 19, 2025 pm 04:15 PM
DeepSeek: A powerful AI image generation tool! DeepSeek itself is not an image generation tool, but its powerful core technology provides underlying support for many AI painting tools. Want to know how to use DeepSeek to generate images indirectly? Please continue reading! Generate images with DeepSeek-based AI tools: The following steps will guide you to use these tools: Launch the AI Painting Tool: Search and open a DeepSeek-based AI Painting Tool (for example, search "Simple AI"). Select the drawing mode: select "AI Drawing" or similar function, and select the image type according to your needs, such as "Anime Avatar", "Landscape"
 Pi Node Teaching: What is a Pi Node? How to install and set up Pi Node?
Mar 05, 2025 pm 05:57 PM
Detailed explanation and installation guide for PiNetwork nodes This article will introduce the PiNetwork ecosystem in detail - Pi nodes, a key role in the PiNetwork ecosystem, and provide complete steps for installation and configuration. After the launch of the PiNetwork blockchain test network, Pi nodes have become an important part of many pioneers actively participating in the testing, preparing for the upcoming main network release. If you don’t know PiNetwork yet, please refer to what is Picoin? What is the price for listing? Pi usage, mining and security analysis. What is PiNetwork? The PiNetwork project started in 2019 and owns its exclusive cryptocurrency Pi Coin. The project aims to create a one that everyone can participate
 How to ask deepseek
Feb 19, 2025 pm 04:39 PM
The search accuracy of DeepSeek depends on the way of asking questions. To achieve ideal results, the question should contain the following key elements: Clear topic: Specific specified information objectives. Specific angles: Cut into the topic from a specific perspective. Expected output form: define the desired result type (summary, analysis, list, etc.).
 How to download deepseek
Feb 19, 2025 pm 05:45 PM
Make sure to access official website downloads and carefully check the domain name and website design. After downloading, scan the file. Read the protocol during installation and avoid the system disk when installing. Test the function and contact customer service to solve the problem. Update the version regularly to ensure the security and stability of the software.
 How to use deepseek
Feb 19, 2025 pm 04:45 PM
DeepSeek is an efficient data search and analysis tool with an indexing mechanism at its core. Factors that affect their efficiency include: data type, data size, search strategy, and DeepSeek performance. High-quality data, refined search queries and sufficient computing resources are essential to optimize search results.
 How to adjust Sesame Open Exchange into Chinese
Mar 04, 2025 pm 11:51 PM
How to adjust Sesame Open Exchange to Chinese? This tutorial covers detailed steps on computers and Android mobile phones, from preliminary preparation to operational processes, and then to solving common problems, helping you easily switch the Sesame Open Exchange interface to Chinese and quickly get started with the trading platform.
 Ouyi Exchange Download Official Portal
Feb 21, 2025 pm 07:51 PM
Ouyi, also known as OKX, is a world-leading cryptocurrency trading platform. The article provides a download portal for Ouyi's official installation package, which facilitates users to install Ouyi client on different devices. This installation package supports Windows, Mac, Android and iOS systems. Users can choose the corresponding version to download according to their device type. After the installation is completed, users can register or log in to the Ouyi account, start trading cryptocurrencies and enjoy other services provided by the platform.


