How to use Java to implement an efficient flash sale system?
First, let’s take a look at the final architecture diagram:
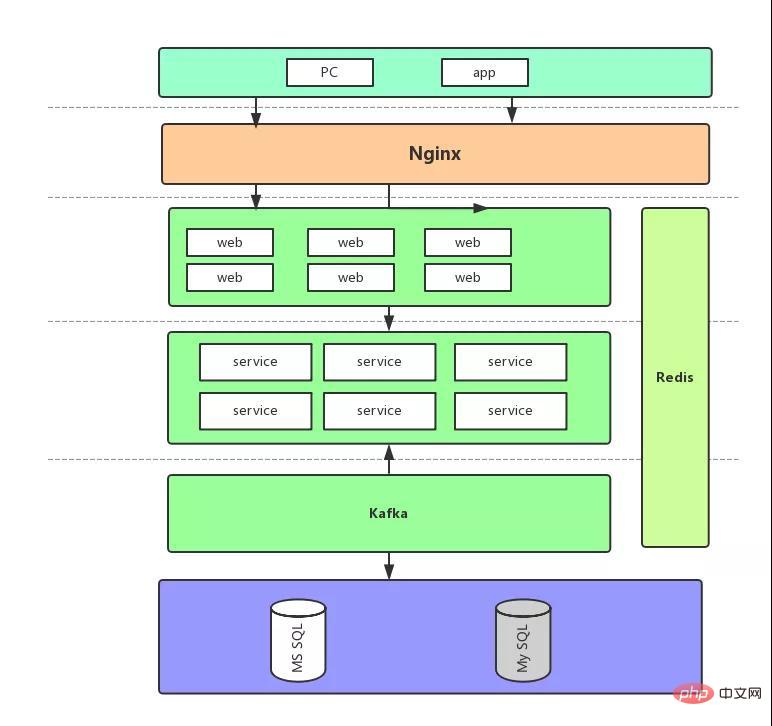
Let’s briefly talk about the flow of requests based on this diagram, because no matter how we improve it later, these will remain unchanged:
The front-end request enters the Web layer, and the corresponding code is the Controller.
After that, the real inventory verification, order placement and other requests are sent to the Service layer. The RPC call still uses Dubbo, but it is updated to the *** version.
The Service layer will then implement the data and the order will be placed.
*** system
Putting aside the flash sale scenario, a normal order process can be simply divided into the following steps:
Check inventory
Deduct inventory
-
Create order
Payment
Based on the above structure, we have With the following implementation, let’s first look at the structure of the actual project:
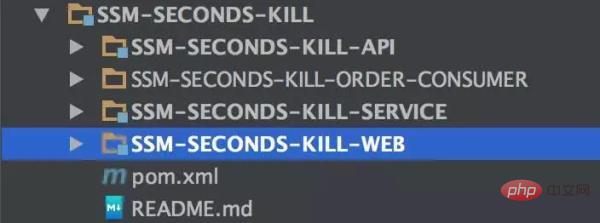
It’s still the same as before:
Provides an API for Service layer implementation, and Web layer consumption.
The Web layer is simply a Spring MVC.
The Service layer is the real data implementation.
SSM-SECONDS-KILL-ORDER-CONSUMER is the Kafka consumption that will be mentioned later.
The database also has only two simple tables to simulate ordering:
CREATE TABLE `stock` ( `id` int(11) unsigned NOT NULL AUTO_INCREMENT, `name` varchar(50) NOT NULL DEFAULT '' COMMENT '名称', `count` int(11) NOT NULL COMMENT '库存', `sale` int(11) NOT NULL COMMENT '已售', `version` int(11) NOT NULL COMMENT '乐观锁,版本号', PRIMARY KEY (`id`) ) ENGINE=InnoDB AUTO_INCREMENT=2 DEFAULT CHARSET=utf8; CREATE TABLE `stock_order` ( `id` int(11) unsigned NOT NULL AUTO_INCREMENT, `sid` int(11) NOT NULL COMMENT '库存ID', `name` varchar(30) NOT NULL DEFAULT '' COMMENT '商品名称', `create_time` timestamp NOT NULL DEFAULT CURRENT_TIMESTAMP ON UPDATE CURRENT_TIMESTAMP COMMENT '创建时间', PRIMARY KEY (`id`) ) ENGINE=InnoDB AUTO_INCREMENT=55 DEFAULT CHARSET=utf8;
Web layer Controller implementation:
@Autowired private StockService stockService; @Autowired private OrderService orderService; @RequestMapping("/createWrongOrder/{sid}") @ResponseBody public String createWrongOrder(@PathVariable int sid) { logger.info("sid=[{}]", sid); int id = 0; try { id = orderService.createWrongOrder(sid); } catch (Exception e) { logger.error("Exception",e); } return String.valueOf(id); }The Web is called as a consumer Look at the Dubbo service provided by OrderService.
Service layer, OrderService implementation, first is the implementation of API (output interface will be provided in API):
@Service public class OrderServiceImpl implements OrderService { @Resource(name = "DBOrderService") private com.crossoverJie.seconds.kill.service.OrderService orderService ; @Override public int createWrongOrder(int sid) throws Exception { return orderService.createWrongOrder(sid); } }Here is just a simple call to the implementation in DBOrderService, DBOrderService is the real data Landing, that is, writing the database.
DBOrderService implementation:
Transactional(rollbackFor = Exception.class) @Service(value = "DBOrderService") public class OrderServiceImpl implements OrderService { @Resource(name = "DBStockService") private com.crossoverJie.seconds.kill.service.StockService stockService; @Autowired private StockOrderMapper orderMapper; @Override public int createWrongOrder(int sid) throws Exception{ //校验库存 Stock stock = checkStock(sid); //扣库存 saleStock(stock); //创建订单 int id = createOrder(stock); return id; } private Stock checkStock(int sid) { Stock stock = stockService.getStockById(sid); if (stock.getSale().equals(stock.getCount())) { throw new RuntimeException("库存不足"); } return stock; } private int saleStock(Stock stock) { stock.setSale(stock.getSale() + 1); return stockService.updateStockById(stock); } private int createOrder(Stock stock) { StockOrder order = new StockOrder(); order.setSid(stock.getId()); order.setName(stock.getName()); int id = orderMapper.insertSelective(order); return id; } }Pre-initialized 10 inventories. Manually call the createWrongOrder/1 interface and find:

Inventory table


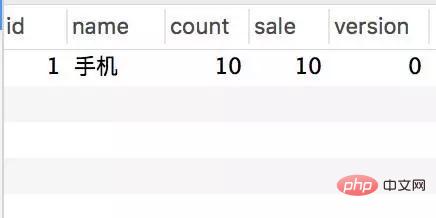
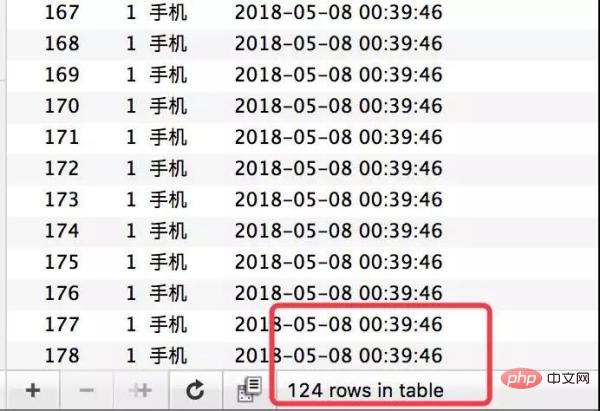
 ##The requests were all responded successfully, and the inventory was indeed deducted, but 124 records were generated for the order. This is obviously a classic oversold phenomenon.
In fact, if you manually call the interface now, it will return insufficient inventory, but it is too late.
Optimistic lock updateHow to avoid the above phenomenon? The simplest way is naturally optimistic locking. Let’s take a look at the specific implementation:
In fact, nothing else has changed much, mainly the Service layer:
@Override public int createOptimisticOrder(int sid) throws Exception { //校验库存 Stock stock = checkStock(sid); //乐观锁更新库存 saleStockOptimistic(stock); //创建订单 int id = createOrder(stock); return id; } private void saleStockOptimistic(Stock stock) { int count = stockService.updateStockByOptimistic(stock); if (count == 0){ throw new RuntimeException("并发更新库存失败") ; } }Corresponding XML:
<update> update stock <set> sale = sale + 1, version = version + 1, </set> WHERE id = #{id,jdbcType=INTEGER} AND version = #{version,jdbcType=INTEGER} </update>With the same test conditions, we will perform the above test again/createOptimisticOrder/1:


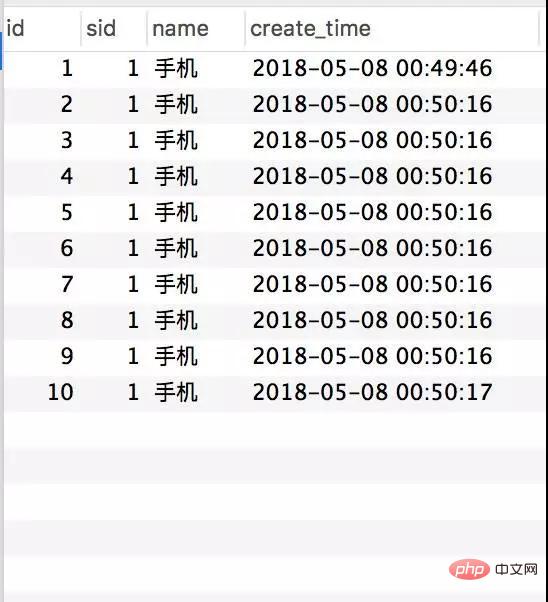 This time I found that both stock orders are OK.
Check the log and find:
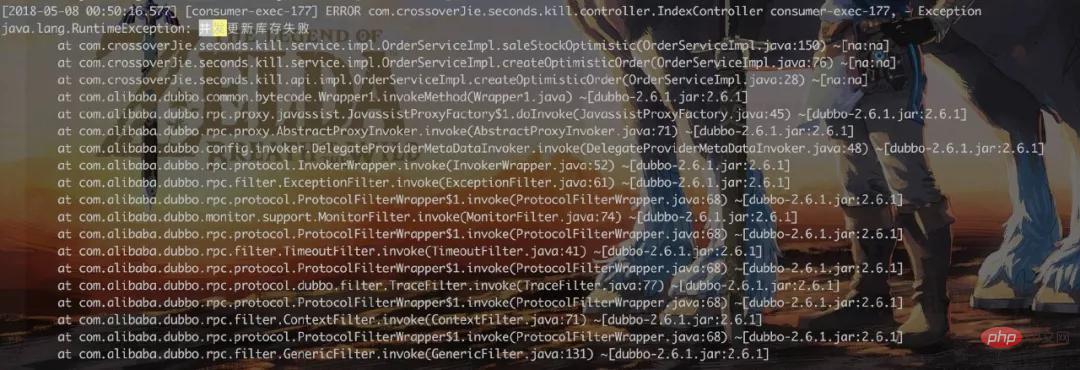 Many concurrent requests will respond with errors, which achieves the effect.
In order to further improve the throughput and response efficiency during flash sales, both the Web and Service here have been horizontally expanded:
- Web uses Nginx for load.
- Service is also a multi-application.

再用 JMeter 测试时可以直观的看到效果。
由于我是在阿里云的一台小水管服务器进行测试的,加上配置不高、应用都在同一台,所以并没有完全体现出性能上的优势( Nginx 做负载转发时候也会增加额外的网络消耗)。
Shell 脚本实现简单的 CI
由于应用多台部署之后,手动发版测试的痛苦相信经历过的都有体会。
这次并没有精力去搭建完整的 CICD,只是写了一个简单的脚本实现了自动化部署,希望给这方面没有经验的同学带来一点启发。
构建 Web:
#!/bin/bash # 构建 web 消费者 #read appname appname="consumer" echo "input="$appname PID=$(ps -ef | grep $appname | grep -v grep | awk '{print $2}') # 遍历杀掉 pid for var in ${PID[@]}; do echo "loop pid= $var" kill -9 $var done echo "kill $appname success" cd .. git pull cd SSM-SECONDS-KILL mvn -Dmaven.test.skip=true clean package echo "build war success" cp /home/crossoverJie/SSM/SSM-SECONDS-KILL/SSM-SECONDS-KILL-WEB/target/SSM-SECONDS-KILL-WEB-2.2.0-SNAPSHOT.war /home/crossoverJie/tomcat/tomcat-dubbo-consumer-8083/webapps echo "cp tomcat-dubbo-consumer-8083/webapps ok!" cp /home/crossoverJie/SSM/SSM-SECONDS-KILL/SSM-SECONDS-KILL-WEB/target/SSM-SECONDS-KILL-WEB-2.2.0-SNAPSHOT.war /home/crossoverJie/tomcat/tomcat-dubbo-consumer-7083-slave/webapps echo "cp tomcat-dubbo-consumer-7083-slave/webapps ok!" sh /home/crossoverJie/tomcat/tomcat-dubbo-consumer-8083/bin/startup.sh echo "tomcat-dubbo-consumer-8083/bin/startup.sh success" sh /home/crossoverJie/tomcat/tomcat-dubbo-consumer-7083-slave/bin/startup.sh echo "tomcat-dubbo-consumer-7083-slave/bin/startup.sh success" echo "start $appname success"构建 Service:
# 构建服务提供者 #read appname appname="provider" echo "input="$appname PID=$(ps -ef | grep $appname | grep -v grep | awk '{print $2}') #if [ $? -eq 0 ]; then # echo "process id:$PID" #else # echo "process $appname not exit" # exit #fi # 遍历杀掉 pid for var in ${PID[@]}; do echo "loop pid= $var" kill -9 $var done echo "kill $appname success" cd .. git pull cd SSM-SECONDS-KILL mvn -Dmaven.test.skip=true clean package echo "build war success" cp /home/crossoverJie/SSM/SSM-SECONDS-KILL/SSM-SECONDS-KILL-SERVICE/target/SSM-SECONDS-KILL-SERVICE-2.2.0-SNAPSHOT.war /home/crossoverJie/tomcat/tomcat-dubbo-provider-8080/webapps echo "cp tomcat-dubbo-provider-8080/webapps ok!" cp /home/crossoverJie/SSM/SSM-SECONDS-KILL/SSM-SECONDS-KILL-SERVICE/target/SSM-SECONDS-KILL-SERVICE-2.2.0-SNAPSHOT.war /home/crossoverJie/tomcat/tomcat-dubbo-provider-7080-slave/webapps echo "cp tomcat-dubbo-provider-7080-slave/webapps ok!" sh /home/crossoverJie/tomcat/tomcat-dubbo-provider-8080/bin/startup.sh echo "tomcat-dubbo-provider-8080/bin/startup.sh success" sh /home/crossoverJie/tomcat/tomcat-dubbo-provider-7080-slave/bin/startup.sh echo "tomcat-dubbo-provider-8080/bin/startup.sh success" echo "start $appname success"之后每当我有更新,只需要执行这两个脚本就可以帮我自动构建。都是最基础的 Linux 命令,相信大家都看得明白。
乐观锁更新 + 分布式限流
上文的结果看似没有问题,其实还差得远呢。这里只是模拟了 300 个并发没有问题,但是当请求达到了 3000,3W,300W 呢?
虽说可以横向扩展支撑更多的请求,但是能不能利用最少的资源解决问题呢?
仔细分析下会发现:假设我的商品一共只有 10 个库存,那么无论你多少人来买其实最终也最多只有 10 人可以下单成功。所以其中会有 99% 的请求都是无效的。
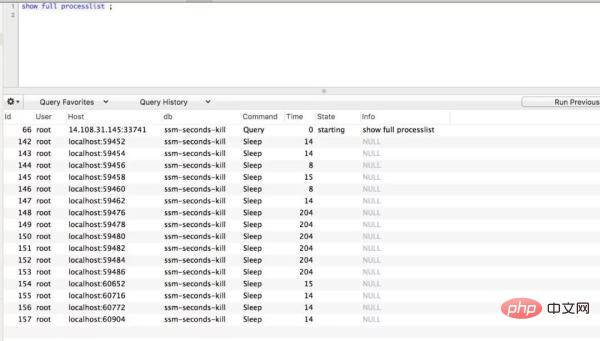
大家都知道:大多数应用数据库都是压倒骆驼的***一根稻草。通过 Druid 的监控来看看之前请求数据库的情况:
因为 Service 是两个应用:


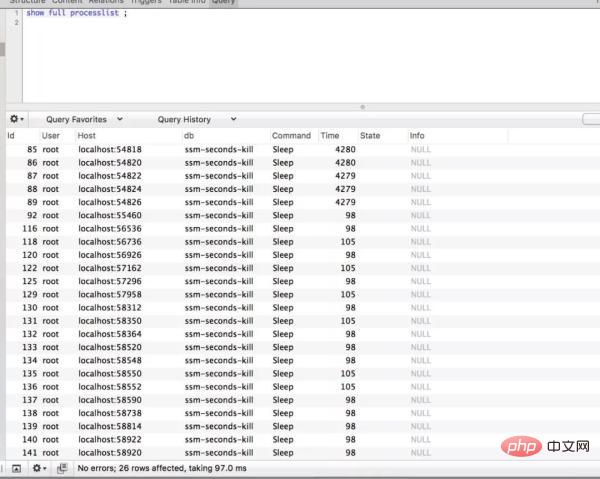
数据库也有 20 多个连接。怎么样来优化呢?其实很容易想到的就是分布式限流。
我们将并发控制在一个可控的范围之内,然后快速失败这样就能***程度的保护系统。
①distributed-redis-tool ⬆v1.0.3
因为加上该组件之后所有的请求都会经过 Redis,所以对 Redis 资源的使用也是要非常小心。
②API 更新
修改之后的 API 如下:
@Configuration public class RedisLimitConfig { private Logger logger = LoggerFactory.getLogger(RedisLimitConfig.class); @Value("${redis.limit}") private int limit; @Autowired private JedisConnectionFactory jedisConnectionFactory; @Bean public RedisLimit build() { RedisLimit redisLimit = new RedisLimit.Builder(jedisConnectionFactory, RedisToolsConstant.SINGLE) .limit(limit) .build(); return redisLimit; } }这里构建器改用了 JedisConnectionFactory,所以得配合 Spring 来一起使用。
并在初始化时显示传入 Redis 是以集群方式部署还是单机(强烈建议集群,限流之后对 Redis 还是有一定的压力)。
③限流实现
既然 API 更新了,实现自然也要修改:
/** * limit traffic * @return if true */ public boolean limit() { //get connection Object connection = getConnection(); Object result = limitRequest(connection); if (FAIL_CODE != (Long) result) { return true; } else { return false; } } private Object limitRequest(Object connection) { Object result = null; String key = String.valueOf(System.currentTimeMillis() / 1000); if (connection instanceof Jedis){ result = ((Jedis)connection).eval(script, Collections.singletonList(key), Collections.singletonList(String.valueOf(limit))); ((Jedis) connection).close(); }else { result = ((JedisCluster) connection).eval(script, Collections.singletonList(key), Collections.singletonList(String.valueOf(limit))); try { ((JedisCluster) connection).close(); } catch (IOException e) { logger.error("IOException",e); } } return result; } private Object getConnection() { Object connection ; if (type == RedisToolsConstant.SINGLE){ RedisConnection redisConnection = jedisConnectionFactory.getConnection(); connection = redisConnection.getNativeConnection(); }else { RedisClusterConnection clusterConnection = jedisConnectionFactory.getClusterConnection(); connection = clusterConnection.getNativeConnection() ; } return connection; }如果是原生的 Spring 应用得采用 @SpringControllerLimit(errorCode=200) 注解。
实际使用如下,Web 端:
/** * 乐观锁更新库存 限流 * @param sid * @return */ @SpringControllerLimit(errorCode = 200) @RequestMapping("/createOptimisticLimitOrder/{sid}") @ResponseBody public String createOptimisticLimitOrder(@PathVariable int sid) { logger.info("sid=[{}]", sid); int id = 0; try { id = orderService.createOptimisticOrder(sid); } catch (Exception e) { logger.error("Exception",e); } return String.valueOf(id); }Service 端就没什么更新了,依然是采用的乐观锁更新数据库。
再压测看下效果 /createOptimisticLimitOrderByRedis/1:

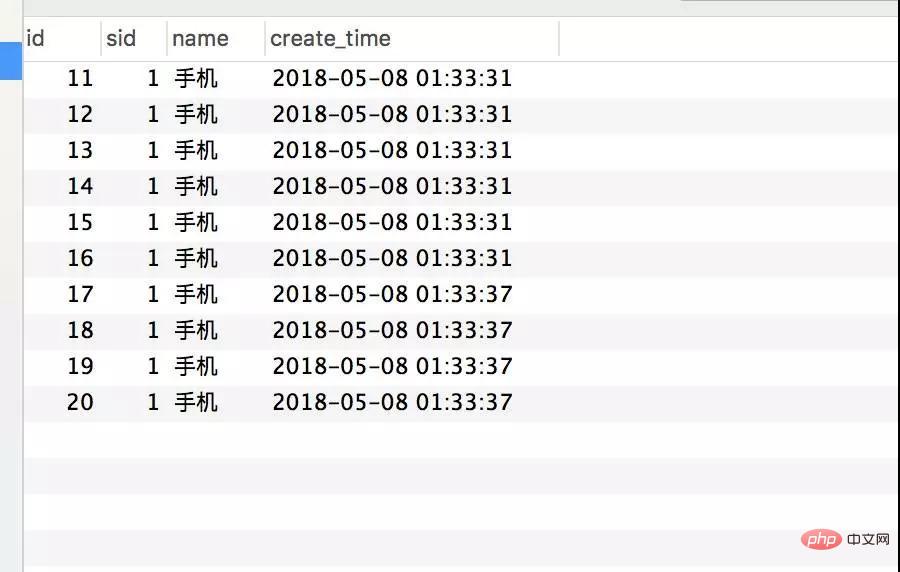


首先是看结果没有问题,再看数据库连接以及并发请求数都有明显的下降。
乐观锁更新+分布式限流+Redis 缓存
仔细观察 Druid 监控数据发现这个 SQL 被多次查询:

其实这是实时查询库存的 SQL,主要是为了在每次下单之前判断是否还有库存。
这也是个优化点。这种数据我们完全可以放在内存中,效率比在数据库要高很多。
由于我们的应用是分布式的,所以堆内缓存显然不合适,Redis 就非常适合。
这次主要改造的是 Service 层:
每次查询库存时走 Redis。
扣库存时更新 Redis。
需要提前将库存信息写入 Redis。(手动或者程序自动都可以)
主要代码如下:
@Override public int createOptimisticOrderUseRedis(int sid) throws Exception { //检验库存,从 Redis 获取 Stock stock = checkStockByRedis(sid); //乐观锁更新库存 以及更新 Redis saleStockOptimisticByRedis(stock); //创建订单 int id = createOrder(stock); return id ; } private Stock checkStockByRedis(int sid) throws Exception { Integer count = Integer.parseInt(redisTemplate.opsForValue().get(RedisKeysConstant.STOCK_COUNT + sid)); Integer sale = Integer.parseInt(redisTemplate.opsForValue().get(RedisKeysConstant.STOCK_SALE + sid)); if (count.equals(sale)){ throw new RuntimeException("库存不足 Redis currentCount=" + sale); } Integer version = Integer.parseInt(redisTemplate.opsForValue().get(RedisKeysConstant.STOCK_VERSION + sid)); Stock stock = new Stock() ; stock.setId(sid); stock.setCount(count); stock.setSale(sale); stock.setVersion(version); return stock; } /** * 乐观锁更新数据库 还要更新 Redis * @param stock */ private void saleStockOptimisticByRedis(Stock stock) { int count = stockService.updateStockByOptimistic(stock); if (count == 0){ throw new RuntimeException("并发更新库存失败") ; } //自增 redisTemplate.opsForValue().increment(RedisKeysConstant.STOCK_SALE + stock.getId(),1) ; redisTemplate.opsForValue().increment(RedisKeysConstant.STOCK_VERSION + stock.getId(),1) ; }压测看看实际效果 /createOptimisticLimitOrderByRedis/1:
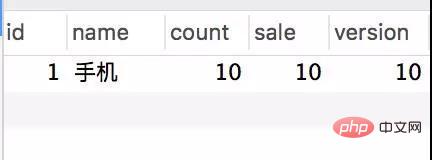
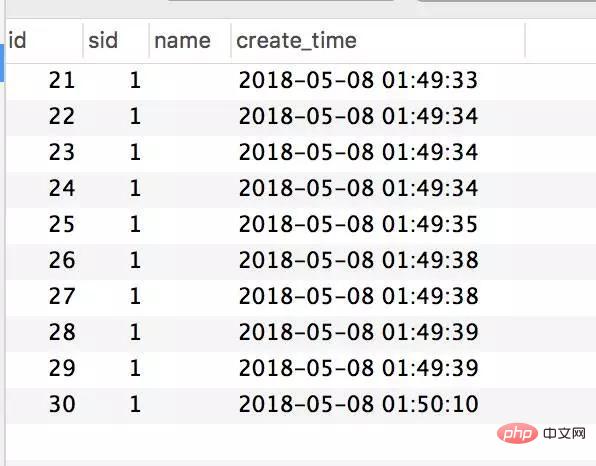


***发现数据没问题,数据库的请求与并发也都下来了。
乐观锁更新+分布式限流+Redis 缓存+Kafka 异步
***的优化还是想如何来再次提高吞吐量以及性能的。我们上文所有例子其实都是同步请求,完全可以利用同步转异步来提高性能啊。
这里我们将写订单以及更新库存的操作进行异步化,利用 Kafka 来进行解耦和队列的作用。
每当一个请求通过了限流到达了 Service 层通过了库存校验之后就将订单信息发给 Kafka ,这样一个请求就可以直接返回了。
消费程序再对数据进行入库落地。因为异步了,所以最终需要采取回调或者是其他提醒的方式提醒用户购买完成。
这里代码较多就不贴了,消费程序其实就是把之前的 Service 层的逻辑重写了一遍,不过采用的是 Spring Boot。
The above is the detailed content of How to use Java to implement an efficient flash sale system?. For more information, please follow other related articles on the PHP Chinese website!

Hot AI Tools

Undresser.AI Undress
AI-powered app for creating realistic nude photos

AI Clothes Remover
Online AI tool for removing clothes from photos.

Undress AI Tool
Undress images for free

Clothoff.io
AI clothes remover

AI Hentai Generator
Generate AI Hentai for free.

Hot Article

Hot Tools

Notepad++7.3.1
Easy-to-use and free code editor

SublimeText3 Chinese version
Chinese version, very easy to use

Zend Studio 13.0.1
Powerful PHP integrated development environment

Dreamweaver CS6
Visual web development tools

SublimeText3 Mac version
God-level code editing software (SublimeText3)

Hot Topics
 Square Root in Java
Aug 30, 2024 pm 04:26 PM
Guide to Square Root in Java. Here we discuss how Square Root works in Java with example and its code implementation respectively.
 Perfect Number in Java
Aug 30, 2024 pm 04:28 PM
Guide to Perfect Number in Java. Here we discuss the Definition, How to check Perfect number in Java?, examples with code implementation.
 Random Number Generator in Java
Aug 30, 2024 pm 04:27 PM
Guide to Random Number Generator in Java. Here we discuss Functions in Java with examples and two different Generators with ther examples.
 Weka in Java
Aug 30, 2024 pm 04:28 PM
Guide to Weka in Java. Here we discuss the Introduction, how to use weka java, the type of platform, and advantages with examples.
 Armstrong Number in Java
Aug 30, 2024 pm 04:26 PM
Guide to the Armstrong Number in Java. Here we discuss an introduction to Armstrong's number in java along with some of the code.
 Smith Number in Java
Aug 30, 2024 pm 04:28 PM
Guide to Smith Number in Java. Here we discuss the Definition, How to check smith number in Java? example with code implementation.
 Java Spring Interview Questions
Aug 30, 2024 pm 04:29 PM
In this article, we have kept the most asked Java Spring Interview Questions with their detailed answers. So that you can crack the interview.
 Break or return from Java 8 stream forEach?
Feb 07, 2025 pm 12:09 PM
Java 8 introduces the Stream API, providing a powerful and expressive way to process data collections. However, a common question when using Stream is: How to break or return from a forEach operation? Traditional loops allow for early interruption or return, but Stream's forEach method does not directly support this method. This article will explain the reasons and explore alternative methods for implementing premature termination in Stream processing systems. Further reading: Java Stream API improvements Understand Stream forEach The forEach method is a terminal operation that performs one operation on each element in the Stream. Its design intention is


