 Java
Java
 javaTutorial
 How does Java8 CompletableFuture implement asynchronous multi-threaded programming?
How does Java8 CompletableFuture implement asynchronous multi-threaded programming?
1. An example review of Future
In some business scenarios, we need to use multi-threads to execute tasks asynchronously to speed up task execution.
JDK5 adds a new Future interface, which is used to describe the results of an asynchronous calculation.
Although Future and related usage methods provide the ability to execute tasks asynchronously, it is very inconvenient to obtain the results. We must use Future.get() to block the calling thread, or use polling. Determine whether the Future.isDone task is completed, and then obtain the result.
Both of these processing methods are not very elegant. The relevant code is as follows:
    @Test
    public void testFuture() throws ExecutionException, InterruptedException {
        ExecutorService executorService = Executors.newFixedThreadPool(5);
        Future<String> future = executorService.submit(() -> {
            Thread.sleep(2000);
            return "hello";
        });
        System.out.println(future.get());
        System.out.println("end");
}At the same time, Future cannot solve the scenario where multiple asynchronous tasks need to depend on each other. To put it simply, the main The thread needs to wait for the sub-thread task to complete before executing it. At this time, you may have thought of "CountDownLatch". Yes, it can be solved. The code is as follows.
Two Futures are defined here. The first one obtains user information through user id, and the second one obtains product information through product id.
    @Test
    public void testCountDownLatch() throws InterruptedException, ExecutionException {
        ExecutorService executorService = Executors.newFixedThreadPool(5);
        CountDownLatch downLatch = new CountDownLatch(2);
        long startTime = System.currentTimeMillis();
        Future<String> userFuture = executorService.submit(() -> {
            //模拟查询商品耗时500毫秒
            Thread.sleep(500);
            downLatch.countDown();
            return "用户A";
        });

        Future<String> goodsFuture = executorService.submit(() -> {
            //模拟查询商品耗时500毫秒
            Thread.sleep(400);
            downLatch.countDown();
            return "商品A";
        });

        downLatch.await();
        //模拟主程序耗时时间
        Thread.sleep(600);
        System.out.println("获取用户信息:" + userFuture.get());
        System.out.println("获取商品信息:" + goodsFuture.get());
        System.out.println("总共用时" + (System.currentTimeMillis() - startTime) + "ms");

}「Run result」
Get user information: User A
Get product information: Product A
Total time 1110ms
From running The results can be seen that the results have been obtained, and if we do not use asynchronous operations, the execution time should be: 500 400 600 = 1500. After using asynchronous operations, it actually only takes 1110.
But after Java8, I no longer think this is an elegant solution. Next, let’s learn about the use of CompletableFuture.
2. Implement the above example through CompletableFuture
    @Test
    public void testCompletableInfo() throws InterruptedException, ExecutionException {
        long startTime = System.currentTimeMillis();

        //调用用户服务获取用户基本信息
        CompletableFuture<String> userFuture = CompletableFuture.supplyAsync(() ->
                //模拟查询商品耗时500毫秒
        {
            try {
                Thread.sleep(500);
            } catch (InterruptedException e) {
                e.printStackTrace();
            }
            return "用户A";
        });

        //调用商品服务获取商品基本信息
        CompletableFuture<String> goodsFuture = CompletableFuture.supplyAsync(() ->
                //模拟查询商品耗时500毫秒
        {
            try {
                Thread.sleep(400);
            } catch (InterruptedException e) {
                e.printStackTrace();
            }
            return "商品A";
        });

        System.out.println("获取用户信息:" + userFuture.get());
        System.out.println("获取商品信息:" + goodsFuture.get());

        //模拟主程序耗时时间
        Thread.sleep(600);
        System.out.println("总共用时" + (System.currentTimeMillis() - startTime) + "ms");
}Running results
Get user information: User A
Get product information: Product A
takes a total of 1112ms
The function of CountDownLatch can be easily implemented through CompletableFuture. You think this is the end, but it is far more than that. CompletableFuture is much better than this.
For example, it can be implemented: after task 1 is executed, task 2 is executed, and even the result of task 1 execution can be used as the input parameter of task 2 and other powerful functions. Let’s learn the API of CompletableFuture.
3. CompletableFuture creation methods
3.1. Four commonly used creation methods
There are four static methods in the CompletableFuture source code to perform asynchronous tasks
public static <U> CompletableFuture<U> supplyAsync(Supplier<U> supplier){..}
public static <U> CompletableFuture<U> supplyAsync(Supplier<U> supplier,Executor executor){..}
public static CompletableFuture<Void> runAsync(Runnable runnable){..}
public static CompletableFuture<Void> runAsync(Runnable runnable,Executor executor){..}Generally we use the above static method to create CompletableFuture. Here we also explain their differences:
##「supplyAsync」Execute tasks and support return values.
「runAsync」Execute the task, no return value.
//使用默认内置线程池ForkJoinPool.commonPool(),根据supplier构建执行任务
public static <U> CompletableFuture<U> supplyAsync(Supplier<U> supplier)
//自定义线程,根据supplier构建执行任务
public static <U> CompletableFuture<U> supplyAsync(Supplier<U> supplier, Executor executor)
//使用默认内置线程池ForkJoinPool.commonPool(),根据runnable构建执行任务
public static CompletableFuture<Void> runAsync(Runnable runnable)
//自定义线程,根据runnable构建执行任务
public static CompletableFuture<Void> runAsync(Runnable runnable,  Executor executor)
//方式一
public T get()
//方式二
public T get(long timeout, TimeUnit unit)
//方式三
public T getNow(T valueIfAbsent)
//方式四
public T join()
「get() and get(long timeout , TimeUnit unit)" => It is already provided in Future, which provides timeout processing. If the result is not obtained within the specified time, a timeout exception will be thrown
-
『getNow』 => Obtain the result immediately without blocking. If the result calculation is completed, the result or an exception during the calculation process will be returned. If the calculation is not completed, the set valueIfAbsent value will be returned.
『join』 => No exception will be thrown in the method
Example:
    @Test
    public void testCompletableGet() throws InterruptedException, ExecutionException {

        CompletableFuture<String> cp1 = CompletableFuture.supplyAsync(() -> {
            try {
                Thread.sleep(1000);
            } catch (InterruptedException e) {
                e.printStackTrace();
            }
            return "商品A";
        });

        // getNow方法测试
        System.out.println(cp1.getNow("商品B"));

        //join方法测试
        CompletableFuture<Integer> cp2 = CompletableFuture.supplyAsync((() -> 1 / 0));
        System.out.println(cp2.join());
        System.out.println("-----------------------------------------------------");
        //get方法测试
        CompletableFuture<Integer> cp3 = CompletableFuture.supplyAsync((() -> 1 / 0));
        System.out.println(cp3.get());
}- The first execution result is
「Product B」, because the result cannot be obtained immediately because it has to sleep for 1 second first
- The join method will not throw an exception in the result method, but the execution result will throw an exception. The exception thrown is CompletionException
- The get method will get the result method An exception will be thrown, and the exception thrown by the execution result is ExecutionException
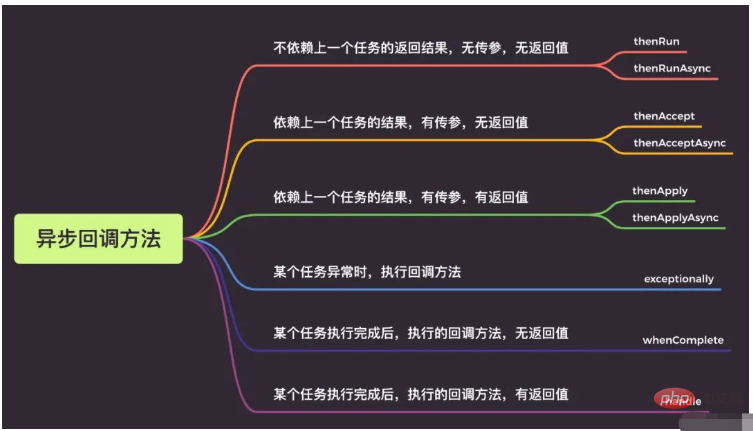
 ##4.1, thenRun/thenRunAsync
To put it simply,
"After completing the first task, do the second task, and the second task will not return a value".
Example @Test
public void testCompletableThenRunAsync() throws InterruptedException, ExecutionException {
long startTime = System.currentTimeMillis();
CompletableFuture<Void> cp1 = CompletableFuture.runAsync(() -> {
try {
//执行任务A
Thread.sleep(600);
} catch (InterruptedException e) {
e.printStackTrace();
}
});
CompletableFuture<Void> cp2 = cp1.thenRun(() -> {
try {
//执行任务B
Thread.sleep(400);
} catch (InterruptedException e) {
e.printStackTrace();
}
});
// get方法测试
System.out.println(cp2.get());
//模拟主程序耗时时间
Thread.sleep(600);
System.out.println("总共用时" + (System.currentTimeMillis() - startTime) + "ms");
}
//运行结果
/**
* null
* 总共用时1610ms
*/
If you execute the first task When, a custom thread pool is passed in:
- When the thenRun method is called to execute the second task, the second task and the first task share the same thread pool.
- When calling thenRunAsync to execute the second task, the first task uses the thread pool you passed in, and the second task uses the ForkJoin thread pool.
: The difference between thenAccept and thenAcceptAsync, thenApply and thenApplyAsync introduced later is also this. 4.2, thenAccept/thenAcceptAsync
After the first task is executed, the second callback method task is executed.
The execution result of the task will be used as the input parameter, passed to the callback method, but the callback method has no return value.
Example<div class="code" style="position:relative; padding:0px; margin:0px;"><pre class='brush:php;toolbar:false;'> @Test
public void testCompletableThenAccept() throws ExecutionException, InterruptedException {
long startTime = System.currentTimeMillis();
CompletableFuture<String> cp1 = CompletableFuture.supplyAsync(() -> {
return "dev";
});
CompletableFuture<Void> cp2 = cp1.thenAccept((a) -> {
System.out.println("上一个任务的返回结果为: " + a);
});
cp2.get();
}</pre><div class="contentsignin">Copy after login</div></div><h4 id="thenApply-thenApplyAsync">4.3、 thenApply/thenApplyAsync</h4><p>表示第一个任务执行完成后,执行第二个回调方法任务,会将该任务的执行结果,作为入参,传递到回调方法中,并且回调方法是有返回值的。</p><p><code>示例
    @Test
    public void testCompletableThenApply() throws ExecutionException, InterruptedException {
        CompletableFuture<String> cp1 = CompletableFuture.supplyAsync(() -> {
            return "dev";

        }).thenApply((a) -> {
            if (Objects.equals(a, "dev")) {
                return "dev";
            }
            return "prod";
        });

        System.out.println("当前环境为:" + cp1.get());

        //输出: 当前环境为:dev
}5、异常回调
当CompletableFuture的任务不论是正常完成还是出现异常它都会调用「whenComplete」这回调函数。
「正常完成」:whenComplete返回结果和上级任务一致,异常为null;
「出现异常」:whenComplete返回结果为null,异常为上级任务的异常;
即调用get()时,正常完成时就获取到结果,出现异常时就会抛出异常,需要你处理该异常。
下面来看看示例
5.1、只用whenComplete
    @Test
    public void testCompletableWhenComplete() throws ExecutionException, InterruptedException {
        CompletableFuture<Double> future = CompletableFuture.supplyAsync(() -> {

            if (Math.random() < 0.5) {
                throw new RuntimeException("出错了");
            }
            System.out.println("正常结束");
            return 0.11;

        }).whenComplete((aDouble, throwable) -> {
            if (aDouble == null) {
                System.out.println("whenComplete aDouble is null");
            } else {
                System.out.println("whenComplete aDouble is " + aDouble);
            }
            if (throwable == null) {
                System.out.println("whenComplete throwable is null");
            } else {
                System.out.println("whenComplete throwable is " + throwable.getMessage());
            }
        });
        System.out.println("最终返回的结果 = " + future.get());
}正常完成,没有异常时:
正常结束
whenComplete aDouble is 0.11
whenComplete throwable is null
最终返回的结果 = 0.11
出现异常时:get()会抛出异常
whenComplete aDouble is null
whenComplete throwable is java.lang.RuntimeException: 出错了
java.util.concurrent.ExecutionException: java.lang.RuntimeException: 出错了
at java.util.concurrent.CompletableFuture.reportGet(CompletableFuture.java:357)
at java.util.concurrent.CompletableFuture.get(CompletableFuture.java:1895)
5.2、whenComplete + exceptionally示例
    @Test
    public void testWhenCompleteExceptionally() throws ExecutionException, InterruptedException {
        CompletableFuture<Double> future = CompletableFuture.supplyAsync(() -> {
            if (Math.random() < 0.5) {
                throw new RuntimeException("出错了");
            }
            System.out.println("正常结束");
            return 0.11;

        }).whenComplete((aDouble, throwable) -> {
            if (aDouble == null) {
                System.out.println("whenComplete aDouble is null");
            } else {
                System.out.println("whenComplete aDouble is " + aDouble);
            }
            if (throwable == null) {
                System.out.println("whenComplete throwable is null");
            } else {
                System.out.println("whenComplete throwable is " + throwable.getMessage());
            }
        }).exceptionally((throwable) -> {
            System.out.println("exceptionally中异常:" + throwable.getMessage());
            return 0.0;
        });

        System.out.println("最终返回的结果 = " + future.get());
}当出现异常时,exceptionally中会捕获该异常,给出默认返回值0.0。
whenComplete aDouble is null
whenComplete throwable is java.lang.RuntimeException: 出错了
exceptionally中异常:java.lang.RuntimeException: 出错了
最终返回的结果 = 0.0
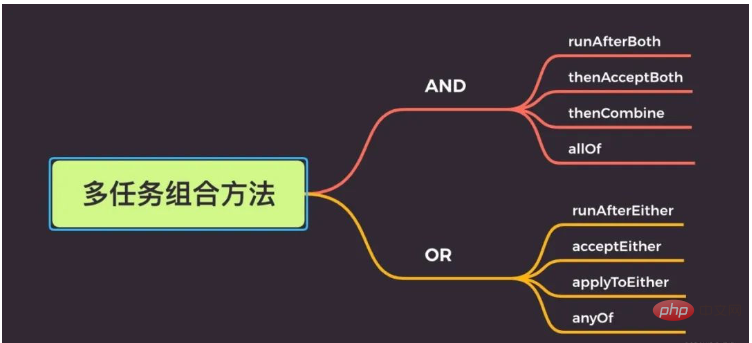
6、多任务组合回调

6.1、AND组合关系
thenCombine / thenAcceptBoth / runAfterBoth都表示:「当任务一和任务二都完成再执行任务三」。
区别在于:
「runAfterBoth」 不会把执行结果当做方法入参,且没有返回值
「thenAcceptBoth」: 会将两个任务的执行结果作为方法入参,传递到指定方法中,且无返回值
「thenCombine」:会将两个任务的执行结果作为方法入参,传递到指定方法中,且有返回值
示例
    @Test
    public void testCompletableThenCombine() throws ExecutionException, InterruptedException {
        //创建线程池
        ExecutorService executorService = Executors.newFixedThreadPool(10);
        //开启异步任务1
        CompletableFuture<Integer> task = CompletableFuture.supplyAsync(() -> {
            System.out.println("异步任务1,当前线程是:" + Thread.currentThread().getId());
            int result = 1 + 1;
            System.out.println("异步任务1结束");
            return result;
        }, executorService);

        //开启异步任务2
        CompletableFuture<Integer> task2 = CompletableFuture.supplyAsync(() -> {
            System.out.println("异步任务2,当前线程是:" + Thread.currentThread().getId());
            int result = 1 + 1;
            System.out.println("异步任务2结束");
            return result;
        }, executorService);

        //任务组合
        CompletableFuture<Integer> task3 = task.thenCombineAsync(task2, (f1, f2) -> {
            System.out.println("执行任务3,当前线程是:" + Thread.currentThread().getId());
            System.out.println("任务1返回值:" + f1);
            System.out.println("任务2返回值:" + f2);
            return f1 + f2;
        }, executorService);

        Integer res = task3.get();
        System.out.println("最终结果:" + res);
}「运行结果」
异步任务1,当前线程是:17
异步任务1结束
异步任务2,当前线程是:18
异步任务2结束
执行任务3,当前线程是:19
任务1返回值:2
任务2返回值:2
最终结果:4
6.2、OR组合关系
applyToEither / acceptEither / runAfterEither 都表示:「两个任务,只要有一个任务完成,就执行任务三」。
区别在于:
「runAfterEither」:不会把执行结果当做方法入参,且没有返回值
「acceptEither」: 会将已经执行完成的任务,作为方法入参,传递到指定方法中,且无返回值
「applyToEither」:会将已经执行完成的任务,作为方法入参,传递到指定方法中,且有返回值
示例
    @Test
    public void testCompletableEitherAsync() {
        //创建线程池
        ExecutorService executorService = Executors.newFixedThreadPool(10);
        //开启异步任务1
        CompletableFuture<Integer> task = CompletableFuture.supplyAsync(() -> {
            System.out.println("异步任务1,当前线程是:" + Thread.currentThread().getId());

            int result = 1 + 1;
            System.out.println("异步任务1结束");
            return result;
        }, executorService);

        //开启异步任务2
        CompletableFuture<Integer> task2 = CompletableFuture.supplyAsync(() -> {
            System.out.println("异步任务2,当前线程是:" + Thread.currentThread().getId());
            int result = 1 + 2;
            try {
                Thread.sleep(3000);
            } catch (InterruptedException e) {
                e.printStackTrace();
            }
            System.out.println("异步任务2结束");
            return result;
        }, executorService);

        //任务组合
        task.acceptEitherAsync(task2, (res) -> {
            System.out.println("执行任务3,当前线程是:" + Thread.currentThread().getId());
            System.out.println("上一个任务的结果为:" + res);
        }, executorService);
}运行结果
//通过结果可以看出,异步任务2都没有执行结束,任务3获取的也是1的执行结果
异步任务1,当前线程是:17
异步任务1结束
异步任务2,当前线程是:18
执行任务3,当前线程是:19
上一个任务的结果为:2
注意
如果把上面的核心线程数改为1也就是
ExecutorService executorService = Executors.newFixedThreadPool(1);
运行结果就是下面的了,会发现根本没有执行任务3,显然是任务3直接被丢弃了。
异步任务1,当前线程是:17
异步任务1结束
异步任务2,当前线程是:17
6.3、多任务组合
「allOf」:等待所有任务完成
「anyOf」:只要有一个任务完成
示例
allOf:等待所有任务完成
    @Test
    public void testCompletableAallOf() throws ExecutionException, InterruptedException {
        //创建线程池
        ExecutorService executorService = Executors.newFixedThreadPool(10);
        //开启异步任务1
        CompletableFuture<Integer> task = CompletableFuture.supplyAsync(() -> {
            System.out.println("异步任务1,当前线程是:" + Thread.currentThread().getId());
            int result = 1 + 1;
            System.out.println("异步任务1结束");
            return result;
        }, executorService);

        //开启异步任务2
        CompletableFuture<Integer> task2 = CompletableFuture.supplyAsync(() -> {
            System.out.println("异步任务2,当前线程是:" + Thread.currentThread().getId());
            int result = 1 + 2;
            try {
                Thread.sleep(3000);
            } catch (InterruptedException e) {
                e.printStackTrace();
            }
            System.out.println("异步任务2结束");
            return result;
        }, executorService);

        //开启异步任务3
        CompletableFuture<Integer> task3 = CompletableFuture.supplyAsync(() -> {
            System.out.println("异步任务3,当前线程是:" + Thread.currentThread().getId());
            int result = 1 + 3;
            try {
                Thread.sleep(4000);
            } catch (InterruptedException e) {
                e.printStackTrace();
            }
            System.out.println("异步任务3结束");
            return result;
        }, executorService);

        //任务组合
        CompletableFuture<Void> allOf = CompletableFuture.allOf(task, task2, task3);

        //等待所有任务完成
        allOf.get();
        //获取任务的返回结果
        System.out.println("task结果为:" + task.get());
        System.out.println("task2结果为:" + task2.get());
        System.out.println("task3结果为:" + task3.get());
}anyOf: 只要有一个任务完成
    @Test
    public void testCompletableAnyOf() throws ExecutionException, InterruptedException {
        //创建线程池
        ExecutorService executorService = Executors.newFixedThreadPool(10);
        //开启异步任务1
        CompletableFuture<Integer> task = CompletableFuture.supplyAsync(() -> {
            int result = 1 + 1;
            return result;
        }, executorService);

        //开启异步任务2
        CompletableFuture<Integer> task2 = CompletableFuture.supplyAsync(() -> {
            int result = 1 + 2;
            return result;
        }, executorService);

        //开启异步任务3
        CompletableFuture<Integer> task3 = CompletableFuture.supplyAsync(() -> {
            int result = 1 + 3;
            return result;
        }, executorService);

        //任务组合
        CompletableFuture<Object> anyOf = CompletableFuture.anyOf(task, task2, task3);
        //只要有一个有任务完成
        Object o = anyOf.get();
        System.out.println("完成的任务的结果:" + o);
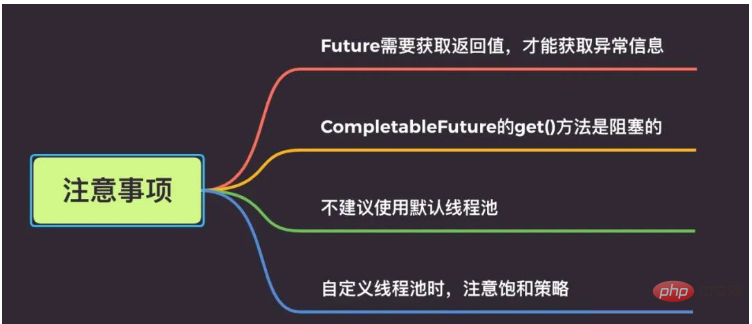
}7、CompletableFuture使用有哪些注意点

CompletableFuture 使我们的异步编程更加便利的、代码更加优雅的同时,我们也要关注下它,使用的一些注意点。
7.1、Future需要获取返回值,才能获取异常信息
    @Test
    public void testWhenCompleteExceptionally() {
        CompletableFuture<Double> future = CompletableFuture.supplyAsync(() -> {
            if (1 == 1) {
                throw new RuntimeException("出错了");
            }
            return 0.11;
        });

        //如果不加 get()方法这一行,看不到异常信息
        //future.get();
}Future需要获取返回值,才能获取到异常信息。如果不加 get()/join()方法,看不到异常信息。
小伙伴们使用的时候,注意一下哈,考虑是否加try...catch...或者使用exceptionally方法。
7.2、CompletableFuture的get()方法是阻塞的
CompletableFuture的get()方法是阻塞的,如果使用它来获取异步调用的返回值,需要添加超时时间。
//反例
 CompletableFuture.get();
//正例
CompletableFuture.get(5, TimeUnit.SECONDS);
7.3、不建议使用默认线程池
CompletableFuture代码中又使用了默认的「ForkJoin线程池」,处理的线程个数是电脑「CPU核数-1」。在大量请求过来的时候,处理逻辑复杂的话,响应会很慢。一般建议使用自定义线程池,优化线程池配置参数。
7.4、自定义线程池时,注意饱和策略
CompletableFuture的get()方法是阻塞的,我们一般建议使用future.get(5, TimeUnit.SECONDS)。并且一般建议使用自定义线程池。
但是如果线程池拒绝策略是DiscardPolicy或者DiscardOldestPolicy,当线程池饱和时,会直接丢弃任务,不会抛弃异常。因此建议,CompletableFuture线程池策略最好使用AbortPolicy,然后耗时的异步线程,做好线程池隔离哈。
The above is the detailed content of How does Java8 CompletableFuture implement asynchronous multi-threaded programming?. For more information, please follow other related articles on the PHP Chinese website!

Hot AI Tools

Undresser.AI Undress
AI-powered app for creating realistic nude photos

AI Clothes Remover
Online AI tool for removing clothes from photos.

Undress AI Tool
Undress images for free

Clothoff.io
AI clothes remover

AI Hentai Generator
Generate AI Hentai for free.

Hot Article

Hot Tools

Notepad++7.3.1
Easy-to-use and free code editor

SublimeText3 Chinese version
Chinese version, very easy to use

Zend Studio 13.0.1
Powerful PHP integrated development environment

Dreamweaver CS6
Visual web development tools

SublimeText3 Mac version
God-level code editing software (SublimeText3)

Hot Topics
 1386
1386
 52
52
 Perfect Number in Java
Aug 30, 2024 pm 04:28 PM
Guide to Perfect Number in Java. Here we discuss the Definition, How to check Perfect number in Java?, examples with code implementation.
 Weka in Java
Aug 30, 2024 pm 04:28 PM
Guide to Weka in Java. Here we discuss the Introduction, how to use weka java, the type of platform, and advantages with examples.
 Smith Number in Java
Aug 30, 2024 pm 04:28 PM
Guide to Smith Number in Java. Here we discuss the Definition, How to check smith number in Java? example with code implementation.
 Java Spring Interview Questions
Aug 30, 2024 pm 04:29 PM
In this article, we have kept the most asked Java Spring Interview Questions with their detailed answers. So that you can crack the interview.
 Break or return from Java 8 stream forEach?
Feb 07, 2025 pm 12:09 PM
Java 8 introduces the Stream API, providing a powerful and expressive way to process data collections. However, a common question when using Stream is: How to break or return from a forEach operation? Traditional loops allow for early interruption or return, but Stream's forEach method does not directly support this method. This article will explain the reasons and explore alternative methods for implementing premature termination in Stream processing systems. Further reading: Java Stream API improvements Understand Stream forEach The forEach method is a terminal operation that performs one operation on each element in the Stream. Its design intention is
 TimeStamp to Date in Java
Aug 30, 2024 pm 04:28 PM
Guide to TimeStamp to Date in Java. Here we also discuss the introduction and how to convert timestamp to date in java along with examples.
 Java Program to Find the Volume of Capsule
Feb 07, 2025 am 11:37 AM
Capsules are three-dimensional geometric figures, composed of a cylinder and a hemisphere at both ends. The volume of the capsule can be calculated by adding the volume of the cylinder and the volume of the hemisphere at both ends. This tutorial will discuss how to calculate the volume of a given capsule in Java using different methods. Capsule volume formula The formula for capsule volume is as follows: Capsule volume = Cylindrical volume Volume Two hemisphere volume in, r: The radius of the hemisphere. h: The height of the cylinder (excluding the hemisphere). Example 1 enter Radius = 5 units Height = 10 units Output Volume = 1570.8 cubic units explain Calculate volume using formula: Volume = π × r2 × h (4
 Create the Future: Java Programming for Absolute Beginners
Oct 13, 2024 pm 01:32 PM
Java is a popular programming language that can be learned by both beginners and experienced developers. This tutorial starts with basic concepts and progresses through advanced topics. After installing the Java Development Kit, you can practice programming by creating a simple "Hello, World!" program. After you understand the code, use the command prompt to compile and run the program, and "Hello, World!" will be output on the console. Learning Java starts your programming journey, and as your mastery deepens, you can create more complex applications.


