

How to use EasyExcel to merge cells in Java

1. Project scenario:
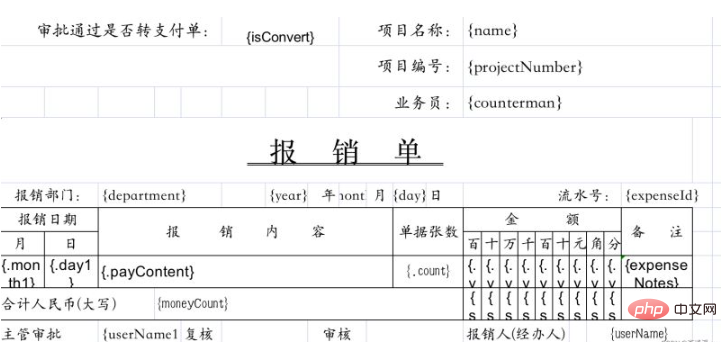
Introduction: Exporting reimbursement forms should automatically replace the corresponding ones according to the specified excel template, and then regenerate a new excel. In the given excel template, some fields have been cell merged, as shown below.
2. Problem description
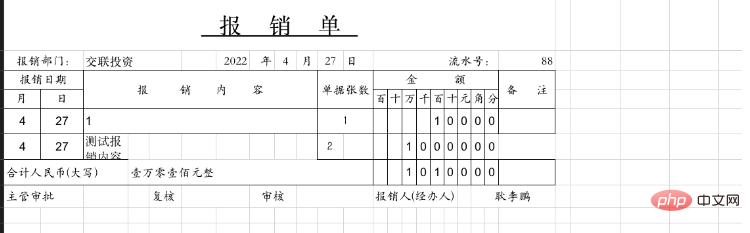
Since a reimbursement form may contain multiple reimbursement contents, you can see that when the number of reimbursement items exceeds the preset value in the template, When a specified line is specified, the line will be automatically wrapped, but the cells will not be automatically merged according to the style in the template when the line is wrapped, as shown below.
3. Cause analysis:
First of all, you can intuitively see that when excel inserts data and automatically wraps the line, the line breaks The data is not automatically merged according to the style of the previous row.
So I thought about using code to manually merge these columns, and then adding the border style would solve the problem.
4. Solution:
It should be noted that following the above idea, merging cells directly and then adding borders cannot directly solve the problem. question.
You need to create each empty cell at the end first, and then merge them together to solve the problem. The code for creating cells is explained in the
CustomCellWriteHandlerclass below .
This can be regarded as a pit that took a whole day to step on. . .
public static void outExcelBalance(String modelFile, String newFile, Map<String, Object> map, List<FillDataExpense> fillData, HttpServletResponse response, String fileName){
        //定义model模板中默认的行数
        int firstRow = 7; //excel中表示第八行,即模板中默认的一条
        int lastRow = 7;
        InputStream is = null;
        File file = new File(modelFile);
        File file1 = new File(newFile);
        //String file1Name = file1.getName();
        BufferedInputStream bis = null;
        try {
            if (!file.exists()) {
                copyFileUsingJava7Files(file, file1);
            }

            //TODO 单元格样式
            Set<Integer> rowsBorderSet= new HashSet<>();
            CustomCellWriteHandler customCellWriteHandler = null;

            //TODO 单元格合并
            List<CellRangeAddress> cellRangeAddresss = new ArrayList<>();

            if (ListUtils.isNotNull(fillData)){
                if (fillData.size() > 1){
                    //合并每条报销单的第3-10列
                    for (int i = 1; i < fillData.size(); i++) {
                        firstRow++;
                        lastRow++;

                        cellRangeAddresss.add(new CellRangeAddress(firstRow, lastRow, 2, 9));
                        cellRangeAddresss.add(new CellRangeAddress(firstRow, lastRow, 10, 11));

                        rowsBorderSet.add(firstRow);
                    }
                }
            }
            customCellWriteHandler = new CustomCellWriteHandler(rowsBorderSet);
            MyMergeStrategy myMergeStrategy = new MyMergeStrategy(cellRangeAddresss);

            ExcelWriter excelWriter = EasyExcel.write(newFile)
                    //注册单元格式
                    .registerWriteHandler(customCellWriteHandler)
                    //注册合并策略
                    .registerWriteHandler(myMergeStrategy)
                    .withTemplate(modelFile).build();
            WriteSheet writeSheet = EasyExcel.writerSheet().build();
            FillConfig fillConfig = FillConfig.builder().forceNewRow(Boolean.TRUE).build();
            if (!ListUtil.listIsEmpty(fillData)){
                excelWriter.fill(fillData, fillConfig, writeSheet);
                //excelWriter.fill(fillData, fillConfig, writeSheet);
            }
            excelWriter.fill(map, writeSheet);
            excelWriter.finish();
            response.setHeader("content-type", "text/plain");
            response.setHeader("content-type", "application/x-msdownload;");
            response.setContentType("text/plain; charset=utf-8");
            response.setHeader("Content-Disposition", "attachment; filename=" + new String(fileName.getBytes("utf-8"),"ISO8859-1"));
            byte[] buff = new byte[1024];

            OutputStream os = null;
            os = response.getOutputStream();
            bis = new BufferedInputStream(new FileInputStream(file1));
            int i = bis.read(buff);

            while (i != -1) {
                os.write(buff, 0, buff.length);
                os.flush();
                i = bis.read(buff);
            }
        }
        catch (Exception e){
            LOGGER.error(e.getMessage());
        }
        finally {
            if (bis != null) {
                try {
                    bis.close();
                } catch (IOException e) {
                    e.printStackTrace();
                }
            }
            // 删除生成文件
                /*if (file1.exists()) {
                    file1.delete();
                }*/
        }
}Cell mergeMyMergeStrategyClass code:
public class MyMergeStrategy extends AbstractMergeStrategy {

    //合并坐标集合
    private List<CellRangeAddress> cellRangeAddresss;

    //构造
    public MyMergeStrategy(List<CellRangeAddress> cellRangeAddresss) {
        this.cellRangeAddresss = cellRangeAddresss;
    }

    @Override
    protected void merge(Sheet sheet, Cell cell, Head head, Integer integer) {
        if (ListUtils.isNotNull(cellRangeAddresss)) {
            if (cell.getRowIndex() == 7 ) {
                for (CellRangeAddress item : cellRangeAddresss) {
                    sheet.addMergedRegionUnsafe(item);
                }
            }
        }
    }
}Cell styleCustomCellWriteHandlerClass code:
public class CustomCellWriteHandler implements CellWriteHandler {
    private static final Logger LOGGER = LoggerFactory.getLogger(CustomCellWriteHandler.class);

    //标黄行宽集合
    private Set<Integer> rowIndexs;

    //构造
    public CustomCellWriteHandler(Set<Integer> rowIndexs) {
        this.rowIndexs = rowIndexs;
    }

    public CustomCellWriteHandler() {
    }

    @Override
    public void beforeCellCreate(WriteSheetHolder writeSheetHolder, WriteTableHolder writeTableHolder, Row row, Head head, Integer columnIndex, Integer relativeRowIndex, Boolean isHead) {
        LOGGER.info("beforeCellCreate~~~~");
    }

    @Override
    public void afterCellCreate(WriteSheetHolder writeSheetHolder, WriteTableHolder writeTableHolder, Cell cell, Head head, Integer relativeRowIndex, Boolean isHead) {
        LOGGER.info("afterCellCreate~~~~");
    }

    @Override
    public void afterCellDataConverted(WriteSheetHolder writeSheetHolder, WriteTableHolder writeTableHolder, CellData cellData, Cell cell, Head head, Integer integer, Boolean aBoolean) {

    }

    @Override
    public void afterCellDispose(WriteSheetHolder writeSheetHolder, WriteTableHolder writeTableHolder, List<CellData> cellDataList, Cell cell, Head head, Integer relativeRowIndex, Boolean isHead) {

          //获取工作簿
//        HSSFWorkbook wb = new HSSFWorkbook();
//        //获取sheet
//        HSSFSheet sheet = wb.createSheet();
//        HSSFRow row = sheet.createRow();
//        HSSFCellStyle style = wb.createCellStyle();

        // 这里可以对cell进行任何操作
        if (CollectionUtils.isNotEmpty(rowIndexs)) {
            Workbook workbook = writeSheetHolder.getSheet().getWorkbook();
            CellStyle cellStyle = workbook.createCellStyle();

            Sheet sheet = writeSheetHolder.getSheet();
            cellStyle.setAlignment(new HSSFWorkbook().createCellStyle().getAlignment());
            cellStyle.setBorderBottom(BorderStyle.THIN); //下边框
            cellStyle.setBottomBorderColor(IndexedColors.BLACK.getIndex());
            cellStyle.setBorderLeft(BorderStyle.THIN);//左边框
            cellStyle.setBorderTop(BorderStyle.THIN);//上边框
            cellStyle.setBorderRight(BorderStyle.THIN);//右边框
            cellStyle.setWrapText(true);//自动换行

            //字体
//            Font cellFont = workbook.createFont();
//            cellFont.setBold(true);
//            cellStyle.setFont(cellFont);
//            //标黄,要一起设置
//            cellStyle.setFillPattern(FillPatternType.SOLID_FOREGROUND); //设置前景填充样式
//            cellStyle.setFillForegroundColor(IndexedColors.YELLOW.getIndex());//前景填充色

            if (rowIndexs.contains(cell.getRowIndex())) {
                Row row = null;
                //循环创建空白单元格
                for (int i = 0; i < rowIndexs.size(); i++) {
                    for (Integer rowIndex : rowIndexs){
                        //创建4-10列的空白格
                        row = sheet.getRow(rowIndex.intValue());
                        if (row == null){
                            row = sheet.createRow(rowIndex.intValue());
                        }
                        for (int j = 3; j <= 9; j++) {
                            //获取8行的cell列
                            cell = row.createCell(j);
                            cell.setCellStyle(cellStyle);
                            cell.setCellValue(" ");
                            LOGGER.info("第{}行,第{}列创建空白格。", cell.getRowIndex(), j);
                        }
                        //创建12列的红白格
                        cell = row.createCell(11);
                        cell.setCellStyle(cellStyle);
                        cell.setCellValue(" ");
                        LOGGER.info("第{}行,第11列创建空白格。", cell.getRowIndex());
                        //创建21列的空白格
                        cell = row.createCell(21);
                        cell.setCellStyle(cellStyle);
                        cell.setCellValue(" ");
                        LOGGER.info("第{}行,第21列创建空白格。", cell.getRowIndex());
                    }
                }
            }
        }
    }
}5. Summary
Core steps:
1.
	//创建单元格样式
	CustomCellWriteHandler customCellWriteHandler = new CustomCellWriteHandler(参数按需给定);
2.
	//单元格进行合并
	List<CellRangeAddress> cellRangeAddresss = new ArrayList<>();
	//例如:从firstRow行到lastRow行的2列到9列合并
    cellRangeAddresss.add(new CellRangeAddress(firstRow, lastRow, 2, 9));
    cellRangeAddresss.add(new CellRangeAddress(firstRow, lastRow, 10, 11));
    MyMergeStrategy myMergeStrategy = new MyMergeStrategy(cellRangeAddresss);
3.
	//注册以上两种策略
	ExcelWriter excelWriter = EasyExcel.write(newFile)
    //注册单元格式
    .registerWriteHandler(customCellWriteHandler)
    //注册合并策略
    .registerWriteHandler(myMergeStrategy)
.withTemplate(modelFile).build();Note: When I first started repairing, I didn’t think that every empty cell in the future needs to be created before it can be merged. I always thought it was a tool problem, but then I kept reading through the solutions and saw that it was said that blank cells need to be created first and then merged. Finally, it was solved perfectly.
Regarding the code part, since it is business code, there are many unnecessary things mixed in.
The above is the detailed content of How to use EasyExcel to merge cells in Java. For more information, please follow other related articles on the PHP Chinese website!

Hot AI Tools

Undresser.AI Undress
AI-powered app for creating realistic nude photos

AI Clothes Remover
Online AI tool for removing clothes from photos.

Undress AI Tool
Undress images for free

Clothoff.io
AI clothes remover

Video Face Swap
Swap faces in any video effortlessly with our completely free AI face swap tool!

Hot Article
Hot Tools

Notepad++7.3.1
Easy-to-use and free code editor

SublimeText3 Chinese version
Chinese version, very easy to use

Zend Studio 13.0.1
Powerful PHP integrated development environment

Dreamweaver CS6
Visual web development tools

SublimeText3 Mac version
God-level code editing software (SublimeText3)
Hot Topics
 1387
1387
 52
52

 Perfect Number in Java
Aug 30, 2024 pm 04:28 PM
Perfect Number in Java
Aug 30, 2024 pm 04:28 PM
Guide to Perfect Number in Java. Here we discuss the Definition, How to check Perfect number in Java?, examples with code implementation.
 Weka in Java
Aug 30, 2024 pm 04:28 PM
Weka in Java
Aug 30, 2024 pm 04:28 PM
Guide to Weka in Java. Here we discuss the Introduction, how to use weka java, the type of platform, and advantages with examples.
 Smith Number in Java
Aug 30, 2024 pm 04:28 PM
Smith Number in Java
Aug 30, 2024 pm 04:28 PM
Guide to Smith Number in Java. Here we discuss the Definition, How to check smith number in Java? example with code implementation.
 Java Spring Interview Questions
Aug 30, 2024 pm 04:29 PM
Java Spring Interview Questions
Aug 30, 2024 pm 04:29 PM
In this article, we have kept the most asked Java Spring Interview Questions with their detailed answers. So that you can crack the interview.
 Break or return from Java 8 stream forEach?
Feb 07, 2025 pm 12:09 PM
Break or return from Java 8 stream forEach?
Feb 07, 2025 pm 12:09 PM
Java 8 introduces the Stream API, providing a powerful and expressive way to process data collections. However, a common question when using Stream is: How to break or return from a forEach operation? Traditional loops allow for early interruption or return, but Stream's forEach method does not directly support this method. This article will explain the reasons and explore alternative methods for implementing premature termination in Stream processing systems. Further reading: Java Stream API improvements Understand Stream forEach The forEach method is a terminal operation that performs one operation on each element in the Stream. Its design intention is
 TimeStamp to Date in Java
Aug 30, 2024 pm 04:28 PM
TimeStamp to Date in Java
Aug 30, 2024 pm 04:28 PM
Guide to TimeStamp to Date in Java. Here we also discuss the introduction and how to convert timestamp to date in java along with examples.
 Java Program to Find the Volume of Capsule
Feb 07, 2025 am 11:37 AM
Java Program to Find the Volume of Capsule
Feb 07, 2025 am 11:37 AM
Capsules are three-dimensional geometric figures, composed of a cylinder and a hemisphere at both ends. The volume of the capsule can be calculated by adding the volume of the cylinder and the volume of the hemisphere at both ends. This tutorial will discuss how to calculate the volume of a given capsule in Java using different methods. Capsule volume formula The formula for capsule volume is as follows: Capsule volume = Cylindrical volume Volume Two hemisphere volume in, r: The radius of the hemisphere. h: The height of the cylinder (excluding the hemisphere). Example 1 enter Radius = 5 units Height = 10 units Output Volume = 1570.8 cubic units explain Calculate volume using formula: Volume = π × r2 × h (4
 Create the Future: Java Programming for Absolute Beginners
Oct 13, 2024 pm 01:32 PM
Create the Future: Java Programming for Absolute Beginners
Oct 13, 2024 pm 01:32 PM
Java is a popular programming language that can be learned by both beginners and experienced developers. This tutorial starts with basic concepts and progresses through advanced topics. After installing the Java Development Kit, you can practice programming by creating a simple "Hello, World!" program. After you understand the code, use the command prompt to compile and run the program, and "Hello, World!" will be output on the console. Learning Java starts your programming journey, and as your mastery deepens, you can create more complex applications.
