

How to Fix Steam Error Code 130 on Windows PC

Steam is a popular online game streaming platform that allows its users to purchase and play games as well as chat with other gamers on the platform. In addition to the features it offers, there are also some bugs encountered on the platform. One such error that many Steam users encounter is "Error code: 130 The page cannot be loaded (Unknown error)". This error occurs when the Steam client attempts to load a web page but is unable to retrieve the page from its server. This error code may appear on any page in the Steam client, including the inventory page, update news, or store pages that prevent you from searching for a game you're interested in purchasing.
One of the main reasons for this problem is a weak internet connection on your PC. Other possible causes are a malfunctioning Steam client or Steam server, antivirus or firewall interfering with the connection to the Steam server, corrupted Steam files, or an incorrect IP address associated with the URL in the DNS cache. Are you encountering error code 130 on your Steam client and looking for a suitable solution to resolve this error? Then you've landed on the right page. In this article, we have listed some troubleshooting methods that can help you fix Steam Error Code 130 on Windows PC.
Solution
1. Check if you are connected to a stable internet connection. Try opening some other web pages to check if there are any network issues.
2. Go to this link and check the Steam server status. This error is most likely to occur if the Steam server is down and you need to wait until the server is up and working properly.
Method 1 – Adjust Proxy Settings
Step 1. Simply hold down the Windows and R keys simultaneously to open the Run dialog box .
Step 2. Type inetcpl.cpl and press Enter to open the Internet Properties window.

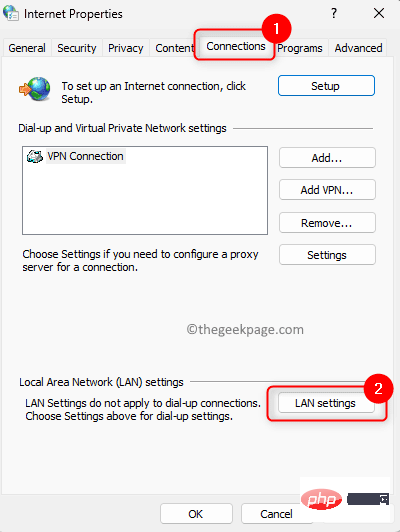
Step 3. Go to the Connections tab.
Step 4. Click the LAN Settings button at the bottom.
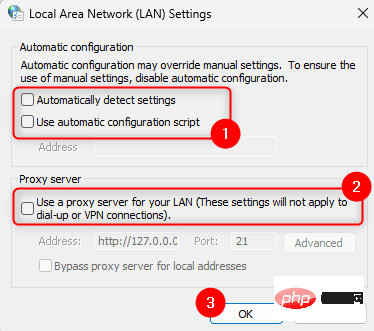
Step 5. In In the Local Area Connection (LAN) Settings window, make sure all check boxes in the Automatic Configuration and Proxy Server sections are unchecked.
Step 6. Finally, click OK.
Step 7. RestartSteam.
Check if the error has been resolved.
Method 2 – Restart Steam
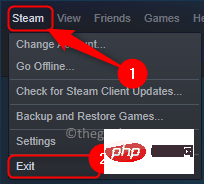
Steps 1. In your Steam application, click the Steam menu in the upper left corner.
Step 2. Select the Exit option in the menu that opens.
#Step 3. Wait for some time until Steam closes properly, do not force close it.
Step 4. After the Steam client is closed, use the Ctrl Shift Esc key to open the Task Manager.
Step 5. In Task Manager, Go to the Processestab.
Step 6: Find any running Steam processes in the list.
Select this Steam process and click the End Task button.
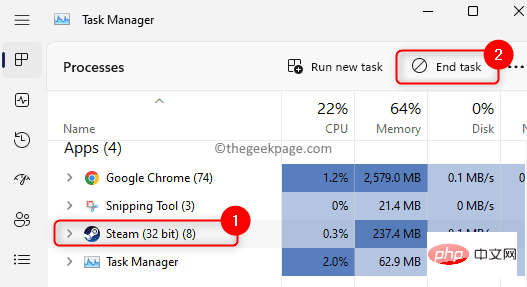
#Make sure there are no Steam-related processes running on your system.
Step 7.Restart the Steam application and check if error code 130 has been fixed.
Method 3 – Flush DNS Cache
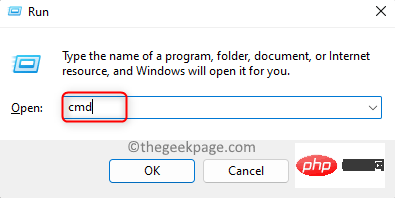
Steps 1. Use the Windows and R key combination to open the Run box.
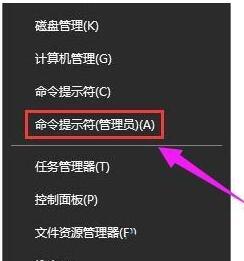
Step 2. Type cmd and press the Ctrl Shift Enter key at the same time to open the command prompt as an administrator.
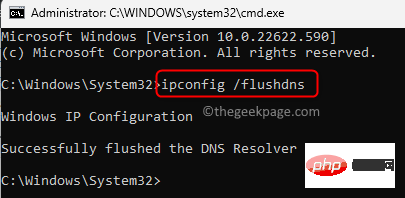
Step 3. Enter the command given below and execute it.
ipconfig /flushdns
Step 4. After the command is executed, you will see a message saying DNS resolver cache flushed successfully.
Step 5. RestartSteam and see if you are able to load the web page without any errors.
Method 4 – Update Network Adapter Driver
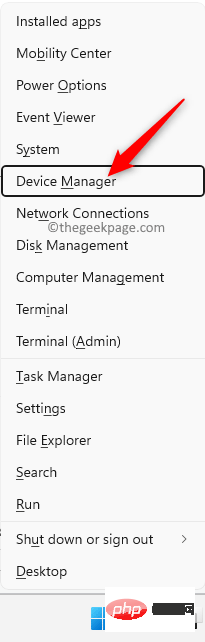
Steps 1. Press Windows X to open the context menu associated with the "Start" button.
Step 2. Click Device Manager in the menu that opens.
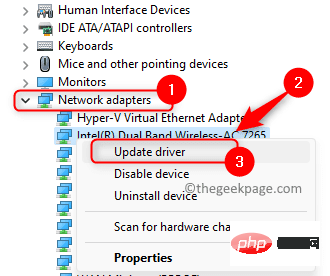
Step 3. In Device Manager, click the arrow next to Network Adapters to expand it.
Step 4. In the driver list, find the driver that needs to be updated.
Right-click on this Network Adapter Driver and select Update Driver.
Step 5. In the Update Driver window, select the Automatically search for drivers option.
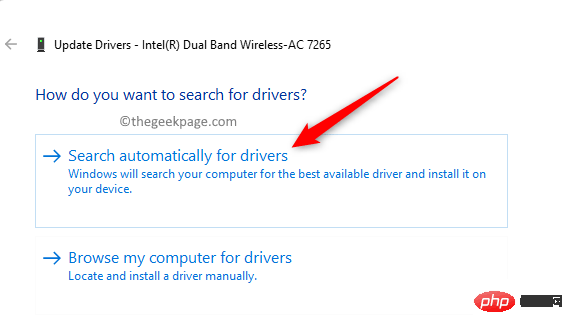
#Step 6. Windows will start searching for the latest version of the driver.
The driver update process will occur if any updates are available.
If the driver has been updated, a message will appear indicating that the best driver for your device is installed.
Step 7.Restart the computer and check if the error still exists.
Method 5 – Disable any third-party antivirus programs or firewalls
If you have antivirus software installed on your PC, it may interfere with other applications and cause problems. In this case, you can try disabling or uninstalling the antivirus program from the system. The steps to disable any antivirus program vary from application to application. Therefore, you need to look at your application and find the relevant settings. For example, if you use Avast, you have Avast Sheild Control or Bitdefender Sheild for BitDefender.
Disable or turn off Windows Defender Firewall
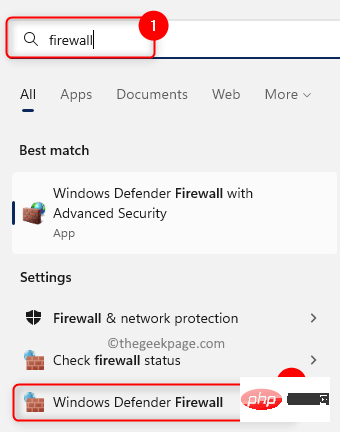
Steps 1. Click the Windows key and enter Firewall in the search bar.
Step 2. SelectWindows Defender Firewall in the search results displayed.
#Step 3. In the window that opens, click in the left pane to turn Windows Defender Firewall on or off.
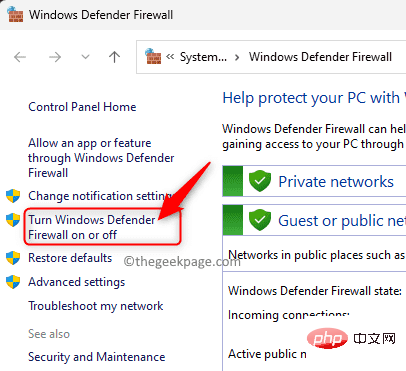
Step 4. This will open the "Custom Settings" window.
Here, for Private network settings and Public network settings select the Turn off Windows Defender Firewall (not recommended) option to disable the firewall.
Step 5. Click OK to save changes.

Step 6. Open Steam and check if the page is loading and there is no error code 130.
Method 6 – Reinstall the Steam Client
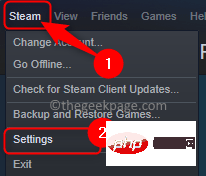
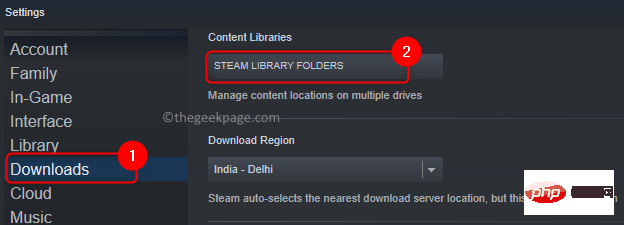
Steps 1. Open Steam. Click the Steam menu at the top and select the Settings option.
Step 2. In the "Settings" window, go to the "Downloads" tab.
Step 3. On the right, click the Steam Library Folder under Content Library.
Step 4. This will open the Steam Storage Manager.
Here, select the drive where you installed Steam on your PC. The default Steam game installation folder is your local drive (C:).
We chose drive (D:) because we installed the game there.

Step 5. Click Three-dot menu, then click to browse for folders.
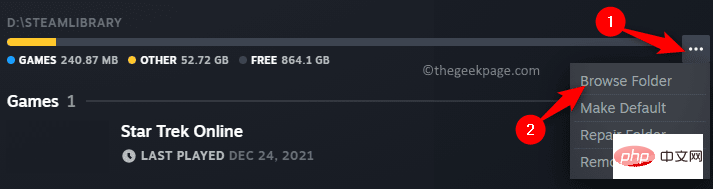
#It will open the steamapps folder in File Explorer.
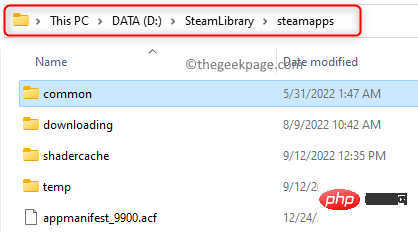
Step 6. Return to the previous folder containing the steamapps folder.
Step 7. Now, select the steamapps folder and press Ctrl C to copy it.
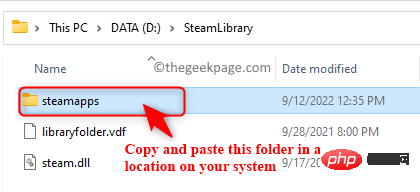
Step 8. Go to another location on the drive and paste this copied folder using the Ctrl V key combination.
This will create a backup of your steamapps folder.
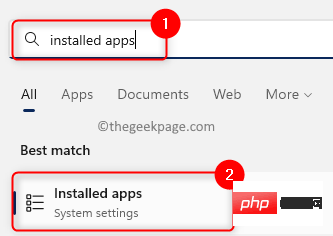
Step 9. Click the Windows key on your keyboard and type Installed Apps in the Windows search bar.
Step 10. Select Installed Applications in the search results.
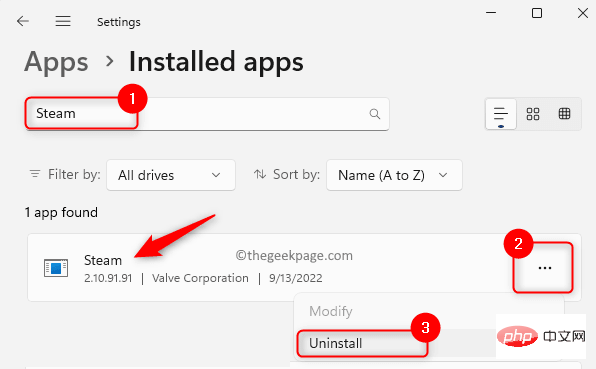
Step 11. On the Installed Applications page, find Steam## in the list of displayed applications #app.
Step 12. Click on thethree-dot menu associated with Steam and select Uninstall.
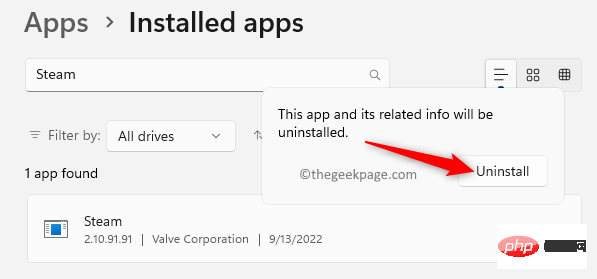
Uninstall again in the pop-up window.
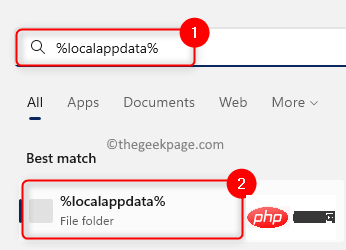
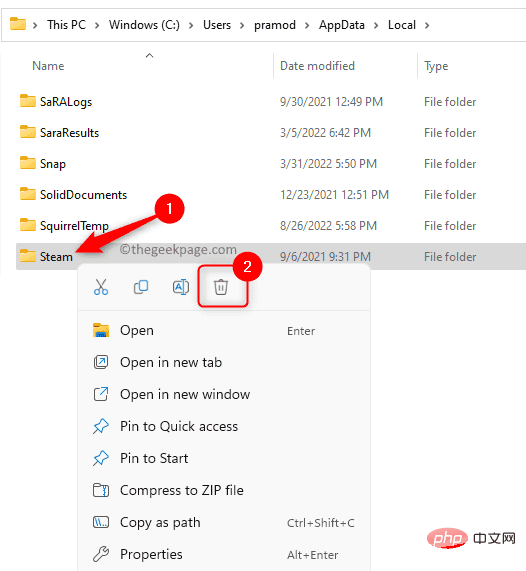
Windows key and type %localappdata% and press the Enter key.
Steam folder and select the Delete icon at the top of the context menu.
Windows button in the taskbar again. Type %appdata% and press Enter to open the Roaming folder in AppData.
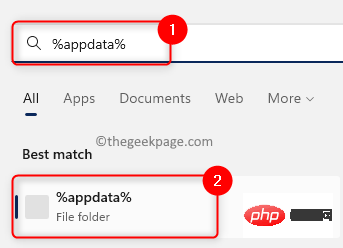
Steam folder.
Step 18. Go to the official Steam website to download the latest version of the Steam installer. Step 19. Here, clickInstall Steam to install Steam's executable file onto your PC.

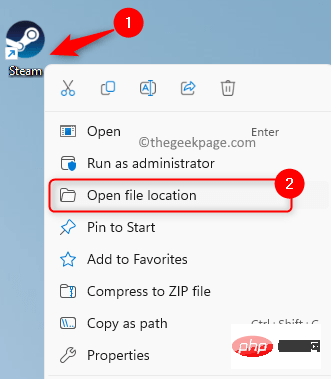
Step 21. After installing Steam on your computer, right-click the Steam icon on your desktop and select Open file location.
Step 22. Copy and paste the backup steamapps folder you created earlier into the current default installation directory of Steam.
Step 23.RestartSteam and check if the issue is resolved.
The above is the detailed content of How to Fix Steam Error Code 130 on Windows PC. For more information, please follow other related articles on the PHP Chinese website!

Hot AI Tools

Undresser.AI Undress
AI-powered app for creating realistic nude photos

AI Clothes Remover
Online AI tool for removing clothes from photos.

Undress AI Tool
Undress images for free

Clothoff.io
AI clothes remover

Video Face Swap
Swap faces in any video effortlessly with our completely free AI face swap tool!

Hot Article
Hot Tools

Notepad++7.3.1
Easy-to-use and free code editor

SublimeText3 Chinese version
Chinese version, very easy to use

Zend Studio 13.0.1
Powerful PHP integrated development environment

Dreamweaver CS6
Visual web development tools

SublimeText3 Mac version
God-level code editing software (SublimeText3)
Hot Topics


 What to do if WPS Office cannot open the PPT file - What to do if WPS Office cannot open the PPT file
Mar 04, 2024 am 11:40 AM
What to do if WPS Office cannot open the PPT file - What to do if WPS Office cannot open the PPT file
Mar 04, 2024 am 11:40 AM
Recently, many friends have asked me what to do if WPSOffice cannot open PPT files. Next, let us learn how to solve the problem of WPSOffice not being able to open PPT files. I hope it can help everyone. 1. First open WPSOffice and enter the homepage, as shown in the figure below. 2. Then enter the keyword "document repair" in the search bar above, and then click to open the document repair tool, as shown in the figure below. 3. Then import the PPT file for repair, as shown in the figure below.
 What software is crystaldiskmark? -How to use crystaldiskmark?
Mar 18, 2024 pm 02:58 PM
What software is crystaldiskmark? -How to use crystaldiskmark?
Mar 18, 2024 pm 02:58 PM
CrystalDiskMark is a small HDD benchmark tool for hard drives that quickly measures sequential and random read/write speeds. Next, let the editor introduce CrystalDiskMark to you and how to use crystaldiskmark~ 1. Introduction to CrystalDiskMark CrystalDiskMark is a widely used disk performance testing tool used to evaluate the read and write speed and performance of mechanical hard drives and solid-state drives (SSD). Random I/O performance. It is a free Windows application and provides a user-friendly interface and various test modes to evaluate different aspects of hard drive performance and is widely used in hardware reviews
 Tips to solve error code 0xc004f034 during WIN10 system activation
Mar 27, 2024 pm 04:30 PM
Tips to solve error code 0xc004f034 during WIN10 system activation
Mar 27, 2024 pm 04:30 PM
1. Press Windows+X keys and click [Command Indicator (Administrator)]. 2. Enter: slmgr-upk in the command indicator box and press Enter (regardless of whether there is an activation code or not, clear it first). 3. Enter: slmgr.vbs-ipkQN2M7-VCVJQ-Y36FD-T3PHJ-82M93 (load key) and press Enter. 4. Enter: slmgr-ato, and press Enter to take a screenshot of the error code box that pops up (valid if the mantissa is 08020, invalid if the mantissa is 03060).
 What to do if the 0x80004005 error code appears. The editor will teach you how to solve the 0x80004005 error code.
Mar 21, 2024 pm 09:17 PM
What to do if the 0x80004005 error code appears. The editor will teach you how to solve the 0x80004005 error code.
Mar 21, 2024 pm 09:17 PM
When deleting or decompressing a folder on your computer, sometimes a prompt dialog box "Error 0x80004005: Unspecified Error" will pop up. How should you solve this situation? There are actually many reasons why the error code 0x80004005 is prompted, but most of them are caused by viruses. We can re-register the dll to solve the problem. Below, the editor will explain to you the experience of handling the 0x80004005 error code. Some users are prompted with error code 0X80004005 when using their computers. The 0x80004005 error is mainly caused by the computer not correctly registering certain dynamic link library files, or by a firewall that does not allow HTTPS connections between the computer and the Internet. So how about
 CrystalDiskinfo usage tutorial-What software is CrystalDiskinfo?
Mar 18, 2024 pm 04:50 PM
CrystalDiskinfo usage tutorial-What software is CrystalDiskinfo?
Mar 18, 2024 pm 04:50 PM
CrystalDiskInfo is a software used to check computer hardware devices. In this software, we can check our own computer hardware, such as reading speed, transmission mode, interface, etc.! So in addition to these functions, how to use CrystalDiskInfo and what exactly is CrystalDiskInfo? Let me sort it out for you! 1. The Origin of CrystalDiskInfo As one of the three major components of a computer host, a solid-state drive is the storage medium of a computer and is responsible for computer data storage. A good solid-state drive can speed up file reading and affect consumer experience. When consumers receive new devices, they can use third-party software or other SSDs to
 What to do if the blue screen error code 0x00000124 appears in Win7 system? The editor will teach you how to solve it
Mar 21, 2024 pm 10:10 PM
What to do if the blue screen error code 0x00000124 appears in Win7 system? The editor will teach you how to solve it
Mar 21, 2024 pm 10:10 PM
Computers are now the most commonly used. Whether it is work, study, or life, they are everywhere. However, computers also have their problems. People are overwhelmed with all kinds of problems, such as the blue screen 0x00000124 error in the Win7 system of the computer. Code is one of the more common problems for win7 users. What should you do if you encounter this problem? For this reason, the editor has brought a method to solve the blue screen 0x00000124. In the process of using the win7 system, it is inevitable to encounter problems of one kind or another, especially problems such as blue screen or black screen, which are often encountered by users. Some users of the win7 ultimate system reported that a blue screen appeared when the computer was turned on. And prompts 0x00000124 error code, how to deal with this
 How to set the keyboard increment in Adobe Illustrator CS6 - How to set the keyboard increment in Adobe Illustrator CS6
Mar 04, 2024 pm 06:04 PM
How to set the keyboard increment in Adobe Illustrator CS6 - How to set the keyboard increment in Adobe Illustrator CS6
Mar 04, 2024 pm 06:04 PM
Many users are using the Adobe Illustrator CS6 software in their offices, so do you know how to set the keyboard increment in Adobe Illustrator CS6? Then, the editor will bring you the method of setting the keyboard increment in Adobe Illustrator CS6. Interested users can take a look below. Step 1: Start Adobe Illustrator CS6 software, as shown in the figure below. Step 2: In the menu bar, click the [Edit] → [Preferences] → [General] command in sequence. Step 3: The [Keyboard Increment] dialog box pops up, enter the required number in the [Keyboard Increment] text box, and finally click the [OK] button. Step 4: Use the shortcut key [Ctrl]
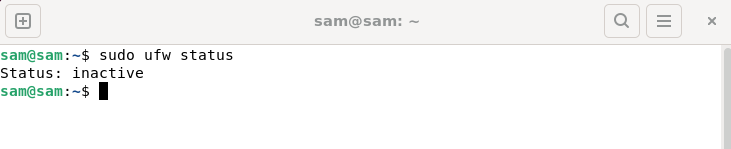 How to fix UFW status showing as inactive in Linux
Mar 20, 2024 pm 01:50 PM
How to fix UFW status showing as inactive in Linux
Mar 20, 2024 pm 01:50 PM
UFW, also known as Uncomplex Firewall, is adopted by many Linux distributions as their firewall system. UFW is designed to make it easy for novice users to manage firewall settings through both the command line interface and the graphical user interface. A UFW firewall is a system that monitors network traffic according to set rules to protect the network from network sniffing and other attacks. If you have UFW installed on your Linux system but its status shows as inactive, there could be several reasons. In this guide, I will share how to resolve the UFW firewall inactive issue on Linux systems. Why UFW Shows Inactive Status on Linux Why UFW Is Inactive by Default on Linux How to Inactive on Linux