'Windows 11 Memory Integrity is Off” Issue: How to Fix
The security of your Windows PC is critical to its proper functioning. If the system is protected from hackers and malware and its core functionality is stable, then Windows has a secure environment to perform full functionality.
Windows has a number of security features that utilize different components to achieve this, and Memory Integrity is one of them. But these features can sometimes impact system performance, especially if they are forced on you by default.
How does memory integrity work?
To understand the breadth of how memory integrity works, we need to understand two other features related to it - core isolation and virtual machine platform (VMP).
- Core Isolation: This is a set of virtualization-based security features that work by isolating important core processes in memory and creating processes that can run without hindrance. virtual environment to protect them.
- Virtual Machine Platform (VMP): VMP provides the virtual machine services that the "core isolation" function relies on.
- Memory Integrity: Also known as Hypervisor Protected Code Integrity (HVCI), this is a Windows security feature that falls under the primary "Core Isolation" umbrella that helps Prevent malware and programs from accessing drivers and control high-security processes.
When these features are turned on, Windows isolates the core decision-making processes from the rest of memory and creates a safe working environment for them.
When a program runs, Memory Integrity must verify its driver code and ensure that the installed driver is trustworthy before it can access core Windows functionality. As Microsoft itself emphasizes, this whole process is akin to security in a locked booth, where "Memory Integrity" is the security guard in an isolated environment created by "Core Isolation."
All of this increases the security of the system, and although it all happens very quickly, with so many checks, there is bound to be some impact elsewhere.
What impact does memory integrity have on your PC performance?
Microsoft notes that virtualization technology and memory integrity features may have some impact on performance, especially when gaming or running resource-intensive applications.
In a blog post, Microsoft stated that "in certain scenarios and in certain configurations of gaming devices, memory integrity and VMP may have an impact on performance...".
The entire process of driver verification occupies key system resources and is bound to have an impact on performance. However, it's important to note that on modern systems running Windows 11, this effect appears to be negligible when you're running day-to-day tasks. Only when running resource-hungry applications are valuable resources squeezed.
When should you disable memory integrity on Windows 11?
The entire set of core isolation features is an important aspect of Windows security. It is an important part of ensuring the overall security of your PC and data from malware and hackers. But the performance trade-off may not be worth it, depending on where you stand.
While the performance impact on general productivity may or may not be noticeable, when it comes to gaming it's a different story. This means that if you experience performance degradation when these features are turned on, you should probably consider disabling them before starting a game.
According to Microsoft, "Gamers who want to prioritize performance can choose to turn off these features while playing games and turn them back on when they're done. However, if turned off, the device may be vulnerable to threats ."
"Windows 11 Memory Integrity is turned off" Question: How to turn it on in 3 ways
If you decide to turn off Memory Integrity, here are some ways to help you do so One point:
Method 1: Use Windows Security
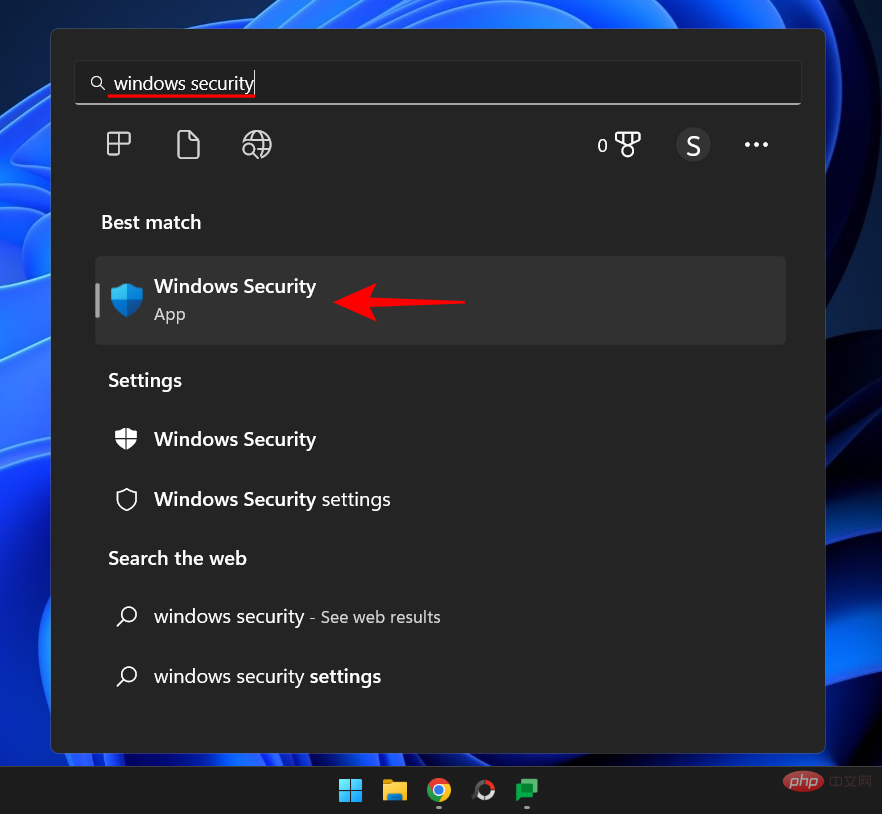
Press Start, type "Windows Security" and then press Enter.
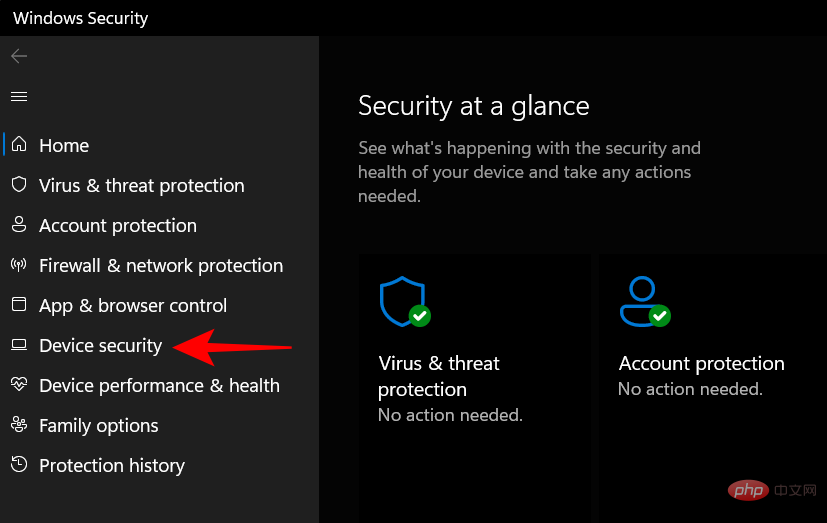
Click Device Security in the left pane.
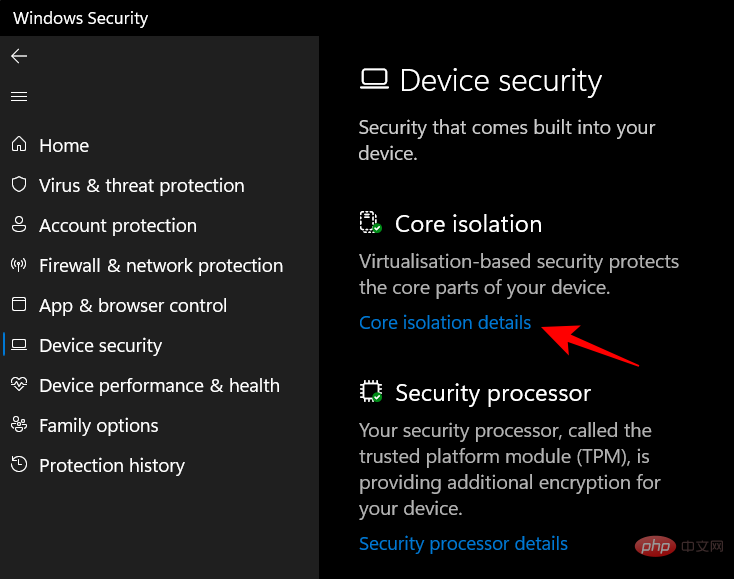
Under Core Isolation, click Core Isolation Details.
Here, under Memory Integrity, toggle the switch to "Off".
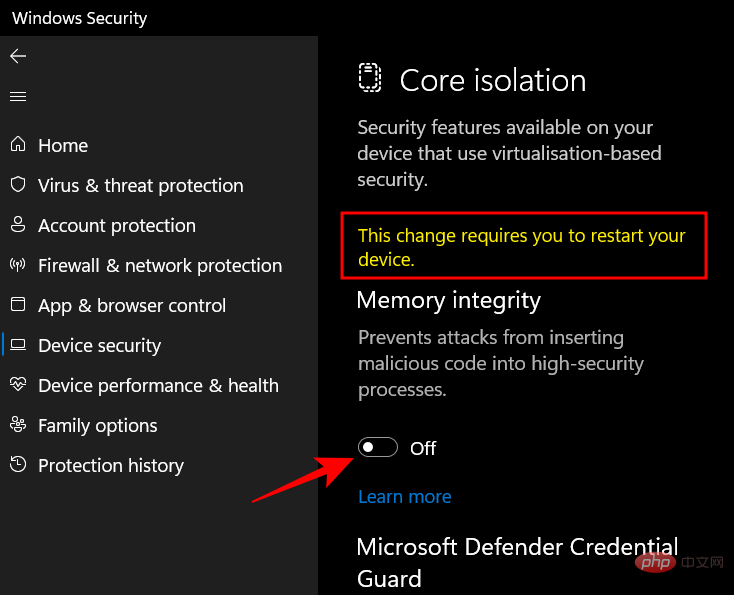
You will receive a Windows security notification asking you to restart your system for the changes to take effect.
To turn memory integrity back on, return to this window and switch Memory Integrity to On.
Method 2: Use Registry Editor
Another way to turn off memory integrity is to use Registry Editor. Here's how to do it.
Press Start, type "regedit" and press Enter.
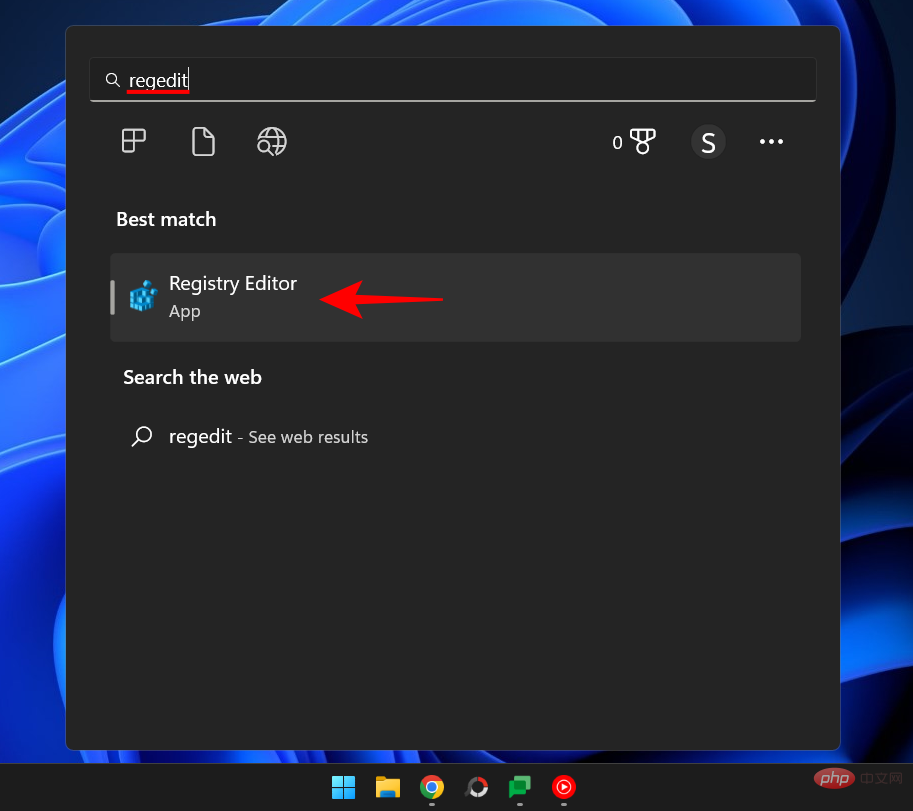
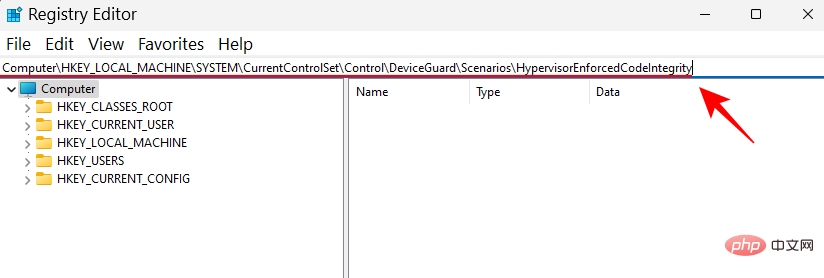
Once the Registry Editor opens, navigate to the following address:
Computer\HKEY_LOCAL_MACHINE\SYSTEM\CurrentControlSet\Control\DeviceGuard\Scenarios\ HypervisorEnforcedCodeIntegrity
Alternatively, copy and paste the above into the address bar of Registry Editor and press Enter.
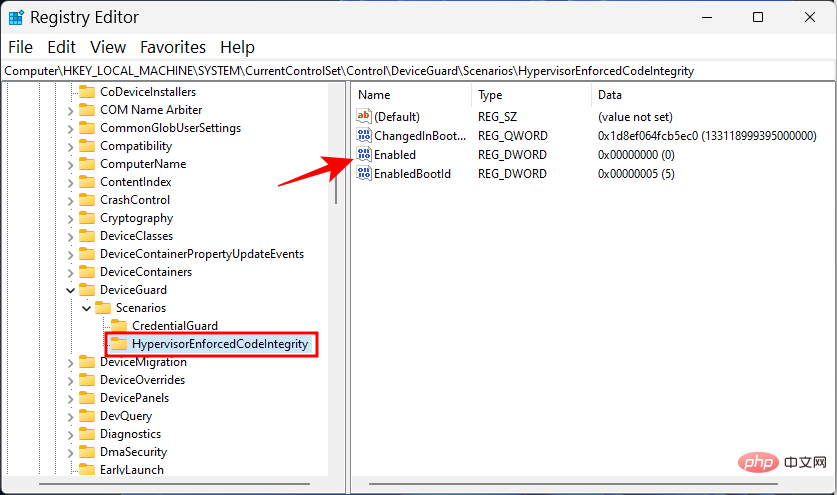
Next, double-click the Enable key on the right.
#Then set its value data from "0" to "1".
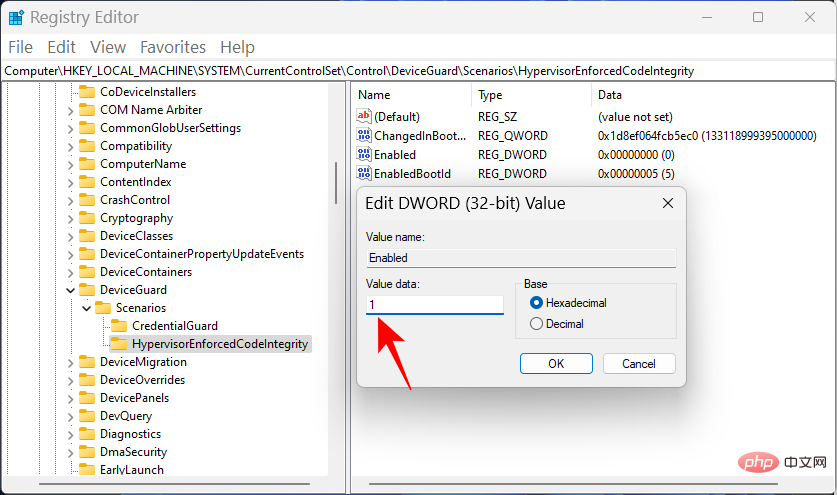
Click OK.
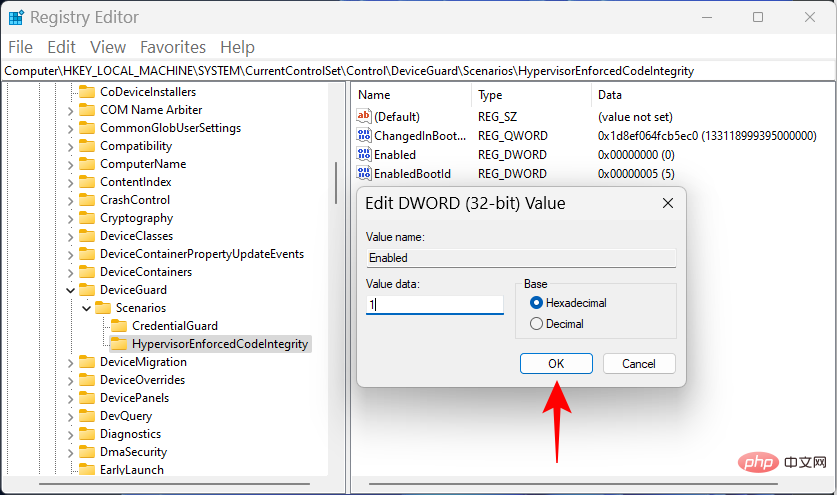
Now close the Registry Editor and restart your PC for the changes to take effect.
To turn memory integrity back on, return this key, change the value back to "0" and click OK.
Method 3: Use the Group Policy Editor
The Group Policy Editor can be used to enable or disable the entire virtualization-based security on which memory integrity depends. To do this, follow these steps:
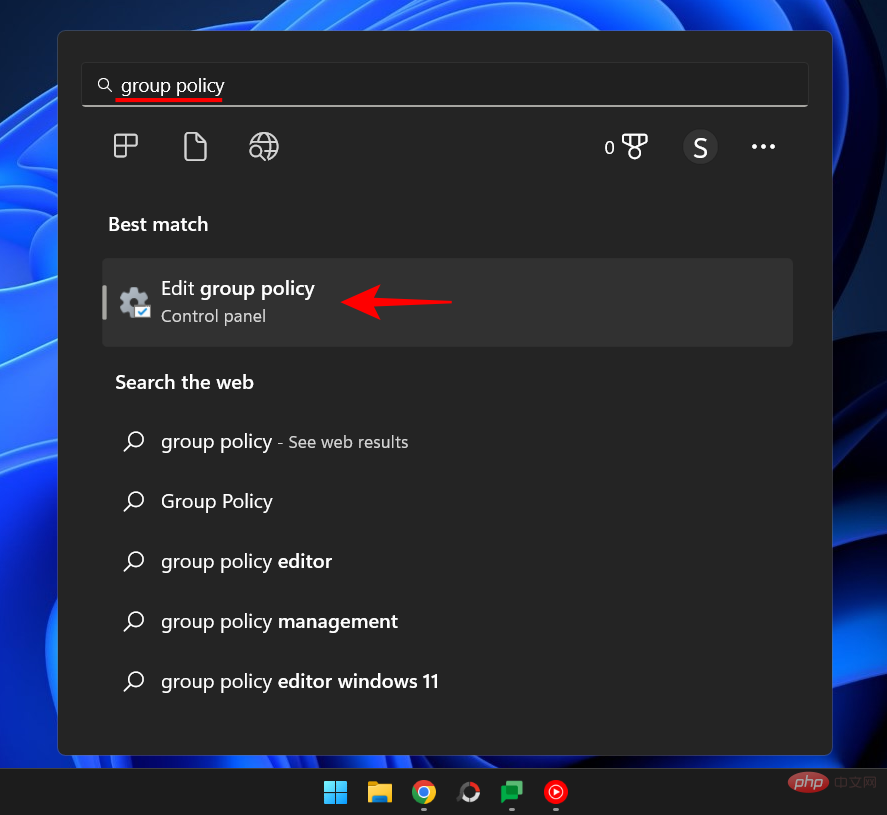
Press Start, type "Group Policy", and then press Enter.
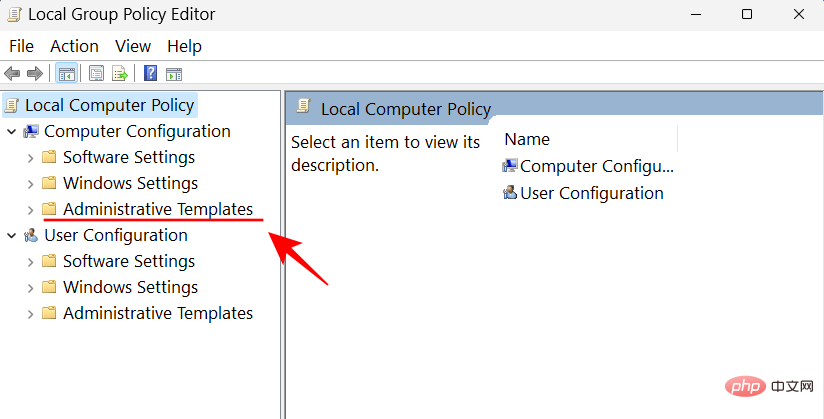
After the Group Policy Editor opens, click Administrative Templates under Computer Configuration in the left pane.
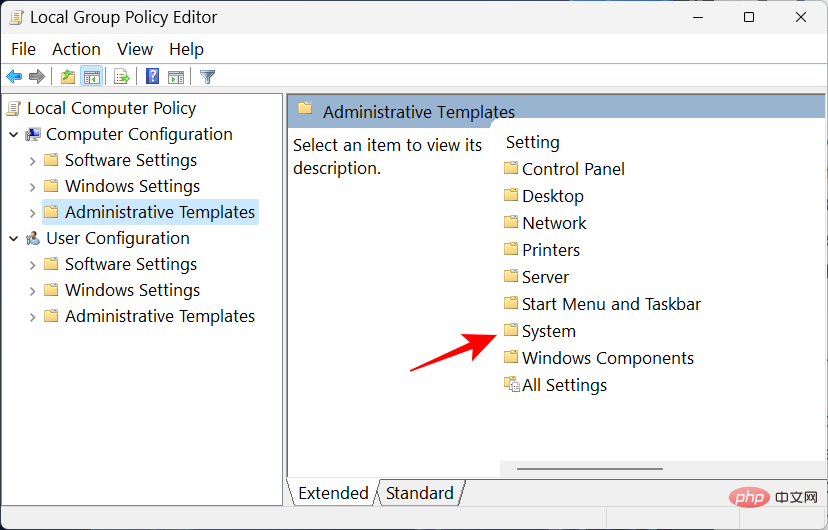
#Then, on the right side, double-click System.
Double-click Device Guard.
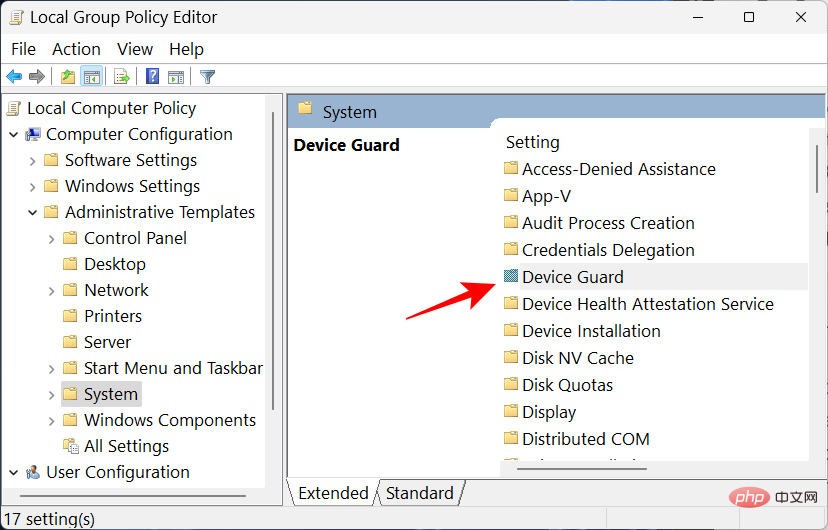
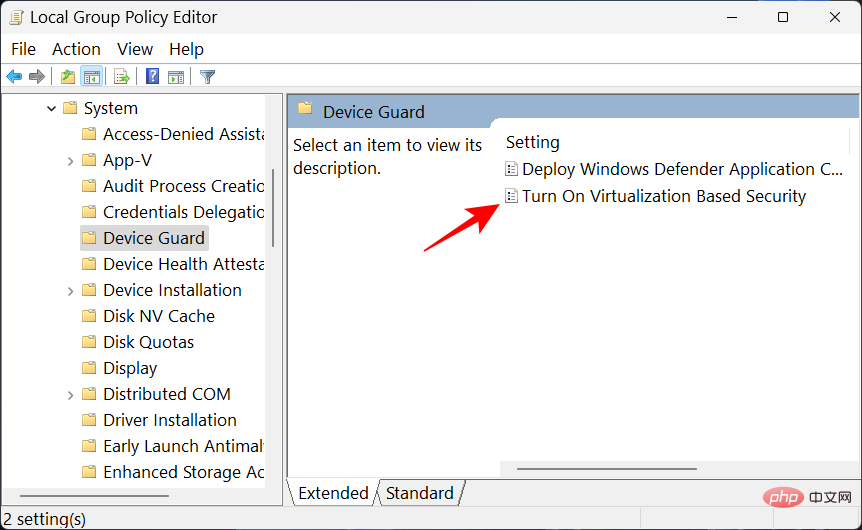
Now, double-click to turn on virtualization-based security .
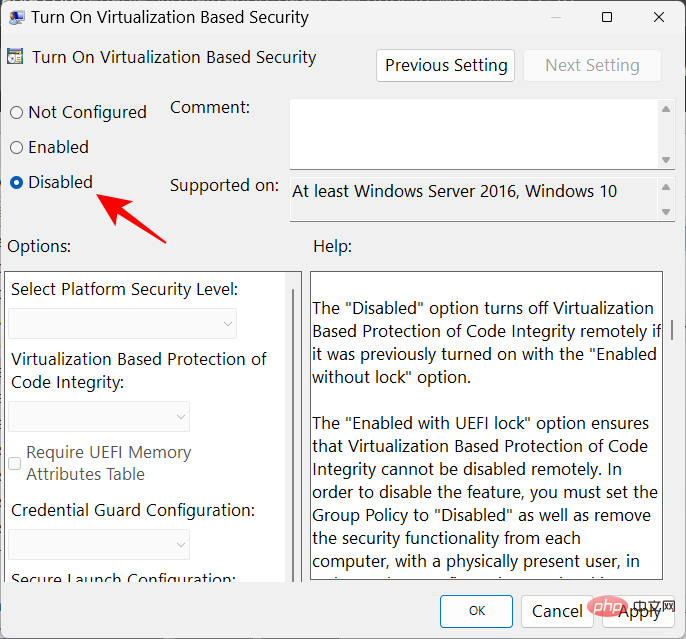
Select Disable to turn it off.
Then click OK.
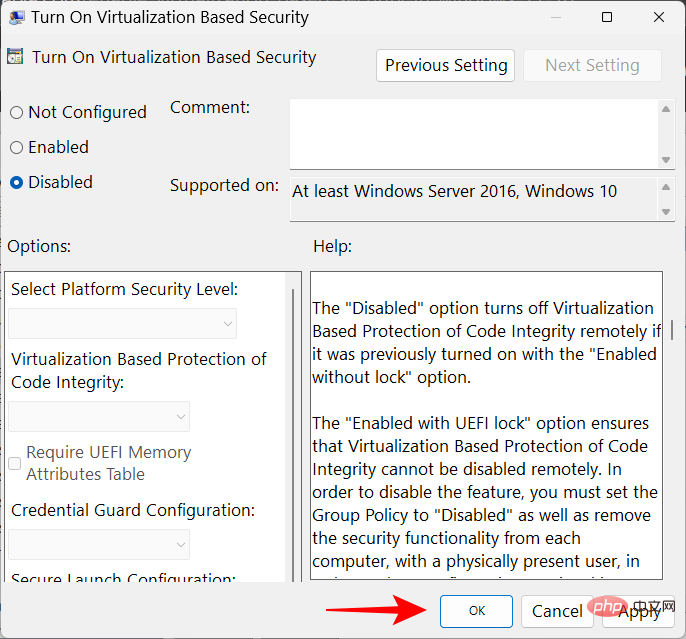
Now close the Group Policy Editor and restart your PC.
To turn it back on, select Enable.
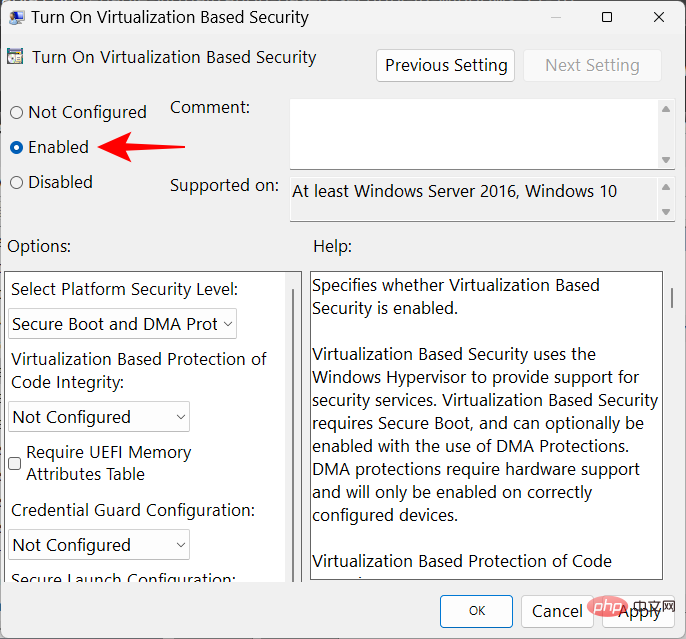
#Then, under Options, click the drop-down menu for Virtualization-based Code Integrity Protection.
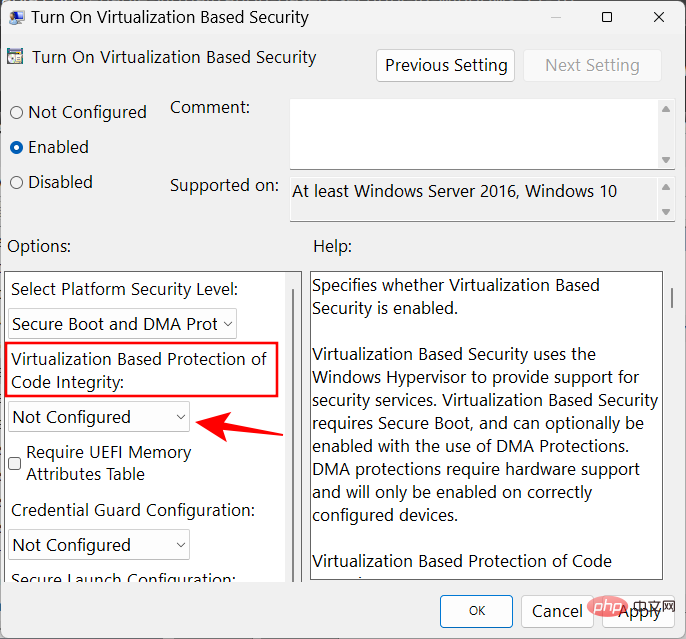
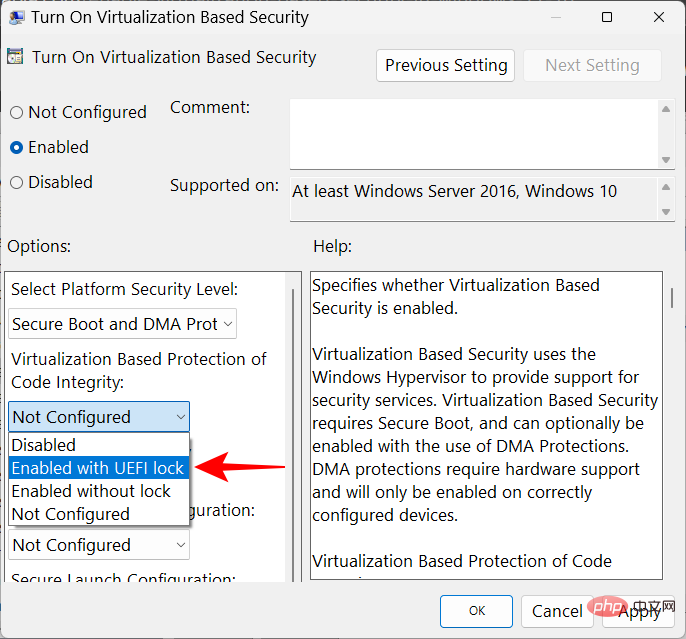
Select Enabled with UEFI Lock.
Finally, click OK.
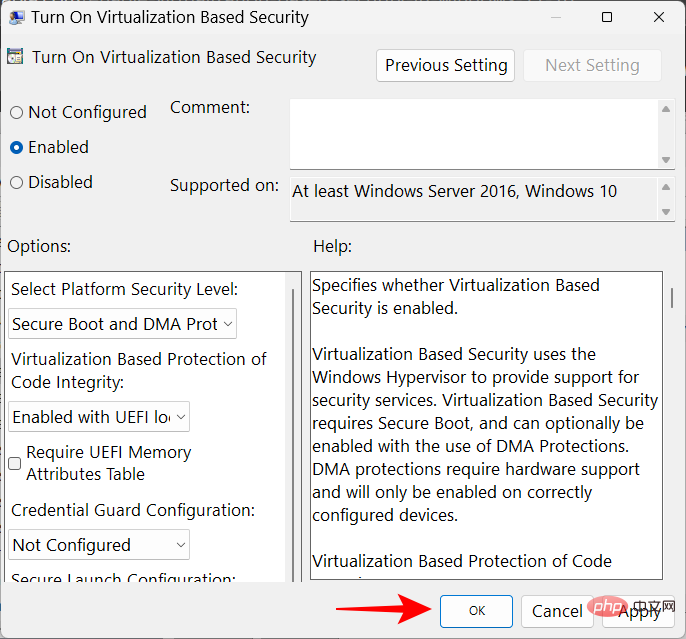
Now close the Group Policy Editor and restart your PC.
FIX: Memory Integrity is turned off and cannot be turned on
For some users, simply turning on the Memory Integrity switch does not turn it on. Instead, what they get is an error message telling them that an incompatible or malicious driver is installed.
In most cases, Windows will determine exactly which driver is causing the problem. You will need to check with the device manufacturer if a compatible driver is available. If this is not the case, uninstalling the application or device linked to these drivers may resolve the issue, and you must wait until the publisher rolls out a compatible driver before you can use the application associated with it.
If uninstalling the application or device does not resolve the issue, you must uninstall the incompatible driver yourself. To do this, first, note the "Release Name" of the driver when you receive the error message.
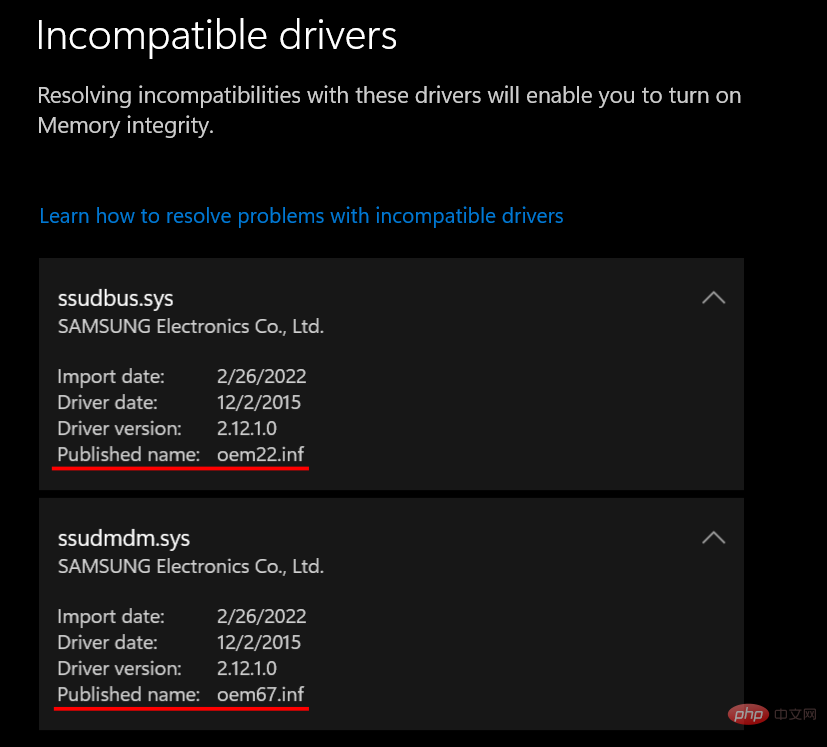
Then, follow these steps:
Press Start, type cmd, Right-click Command Prompt and select Run as administrator.
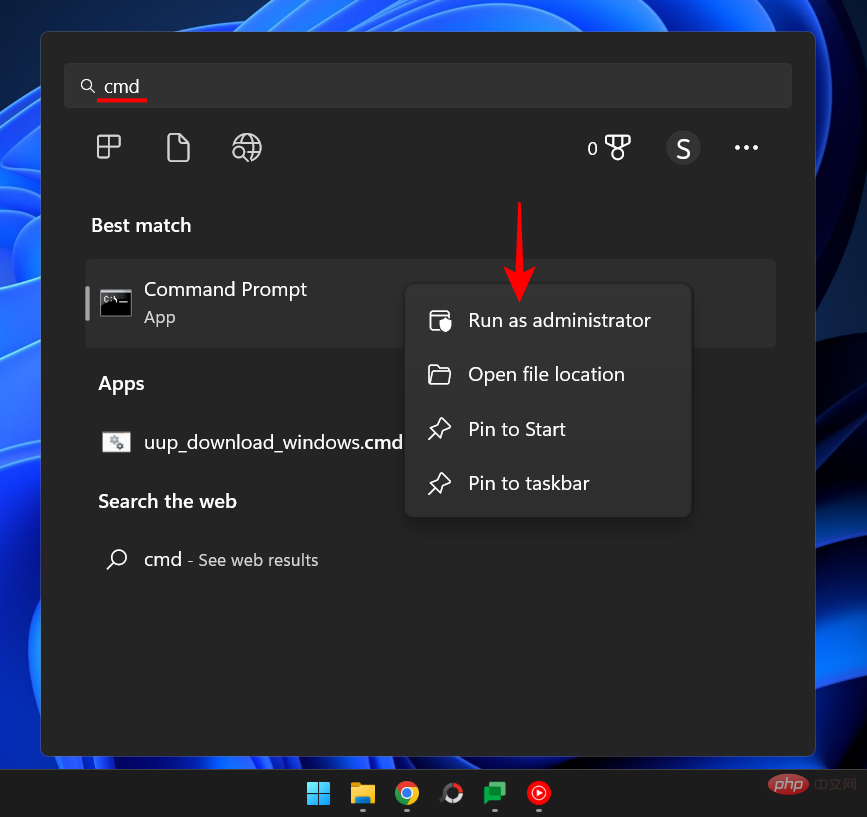
Here, type the following command to get a list of all third-party drivers on your system:
dism /online /get-drivers / format:table

Click to enter. You will now get a list of all third-party drivers on your system, including additional information about them such as the name of the provider, release date, version, etc.
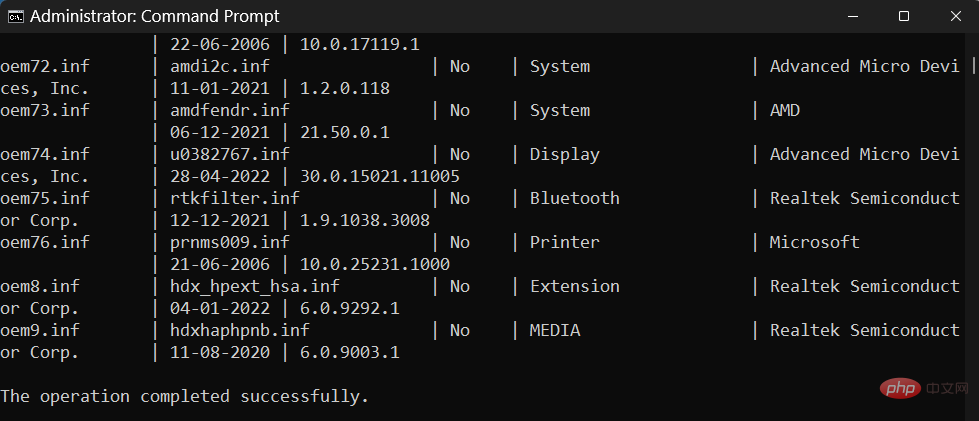
To uninstall the one causing the problem, type the following command:
pnputil /delete-driver (driver's published name) /uninstall /force
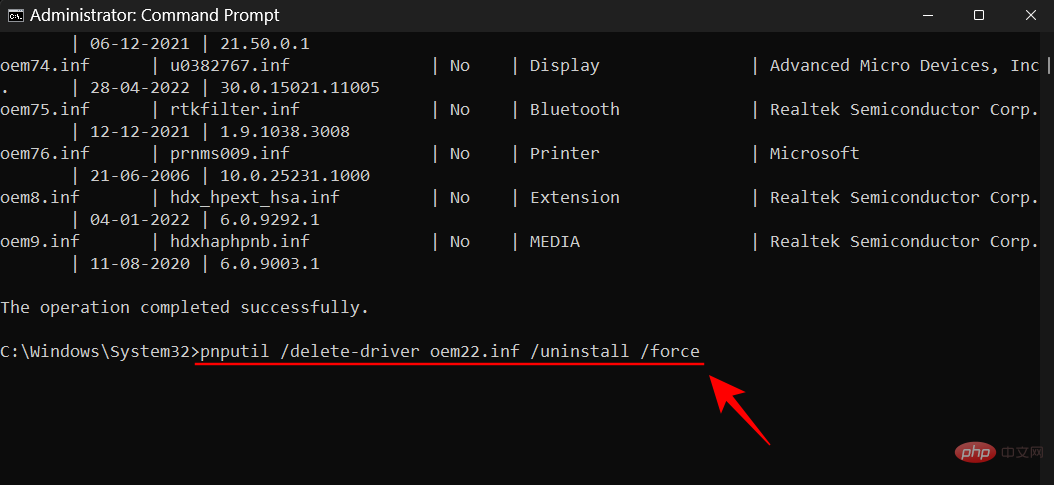
# Make sure you type the correct publication name. Otherwise, you may end up deleting running drivers and causing problems with peripherals and applications. Press Enter after entering the command.
You will now remove the problematic driver and can turn on Memory Integrity via the method given above.
FAQ
1. Should I turn on Memory Integrity on Windows 11?
Memory integrity is a key feature of Windows security because it creates another layer of security for core components running in a virtual environment. If you don't turn it on, you're basically leaving your system vulnerable to a variety of threats that can compromise not only your system, but your data as well.
That said, if you only disable it for a short period of time, such as while playing a game, it shouldn't cause much trouble as there are other Windows security features that can protect you on its behalf.
2. Does memory integrity slow down your PC?
Theoretically, memory integrity will have an impact on performance. However, in real applications, you may or may not feel any performance degradation at all. You'll only experience slight slowdowns when running resource-intensive applications like games. So if you want to improve your gaming performance, you can try disabling memory integrity beforehand.
3. Is memory integrity turned on by default?
The memory integrity feature was previously turned off by default. However, Microsoft has been pushing hard for users to make this a security feature, and it has been turned on by default since the 22H2 update.
We hope you now have a better understanding of what memory integrity is, what it does, and how to turn it on or off depending on whether you want better performance or better security on Windows 11 .
The above is the detailed content of 'Windows 11 Memory Integrity is Off” Issue: How to Fix. For more information, please follow other related articles on the PHP Chinese website!

Hot AI Tools

Undresser.AI Undress
AI-powered app for creating realistic nude photos

AI Clothes Remover
Online AI tool for removing clothes from photos.

Undress AI Tool
Undress images for free

Clothoff.io
AI clothes remover

AI Hentai Generator
Generate AI Hentai for free.

Hot Article

Hot Tools

Notepad++7.3.1
Easy-to-use and free code editor

SublimeText3 Chinese version
Chinese version, very easy to use

Zend Studio 13.0.1
Powerful PHP integrated development environment

Dreamweaver CS6
Visual web development tools

SublimeText3 Mac version
God-level code editing software (SublimeText3)

Hot Topics
 1376
1376
 52
52
 How to disable driver signature enforcement in Windows 11
May 20, 2023 pm 02:17 PM
Microsoft has built several security features into Windows to ensure your PC remains secure. One of them is driver signature enforcement in Windows 11. When this feature is enabled, it ensures that only drivers digitally signed by Microsoft can be installed on the system. This helps most of the users to a great extent as it protects them. But there is a downside to enabling driver signature enforcement. Suppose you find a driver that works for your device, but it is not signed by Microsoft, although it is completely safe. But you won't be able to install it. Therefore, you must know how to disable driver signing in Windows 11
 How to fix Windows 11 activation error 0xc004c060
May 17, 2023 pm 08:47 PM
Why am I encountering Windows 11 activation error 0xc004c060? First make sure you are using genuine Windows and that the license key is valid. Also, check if it was obtained from an official source and if the key is suitable for the installed OS version. If there is an issue with any of these, you may encounter Windows 11 activation error 0xc004c060. So be sure to verify these and if you find everything is in order, move on to the next section. If you obtained the key through unreliable means or believe that the installed copy is a pirated version, you will need to purchase a valid key from Microsoft. In addition to this, misconfigured settings, missing
 0x80010105: How to fix this Windows update error
May 17, 2023 pm 05:44 PM
Microsoft regularly releases Windows updates to improve functionality or increase the security of the operating system. You can ignore some of these updates, but it's important to always install security updates. While installing these updates, you may encounter error code; 0x80010105. An unstable connection usually causes most update errors, and once the connection is reestablished you're good to go. However, some require more technical troubleshooting, such as the 0x80010105 error, which is what we will see in this article. What causes WindowsUpdate error 0x80010105? This error may occur if your computer has not been updated in a while. Some users may have permanently disabled W for their reasons
 5 Ways to Disable Delivery Optimization Service in Windows
May 17, 2023 am 09:31 AM
There are many reasons why you might want to disable the Delivery Optimization service on your Windows computer. However, our readers complained about not knowing the correct steps to follow. This guide discusses how to disable the Delivery Optimization service in a few steps. To learn more about services, you may want to check out our How to open services.msc guide for more information. What does Delivery Optimization Service do? Delivery Optimization Service is an HTTP downloader with cloud hosting solution. It allows Windows devices to download Windows updates, upgrades, applications and other large package files from alternative sources. Additionally, it helps reduce bandwidth consumption by allowing multiple devices in a deployment to download these packages. In addition, Windo
 How to disable display scaling for high DPI settings in Windows 11 or 10
May 22, 2023 pm 10:11 PM
The default display scaling feature on Windows 10 or later is a core component of the Windows operating system. But sometimes, this feature of certain apps can cause compatibility issues, unreadable text, blurry logos, and ultimately, app crashes. This can be a huge headache if you're dealing with 2160p or higher resolutions. There are many ways to disable the default display scaling feature on high DPI settings. We've selected the best ones and detailed step-by-step instructions for each process. How to Disable Display Scaling on High DPI Settings There is a way, all you have to do is disable high DPI scaling for a single application, and there is a way to do it for the entire Window
 How to install the Group Policy Management Console on Windows 11
May 17, 2023 am 09:59 AM
Installing the Group Policy Management Console (also known as GPMC) on Windows 11 will be the topic of today’s post. In Windows systems, the tools we are discussing improve the management of Group Policy by making it easier for IT and system administrators to understand. Be careful not to confuse the Local Group Policy Editor (gpedit.msc) with the Group Policy Management Console (GPMC). In terms of local system settings, Gpedit works with the registry, but GPMC works with server management settings for domain-based networks. You need to download and install the Windows Remote Server Administration Tools, sometimes called RSAT, to accomplish this. Use remote server management
 How to disable core parking on Windows 10
May 16, 2023 pm 01:07 PM
If you are a Windows user and want to disable the core parking functionality in your system, this article will guide you through the process. What is core parking? The core parking function is a power saving mechanism. It puts some of your processors into a sleep mode that doesn't perform any tasks and consumes very little or no power. This helps reduce energy consumption and therefore heat in the system. These cores are unparked when needed. Few users need to disable this feature, especially gamers. Disabling this feature will improve your system performance. Disable Windows Core Parking using Windows Registry Editor Step 1: Use Windows + R keys simultaneously to open the run prompt. Step 2: At the run prompt
 Tiny10 makes Windows 10 durable on (very old) PCs
May 22, 2023 pm 04:02 PM
Tiny10 is one developer's attempt to make Microsoft's Windows 10 operating system usable on both older PC systems and modern systems. When Microsoft released Windows 10 in 2015, it ensured that the operating system had the same system requirements as previous versions of Windows. That changes with the release of Windows 11 in 2021. Still, Windows 10 felt noticeably heavier than previous Windows versions, and users began looking for ways to improve the usability of the operating system. Faster hard drive, more memory, faster and more powerful CP


