
 Backend Development
Python Tutorial
How to solve the thread pool problem of Python's ThreadPoolExecutor
Backend Development
Python Tutorial
How to solve the thread pool problem of Python's ThreadPoolExecutor
How to solve the thread pool problem of Python's ThreadPoolExecutor

Concept
Python already has the threading module, why do we need a thread pool? What is a pool?
Taking the crawler as an example, you need to control the number of threads crawled at the same time. In the example, 20 threads are created, and only 3 threads are allowed to run at the same time, but all 20 threads need to be created and destroyed. Creation requires system resources. Is there a better solution?
In fact, only three threads are needed. Each thread is assigned a task, and the remaining tasks are queued to wait. When a thread completes the task, the queued tasks can be arranged for this thread to continue execution. .
This is the idea of a thread pool (of course it is not that simple), but it is difficult to write a thread pool perfectly by yourself. You also need to consider thread synchronization in complex situations, and deadlocks can easily occur.
Starting from Python3.2, the standard library provides us with the concurrent.futures module, which provides ThreadPoolExecutor and ProcessPoolExecutor The two classes realize further abstraction of threading and multiprocessing (the main focus here is the thread pool). They can not only help us automatically schedule threads, but also do:
The main thread can obtain the status of a certain thread (or task) and the return value.
When a thread completes, the main thread can know immediately.
Make the coding interfaces of multi-threads and multi-processes consistent.
Example
Simple use
from concurrent.futures import ThreadPoolExecutor
import time

# 参数times用来模拟网络请求的时间
def get_html(times):
    time.sleep(times)
    print("get page {}s finished".format(times))
    return times

executor = ThreadPoolExecutor(max_workers=2)
# 通过submit函数提交执行的函数到线程池中,submit函数立即返回,不阻塞
task1 = executor.submit(get_html, (3))
task2 = executor.submit(get_html, (2))
# done方法用于判定某个任务是否完成
print(task1.done())
# cancel方法用于取消某个任务,该任务没有放入线程池中才能取消成功
print(task2.cancel())
time.sleep(4)
print(task1.done())
# result方法可以获取task的执行结果
print(task1.result())

# 执行结果
# False  # 表明task1未执行完成
# False  # 表明task2取消失败,因为已经放入了线程池中
# get page 2s finished
# get page 3s finished
# True  # 由于在get page 3s finished之后才打印,所以此时task1必然完成了
# 3 # 得到task1的任务返回值When ThreadPoolExecutor constructs an instance, pass in the max_workers parameter to set the maximum number of threads that can run simultaneously in the thread pool .
Use the submit function to submit the task (function name and parameters) that the thread needs to perform to the thread pool, and return the handle of the task (similar to files and drawings). Note that submit() is not blocking, but Return immediately.
Through the task handle returned by the submit function, you can use the done() method to determine whether the task has ended. As can be seen from the above example, since the task has a delay of 2s, it is judged immediately after task1 is submitted that task1 has not been completed, but after a delay of 4s, it is judged that task1 is completed.
Use the cancel() method to cancel the submitted task. If the task is already running in the thread pool, it cannot be canceled. In this example, the thread pool size is set to 2 and the task is already running, so the cancellation fails. If you change the size of the thread pool to 1, then task1 is submitted first, and task2 is still waiting in the queue. At this time, it can be successfully canceled.
Use the result() method to obtain the return value of the task. Looking at the internal code, we found that this method is blocking.
as_completed
Although the above provides a method to determine whether the task is completed, it cannot always be determined in the main thread.
Sometimes when we know that a certain task is over, we get the result instead of always judging whether each task is over.
This is how you can use the as_completed method to retrieve the results of all tasks at once.
from concurrent.futures import ThreadPoolExecutor, as_completed
import time

# 参数times用来模拟网络请求的时间
def get_html(times):
    time.sleep(times)
    print("get page {}s finished".format(times))
    return times

executor = ThreadPoolExecutor(max_workers=2)
urls = [3, 2, 4] # 并不是真的url
all_task = [executor.submit(get_html, (url)) for url in urls]

for future in as_completed(all_task):
    data = future.result()
    print("in main: get page {}s success".format(data))

# 执行结果
# get page 2s finished
# in main: get page 2s success
# get page 3s finished
# in main: get page 3s success
# get page 4s finished
# in main: get page 4s successas_completed()The method is a generator. When no task is completed, it will block. When a certain task is completed, yield will Task, you can execute the statement below the for loop, and then continue to block until all tasks are completed.
It can also be seen from the results that the task completed first will notify the main thread first.
map
In addition to the above as_completed method, you can also use the executor.map method, but there is a little difference.
from concurrent.futures import ThreadPoolExecutor
import time

# 参数times用来模拟网络请求的时间
def get_html(times):
    time.sleep(times)
    print("get page {}s finished".format(times))
    return times

executor = ThreadPoolExecutor(max_workers=2)
urls = [3, 2, 4] # 并不是真的url

for data in executor.map(get_html, urls):
    print("in main: get page {}s success".format(data))
# 执行结果
# get page 2s finished
# get page 3s finished
# in main: get page 3s success
# in main: get page 2s success
# get page 4s finished
# in main: get page 4s successUse the map method without using the submit method in advance. The map method is the same as python in the standard library. ##mapThe meaning is the same, each element in the sequence is executed with the same function.
get_html function for each element of urls and allocate each thread pool. You can see that the execution result is different from the result of the as_completed method above. The output order is the same as the order of the urlslist, even if it is 2s If the task is executed and completed first, the 3s task will be printed first, and then the 2s task will be printed. The wait
method allows the main thread to block until the set requirements are met. <div class="code" style="position:relative; padding:0px; margin:0px;"><pre class='brush:php;toolbar:false;'>from concurrent.futures import ThreadPoolExecutor, wait, ALL_COMPLETED, FIRST_COMPLETED
import time
# 参数times用来模拟网络请求的时间
def get_html(times):
time.sleep(times)
print("get page {}s finished".format(times))
return times
executor = ThreadPoolExecutor(max_workers=2)
urls = [3, 2, 4] # 并不是真的url
all_task = [executor.submit(get_html, (url)) for url in urls]
wait(all_task, return_when=ALL_COMPLETED)
print("main")
# 执行结果
# get page 2s finished
# get page 3s finished
# get page 4s finished
# main</pre><div class="contentsignin">Copy after login</div></div>wait<p>The method receives 3 parameters, the waiting task sequence, timeout time and waiting conditions. <code>Waiting condition
The default is ALL_COMPLETED, indicating that you want to wait for all tasks to end. You can see in the running results that all tasks are indeed completed, and the main thread prints out
. The waiting condition can also be set to
, which means that the wait will stop when the first task is completed. Source code analysis
The After the thread pool can also be called the return container of task, which will store the results and status of task. Then The following is a brief introduction to part of the code of The meaning of this method is easy to understand, mainly to create the specified number of threads. However, the implementation is a bit difficult to understand. For example, weakref.ref in the thread execution function involves concepts such as weak references, which will be understood later. This is the function entry specified when the thread pool creates a thread, mainly from the queue in sequence Take out task and execute it, but the first parameter of the function is not very clear yet. Leave that for later. future in the module means a future object, which can be understood as a one in the future Completed operation, which is the basis of asynchronous programming. submit(), this future object is returned. The task is not completed when it is returned, but it will be completed in the future. ThreadPoolExecutorHow does this object operate internally? ThreadPoolExecutor: 1.init method
initThe main important thing in the method is the task Queues and thread collections are needed in other methods. 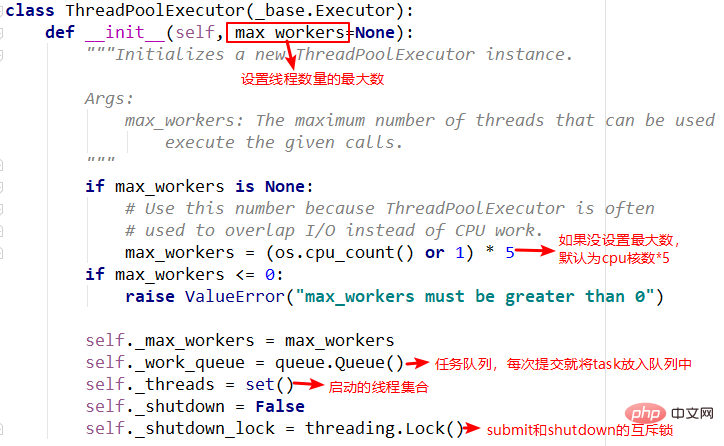
2. There are two important objects in the submit method
submit, _base.Future()And _WorkItem() objects, the _WorkItem() object is responsible for running tasks and setting the future object, and finally the future object will be Return, you can see that the entire process returns immediately without blocking. 
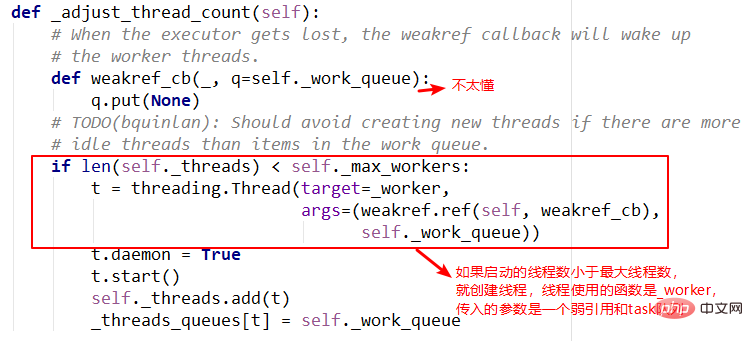
3.adjust_thread_count method
4._WorkItem object
_WorkItemThe responsibility of the object is to perform tasks and set results. The main complexity here is self.future.set_result(result). 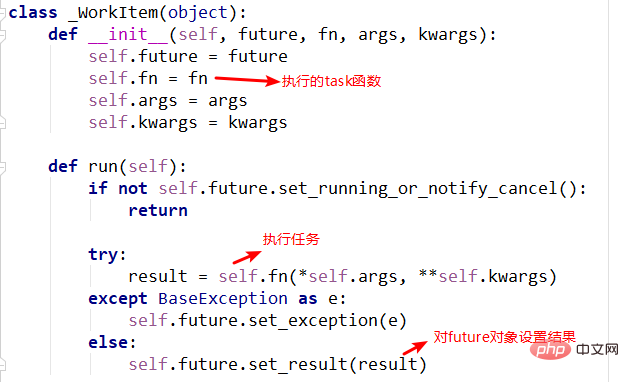
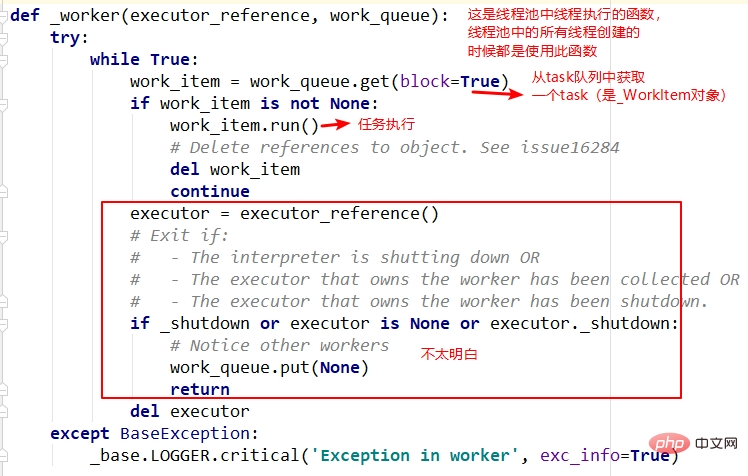
5. Thread execution function--_worker
The above is the detailed content of How to solve the thread pool problem of Python's ThreadPoolExecutor. For more information, please follow other related articles on the PHP Chinese website!

Hot AI Tools

Undresser.AI Undress
AI-powered app for creating realistic nude photos

AI Clothes Remover
Online AI tool for removing clothes from photos.

Undress AI Tool
Undress images for free

Clothoff.io
AI clothes remover

AI Hentai Generator
Generate AI Hentai for free.

Hot Article
Hot Tools

Notepad++7.3.1
Easy-to-use and free code editor

SublimeText3 Chinese version
Chinese version, very easy to use

Zend Studio 13.0.1
Powerful PHP integrated development environment

Dreamweaver CS6
Visual web development tools

SublimeText3 Mac version
God-level code editing software (SublimeText3)
Hot Topics
 1378
1378
 52
52

 Python: Games, GUIs, and More
Apr 13, 2025 am 12:14 AM
Python: Games, GUIs, and More
Apr 13, 2025 am 12:14 AM
Python excels in gaming and GUI development. 1) Game development uses Pygame, providing drawing, audio and other functions, which are suitable for creating 2D games. 2) GUI development can choose Tkinter or PyQt. Tkinter is simple and easy to use, PyQt has rich functions and is suitable for professional development.
 PHP and Python: Comparing Two Popular Programming Languages
Apr 14, 2025 am 12:13 AM
PHP and Python: Comparing Two Popular Programming Languages
Apr 14, 2025 am 12:13 AM
PHP and Python each have their own advantages, and choose according to project requirements. 1.PHP is suitable for web development, especially for rapid development and maintenance of websites. 2. Python is suitable for data science, machine learning and artificial intelligence, with concise syntax and suitable for beginners.
 How debian readdir integrates with other tools
Apr 13, 2025 am 09:42 AM
How debian readdir integrates with other tools
Apr 13, 2025 am 09:42 AM
The readdir function in the Debian system is a system call used to read directory contents and is often used in C programming. This article will explain how to integrate readdir with other tools to enhance its functionality. Method 1: Combining C language program and pipeline First, write a C program to call the readdir function and output the result: #include#include#include#includeintmain(intargc,char*argv[]){DIR*dir;structdirent*entry;if(argc!=2){
 Python and Time: Making the Most of Your Study Time
Apr 14, 2025 am 12:02 AM
Python and Time: Making the Most of Your Study Time
Apr 14, 2025 am 12:02 AM
To maximize the efficiency of learning Python in a limited time, you can use Python's datetime, time, and schedule modules. 1. The datetime module is used to record and plan learning time. 2. The time module helps to set study and rest time. 3. The schedule module automatically arranges weekly learning tasks.
 Nginx SSL Certificate Update Debian Tutorial
Apr 13, 2025 am 07:21 AM
Nginx SSL Certificate Update Debian Tutorial
Apr 13, 2025 am 07:21 AM
This article will guide you on how to update your NginxSSL certificate on your Debian system. Step 1: Install Certbot First, make sure your system has certbot and python3-certbot-nginx packages installed. If not installed, please execute the following command: sudoapt-getupdatesudoapt-getinstallcertbotpython3-certbot-nginx Step 2: Obtain and configure the certificate Use the certbot command to obtain the Let'sEncrypt certificate and configure Nginx: sudocertbot--nginx Follow the prompts to select
 GitLab's plug-in development guide on Debian
Apr 13, 2025 am 08:24 AM
GitLab's plug-in development guide on Debian
Apr 13, 2025 am 08:24 AM
Developing a GitLab plugin on Debian requires some specific steps and knowledge. Here is a basic guide to help you get started with this process. Installing GitLab First, you need to install GitLab on your Debian system. You can refer to the official installation manual of GitLab. Get API access token Before performing API integration, you need to get GitLab's API access token first. Open the GitLab dashboard, find the "AccessTokens" option in the user settings, and generate a new access token. Will be generated
 How to configure HTTPS server in Debian OpenSSL
Apr 13, 2025 am 11:03 AM
How to configure HTTPS server in Debian OpenSSL
Apr 13, 2025 am 11:03 AM
Configuring an HTTPS server on a Debian system involves several steps, including installing the necessary software, generating an SSL certificate, and configuring a web server (such as Apache or Nginx) to use an SSL certificate. Here is a basic guide, assuming you are using an ApacheWeb server. 1. Install the necessary software First, make sure your system is up to date and install Apache and OpenSSL: sudoaptupdatesudoaptupgradesudoaptinsta
 What service is apache
Apr 13, 2025 pm 12:06 PM
What service is apache
Apr 13, 2025 pm 12:06 PM
Apache is the hero behind the Internet. It is not only a web server, but also a powerful platform that supports huge traffic and provides dynamic content. It provides extremely high flexibility through a modular design, allowing for the expansion of various functions as needed. However, modularity also presents configuration and performance challenges that require careful management. Apache is suitable for server scenarios that require highly customizable and meet complex needs.
