

How to implement batch data extraction through Python

Configuration requirements
1.ImageMagick
2.tesseract-OCR
3.Python3.7
4.from PIL import Image as PI
5.import io
6.import os
7.import pyocr.builders
8.from cnocr import CnOcr
import The data is converted into a digital format. Based on this, we need to first complete the conversion of uppercase Chinese characters and numbers.
def chineseNumber2Int(strNum: str):
    result = 0
    temp = 1  # 存放一个单位的数字如:十万
    count = 0  # 判断是否有chArr
    cnArr = ['壹', '贰', '叁', '肆', '伍', '陆', '柒', '捌', '玖']
    chArr = ['拾', '佰', '仟', '万', '亿']
    for i in range(len(strNum)):
        b = True
        c = strNum[i]
        for j in range(len(cnArr)):
            if c == cnArr[j]:
                if count != 0:
                    result += temp
                    count = 0
                temp = j + 1
                b = False
                break
        if b:
            for j in range(len(chArr)):
                if c == chArr[j]:
                    if j == 0:
                        temp *= 10
                    elif j == 1:
                        temp *= 100
                    elif j == 2:
                        temp *= 1000
                    elif j == 3:
                        temp *= 10000
                    elif j == 4:
                        temp *= 100000000
                count += 1
        if i == len(strNum) - 1:
            result += temp
return resultThe above code can be used to convert uppercase letters and numbers. For example, input "Twenty thousand yuan" to export "200000", and then convert it into numbers to greatly simplify the table. Operations can also be beneficial to data archiving while completing table operations. 
As shown in the picture, the small black dot is where the mouse is, and the lower left corner of the drawing software is its coordinates.
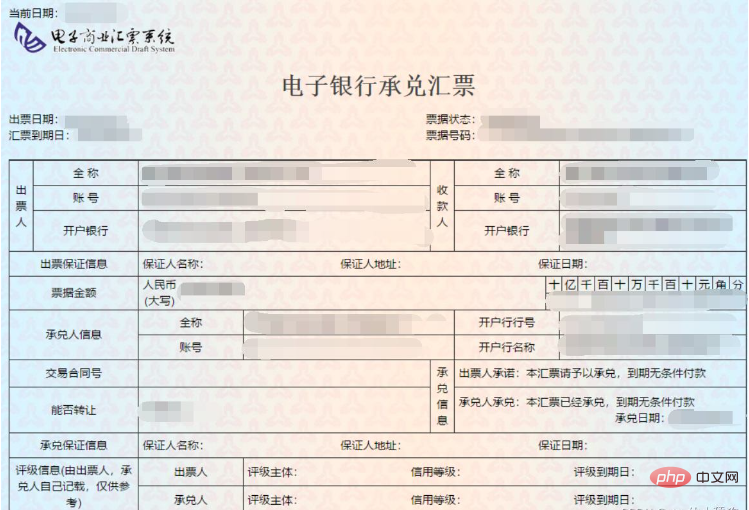
Extract the issue date
def text1(new_img):
    #提取出票日期
    left = 80
    top = 143
    right = 162
    bottom = 162
    image_text1 = new_img.crop((left, top, right, bottom))
    #展示图片
    #image_text1.show()
    txt1 = tool.image_to_string(image_text1)
    print(txt1)
return str(txt1)Withdraw the amount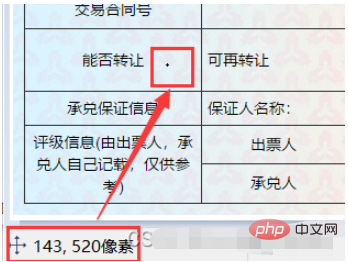
def text2(new_img):
    #提取金额
    left = 224
    top = 355
    right = 585
    bottom = 380
    image_text2 = new_img.crop((left, top, right, bottom))
    #展示图片
    #image_text2.show()
    image_text2.save("img/tmp.png")
    temp = ocr.ocr("img/tmp.png")
    temp="".join(temp[0])
    txt2=chineseNumber2Int(temp)
    print(txt2)
return txt2def text3(new_img):
#提取出票人
left = 177
top = 207
right = 506
bottom = 231
image_text3 = new_img.crop((left, top, right, bottom))
#展示图片
#image_text3.show()
image_text3.save("img/tmp.png")
temp = ocr.ocr("img/tmp.png")
txt3="".join(temp[0])
print(txt3)
return txt3Copy after login
Extract the payment bankdef text3(new_img):
#提取出票人
left = 177
top = 207
right = 506
bottom = 231
image_text3 = new_img.crop((left, top, right, bottom))
#展示图片
#image_text3.show()
image_text3.save("img/tmp.png")
temp = ocr.ocr("img/tmp.png")
txt3="".join(temp[0])
print(txt3)
return txt3def text4(new_img):
#提取付款行
left = 177
top = 274
right = 492
bottom = 311
image_text4 = new_img.crop((left, top, right, bottom))
#展示图片
#image_text4.show()
image_text4.save("img/tmp.png")
temp = ocr.ocr("img/tmp.png")
txt4="".join(temp[0])
print(txt4)
return txt4Copy after login
Extract the bill of exchange arrival datedef text4(new_img):
#提取付款行
left = 177
top = 274
right = 492
bottom = 311
image_text4 = new_img.crop((left, top, right, bottom))
#展示图片
#image_text4.show()
image_text4.save("img/tmp.png")
temp = ocr.ocr("img/tmp.png")
txt4="".join(temp[0])
print(txt4)
return txt4def text5(new_img):
#提取汇票到日期
left = 92
top = 166
right = 176
bottom = 184
image_text5 = new_img.crop((left, top, right, bottom))
#展示图片
#image_text5.show()
txt5 = tool.image_to_string(image_text5)
print(txt5)
return txt5Copy after login
Extract the bill documentdef text5(new_img):
#提取汇票到日期
left = 92
top = 166
right = 176
bottom = 184
image_text5 = new_img.crop((left, top, right, bottom))
#展示图片
#image_text5.show()
txt5 = tool.image_to_string(image_text5)
print(txt5)
return txt5def text6(new_img):
#提取票据号码
left = 598
top = 166
right = 870
bottom = 182
image_text6 = new_img.crop((left, top, right, bottom))
#展示图片
#image_text6.show()
txt6 = tool.image_to_string(image_text6)
print(txt6)
return txt6Copy after login
After all the data is extracted, we enter the setting process. We need to extract all the bill files first , get their file names and paths. def text6(new_img):
#提取票据号码
left = 598
top = 166
right = 870
bottom = 182
image_text6 = new_img.crop((left, top, right, bottom))
#展示图片
#image_text6.show()
txt6 = tool.image_to_string(image_text6)
print(txt6)
return txt6ocr=CnOcr()
tool = pyocr.get_available_tools()[0]
filePath='img'
img_name=[]
for i,j,name in os.walk(filePath):
img_name=nameCopy after login
After obtaining the complete data, you can import the data into Excel. ocr=CnOcr()
tool = pyocr.get_available_tools()[0]
filePath='img'
img_name=[]
for i,j,name in os.walk(filePath):
img_name=namecount=1
book = xlwt.Workbook(encoding='utf-8',style_compression=0)
sheet = book.add_sheet('test',cell_overwrite_ok=True)
for i in img_name:
img_url = filePath+"/"+i
with open(img_url, 'rb') as f:
a = f.read()
new_img = PI.open(io.BytesIO(a))
## 写入csv
col = ('年份','出票日期','金额','出票人','付款行全称','汇票到日期','备注')
for j in range(0,7):
sheet.write(0,j,col[j])
book.save('1.csv')
shijian=text1(new_img)
sheet.write(count,0,shijian[0:4])
sheet.write(count,1,shijian[5:])
sheet.write(count,2,text2(new_img))
sheet.write(count,3,text3(new_img))
sheet.write(count,4,text4(new_img))
sheet.write(count,5,text5(new_img))
sheet.write(count,6,text6(new_img))
count = count + 1Copy after login
At this point, the complete process is over. Attached are all source codescount=1
book = xlwt.Workbook(encoding='utf-8',style_compression=0)
sheet = book.add_sheet('test',cell_overwrite_ok=True)
for i in img_name:
img_url = filePath+"/"+i
with open(img_url, 'rb') as f:
a = f.read()
new_img = PI.open(io.BytesIO(a))
## 写入csv
col = ('年份','出票日期','金额','出票人','付款行全称','汇票到日期','备注')
for j in range(0,7):
sheet.write(0,j,col[j])
book.save('1.csv')
shijian=text1(new_img)
sheet.write(count,0,shijian[0:4])
sheet.write(count,1,shijian[5:])
sheet.write(count,2,text2(new_img))
sheet.write(count,3,text3(new_img))
sheet.write(count,4,text4(new_img))
sheet.write(count,5,text5(new_img))
sheet.write(count,6,text6(new_img))
count = count + 1from wand.image import Image
from PIL import Image as PI
import pyocr
import io
import re
import os
import shutil
import pyocr.builders
from cnocr import CnOcr
import requests
import xlrd
import xlwt
from openpyxl import load_workbook
def chineseNumber2Int(strNum: str):
result = 0
temp = 1 # 存放一个单位的数字如:十万
count = 0 # 判断是否有chArr
cnArr = ['壹', '贰', '叁', '肆', '伍', '陆', '柒', '捌', '玖']
chArr = ['拾', '佰', '仟', '万', '亿']
for i in range(len(strNum)):
b = True
c = strNum[i]
for j in range(len(cnArr)):
if c == cnArr[j]:
if count != 0:
result += temp
count = 0
temp = j + 1
b = False
break
if b:
for j in range(len(chArr)):
if c == chArr[j]:
if j == 0:
temp *= 10
elif j == 1:
temp *= 100
elif j == 2:
temp *= 1000
elif j == 3:
temp *= 10000
elif j == 4:
temp *= 100000000
count += 1
if i == len(strNum) - 1:
result += temp
return result
def text1(new_img):
#提取出票日期
left = 80
top = 143
right = 162
bottom = 162
image_text1 = new_img.crop((left, top, right, bottom))
#展示图片
#image_text1.show()
txt1 = tool.image_to_string(image_text1)
print(txt1)
return str(txt1)
def text2(new_img):
#提取金额
left = 224
top = 355
right = 585
bottom = 380
image_text2 = new_img.crop((left, top, right, bottom))
#展示图片
#image_text2.show()
image_text2.save("img/tmp.png")
temp = ocr.ocr("img/tmp.png")
temp="".join(temp[0])
txt2=chineseNumber2Int(temp)
print(txt2)
return txt2
def text3(new_img):
    #提取出票人
    left = 177
    top = 207
    right = 506
    bottom = 231
    image_text3 = new_img.crop((left, top, right, bottom))
    #展示图片
    #image_text3.show()
    image_text3.save("img/tmp.png")
    temp = ocr.ocr("img/tmp.png")
    txt3="".join(temp[0])
    print(txt3)
    return txt3
def text4(new_img):
    #提取付款行
    left = 177
    top = 274
    right = 492
    bottom = 311
    image_text4 = new_img.crop((left, top, right, bottom))
    #展示图片
    #image_text4.show()
    image_text4.save("img/tmp.png")
    temp = ocr.ocr("img/tmp.png")
    txt4="".join(temp[0])
    print(txt4)
    return txt4
def text5(new_img):
    #提取汇票到日期
    left = 92
    top = 166
    right = 176
    bottom = 184
    image_text5 = new_img.crop((left, top, right, bottom))
    #展示图片
    #image_text5.show()
    txt5 = tool.image_to_string(image_text5)
    print(txt5)
    return txt5
def text6(new_img):
    #提取票据号码
    left = 598
    top = 166
    right = 870
    bottom = 182
    image_text6 = new_img.crop((left, top, right, bottom))
    #展示图片
    #image_text6.show()
    txt6 = tool.image_to_string(image_text6)
    print(txt6)
    return txt6
ocr=CnOcr()
tool = pyocr.get_available_tools()[0]
filePath='img'
img_name=[]
for i,j,name in os.walk(filePath):
    img_name=name
count=1
book = xlwt.Workbook(encoding='utf-8',style_compression=0)
sheet = book.add_sheet('test',cell_overwrite_ok=True)
for i in img_name:
    img_url = filePath+"/"+i
    with open(img_url, 'rb') as f:
        a = f.read()
    new_img = PI.open(io.BytesIO(a))
    ## 写入csv
    col = ('年份','出票日期','金额','出票人','付款行全称','汇票到日期','备注')
    for j in range(0,7):
        sheet.write(0,j,col[j])
    book.save('1.csv')
    shijian=text1(new_img)
    sheet.write(count,0,shijian[0:4])
    sheet.write(count,1,shijian[5:])
    sheet.write(count,2,text2(new_img))
    sheet.write(count,3,text3(new_img))
    sheet.write(count,4,text4(new_img))
    sheet.write(count,5,text5(new_img))
    sheet.write(count,6,text6(new_img))
count = count + 1The above is the detailed content of How to implement batch data extraction through Python. For more information, please follow other related articles on the PHP Chinese website!

Hot AI Tools

Undresser.AI Undress
AI-powered app for creating realistic nude photos

AI Clothes Remover
Online AI tool for removing clothes from photos.

Undress AI Tool
Undress images for free

Clothoff.io
AI clothes remover

AI Hentai Generator
Generate AI Hentai for free.

Hot Article
Hot Tools

Notepad++7.3.1
Easy-to-use and free code editor

SublimeText3 Chinese version
Chinese version, very easy to use

Zend Studio 13.0.1
Powerful PHP integrated development environment

Dreamweaver CS6
Visual web development tools

SublimeText3 Mac version
God-level code editing software (SublimeText3)
Hot Topics
 1382
1382
 52
52

 PHP and Python: Code Examples and Comparison
Apr 15, 2025 am 12:07 AM
PHP and Python: Code Examples and Comparison
Apr 15, 2025 am 12:07 AM
PHP and Python have their own advantages and disadvantages, and the choice depends on project needs and personal preferences. 1.PHP is suitable for rapid development and maintenance of large-scale web applications. 2. Python dominates the field of data science and machine learning.
 How is the GPU support for PyTorch on CentOS
Apr 14, 2025 pm 06:48 PM
How is the GPU support for PyTorch on CentOS
Apr 14, 2025 pm 06:48 PM
Enable PyTorch GPU acceleration on CentOS system requires the installation of CUDA, cuDNN and GPU versions of PyTorch. The following steps will guide you through the process: CUDA and cuDNN installation determine CUDA version compatibility: Use the nvidia-smi command to view the CUDA version supported by your NVIDIA graphics card. For example, your MX450 graphics card may support CUDA11.1 or higher. Download and install CUDAToolkit: Visit the official website of NVIDIACUDAToolkit and download and install the corresponding version according to the highest CUDA version supported by your graphics card. Install cuDNN library:
 Python vs. JavaScript: Community, Libraries, and Resources
Apr 15, 2025 am 12:16 AM
Python vs. JavaScript: Community, Libraries, and Resources
Apr 15, 2025 am 12:16 AM
Python and JavaScript have their own advantages and disadvantages in terms of community, libraries and resources. 1) The Python community is friendly and suitable for beginners, but the front-end development resources are not as rich as JavaScript. 2) Python is powerful in data science and machine learning libraries, while JavaScript is better in front-end development libraries and frameworks. 3) Both have rich learning resources, but Python is suitable for starting with official documents, while JavaScript is better with MDNWebDocs. The choice should be based on project needs and personal interests.
 Detailed explanation of docker principle
Apr 14, 2025 pm 11:57 PM
Detailed explanation of docker principle
Apr 14, 2025 pm 11:57 PM
Docker uses Linux kernel features to provide an efficient and isolated application running environment. Its working principle is as follows: 1. The mirror is used as a read-only template, which contains everything you need to run the application; 2. The Union File System (UnionFS) stacks multiple file systems, only storing the differences, saving space and speeding up; 3. The daemon manages the mirrors and containers, and the client uses them for interaction; 4. Namespaces and cgroups implement container isolation and resource limitations; 5. Multiple network modes support container interconnection. Only by understanding these core concepts can you better utilize Docker.
 MiniOpen Centos compatibility
Apr 14, 2025 pm 05:45 PM
MiniOpen Centos compatibility
Apr 14, 2025 pm 05:45 PM
MinIO Object Storage: High-performance deployment under CentOS system MinIO is a high-performance, distributed object storage system developed based on the Go language, compatible with AmazonS3. It supports a variety of client languages, including Java, Python, JavaScript, and Go. This article will briefly introduce the installation and compatibility of MinIO on CentOS systems. CentOS version compatibility MinIO has been verified on multiple CentOS versions, including but not limited to: CentOS7.9: Provides a complete installation guide covering cluster configuration, environment preparation, configuration file settings, disk partitioning, and MinI
 How to operate distributed training of PyTorch on CentOS
Apr 14, 2025 pm 06:36 PM
How to operate distributed training of PyTorch on CentOS
Apr 14, 2025 pm 06:36 PM
PyTorch distributed training on CentOS system requires the following steps: PyTorch installation: The premise is that Python and pip are installed in CentOS system. Depending on your CUDA version, get the appropriate installation command from the PyTorch official website. For CPU-only training, you can use the following command: pipinstalltorchtorchvisiontorchaudio If you need GPU support, make sure that the corresponding version of CUDA and cuDNN are installed and use the corresponding PyTorch version for installation. Distributed environment configuration: Distributed training usually requires multiple machines or single-machine multiple GPUs. Place
 How to choose the PyTorch version on CentOS
Apr 14, 2025 pm 06:51 PM
How to choose the PyTorch version on CentOS
Apr 14, 2025 pm 06:51 PM
When installing PyTorch on CentOS system, you need to carefully select the appropriate version and consider the following key factors: 1. System environment compatibility: Operating system: It is recommended to use CentOS7 or higher. CUDA and cuDNN:PyTorch version and CUDA version are closely related. For example, PyTorch1.9.0 requires CUDA11.1, while PyTorch2.0.1 requires CUDA11.3. The cuDNN version must also match the CUDA version. Before selecting the PyTorch version, be sure to confirm that compatible CUDA and cuDNN versions have been installed. Python version: PyTorch official branch
 Python: Automation, Scripting, and Task Management
Apr 16, 2025 am 12:14 AM
Python: Automation, Scripting, and Task Management
Apr 16, 2025 am 12:14 AM
Python excels in automation, scripting, and task management. 1) Automation: File backup is realized through standard libraries such as os and shutil. 2) Script writing: Use the psutil library to monitor system resources. 3) Task management: Use the schedule library to schedule tasks. Python's ease of use and rich library support makes it the preferred tool in these areas.
