

How to take ownership of a folder in Windows 11

If you have administrative abilities, you will be able to access most of the data on your C drive, change system settings, and perform various other impossible operations.
However, there are some operations that even an administrator cannot fully perform, so today we will show you how to take ownership of a folder in Windows 11.
If you wish to access the WindowsApps folder, take control of a hard drive belonging to another computer, or delete a shared file that has been corrupted by improper permissions, simply having an administrator account is not enough.
The same principles apply if you want to take ownership of a folder on Windows 10, so having the right method can make a big difference.
This is because these tweaks are associated with Microsoft's Trusted Installer account, so you need to transfer ownership of these files from the Trusted Installer to your Administrator account.
After we see what types of Microsoft accounts exist, we will show you how to take ownership of a folder in Windows 11. Follow us!
What types of Microsoft accounts are there?
Most of us are familiar with the terms administrator profile and regular user profile when it comes to our personal computers. Administrators are compared to God, while users are compared to the masses.
On the other hand, what about domain administrator accounts, domain user accounts, or local groups? There are many other types of profiles that provide varying amounts of access to PC, server, and network configurations and settings.
To maintain network security and ensure everyone has access to the areas they need to perform their duties, it is critical to understand the specific capabilities of each device.
No standard user account should be granted administrator access to your network. Users who use it as part of their regular user account can inadvertently cause a lot of damage, for example, if they become infected with a virus that deletes data on their computer.
A user's permissions are managed by a Windows Active Directory domain on a Windows network, which is typically created when they first connect to the network and contains all of their accounts.
If users require specific permissions, they should be provided with login information from an account with the appropriate level of access to the system.
You can provide high-level access to different parts of your Windows network by creating security groups on your network. These groups should be reviewed regularly to ensure that no ordinary users are included as members, and only administrators do so.
In addition to regular user accounts, there is another type of user account that has special access to specific areas of the network - service accounts.
This term refers to a user account used by software (usually on a server) to perform automated actions, such as backing up data or managing your antivirus management.
How to take ownership of a folder in Windows 11?
1. Use CMD
- Press the Windows key S to start the Search function and enter cmd. Now right click on the top result and select Run as administrator.
- You can change the current working directory of CMD to the directory containing the required files or folders by issuing the cd command, for example:
<strong>cd C:\Program Files</strong> - Run the following two commands and change the folder name in the following two commands to reflect your folder name:
<strong>takeown /f foldername /r /d y icacls foldername /grant administrators:F /t</strong> - If you want to take ownership of the file, use the following command and replace the filename part again with your filename:
<strong>takeown /f filename icacls filename /grant administrators:F</strong>
2. Access the properties of the folder
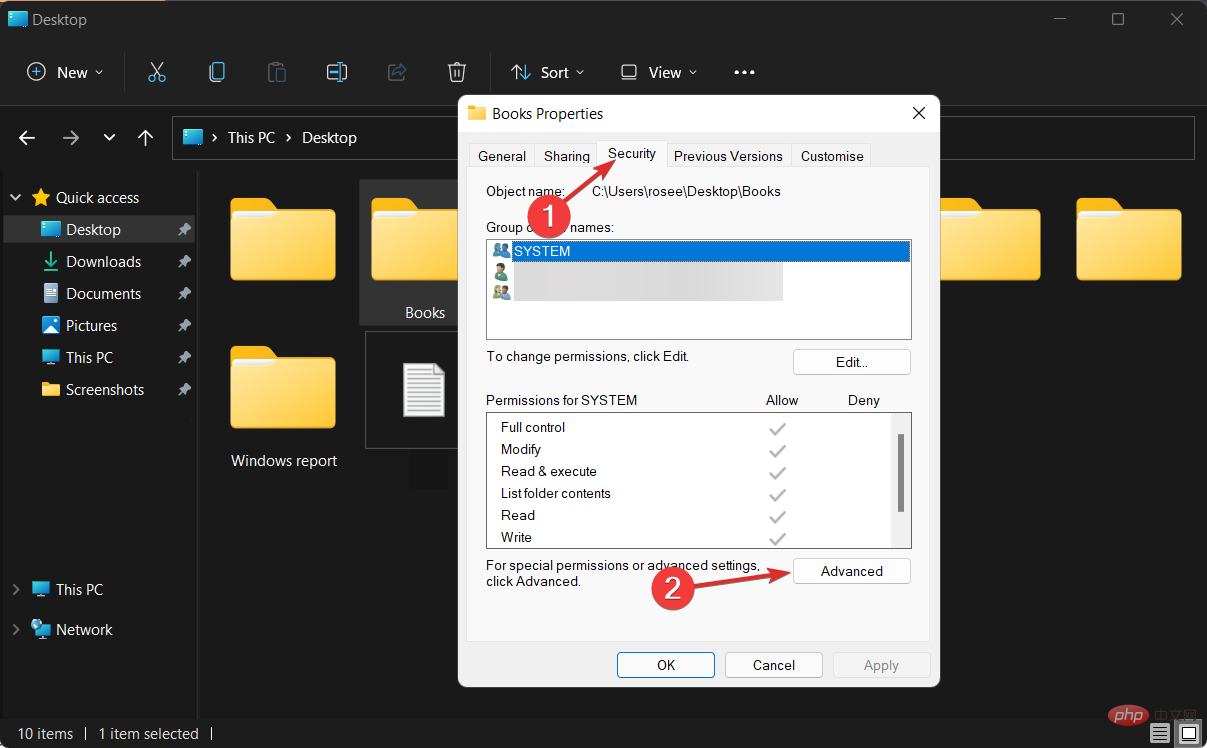
- First, use the keyboard shortcut to launch the file Explorer and navigate to the desired file or folder location and right-click on the file/folder to select Properties. WindowsE
- Navigate to the Security tab and click the Advanced button located at the bottom of the screen.

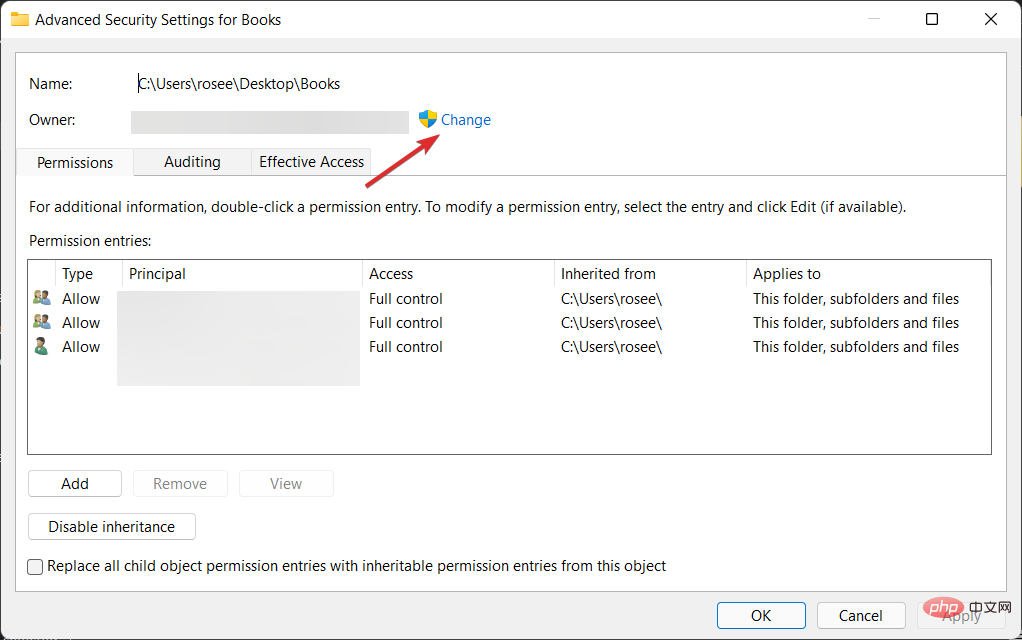
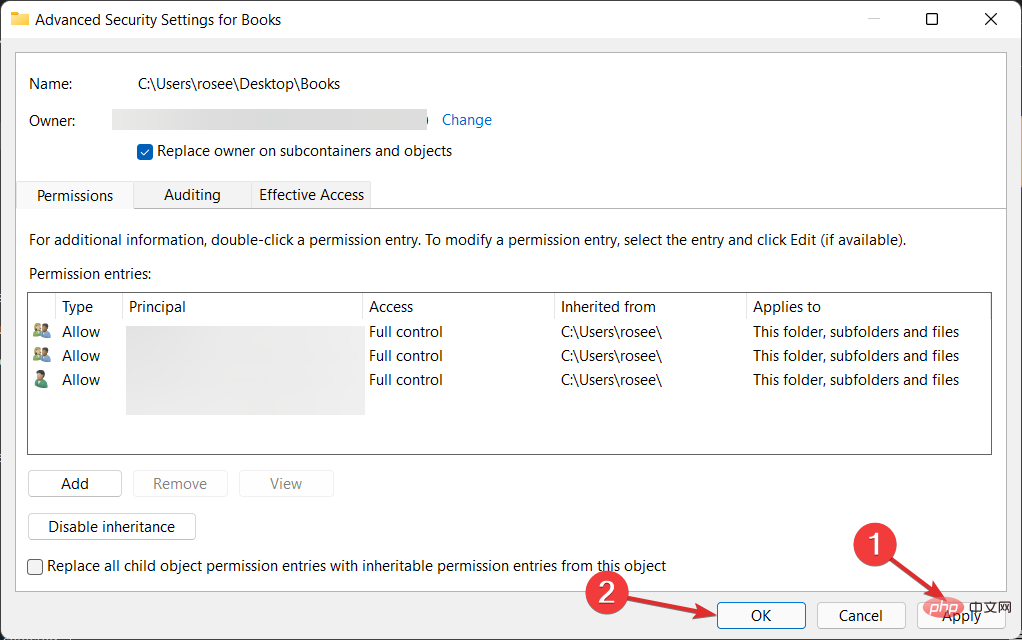
- Then click the Change button next to Owner, this will take you to a new window.
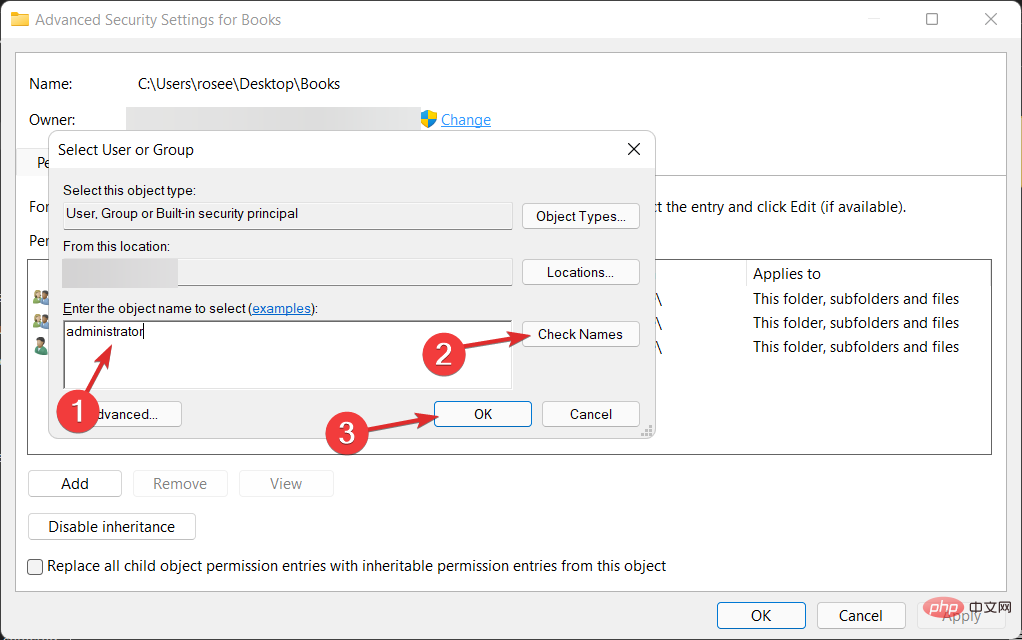
- The administrator should be entered in the "Enter object name to select" form and then the "Check Names" button should be clicked. Click "OK" to continue. Afterwards, you should observe the Owner property changing from the initial name to your administrative account .
- Now select the Replace owners on subcontainers and objects option by checking the checkbox, which can be found directly under the Owner column.
- Finally, to save your changes, click Apply on the toolbar and click OK. Windows will now begin the process of transferring ownership to the new owner. Once the process is completed, you will receive a notification and to close it, use the "OK" button.

The above is the detailed content of How to take ownership of a folder in Windows 11. For more information, please follow other related articles on the PHP Chinese website!

Hot AI Tools

Undresser.AI Undress
AI-powered app for creating realistic nude photos

AI Clothes Remover
Online AI tool for removing clothes from photos.

Undress AI Tool
Undress images for free

Clothoff.io
AI clothes remover

AI Hentai Generator
Generate AI Hentai for free.

Hot Article
Hot Tools

Notepad++7.3.1
Easy-to-use and free code editor

SublimeText3 Chinese version
Chinese version, very easy to use

Zend Studio 13.0.1
Powerful PHP integrated development environment

Dreamweaver CS6
Visual web development tools

SublimeText3 Mac version
God-level code editing software (SublimeText3)
Hot Topics
 1377
1377
 52
52

 How to convert XML to PDF on your phone?
Apr 02, 2025 pm 10:18 PM
How to convert XML to PDF on your phone?
Apr 02, 2025 pm 10:18 PM
It is not easy to convert XML to PDF directly on your phone, but it can be achieved with the help of cloud services. It is recommended to use a lightweight mobile app to upload XML files and receive generated PDFs, and convert them with cloud APIs. Cloud APIs use serverless computing services, and choosing the right platform is crucial. Complexity, error handling, security, and optimization strategies need to be considered when handling XML parsing and PDF generation. The entire process requires the front-end app and the back-end API to work together, and it requires some understanding of a variety of technologies.
 How to jump from Word plug-in to browser for login authorization?
Apr 01, 2025 pm 08:27 PM
How to jump from Word plug-in to browser for login authorization?
Apr 01, 2025 pm 08:27 PM
How to achieve login authorization from within the application to outside the application? In some applications, we often encounter the need to jump from one application to another...
 What is the reason why PS keeps showing loading?
Apr 06, 2025 pm 06:39 PM
What is the reason why PS keeps showing loading?
Apr 06, 2025 pm 06:39 PM
PS "Loading" problems are caused by resource access or processing problems: hard disk reading speed is slow or bad: Use CrystalDiskInfo to check the hard disk health and replace the problematic hard disk. Insufficient memory: Upgrade memory to meet PS's needs for high-resolution images and complex layer processing. Graphics card drivers are outdated or corrupted: Update the drivers to optimize communication between the PS and the graphics card. File paths are too long or file names have special characters: use short paths and avoid special characters. PS's own problem: Reinstall or repair the PS installer.
 xml online formatting
Apr 02, 2025 pm 10:06 PM
xml online formatting
Apr 02, 2025 pm 10:06 PM
XML Online Format Tools automatically organizes messy XML code into easy-to-read and maintain formats. By parsing the syntax tree of XML and applying formatting rules, these tools optimize the structure of the code, enhancing its maintainability and teamwork efficiency.
 Does H5 page production require continuous maintenance?
Apr 05, 2025 pm 11:27 PM
Does H5 page production require continuous maintenance?
Apr 05, 2025 pm 11:27 PM
The H5 page needs to be maintained continuously, because of factors such as code vulnerabilities, browser compatibility, performance optimization, security updates and user experience improvements. Effective maintenance methods include establishing a complete testing system, using version control tools, regularly monitoring page performance, collecting user feedback and formulating maintenance plans.
 How to speed up the loading speed of PS?
Apr 06, 2025 pm 06:27 PM
How to speed up the loading speed of PS?
Apr 06, 2025 pm 06:27 PM
Solving the problem of slow Photoshop startup requires a multi-pronged approach, including: upgrading hardware (memory, solid-state drive, CPU); uninstalling outdated or incompatible plug-ins; cleaning up system garbage and excessive background programs regularly; closing irrelevant programs with caution; avoiding opening a large number of files during startup.
 How to implement cross-application jump for Word plug-in login authorization?
Apr 01, 2025 pm 11:27 PM
How to implement cross-application jump for Word plug-in login authorization?
Apr 01, 2025 pm 11:27 PM
How to implement cross-application jump for Word plug-in login authorization? When using certain Word plugins, we often encounter this scenario: click on the login in the plugin...
 How to convert XML to PDF on Android phone?
Apr 02, 2025 pm 09:51 PM
How to convert XML to PDF on Android phone?
Apr 02, 2025 pm 09:51 PM
Converting XML to PDF directly on Android phones cannot be achieved through the built-in features. You need to save the country through the following steps: convert XML data to formats recognized by the PDF generator (such as text or HTML); convert HTML to PDF using HTML generation libraries such as Flying Saucer.