File Explorer freezes or crashes when creating new folders on Windows 10/11
Sometimes when you create a new folder in Windows Explorer (File Explorer), it freezes or crashes. This is mainly because you have not updated your PC or need to make some setting changes in the registry or Windows settings. But if you're thinking about how to fix it, don't worry. In this article, we have a few ways to help you. Try them and get rid of the problem. let's start!
Method 1 – Restart Windows Explorer
Step 1 – Right click on the Tasksbar and select from Click Task Manager
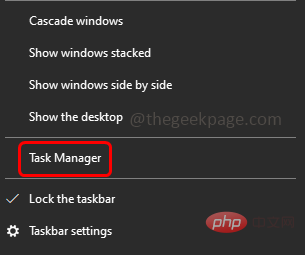
in the list that appears. Step 2 –Find Windows# under the Processes tab ## Explorer or Explorer.exe then right click on it
Step 3 –From the list that appears, click End Task
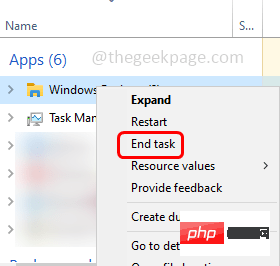
Step 4 –Now open Windows Explorer again and try to create a folder and check if the issue is resolved.
Method 2 – Update Display Adapter Driver
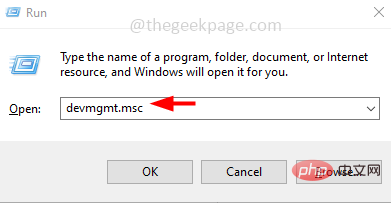
Step 1 –Also use the Windows R key to open the run prompt
Step 2 –Type devmgmt.msc in the run prompt and press Enter. This will open the Device Manager window
Step 3 –Scroll down and ExpandDisplay AdaptersOptions
Step 4 – Right-click the adapter device and click Update Driver
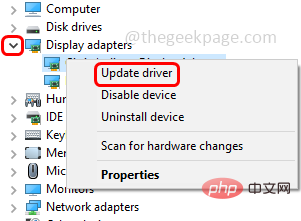
Step 5 – Select Automatically search for driver option and then if there is any update it will show in the screen and you will need to update it otherwise it will show installed for you The best driver for your device
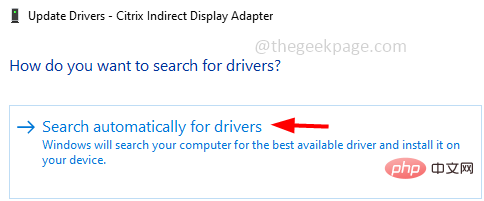
Step 6 –If you have updated the driver, please close the window and restart the system , and then check whether the problem is resolved.
Method 3 – Repair Corrupted System Files
Step 1 –Open the command as administrator Prompt . To do this, type cmd in the window search, then hold down the Ctrl Shift key and press the Enter key
Steps 2 – A User Account Control window will open, click “Yes ”
Step 3 – In the command prompt type The following command and press Enter
sfc /scannow
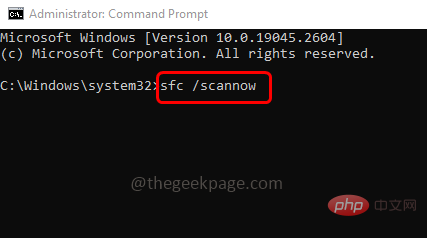
Step 4 –It will take a few seconds to complete the process. Once completed Restart the computer and check if the problem is resolved.
Method 4 – Uninstall Autodesk Inventor
In some cases, installing Autodesk Inventor may cause folders to freeze in File Explorer. So please uninstall it and restart your system.Step 1 –To uninstall, use the Windows I keys together to open Windows Settings
Step 2 –Click Apps
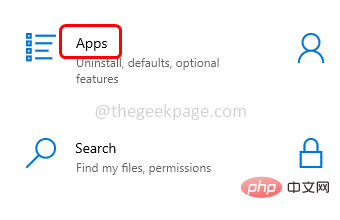
Step 3 –In the Apps and Features page, find Autodesk inventor and select it
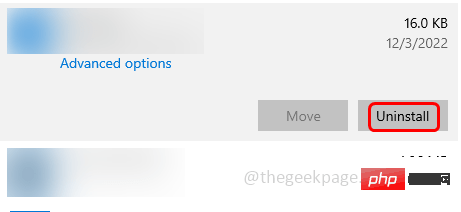
Step 4 –Click the Uninstall button and wait for the uninstallation to complete. Now check if the issue is resolved.
Method 5 – Modify shell extension settings from the Registry Editor
Step 1 –Use both Windows R key to open the run prompt
步骤 2 –在运行提示符中键入注册表编辑器并按回车键
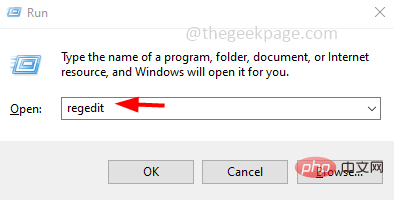
第 3 步 –用户帐户控制窗口将打开,单击是。这将打开注册表编辑器
第 4 步 –在注册表编辑器中导航到以下路径,或者只是复制以下路径并将其粘贴到注册表编辑器的地址栏中,然后按回车键
HKEY_LOCAL_MACHINE\SOFTWARE\Microsoft\Windows\CurrentVersion\Shell Extensions
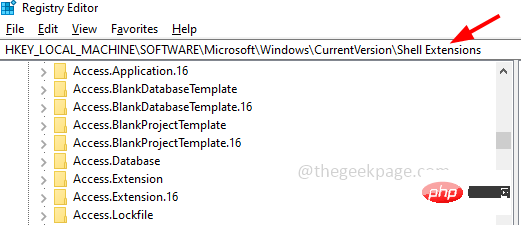
步骤 5 –然后点击批准
步骤 6 –在右侧搜索以下键。要轻松搜索,您可以同时按 Ctrl + F 键并将以下键粘贴到查找内容字段中,然后单击查找下一个一次
{289AF617-1CC3-42A6-926C-E6A863F0E3BA}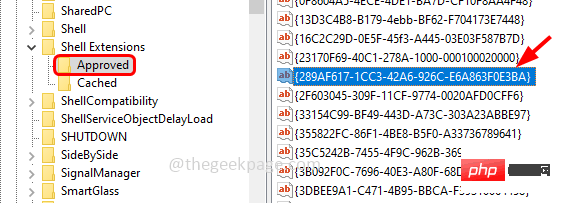
步骤7 –双击该值,然后在值数据字段中删除存在的任何内容,然后将值输入为0
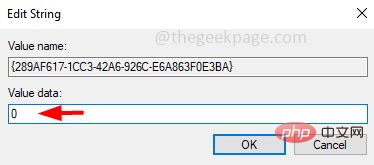
步骤 8 –要保存更改,请单击确定
步骤9 –重新启动计算机,然后检查问题是否已解决。
方法 6 – 修改注册表项
注意:并非所有计算机都找到以下注册表路径。如果您的计算机注册表中不存在该路径,请跳过此方法并按照下一个方法进行操作。
步骤 1 – 同时使用 Windows + R 键打开运行提示
步骤 2 –在运行提示符中键入注册表编辑器并按回车键

第 3 步 –用户帐户控制窗口将打开,单击是。这将打开注册表编辑器
步骤4 –在注册表编辑器中导航到以下路径,或者仅复制以下路径并将其粘贴到注册表编辑器的地址栏中,然后按回车键
Computer\HKEY_CLASSES_ROOT\CLSID\{8E757038-BE02-4bce-9680-E4BE0C6C70CD}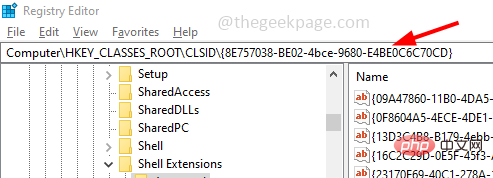
步骤5 –右键单击ShellFolder,然后从出现的列表中选择权限
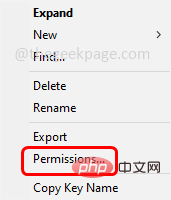
步骤 6 –点击更改按钮
步骤7 –通过单击旁边的复选框为子容器和对象选项启用替换(应存在刻度线)
步骤 8 –同时启用“将所有子对象权限替换为此主题的可继承权限”选项
步骤 9 –点击确定
步骤 10 –在用户名列表中,选择您的用户名,然后单击用户的权限
步骤 11 –单击完全控制选项中允许旁边的复选框。然后点击确定
步骤 12 –返回注册表编辑器,双击位于 DWORD 中的“属性”图标
步骤 13 –将值数据设置为 0,然后单击确定
步骤14 –重新启动计算机,然后检查问题是否已解决。
方法7 –重置PC
步骤 1 –一起使用Windows + I键打开Windows设置
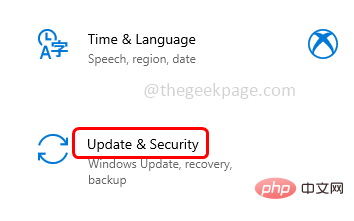
步骤 2 –点击更新和安全
第 3 步 –在左侧单击恢复
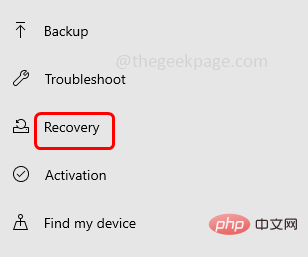
Step 4 –On the right, under Reset this PC, click the Get Started button
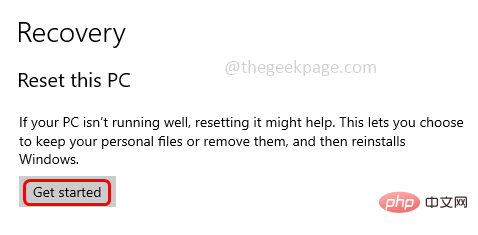
Step 5 –Select the Keep my files option and follow the on-screen instructions to complete the process. Then check if the problem is resolved.
Method 8 – Check for Windows Updates
Step 1 –Open Window Settings using the Windows I key together
Step 2 –Click on Update and Security

Click on the left The Window Updates
Step 4 –On the right side, click the Check for Updates button. If there are any updates, it will be installed. If there are no updates, you are up to date
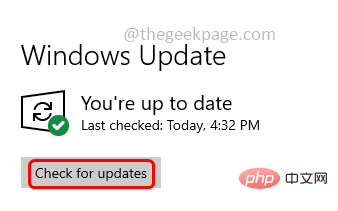
computer and check if the issue is resolved.
Method 9 – Set Wallpaper as ImageStep 1 –
Use Windows I key together to open Window Settings
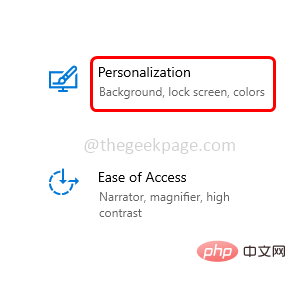
Step 2 –ClickPersonalize
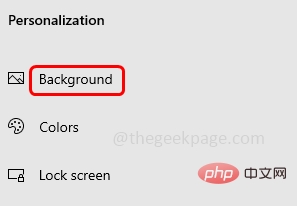
Click left Side’s background
Make sure the background is not set to the slideshow. To do this on the right, select "Picture" in the Background drop-down list.

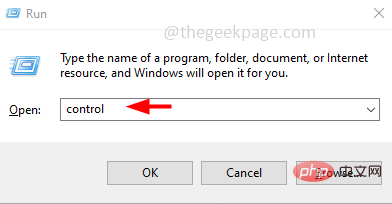
Step 1 –
Also using Windows R key to open the run prompt
Step 2 –Type control in the run prompt and press Enter key. This will open the Control Panel window
SelectLarge Icons# from the View by drop-down list
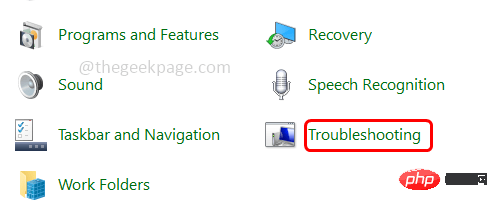
 ##Step 4 –
Troubleshooting
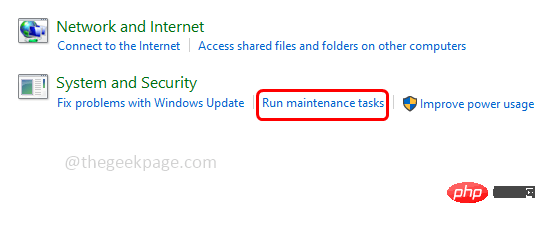
 Step 5 –
“Run Maintenance Task”
 Step 6 –
Next and follow the on-screen instructions to complete the process. Once completed, check if the issue has been resolved. Method 11 – Hide Hidden Files, Folders and Drives
Step 1 –
Open withWindows E key File ExplorerStep 2 –
Click on theView tab at the top
 Step 3 –
Change folder and search for Options
##Step 4 – 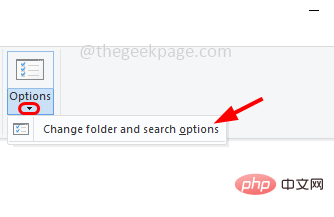 Go to
Go to
Tab Step 5 – Under Hidden Files and Folders, click the Option button selection
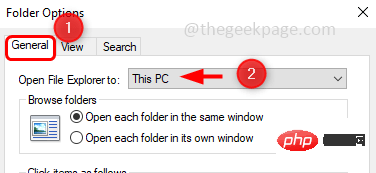
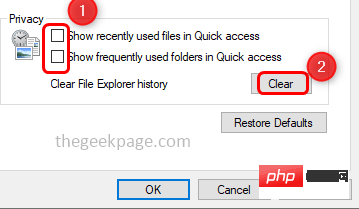
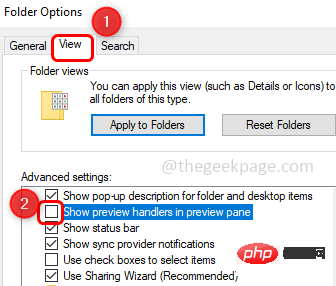
Do not show hidden files, folders, or drivesStep 6 –To save changes, click "Apply" and "OK" Step 1 –Open File Explorer using the Windows E key together Step 2 –Click on the View tab at the top Step 3 – Then select the options dropdown and click Change Folder and Search Options Step 4 –Go to the General tab Step 5 –In the file explorer that opens, select “This PC ” Step 6 – Uncheck “Show recent files in Quick Access” and “Show ## in Quick Access” #Common Folders" option (ticks should not be present) Step 7 –Now click on Clear next to Clear File Explorer History Button Step 8 –Click Apply Step 9 –Go to the View tab and disable the Show preview handler in preview pane option by clicking the checkbox next to it (ticks should not be present) Step 10 –Save changes by clicking “Apply” and then OK Step 11 – You can also disable the preview pane in File Explorer by holding down the Alt P keys simultaneously. Step 1 –Go to the Microsoft website and download by clicking the Download Now button Media Creation Tool Step 2 –After downloading, double-click the downloaded .exe file to run it Step 3 –Accept the license agreement and click the "Upgrade this PC now" option by clicking the radio button next to it. Then click Next Step 4 – Follow the on-screen instructions to complete the upgrade process Step 5 – Restart the computer and check for issues Has it been resolved? 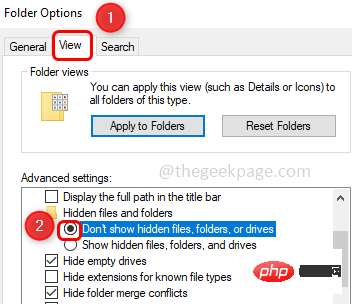
Method 12 – Disable Quick Access and File Preview Options


Method 13 – Upgrade PC
The above is the detailed content of File Explorer freezes or crashes when creating new folders on Windows 10/11. For more information, please follow other related articles on the PHP Chinese website!

Hot AI Tools

Undresser.AI Undress
AI-powered app for creating realistic nude photos

AI Clothes Remover
Online AI tool for removing clothes from photos.

Undress AI Tool
Undress images for free

Clothoff.io
AI clothes remover

AI Hentai Generator
Generate AI Hentai for free.

Hot Article

Hot Tools

Notepad++7.3.1
Easy-to-use and free code editor

SublimeText3 Chinese version
Chinese version, very easy to use

Zend Studio 13.0.1
Powerful PHP integrated development environment

Dreamweaver CS6
Visual web development tools

SublimeText3 Mac version
God-level code editing software (SublimeText3)

Hot Topics
 Fix: ERR_ADDRESS_UNREACHABLE error in Google Chrome
May 15, 2023 pm 06:22 PM
Several Windows users have complained that when they try to access some websites on Google Chrome browser on their systems, they are unable to access the web pages. It also displays a message on the browser saying "The site cannot be reached" with error code ERR_ADDRESS_UNREACHABLE. There could be many potential reasons behind this issue, it could be due to website server issues, proxy server settings, unstable internet connection, etc. If you encounter similar problems, don't panic. After deeply analyzing the problem in this article, we got a bunch of solutions. Before proceeding, try the following workarounds: Try checking if the user is trying to access the site from other devices and there are no issues, then this
 Can't use MSI Afterburner in Windows 11? Try the following fixes.
May 09, 2023 am 09:16 AM
MSIAfterburner is an overclocking tool suitable for most graphics cards. Apart from that, you can also use it to monitor the performance of your system. But some users reported that MSIAfterburner is not working in Windows 11. This may be due to several reasons, which we discuss in the following sections. However, when this happens, it prevents you from changing the performance or monitoring it while playing the game. As expected, this poses a significant challenge to gamers. That’s why we’ve dedicated this tutorial to help you understand the issue and walk you through the most effective fixes for MSIAfterburned not working in Windows 11 issue.
 How to fix preview pane not working in Windows 11
Apr 24, 2023 pm 06:46 PM
One of the features that comes with Windows File Explorer is the preview pane, which displays a preview of the file you selected. This means you can view the contents of the file before opening it. The preview pane of File Explorer provides previews for different types of files such as Office-related documents, PDFs, text files, images, and videos. It usually works fine, but sometimes the file preview isn't available. Recently, many Windows 11 users have raised the issue that File Explorer’s preview pane is not working and they are unable to view file previews. Are you facing the issue of preview pane not working on your Windows computer? Then, continue reading this article. Here we have compiled a list of fixes that can help you fix
 Fix: VAN 1067 error when running Valorant on Windows 11
May 22, 2023 pm 02:41 PM
The operating system looks much better than its predecessor and has gamer-oriented features like AutoHDR and DirectStorage, but Valorant players have had some trouble launching the game. This is not the first issue faced by gamers earlier, Valorant not opening on Windows 11 is another issue plaguing them but we have covered the ways to fix it. Now it seems that Valorant players who switched to Windows 11 are facing issues due to Secure Boot and TPM2.0 services, which causes the game menu to only show an exit option while running. Many users are getting the VAN1067 error, but it shouldn't be a cause for alarm
 To fix this, you need to use an interactive window station
Apr 24, 2023 pm 11:52 PM
This operation requires an interactive window station which is a rather strange bug. Software windows that allow users to interact with the app are not open, you need to enable them. This bug has been linked to the 2021 Printing Nightmare vulnerability. However, it continues to this day, affecting your computer and device drivers. Fortunately, it's easy to fix. Why does this error occur in the first place? Before describing how to fix this error, be sure to list the causes of this error. This way, you can take the necessary steps to ensure it doesn't happen again. Corrupted files are messing up your computer files – Corruption can be caused by a variety of reasons, from malware to power outages. It is recommended that you run an SFC scan. You have an overzealous antivirus app – antivirus software sometimes blocks
 DirectX function GetDeviceRemovedReason fails with error
May 17, 2023 pm 03:38 PM
Almost every high-end game we play relies on DirectX to run efficiently. However, some users reported encountering the DirectX function GetDeviceRemovedReasonfailedwith followed by the error reason. The above reasons are not self-evident to the average user and require some level of research to determine the root cause and the most effective solution. To make things easier, we've dedicated this tutorial to this problem. In the following sections, we will help you identify the potential causes and walk you through the troubleshooting steps to eliminate the DirectX function GetDeviceRemovedReasonfailedwitherror. what causes
 How to disable video autoplay in Opera browser?
Apr 22, 2023 pm 10:43 PM
The latest version of the Opera browser includes a new automatic video popup feature. Using this feature, you will notice that the video will pop up automatically when you navigate to another tab in the browser. It has been noticed that this pop-up video can be resized and moved around the screen. When you navigate back to the Videos tab, it resumes and the floating window disappears. The video pop-up feature is useful for multitasking users who like to watch videos while working. However, not every Opera user will like this automatic video popup feature. If you are one of those Opera browser users who are annoyed by videos popping up every time you change tabs, then you have found the right post. Here we detail how to disable this popup in Opera
 How to disable display scaling for high DPI settings in Windows 11 or 10
May 22, 2023 pm 10:11 PM
The default display scaling feature on Windows 10 or later is a core component of the Windows operating system. But sometimes, this feature of certain apps can cause compatibility issues, unreadable text, blurry logos, and ultimately, app crashes. This can be a huge headache if you're dealing with 2160p or higher resolutions. There are many ways to disable the default display scaling feature on high DPI settings. We've selected the best ones and detailed step-by-step instructions for each process. How to Disable Display Scaling on High DPI Settings There is a way, all you have to do is disable high DPI scaling for a single application, and there is a way to do it for the entire Window


