Fix: Network discovery not working in Windows 11/10
You are trying to share a file or print a document, but suddenly you realize that you are unable to do so. This usually happens when the network discovery feature stops working or glitches on your Windows 11/10 PC. It is a tool that helps you share files and printers by allowing you to create a communication bridge between different devices on the same network. This way, it saves you the overall time of attaching documents to emails or sharing via pen drives, etc.
The network discovery tool can malfunction for a number of reasons, for example, some services are not functioning properly, SMB 1.0/CIFS file share support is not working properly, a firewall has marked it as unsafe, etc. In this article, we will guide you through different solutions that may help you fix the network discovery not working issue on your Windows 11/10 PC. Although you can try restarting your PC to check if it helps fix the issue because in many cases it does, but if not, then you can try the following methods.
Method 1: Run the Windows Troubleshooter
The first and most basic method to try before any other fixes is to run the Windows Troubleshooter. It's a built-in tool that, in some cases, really helps identify and resolve problems. Here's how to run the troubleshooter:
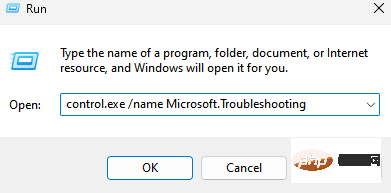
Step 1: Press the Win R hotkey on your keyboard.
This will open the Run command search bar.
Step 2: In the text field, type control.exe /name Microsoft.Troubleshooting and press the OK button to open Other in the Settings app Troubleshooting window.
Step 3: Click Other Troubleshooters

on the other-troubleshooters screen On the right, scroll down and under the Other section, click Network Adapter.

Click next to it to run.
Step 4: Windows will begin troubleshooting the network adapter.
Follow the on-screen instructions to detect the problem and fix it automatically.
Once completed, close the Troubleshooter and Settings app, restart your PC and now check if the network discovery issue has been resolved.
Method 2: Update the Network Adapter Driver
Most likely, the network adapter driver is outdated and therefore the adapter stopped working. In this case, you can update the driver and check if this helps resolve the issue. Here's how to update your network adapter driver:
Step 1: Go to the Windows icon (the four squares on the taskbar), right-click it and select Device Manager.

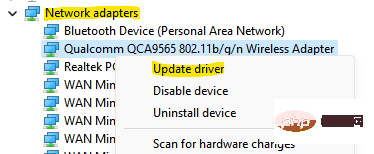
Step 3: In the opened Device Manager window, click on the Network Adapters option to expand the section.
Here, find your network adapter, right-click it and select Update Driver.
Step 4: You will now see a new window - Update Drivers.
SelectAutomatically search for drivers.
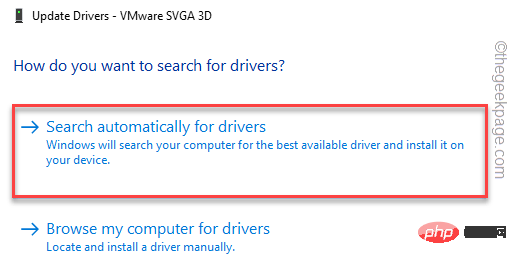
#Now Windows will start looking for the latest driver and if available, it will automatically apply the update.
After the process is over, close the Device Manager window, restart your PC, and now check if the network discovery issue has been fixed.
Method 3: Make the network profile private
Windows 11 and Windows 10, both versions come with two network profiles: public and private. Public profiles, on the other hand, allow all nearby devices to discover your PC and even share files with them. When you are in public places such as airports, restaurants, cafes, etc., you can choose to set your network profile to public without exposing your data to any online threats.
However, if you choose to set your network profile to private, it will allow you to share files from your PC in a protected environment. This makes your Windows 11/10 PC think your home or work network is more secure, protecting your data. Let’s see how to set your network profile to private mode:
Step 1: Press the keyboard shortcut - Win IStart Windows on your keyboardSettingsapp.
Step 2: In the Settings app, go to the left side of the pane and click Network & Internet.
Step 3: Next, on the right side, click Network Adapter (WiFi or Ethernet, depending on what you are using).
Click on Properties located below Network Adapters
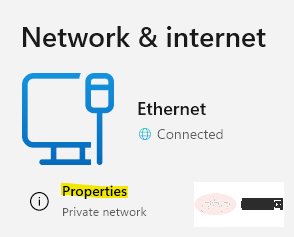
Step 4: This will take you to the next screen, on the right On the side you can see your Wifi properties.
Under the Network Profile Type section, select Private.
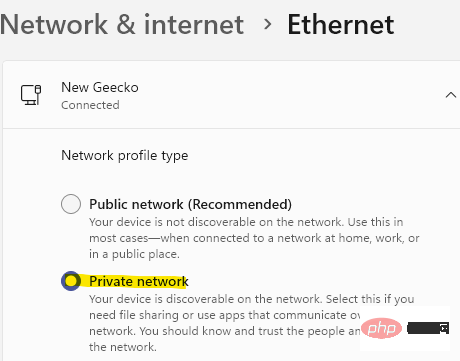
Now, exor setup window and check if network discovery mode is working properly.
Method 4: Check Sharing Options
If the network profile has been set to private, but the network adapter is not working on your Windows 11/10 PC, then there must be some glitch in the sharing options, Here's how to change sharing options:
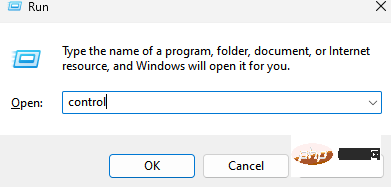
Step 1: Press the Win R keys at the same time, and the run command will pop up.
Step 2: In the Run Command window, type control.exe and press Enter to open the Control Panel window.
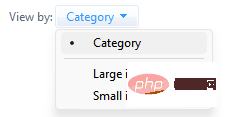
Step 3: In the Control Panel window, go to the upper right corner next to View as , click the drop-down menu and select the category .
Now, select Network and Internet from the list.

Step 4: In the next window, go to the right side and click on Network and Sharing Center.

Step 5: When you reach the Network and Sharing Center screen, navigate to the left and click Change advanced sharing settings.
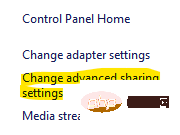
Here, go to your current profile section (Private or Public) and under Network Discovery, then turn on Network Discovery.
If you don't know your current profile, open it for Public or Private
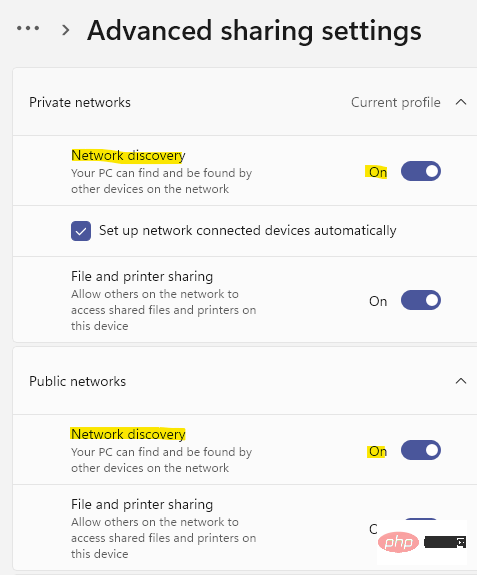
This will make your Windows 11 system visible to everyone on the same network visible to other computers.
Step 6: You can also select the "Turn on File and Printer Sharing" option under the "File and Printer Sharing" section.

Press the Save Changes button at the bottom to apply the changes and exit,
Now the network adapter issue on your PC should be resolved.
Method 5: Enable Network Discovery using Command Prompt
If you prefer using Command Prompt, you can try enabling Network Discovery mode through Command Prompt in Administrator mode. Let’s see how:
Step 1: Go to the four blue box icon on the taskbar (Start), right-click on it and select Run from the menu.
Step 2: When the Run Command window opens, type cmd in the search bar and press the keyboard shortcut - Ctrl Shift Enter together to open A command prompt window with administrator privileges.
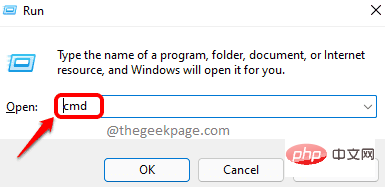
Step 3: In an elevated command prompt window, type the following command and press Enter:
netsh advfirewall 防火墙设置规则组=“网络发现”新启用=是
Network discovery mode will now be enabled.
*Note- If in the future you want to turn off network discovery mode, run the following command and press Enter:
netsh advfirewall firewall settings rule group=" Network Discovery" New Enabled = No
You can now check if the Network Discovery mode is working properly.
Method 6: Use Network Reset
If everything is fine with the network settings, then you can try to reset the network and check if this helps to solve the network discovery failure on Windows 11/10 PC Problems with normal operation. Resetting the network will reinstall all network adapters on the system and change network settings back to their original settings without deleting any data. Here's how to reset your network:
步骤 1:同时按下Win + I快捷键打开设置窗口。
第 2 步:随着设置应用程序打开,转到左侧,然后单击网络和 Internet。
第 3 步:现在,前往窗口右侧,向下滚动到底部,然后单击高级网络设置。

第 4 步:在下一个屏幕的右侧,转到更多设置部分,然后单击网络重置。

第 5 步:现在,在“网络重置”窗口中,单击“立即重置”按钮。

第 6 步:您将看到确认提示。
按是确认。
网络重置过程结束后,重新启动您的 PC,现在网络发现应该启动并运行。
方法7:检查某些服务是否正在运行
在某些情况下,如果与其相关的后台服务由于某种原因停止运行,则网络发现模式可能会出现故障。在这种情况下,您必须仔细检查服务是否正在运行,如果没有,则确保它们正在运行。请按照以下说明检查服务是否正在运行并进行任何必要的更改以可能解决问题:
第 1 步:同时按下键盘上的Win + R键,这将打开运行命令框。
第 2 步:在运行命令字段中,键入services.msc并按OK键。
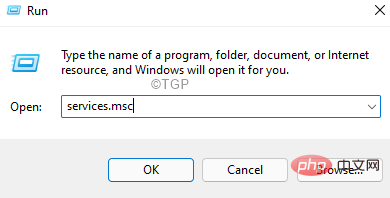
第 3 步:在 Services 窗口中,导航到右侧的 Name 列并查找DNS Client。

双击它以打开其属性窗口。
第 4 步:转到服务状态字段并检查它是否正在运行。
如果没有,请单击开始。
第 5 步:现在,在Startup type部分并将其设置为Automatic。
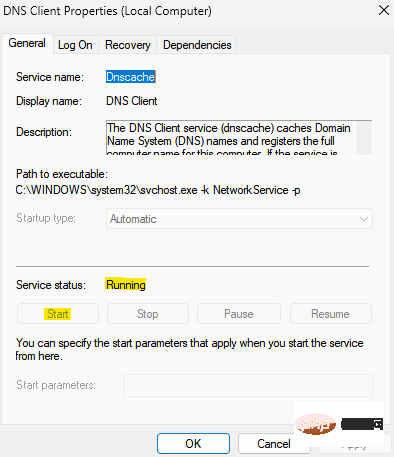
按应用,然后按确定保存更改并返回服务窗口。
第 6 步:现在,寻找SSDP 发现服务并重复第 3 步和第 4 步。
按应用和确定返回服务管理器窗口。
第 7 步:对UPnP 设备主机服务也重复第 3 步和第 4 步。
点击应用,然后点击确定按钮返回到服务窗口。
第 8 步:现在,查找Function Discovery Provider Host 服务。
右键单击它并选择属性。
第 9 步:在其属性对话框中,在常规选项卡下,导航到启动类型字段,然后从其旁边的下拉列表中选择自动(延迟启动) 。
按应用,然后按确定保存更改并返回服务窗口。
第 10 步:对功能发现资源发布服务也重复第 8 步和第 9 步。
现在,关闭服务管理器窗口并检查网络发现是否正在运行。
方法 8:通过 Powershell Admin 启用服务
如果 DNS Clients Properties 或 Function Discovery Provider Host/Function Discovery Resource Publication Properties 中的 Service status 和 Startup type 选项灰显,您可以尝试此方法。下面介绍如何启动 DNS 客户端服务,并通过 Powershell(管理员)更改 Function Discovery Provider Host 和 Function Discovery Resource Publication 服务的启动类型:
第 1 步:要打开运行命令搜索框,请同时按键盘上的Win + R键。
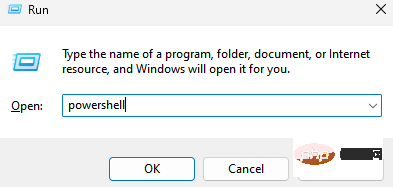
第 2 步:现在在搜索字段中键入Powershell ,然后按Ctrl + Shift + Enter快捷键以管理员模式启动 Windows Powershell。
第 3 步:将以下命令复制并粘贴到 Powershell(管理员)窗口中,然后按 Enter:
REG add "HKLM\SYSTEM\CurrentControlSet\services\dnscache" /v 开始 /t REG_DWORD /d 2 /f
第 4 步:您还可以通过运行以下命令将 Function Discovery Provider Host 和 Function Discovery Resource Publication 服务的启动类型更改为自动(延迟启动):
get-Service fdPHost,FDResPub|Set-Service -startuptype automatic -passthru|Start-Service
当您看到成功消息时,DNS 客户端服务现在将开始运行,并且功能发现提供程序主机和功能发现资源发布服务的启动类型应更改为自动(延迟启动),并且网络发现问题应该消失。
方法 9:检查 Windows 防火墙设置
很有可能,Windows 防火墙错误地认为网络发现是恶意的,因此会阻止它并停止工作。因此,请确保在防火墙中允许网络发现。就是这样:
步骤 1:通过同时按下Win + R键盘快捷键打开运行命令。
第 2 步:在搜索字段中,输入Firewall.cpl并按OK。
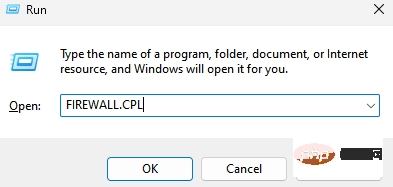
这将在“控制面板”窗口中打开 Windows Defender 防火墙屏幕。
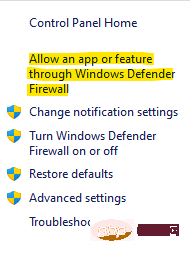
第 3 步:现在,在下一个窗口中,转到左侧并单击允许应用程序或功能通过 Windows Defender 防火墙。
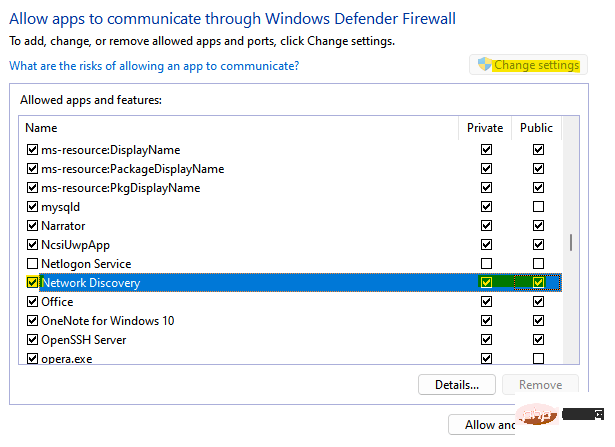
第 4 步:您现在将被重定向到“允许的应用程序”窗口。
在这里,单击更改设置按钮。
第 5 步:现在,转到允许的应用程序和功能列表,查找网络发现并选中它旁边的私有框。
按OK保存更改并退出。
关闭控制面板窗口,现在网络发现功能应该可以工作了。
方法 10:开启 SMB 1.0/CIFS 文件共享支持
您的 Windows 11/10 系统可能禁用了 SMB 1.0/CFS 文件共享支持选项,这可能导致网络发现功能出现问题,从而中断文件共享过程。但是,可以通过启用 SMB 1.0/CFS 文件共享支持选项来解决此问题。让我们看看如何:
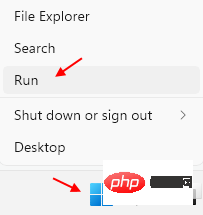
第1步:右键单击任务栏上的开始,然后单击上下文菜单中的运行。
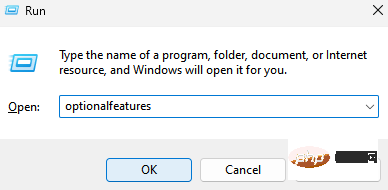
第2步:它将打开“运行”命令窗口。
在这里,在搜索字段中输入optionalfeatures,然后按 Enter 键打开 Windows Features 对话框。
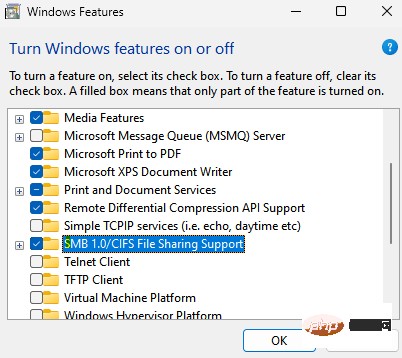
第 3 步:在功能列表中,查找SMB 1.0/CFS 文件共享支持并选中它旁边的框。
按OK应用更改并退出。
现在,重新启动您的 PC 并检查网络发现问题是否没有解决。
方法 11:再次将未显示的计算机添加到工作组
如果工作组设置不正确,可能会导致故障,您可能看不到网络中的 Windows PC。在这种情况下,您可以尝试再次将这些电脑添加到工作组,并检查它是否有助于解决问题。就是这样:
第 1 步:转到“开始”,右键单击并从菜单中选择“运行”以打开“运行”命令窗口。

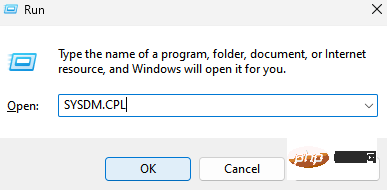
第 2 步:在“运行”命令中,写入sysdm.cpl,然后按“确定”启动“系统属性”窗口。
第 3 步:在 System Properties 对话框中,选择 Computer Name 选项卡,然后单击Network ID。
第 4 步:您现在将看到加入域或工作组屏幕。
在这里,选择这台计算机是业务网络的一部分;我用它在工作选项中连接到其他计算机,然后按下一步。
第 5 步:接下来,选择“我的电脑使用没有域的网络”旁边的单选按钮,然后单击“下一步”。
第 6 步:现在,在 Workgroup 字段中,输入所需的工作组名称,然后按 Finish。
完成后,重新启动您的 PC,网络发现问题应该得到修复。
方法 12:重新安装网络驱动程序
如果网络驱动程序导致问题,重新安装驱动程序可能有助于使网络发现再次工作。请按照以下步骤重新安装网络驱动程序:
Step 1: Press the Win R shortcut keys simultaneously, and when the Run Command window opens, type devmgmt.msc in the search box and press the OK button.
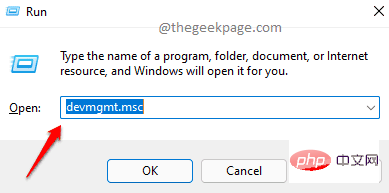
Step 2: This will open the Device Manager window.
Here, look for Network Adapters and expand that section.
Now, right-click on your network adapter and select Uninstall device.
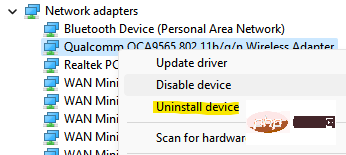
Step 3: You will now see the prompt to uninstall the device.
Check the box next to Try to remove the driver for this device and press Uninstall.
After uninstalling the driver, close Device Manager and restart your PC. Windows will now automatically install the network adapter and network discovery should now work properly.
The above is the detailed content of Fix: Network discovery not working in Windows 11/10. For more information, please follow other related articles on the PHP Chinese website!

Hot AI Tools

Undresser.AI Undress
AI-powered app for creating realistic nude photos

AI Clothes Remover
Online AI tool for removing clothes from photos.

Undress AI Tool
Undress images for free

Clothoff.io
AI clothes remover

AI Hentai Generator
Generate AI Hentai for free.

Hot Article

Hot Tools

Notepad++7.3.1
Easy-to-use and free code editor

SublimeText3 Chinese version
Chinese version, very easy to use

Zend Studio 13.0.1
Powerful PHP integrated development environment

Dreamweaver CS6
Visual web development tools

SublimeText3 Mac version
God-level code editing software (SublimeText3)

Hot Topics
 1377
1377
 52
52
 Network profile type missing in Windows 11: 5 ways to fix it
Apr 16, 2023 pm 04:58 PM
Windows allows you to set different network profile types for connecting to a BSS (Basic Server Set). Typically, network configuration files require XML data fragments. However, users may encounter issues such as losing profiles when changing network profile types, especially on Windows 11. So, we will discuss the missing Windows 11 network profile types and the causes of this issue. Likewise, we will take you through how to fix Windows 10/11 cannot change network to private or public, and other network profile type issues. Why is my network profile type missing in Windows 11? Outdated device drivers: on your computer
 Wi-Fi does not have a valid IP configuration: How to fix it
Apr 13, 2023 pm 06:22 PM
Restart your computer and router you know what to do; if you call your ISP technical support, they will ask you to restart your network hardware. This is for good reason, as restarting your PC will clear out running applications and caches that may be conflicting with your connection. Restarting (rebounding) your router (usually a combo unit containing a router and modem) will clear its cache and re-establish a reliable online connection. If you have a separate modem, restart that as well. Restart the router by unplugging the power button for 30 seconds and then plugging it back in. After powering up the router, restart your PC and see if you regain a stable Wi-Fi connection. Re-enable Wi-
 How to fix Killer Wireless 1535 driver issues on Windows 11
Apr 14, 2023 am 09:40 AM
What is Killer Wireless 1535? Developed by Rivet Technologies, later acquired by Intel, the Killer Wireless 1535 is a WLAN or network card developed for gaming-oriented systems. The Killer Wireless card list boasts a long list of features, including Bluetooth 4.1 and dual-band support for 2.4GHz and 5GHz. Killer Wireless is based on Qualcomm chips and features ExtremeRange technology for wide connectivity, minimal packet loss, and minimal latency when playing multiplayer games. Why Killer W
 Fix: DNS server not responding issue in Windows 11
Jun 01, 2023 pm 04:52 PM
When Windows users are unable to browse or load web pages on the browser on their system, they happen to think of all the factors that can cause this issue. Although many Windows users resolve this issue on their systems, it throws an error message stating “DNS server is not responding” and users don’t know how to resolve this issue to use a stable internet connection. We have come up with a solution in this article that will surely solve this problem. However, try these solutions beforehand – try restarting your router and check if this is causing the problem. Change browser applications. That said, if you're using the Microsoft Edge browser, close it and open Google
 What's the fix for missing WiFi icon in Windows 11?
May 09, 2023 pm 10:22 PM
Some users have reported that the Wi-Fi option or icon is missing on their Windows 11 PC. Missing or corrupt network drivers or Windows operating system or hardware issues can be some of the reasons why this issue pops up on Windows 11 PC. If you are unable to find the WiFi icon in the system tray on your PC, then we have listed some methods that can help you fix this issue and get back the missing Wi-Fi icon. Go ahead and try the fixes mentioned in this article one by one in the order mentioned below. Before trying to fix it, check if there are any buttons/physical switches with a WiFi icon on your laptop. If there are any such switches, press them once to enable the WiFi option. Fix 1 – Re
 12 Ways to Fix 'DNS Server Not Responding” Issue on Windows 11
Apr 15, 2023 pm 10:46 PM
What is DNS? DNS is an acronym for Domain Name System, a decentralized naming system used by all computers, servers, and more devices trying to connect to the Internet. DNS helps identify your PC and the traffic sent to it, and the system automatically deciphers and displays the necessary information. Why do I get "DNS server not responding" on Windows 11? This problem can have many causes. Sometimes Windows may mistake a network problem for a DNS problem, while other times it's likely a third-party application interfering with your network. A recent update to AVG antivirus seems to be the main cause of this issue, disabling the update seems to resolve this issue for most users
 What should I do if win10 cannot find the network adapter driver?
Jul 06, 2023 pm 12:00 PM
Solution to the problem that win10 cannot find the network adapter driver: 1. Update the driver, you can use the device manager to update the driver; 2. Reinstall the driver, uninstall the device first, and then restart the computer; 3. Download the driver from the manufacturer's website Procedure; 4. Check for hardware failure.
 PHP and FTP: realizing file sharing among multiple departments in website development
Jul 28, 2023 pm 01:01 PM
PHP and FTP: Achieve file sharing among multiple departments in website development. With the development of the Internet, more and more companies are beginning to use website platforms for information release and business promotion. However, the problem that arises is how to achieve file sharing and collaboration among multiple departments. In this case, PHP and FTP become one of the most commonly used solutions. This article will introduce how to use PHP and FTP to achieve file sharing among multiple departments in website development. 1. Introduction to FTP FTP (FileTransferPr


